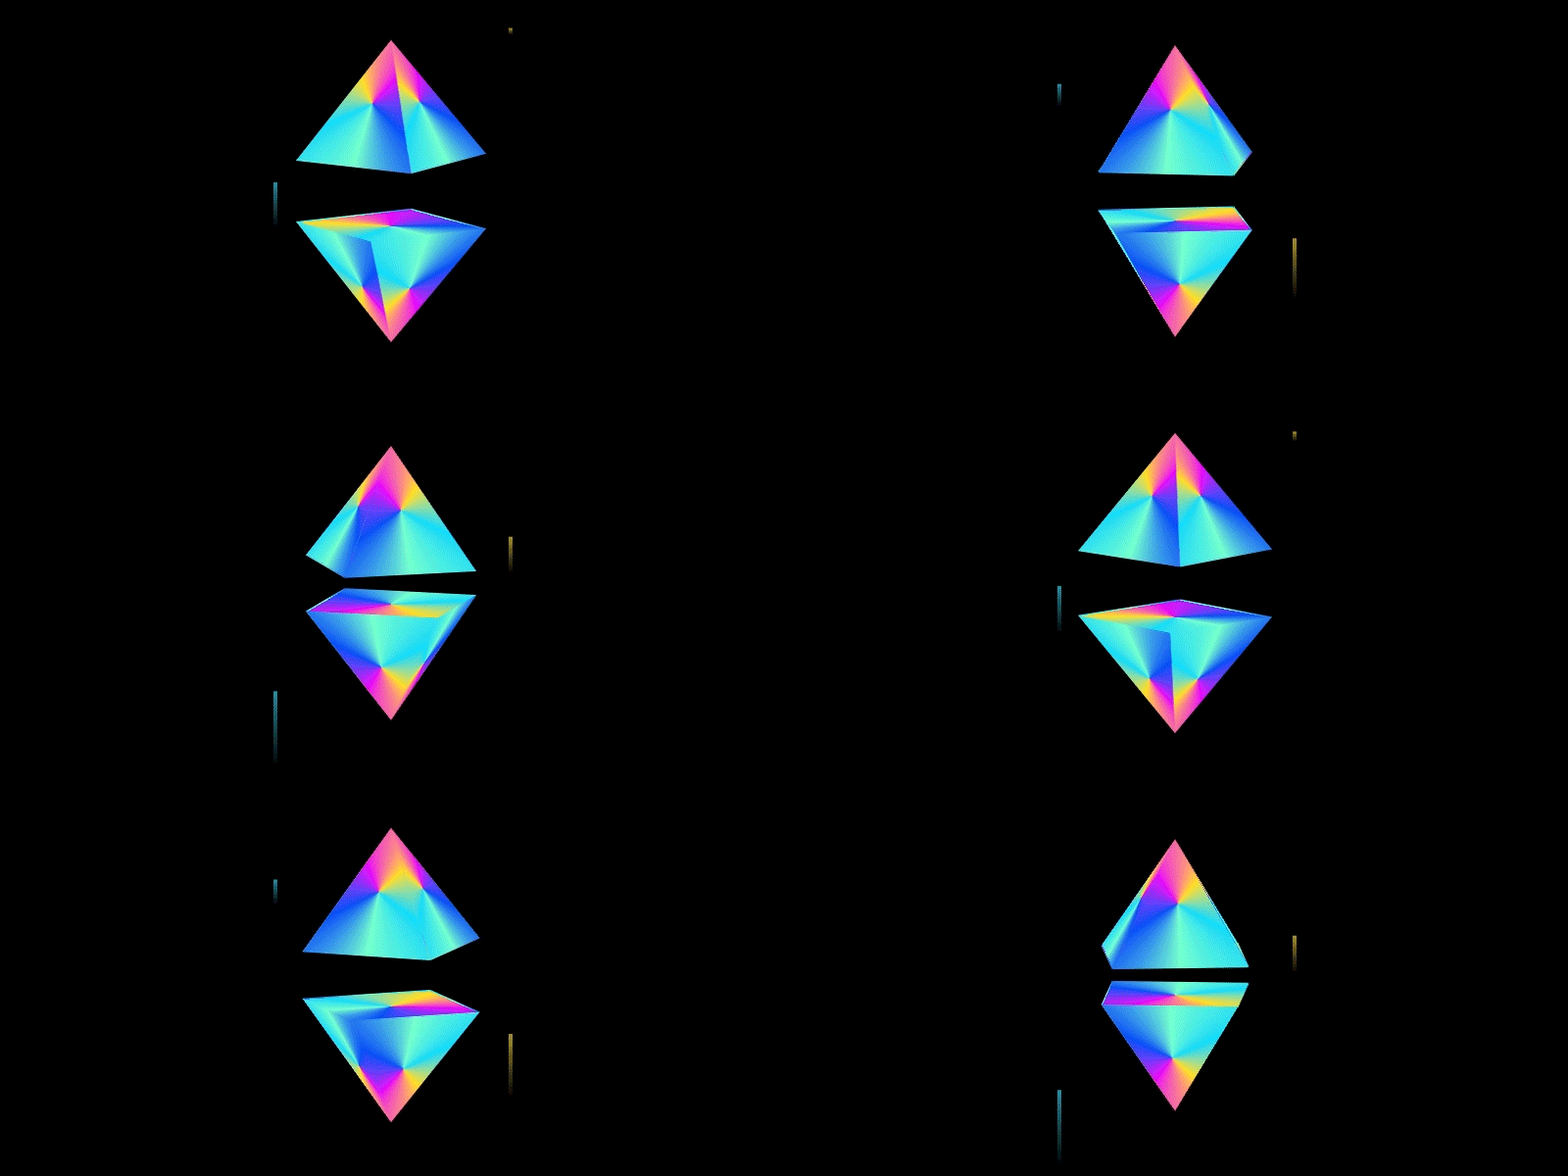
大家好,我是 Just,这里是「设计师工作日常」,今天教你写出一个炫酷的悬浮晶体效果,让你的网站增光添彩~ hhhh。
最新文章通过公众号「设计师工作日常」发布。
(目录)
整体效果

知识点: ① 关于
transform3d 模式的写法 ②transform多个属性的联合使用 ③background: linear-gradient渐变的使用 ④animation的使用 ⑤使用clip-path绘制三角形
思路: 使用
clip-path绘制出三角体的三个三角面,搭配transform调整三角面的角度,搭建出一个三角体,再画出底部矩形,同样调整矩形角度放到合适的位置,然后三角体的每个面添加渐变背景;然后复制这个三角体使用transform来做一个镜像处理,这样一个由两个三角体组合成的镜体就完成了,然后再加上一些动画效果。
核心代码部分,简要说明了写法思路;完整代码在最后,可直接复制到本地运行。
核心代码
html 代码
<div class="cube-box52">
  <div class="cube52">
    <div></div>
    <div></div>
    <div></div>
    <div></div>
    <div></div>
  </div>
  <div class="cube52">
    <div></div>
    <div></div>
    <div></div>
    <div></div>
    <div></div>
  </div>
</div>
两个三角体
.cube52。
css 部分代码
.cube-box52{
  width: 200px;
  height: 200px;
  position: relative;
  display: flex;
  flex-direction: column;
  justify-content: center;
  align-items: center;
  transform-style: preserve-3d;
  transform: rotateX(-10deg);
}
.cube-box52:after,.cube-box52:before{
  content: '';
  width: 2px;
  height: 40px;
  position: absolute;
  left: 40px;
  background: linear-gradient(180deg, rgba(4,222,248,0.7) 0%, rgba(127, 255, 212, 0) 100%);
  animation: movetop52 4s linear infinite;
}
.cube-box52:before{
  left: 160px;
  background: linear-gradient(180deg, rgba(255,225,33,0.7) 0%, rgba(255, 225, 33, 0) 100%);
  animation-delay: 2s;
}
@keyframes movetop52{
  0%{
    bottom: 0px;
  }
  100%{
    bottom: 200px;
    height: 0;
  }
}
.cube52{
  width: 100px;
  height: 70px;
  display: flex;
  justify-content: center;
  align-items: center;
  transform-style: preserve-3d;
  animation: spin52 4s linear infinite;
}
@keyframes spin52{
  0{
    transform: translateY(0px) rotateY(0deg);
  }
  50% {
    transform: translateY(-10px) rotateY(180deg);
  }
  100%{
    transform: translateY(0px) rotateY(360deg);
  }
}
.cube52 > div{
  width: 70px;
  height: 70px;
  clip-path: polygon(50% 0%, 0 100%, 100% 100%);
  background: conic-gradient(from 180deg at 50% 50%, #7FFFD4 0deg, #045AF8 59deg, #EA04F8 149deg, #FFE121 219deg, #04DEF8 301deg, #7FFFD4 360deg);
  position: absolute;
  transform-origin: center top;
}
.cube52 div:nth-of-type(1){
  background-color: rgba(4,222,248,0.7);
  transform: rotateZ(-30deg) rotateY(90deg);
}
.cube52 div:nth-of-type(2){
  background-color: rgba(234,4,248,0.7);
  transform: rotateZ(30deg) rotateY(90deg);
}
.cube52 div:nth-of-type(3){
  background-color: rgba(127,255,212,0.7);
  transform: rotateX(30deg);
}
.cube52 div:nth-of-type(4){
  background-color: rgba(4,90,248,0.7);
  transform: rotateX(-30deg);
}
.cube52 div:nth-of-type(5){
  clip-path: none;
  background-color: rgba(255,225,33,0.7);
  transform: rotateX(90deg) translateY(-35px) translateZ(-60px);
}
.cube-box52 .cube52:nth-of-type(2){
  transform: rotateX(180deg);
  animation: spin52b 4s linear infinite;
}
@keyframes spin52b{
  0{
    transform: rotateX(180deg) translateY(0px) rotateY(0deg);
  }
  50% {
    transform: rotateX(180deg) translateY(-10px) rotateY(180deg);
  }
  100%{
    transform: rotateX(180deg) translateY(0px) rotateY(360deg);
  }
}
1、
.cube52开启transform-style: preserve-3d3d 模式,然后让其子元素div用clip-path: polygon(50% 0%, 0 100%, 100% 100%)绘制出三角形,并且设置transform-origin参数确定变形原点,然后利用nth-of-type()选择器来调整每个子元素div的变形位置,搭建出三角体
2、然后给
.cube52加上一个动画,让其旋转的同时上下浮动
3、复制三角体代码,然后用
transform: rotateX(180deg)来实现镜像翻转,同时设置animation动画参数
4、最后再用
:before和:after创建两个小火焰,加上animation动画,让小火焰动起来。
完整代码如下
html 页面
<!DOCTYPE html>
<html lang="zh">
  <head>
    <meta charset="utf-8">
    <link rel="stylesheet" href="style.css">
    <title>好看的晶体悬浮效果</title>
  </head>
  <body>
    <div class="app">
      <div class="cube-box52">
        <div class="cube52">
          <div></div>
          <div></div>
          <div></div>
          <div></div>
          <div></div>
        </div>
        <div class="cube52">
          <div></div>
          <div></div>
          <div></div>
          <div></div>
          <div></div>
        </div>
      </div>
    </div>
  </body>
</html>
css 样式
/** style.css **/
.app{
  width: 100%;
  height: 100vh;
  background-color: #000000;
  position: relative;
  display: flex;
  justify-content: center;
  align-items: center;
}
.cube-box52{
  width: 200px;
  height: 200px;
  position: relative;
  display: flex;
  flex-direction: column;
  justify-content: center;
  align-items: center;
  transform-style: preserve-3d;
  transform: rotateX(-10deg);
}
.cube-box52:after,.cube-box52:before{
  content: '';
  width: 2px;
  height: 40px;
  position: absolute;
  left: 40px;
  background: linear-gradient(180deg, rgba(4,222,248,0.7) 0%, rgba(127, 255, 212, 0) 100%);
  animation: movetop52 4s linear infinite;
}
.cube-box52:before{
  left: 160px;
  background: linear-gradient(180deg, rgba(255,225,33,0.7) 0%, rgba(255, 225, 33, 0) 100%);
  animation-delay: 2s;
}
@keyframes movetop52{
  0%{
    bottom: 0px;
  }
  100%{
    bottom: 200px;
    height: 0;
  }
}
.cube52{
  width: 100px;
  height: 70px;
  display: flex;
  justify-content: center;
  align-items: center;
  transform-style: preserve-3d;
  animation: spin52 4s linear infinite;
}
@keyframes spin52{
  0{
    transform: translateY(0px) rotateY(0deg);
  }
  50% {
    transform: translateY(-10px) rotateY(180deg);
  }
  100%{
    transform: translateY(0px) rotateY(360deg);
  }
}
.cube52 > div{
  width: 70px;
  height: 70px;
  clip-path: polygon(50% 0%, 0 100%, 100% 100%);
  background: conic-gradient(from 180deg at 50% 50%, #7FFFD4 0deg, #045AF8 59deg, #EA04F8 149deg, #FFE121 219deg, #04DEF8 301deg, #7FFFD4 360deg);
  position: absolute;
  transform-origin: center top;
}
.cube52 div:nth-of-type(1){
  background-color: rgba(4,222,248,0.7);
  transform: rotateZ(-30deg) rotateY(90deg);
}
.cube52 div:nth-of-type(2){
  background-color: rgba(234,4,248,0.7);
  transform: rotateZ(30deg) rotateY(90deg);
}
.cube52 div:nth-of-type(3){
  background-color: rgba(127,255,212,0.7);
  transform: rotateX(30deg);
}
.cube52 div:nth-of-type(4){
  background-color: rgba(4,90,248,0.7);
  transform: rotateX(-30deg);
}
.cube52 div:nth-of-type(5){
  clip-path: none;
  background-color: rgba(255,225,33,0.7);
  transform: rotateX(90deg) translateY(-35px) translateZ(-60px);
}
.cube-box52 .cube52:nth-of-type(2){
  transform: rotateX(180deg);
  animation: spin52b 4s linear infinite;
}
@keyframes spin52b{
  0{
    transform: rotateX(180deg) translateY(0px) rotateY(0deg);
  }
  50% {
    transform: rotateX(180deg) translateY(-10px) rotateY(180deg);
  }
  100%{
    transform: rotateX(180deg) translateY(0px) rotateY(360deg);
  }
}
页面渲染效果

以上就是所有代码,以及简单的思路,希望对你有一些帮助或者启发。
我是 Just,这里是「设计师工作日常」,求点赞求关注!


