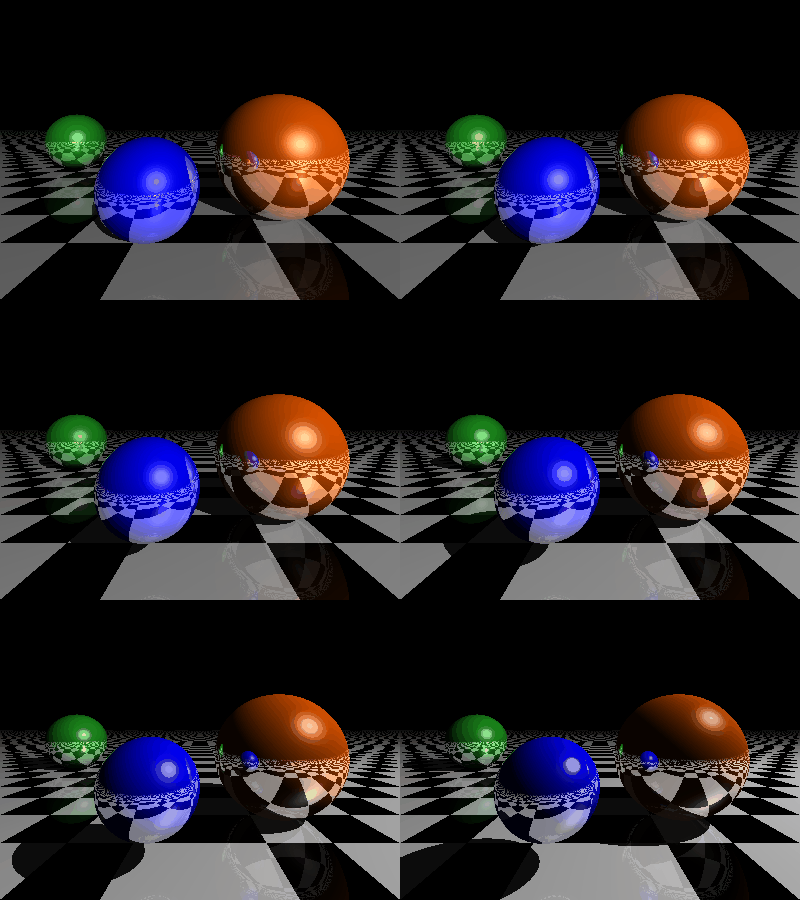
100 行 python 实现光线追踪 400*300 效果:

将多张图片合成为GIF

import numpy as np
import matplotlib.pyplot as plt

def normalize(x): #单位化
    return x / np.linalg.norm(x)

def intersect(origin, dir, obj):    # 射线与物体的相交测试
    if obj['type'] == 'plane':
        return intersect_plane(origin, dir, obj['position'], obj['normal']) #位置 法向量
    elif obj['type'] == 'sphere':
        return intersect_sphere(origin, dir, obj['position'], obj['radius'])

# 射线与平面的相交测试
def intersect_plane(origin, dir, point, normal):    # point 平面上一点 normal平面法向量
    dn = np.dot(dir, normal)
    if np.abs(dn) < 1e-6:   # 射线与平面几乎平行
        return np.inf       # 交点为无穷远处
    d = np.dot(point - origin, normal) / dn         # 交点与射线原点的距离(相似三角形原理)
    return d if d>0 else np.inf     # 负数表示射线射向平面的反方向


# 射线与球的相交测试
def intersect_sphere(origin, dir, center, radius):
    OC = center - origin
    if (np.linalg.norm(OC) < radius) or (np.dot(OC, dir) < 0): #np.linalg.norm 默认求2范数 即(x^2+y^2)^(1/2),点积<0 ,角度>90
        return np.inf
    l = np.linalg.norm(np.dot(OC, dir))
    m_square = np.linalg.norm(OC) * np.linalg.norm(OC) - l * l
    q_square = radius*radius - m_square
    return (l - np.sqrt(q_square)) if q_square >= 0 else np.inf

def get_normal(obj, point):         # 获得物体表面某点处的单位法向量
    if obj['type'] == 'sphere':
        return normalize(point - obj['position'])
    if obj['type'] == 'plane':
        return obj['normal']

def get_color(obj, M): # M 交点
    color = obj['color']              #与球的交点直接获取
    if not hasattr(color, '__len__'): #与平面的交点用color函数
        color = color(M)
    return color

#位置 半径 颜色 镜面反射率 漫反射率 高光参数 c k
def sphere(position, radius, color, reflection=.85, diffuse=1., specular_c=.6, specular_k=50):
    return dict(type='sphere', position=np.array(position), radius=np.array(radius),
                color=np.array(color), reflection=reflection, diffuse=diffuse, specular_c=specular_c, specular_k=specular_k)

#位置 法向量 颜色通过lambda变成黑白相间的棋盘格 color定义为一个函数
def plane(position, normal, color=np.array([1.,1.,1.]), reflection=0.15, diffuse=.75, specular_c=.3, specular_k=50):
    return dict(type='plane', position=np.array(position), normal=np.array(normal),
                color=lambda M: (np.array([1.,1.,1.]) if (int(M[0]*2)%2) == (int(M[2]*2)%2) else (np.array([0.,0.,0.]))),
                reflection=reflection, diffuse=diffuse, specular_c=specular_c, specular_k=specular_k)


def intersect_color(origin, dir, intensity): #视点
    min_distance = np.inf
    #遍历各个物体找出距离最近的点
    for i, obj in enumerate(scene):
        current_distance = intersect(origin, dir, obj)
        if current_distance < min_distance:
            min_distance, obj_index = current_distance, i   # 记录最近的交点距离和对应的物体
    if (min_distance == np.inf) or (intensity < 0.01):
        return np.array([0., 0., 0.]) #黑色

    obj = scene[obj_index]
    P = origin + dir * min_distance     # 交点坐标
    color = get_color(obj, P)           # 获取交点颜色
    N = get_normal(obj, P)              # 交点处单位法向量 平面上的点法向量就是平面法向量 球上的点法向量是该点到球心
    PL = normalize(light_point - P)     # 光源到交点
    PO = normalize(origin - P)          # 视角到交点

    c = ambient * color

    #只考虑反射,不考虑折射
    l = [intersect(P + N * .0001, PL, obj_shadow_test)
            for i, obj_shadow_test in enumerate(scene) if i != obj_index]       # 阴影测试
    if not (l and min(l) < np.linalg.norm(light_point - P)):
        c += obj['diffuse'] * max(np.dot(N, PL), 0) * color * light_color       #兰伯特模型 漫反射
        c += obj['specular_c'] * max(np.dot(N, normalize(PL + PO)), 0) ** obj['specular_k'] * light_color # 高亮项
        # Blinn - Phong模型 高光程度 IK(h,n)^p I:点光源 p:反射指数 越大越光滑 K:系数 n:入射点单位法向量 h:半角方向 h=(l+v)/|l+v|

    #每次反射,我们都将光线强度乘以反射系数(表征反射光线的衰减),并在函数开始时判断当光线强度弱于 0.01 时结束递归。
    reflect_ray = dir - 2 * np.dot(dir, N) * N  # 计算反射光线
    c += obj['reflection'] * intersect_color(P + N * .0001, reflect_ray, obj['reflection'] * intensity)

    return np.clip(c, 0, 1)


def raytracer(light_point,id):
    w, h = 80, 60     # 屏幕宽高
    O = np.array([0., 0.35, -1.])   # 摄像机位置
    Q = np.array([0., 0., 0.])      # 摄像机指向
    img = np.zeros((h, w, 3))
    r = float(w) / h
    S = (-1., -1. / r + .25, 1., 1. / r + .25)

    for i, x in enumerate(np.linspace(S[0], S[2], w)):   # np.linspace 用来创建等差数列 S[0]:返回样本数据开始点 S[2]:返回样本数据结束点 w:生成的样本数据量,
        # print("%.2f" % (i / float(w) * 100), "%")        # 2位小数
        for j, y in enumerate(np.linspace(S[1], S[3], h)):
            Q[:2] = (x, y)
            img[h - j - 1, i, :] = intersect_color(O, normalize(Q - O), 1) #视点   强度

    plt.imsave('ball%d.png'%id, img)

#模拟光源移动的光线追踪
for i in range(1):
    # 场景布置
    scene = [sphere([.75, .1, 1.], .6, [.8, .3, 0.]),  # 球心位置[左右,上下,前后],半径,颜色 黑色[0,0,0] 白色[1,1,1] 橙色
             sphere([-.3, .01, .2], .3, [.0, .0, .9]),  # 蓝色
             sphere([-2.75, .1, 3.5], .6, [.1, .5, .1]),  # 绿色
             plane([0., -.5, 0.], [0., 1., 0.])]  # 平面上一点的位置,平面经过[0,-0.5,0] ,法向量[0,1,0] 即定位了平面位置
    # light_point = np.array([5., 5., -10.])                      # 点光源位置
    light_color = np.array([1., 1., 1.])  # 点光源的颜色值 白色
    ambient = 0.05  # 环境光
    light_point = np.array([5., 5., -10.+i/10])                      # 点光源位置 从后往前移动
    # print(i)
    raytracer(light_point,i)

#合成gif
import imageio
with imageio.get_writer(uri='test.gif', mode='I', fps=20) as writer:
    for i in range(100):
        writer.append_data(imageio.imread('ball%d.png'%i))


