
RIP实验配置
一、基本信息配置(略)
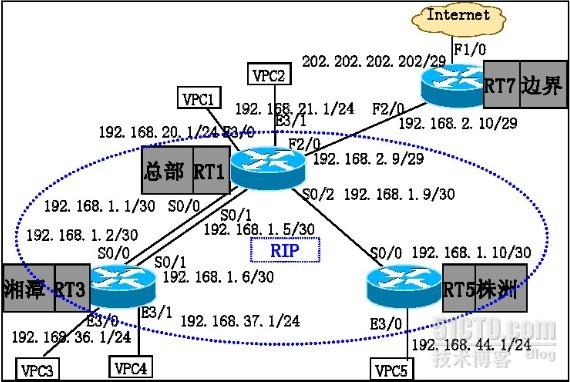
二、接口IP配置(如图标示IP)
RT1(config)#int e3/0 (e3/0的IP配置)
RT1(config-if)#ip add 192.168.20.1 255.255.255.0
RT1(config-if)#no shut (激活接口)
RT1(config-if)#no keepalive (将接口置为不保活,即无论有没有保活信息该接口都可以出于“活”的状态)
RT1(config)#int e3/1 (e3/1的IP配置)
RT1(config-if)#ip add 192.168.21.1 255.255.255.0
RT1(config-if)#no shut
RT1(config-if)#no keepalive
RT1(config)#int f2/0 (f2/0的IP配置)
RT1(config-if)#ip add 192.168.2.9 255.255.255.248
RT1(config-if)#no shut
RT1(config)#int s0/2 (s0/2的配置)
RT1(config-if)#encapsulation hdlc (S口需要封装一种广域网协议,此处均封装hdlc)
RT1(config-if)#clock rate 1000000 (设置时钟频率,只设置链路的一段即可)
RT1(config-if)#ip add 192.168.1.9 255.255.255.252(配置IP)
RT1(config-if)#no shut
RT1(config)#int s0/0 (s0/0的配置)
RT1(config-if)#en hd
RT1(config-if)#en hdlc
RT1(config-if)#clock r 1000000
RT1(config-if)#ip add 192.168.1.1 255.255.255.252
RT1(config-if)#no shut
RT1(config)#int s0/1 (s0/1的配置)
RT1(config-if)#en hd
RT1(config-if)#en hdlc
RT1(config-if)#ip add 192.168.1.5 255.255.255.252
RT1(config-if)#no shu
RT3、RT5、RT7的IP配置就不多写了,很简单,按照图示配置即可,S口注意封装hdlc协议,如果对端配置了时钟频率那另一端就不用再配置时钟频率了。
三、RIP信息配置
RT1(config)#router rip (开启RIP)
RT1(config-router)#version 2(设置为版本2,版本2是无类路由,传播路由时会携带接口掩码,版本1基本不再用了)
RT1(config-router)#no auto-summary(关闭RIP的自动汇总功能)
RT1(config-router)#network 192.168.20.0 (通告发布的网段,下几句命令也是这样)
RT1(config-router)#network 192.168.21.0
RT1(config-router)#network 192.168.1.0
RT1(config-router)#network 192.168.1.4
RT1(config-router)#network 192.168.1.8
RT1(config-router)#passive-interface default(将RT1的所有接口置为被动接口,置为被动接口后就不会从这个接口向外传播RIP路由信息了)
RT1(config-router)#no passive-interface s0/0(将需要传播路由的接口设置为“no”被动,即,可以从这个接口发出路由信息,下面几句命令类似)
RT1(config-router)#no passive-interface s0/1
RT1(config-router)#no passive-interface s0/2
RT3(config)#router rip
RT3(config-router)#version 2
RT3(config-router)#no auto-summary
RT3(config-router)#net 192.168.36.0
RT3(config-router)#net 192.168.37.0
RT3(config-router)#net 192.168.1.0
RT3(config-router)#net 192.168.1.4
RT3(config-router)#passive-interface default
RT3(config-router)#no passive-interface s0/0
RT3(config-router)#no passive-interface s0/1
RT5(config)#router rip
RT5(config-router)#version 2
RT5(config-router)#no auto-summary
RT5(config-router)#net 192.168.1.8
RT5(config-router)#net 192.168.44.8
RT5(config-router)#passive-interface default
RT5(config-router)#no passive-interface s0/0
四、其他路由配置(使RIP可以与没有运行RIP的那部分连通)
RT7(config)#ip route 192.168.0.0 255.255.0.0 192.168.2.9 (RT7上配置通往RIP区域的静态路由)
RT1(config)#ip route 0.0.0.0 0.0.0.0 192.168.2.10 (在RT1上配置缺省路由通往外部区域)
RT1(config)#router rip (进入RIP配置子模式)
RT1(config-router)#default-information originate (对RIP区域下发下发缺省路由)
五、在设备上查看各自的路由表
在RT1上 show ip route
R 192.168.44.0/24 [120/1] via 192.168.1.10, 00:00:18, Serial0/2
C 192.168.21.0/24 is directly connected, Ethernet3/1
C 192.168.20.0/24 is directly connected, Ethernet3/0
R 192.168.36.0/24 [120/1] via 192.168.1.6, 00:00:14, Serial0/1
[120/1] via 192.168.1.2, 00:00:09, Serial0/0
R 192.168.37.0/24 [120/1] via 192.168.1.6, 00:00:14, Serial0/1
[120/1] via 192.168.1.2, 00:00:09, Serial0/0
192.168.1.0/30 is subnetted, 3 subnets
C 192.168.1.8 is directly connected, Serial0/2
C 192.168.1.0 is directly connected, Serial0/0
C 192.168.1.4 is directly connected, Serial0/1
192.168.2.0/29 is subnetted, 1 subnets
C 192.168.2.8 is directly connected, FastEthernet2/0
S* 0.0.0.0/0 [1/0] via 192.168.2.10
R代表RIP学到的路由,C代表直连路由,S*代表静态且为缺省的路由。
在RT3上show ip route
R 192.168.44.0/24 [120/2] via 192.168.1.5, 00:00:08, Serial0/1
[120/2] via 192.168.1.1, 00:00:14, Serial0/0
R 192.168.21.0/24 [120/1] via 192.168.1.5, 00:00:08, Serial0/1
[120/1] via 192.168.1.1, 00:00:14, Serial0/0
R 192.168.20.0/24 [120/1] via 192.168.1.5, 00:00:08, Serial0/1
[120/1] via 192.168.1.1, 00:00:14, Serial0/0
C 192.168.36.0/24 is directly connected, Ethernet3/0
C 192.168.37.0/24 is directly connected, Ethernet3/1
192.168.1.0/30 is subnetted, 3 subnets
R 192.168.1.8 [120/1] via 192.168.1.5, 00:00:08, Serial0/1
[120/1] via 192.168.1.1, 00:00:14, Serial0/0
C 192.168.1.0 is directly connected, Serial0/0
C 192.168.1.4 is directly connected, Serial0/1
R* 0.0.0.0/0 [120/1] via 192.168.1.5, 00:00:08, Serial0/1
[120/1] via 192.168.1.1, 00:00:14, Serial0/0
R*代表RIP下发缺省路由得到的路由条目,这条路由指向的地方就是下发缺省路由的设备。
在RT5上show ip route
C 192.168.44.0/24 is directly connected, Ethernet3/0
R 192.168.21.0/24 [120/1] via 192.168.1.9, 00:00:21, Serial0/0
R 192.168.20.0/24 [120/1] via 192.168.1.9, 00:00:21, Serial0/0
R 192.168.36.0/24 [120/2] via 192.168.1.9, 00:00:21, Serial0/0
R 192.168.37.0/24 [120/2] via 192.168.1.9, 00:00:21, Serial0/0
192.168.1.0/30 is subnetted, 3 subnets
C 192.168.1.8 is directly connected, Serial0/0
R 192.168.1.0 [120/1] via 192.168.1.9, 00:00:21, Serial0/0
R 192.168.1.4 [120/1] via 192.168.1.9, 00:00:21, Serial0/0
R* 0.0.0.0/0 [120/1] via 192.168.1.9, 00:00:21, Serial0/0
在RT7上show ip route
202.202.202.0/29 is subnetted, 1 subnets
C 202.202.202.200 is directly connected, FastEthernet1/0
192.168.2.0/29 is subnetted, 1 subnets
C 192.168.2.8 is directly connected, FastEthernet2/0
S 192.168.0.0/16 [1/0] via 192.168.2.9
六、实验总结
1、 对于RIP的被动接口
被动接口一般配置在那些不需要传播RIP路由信息的接口上,比如直接接PC的那些端口,而需要将路由信息传播出去的接口是不要配置被动接口的,工程化规范中,凡是不需要传播路有消息的那些接口都要配置为被动接口,所以用一条passive-interface default命令来使所有的接口成为被动接口,然后“no”掉那些需要传播路由的接口即可。总之,除了要传播路由信息的接口,其他的都要配置成被动接口。
2、 下发缺省路由
default-information originate这条命令就是用来下发缺省路由的,下发路由的设备会告诉其他路由器:“你们如果有不识别的路由,统统发给我!”,而当收到他们传来的路由时,如果自己也不知道,那么就查找自己的路由表,按照自己的缺省路由进行转发。
3、 关于版本
这里我们都用RIP v2的版本,并且关闭自动汇总。由于版本1只能发送有类路由信息,路由条目非常的不精确,所以版本2进行了改进,版本2应用的无类路由,会携带掩码信息,但是在这里也必须关闭它的自动汇总功能,不要让协议自己去帮你汇总,否则会使路由条目逃出你的掌控范围。
(其他要注意的东东暂时没想到,嘿嘿)


