
1、安装编译器
http://www.gnustep.org/experience/Windows.html
download
Package | Required? | Stable | Unstable | Notes |
GNUstep MSYS System | Required | 0.29.0 | - | MSYS/MinGW System |
GNUstep Core | Required | 0.29.1 | - | GNUstep Core |
GNUstep Devel | Optional | 1.4.0 | - | Developer Tools |
Cairo Backend |
其中,前两个软件包是必须要安装的,第三个软件包是安装一些开发工具,比如:gcc、g++等,所以如果是学习Objective C的话,这个包也是必须要安装,第四个软件包是安装glib等库,这个包安装不安装根据具体情况而定。
makefile方式
在Windows环境下用文本编辑器(Editplus,UE等),编写上述代码,并且保存到GNUstep安装目录下的/home下,比如我把GNUstep安装在D:\app\下面,则你的文件应该放在GNUstep\msys\1.0\home\主机名 下面,具体路径可以在console下面运行pwd命令查看。
3.新建文件GNUmakefile
切记,文件的名字即为GNUmakefile不带扩展名,并输入:
#!/bin/sh
gcc -o $1 $2 -I/GNUstep/System/Library/Headers -fconstant-string-class=NSConstantString -L/GNUstep/System/Library/Libraries -lobjc -lgnustep-base
其中红色部分可以根据自己项目的需要修改,helloworld.m 部分,也可以加空格添加其他的.m文件,如:helloworld.m mian.m等。
4. 在然后打开GNUstep/shell,输入:
make
编译。
5.测试运行
在GNUstep的Shell中 运行 helloworld.exe
object-c的GNUstep环境搭建、测试就ok了。
另外:object-c有两种编译方式,一种即为makefile方式,另一种为sh方式
(未成功)
sh方式
在Windows环境下用文本编辑器(Editplus,UE等),编写上述代码,并且保存到GNUstep安装目录下的/home下,比如我把GNUstep安装在D:\Developer\下面,则你的文件应该放在GNUstep\msys\1.0\home\主机名 下面,具体路径可以在console下面运行pwd命令查看,取名为helloworld.m。在GNUstep的console窗口命令行下,
1、cd /home
2、gcc -o helloworld helloworld.m -I/GNUstep/System/Library/Headers -fconstant-string-class=NSConstantString -L/GNUstep/System/Library/Libraries -lobjc -lgnustep-base
3、运行helloworld.exe
说明:第二步中的一些参数明说,如果熟悉Linux/Unix下C/C++编译的话,上述参数应该很熟悉,-I表示头文件查找的路径,-L表示库文件查找路径,-l表示需要链接的库文件。但是,-fconstant-string-class=NSConstantString 对于这个参数可能比较陌生,这个参数主要是指定常量字符串所使用的class。
自己写了一个简单的脚本,要是嫌编译源代码麻烦,可以建一个文件,比如lc.sh,然后把下面的内容复制进去:
#!/bin/sh
gcc -o $1 $2 -I/GNUstep/System/Library/Headers -fconstant-string-class=NSConstantString -L/GNUstep/System/Library/Libraries -lobjc -lgnustep-base
然后在console下面运行如下命令:chmod +x lc.sh
以后要编译程序的时候,就在命令行下面输入:./lc.sh helloworld helloworld.m
文件中的$1和$2分别表示命令行中的helloworld 和 helloworld.m
可以在GNUstep下Shell中运行 helloworld.exe
helloworld.exe编译并运行成功
2、安装CodeBlocks IDE环境
下载地址:http://www.codeblocks.org/
3、配置编译器
安装好codeblocks之后,进入Settings->Compiler and debugger...,选择GNU GCC Compiler编译器,复制重新命名为“GNUstep MinGW Compiler“配置
编译其他选项录入:-fconstant-string-class=NSConstantString -std=c99
同时指定搜索目录:
》编译器的搜索目录是D:\GNUstep\GNUstep\System\Library\Headers
》linker的搜索目录设置为D:\GNUstep\GNUstep\System\Library\Libraries,同时设置linker的参数:-lobjc -lgnustep-base
或者可以在linker选项中加入D:\GNUstep\GNUstep\System\Library\Libraries下面的2个文件libgnustep-base.dll.a,libobjc.dll.a
设置编译器、连接器的搜索目录
4、配置语法、文件类型,关键字等
添加文件类型支持
1) 进入Settings->Environment...
2) 选择 Files extension handling 添加*.m
3) 进入 Project->Project tree->Edit file types & categories...
4) 在Sources, 下面添加 *.m到文件类型列表中.
添加语法高亮支持
1) 进入 Settings->Editor...
2) 选择 Syntax highlighting 进入Filemasks.... 添加*.m 到文件类型列表中.
3) 进入 Keywords... (紧靠Filemasks...) 添加下面的关键字到列表中
@interface @implementation @end @class @selector @protocol @public @protected @private id BOOL YES NO SEL nil NULL self |
语法高亮中,加入*.m扩展名
5、代码测试
1.创建Objective-C工程
创建一个Console的C工程,将main.c删除,新建main.m文件,内容如下:
#import <Foundation/Foundation.h>
int main (int argc, const char *argv[]) {
NSAutoreleasePool *pool = [[NSAutoreleasePool alloc] init];
NSLog(@"Hello World!");
[pool drain];
return 0;
}
右击main.m点击property,选择Build选项卡,将Compile file与Link file都打上勾,
选择Advanced,将Compiler variable的内容改为CC
2.设置编译选项
(1)方法一
右击将创建的工程,选择Build options…,Selected compiler编译器选择GNUstep MinGW Compiler, 选择Compiler settings>Other options中填入-fconstant-string-class=NSConstantString
选择Linker settings选项卡,点击Add,增加如下两行内容:
C:/GNUstep/GNUstep/System/Library/Libraries/libobjc.dll.a
C:/GNUstep/GNUstep/System/Library/Libraries/libgnustep-base.dll.a
选择Search directories>Compiler,点击Add,增加如下内容:
C:/GNUstep/GNUstep/System/Library/Headers
(2)方法二
右击将创建的工程,选择Build options…,Selected compiler编译器选择GNUstep MinGW Compiler, 选择Compiler settings>Other options中填入-fconstant-string-class=NSConstantString -IC:/GNUstep/GNUstep/System/Library/Headers -LC:/GNUstep/GNUstep/System/Library/Libraries
选择Linker settings选项卡,在Other linker options中输入-lobjc -lgnustep-base即可
3.增加.m文件类型高亮及编辑器关联
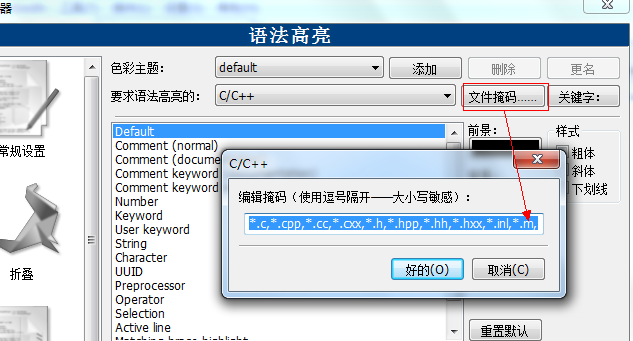
(1)点击Settings>Editors>Syntax highlighting, 选择Syntax highlighting for: C/C++,点击Filemasks…,在弹出窗口里面加入*.m,点OK
选择Matlab,点击Filemasks…,将里面的*.m删除
(2)点击Settings>Environment>Files extension handling,点击*.m,在To open the file中选择
Open it in a Code::Blocks editor即可
新建一个工程,修改main.c为main.m,录入下面代码
#import <Foundation/Foundation.h>
int main (int argc, const char *argv[])
{
    NSAutoreleasePool *pool = [[NSAutoreleasePool alloc] init];
    NSLog(@"%@",@"hello world");
    [pool drain];
    return 0;
}
编译运行效果如下:
2012-03-07 17:33:49.711 objc1[6080] hello world Process returned 0 (0x0) execution time : 0.220 s |


