
注:因部分原因,本篇主要讲解动效分析的思路,不提供源码下载,请见谅 ... ...
上一篇只讲了Canvas中的drawBitmap方法,并且还说的这个方法好像很腻害、能做出很多牛逼效果的样子,接下来这篇文章只是为了作为上一篇文章的一个小栗子,进一步拓展大家利用drawBitmap 完成动效的思路!
好了,先上失真的不能再失真的效果图:
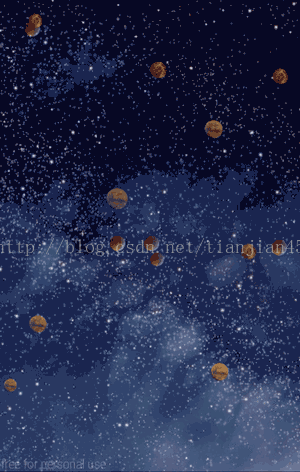
咱们先一起来分析下上面的效果:
假定这是你刚从UE 或动效射鸡湿手里拿到上面的动效设计图,映入眼帘的是苍茫的星空,漂浮的星球营造出的深邃、浩瀚的宇宙,好了,不多BB了,针对上图你会想到什么样的实现方案?
1. 有些同学可能会想到创建对应数量个ImageView,然后针对每一个ImageView使用 Animation或Animator 去做对应的移动效果;
2.采用自己绘制的方式进行实现,不就是漂浮的星球吗,咱都给画出来;
不用说,上面第二种方案肯定更可取,第一种方案有以下几个缺陷:
1. 创建的view 个数过多,性能太差;
2. 灵活性太差,比如UE或产品要增加或减少星球数量,都会是个麻烦事儿;
3. 对每一个view做移动动画,开销太大还不太可控或修改;
针对于此,咱们坚定不移的走自己绘制完成漂浮动效的路线;
既然要绘制,那首先得拿到星球的位图,根据星球的种类拿到所有的位图:
[html] view plain copy
1. /**
2.  * init bitmap info
3.  */
4. private void initBitmapInfo() {
5.
6. mBackBitmap = ((BitmapDrawable) mResources.getDrawable(R.drawable.back))
7.             .getBitmap();
8. mBackWidth = mBackBitmap.getWidth();
9. mBackHeight = mBackBitmap.getHeight();
10.
11. mStarOne = ((BitmapDrawable) mResources.getDrawable(R.drawable.star2))
12.             .getBitmap();
13. mStarOneWidth = mStarOne.getWidth();
14. mStarOneHeight = mStarOne.getHeight();
15.
16. mStarTwo = ((BitmapDrawable) mResources.getDrawable(R.drawable.star1))
17.             .getBitmap();
18. mStarTwoWidth = mStarTwo.getWidth();
19. mStarTwoHeight = mStarTwo.getHeight();
20.
21. mStarThree = ((BitmapDrawable) mResources.getDrawable(R.drawable.star3))
22.             .getBitmap();
23.
24. mStarThreeWidth = mStarThree.getWidth();
25. mStarThreeHeight = mStarThree.getHeight();
26.
27. }
上面拿到了背景和三种类型星球的位图,根据上面的效果,我们来分析下,有哪些特征性数据:
1. 同一种星球有大有小;
2. 彼此之间有透明度的差别;
3. 漂浮的方向不一样;
4. 漂浮的速度不一样;
5. 每个星球都得有自己的位置;
我们暂且只分析这么多,基于此,我们抽象出星球对象:
[html] view plain copy
1. /**
2.  * 星球
3.  * @author AJian
4.  */
5. private class StarInfo {
6.
7.     // 缩放比例
8.     float sizePercent;
9.     // x位置
10.     int xLocation;
11.     // y位置
12.     int yLocation;
13.     // 透明度
14.     float alpha;
15.     // 漂浮方向
16.     int direction;
17.     // 漂浮速度
18.     int speed;
19. }
为了得到上面的部分数据,我们先写一些数据或方法:
1. 为了初始化星球的位置,我们用数组先定义一批星球的位置(基于view宽高的比例),当然大家也可以随机,只是随机可能出现扎堆情况:
[html] view plain copy
1. private static final float[][] STAR_LOCATION = new float[][] {
2.             {0.5f, 0.2f}, {0.68f, 0.35f}, {0.5f, 0.05f},
3.             {0.15f, 0.15f}, {0.5f, 0.5f}, {0.15f, 0.8f},
4.             {0.2f, 0.3f}, {0.77f, 0.4f}, {0.75f, 0.5f},
5.             {0.8f, 0.55f}, {0.9f, 0.6f}, {0.1f, 0.7f},
6.             {0.1f, 0.1f}, {0.7f, 0.8f}, {0.5f, 0.6f}
7.     };
2. 获取星球大小的方法(基于原始Bitmap缩放比例):
[html] view plain copy
1. /**
2.  * 获取星球大小
3.  */
4. private float getStarSize(float start, float end) {
5. nextFloat = (float) Math.random();
6. < nextFloat && nextFloat < end) {
7.         return nextFloat;
8.     } else {
9.         // 如果不处于想要的数据段,则再随机一次,因为不断递归有风险
10.         return (float) Math.random();
11.     }
12.
13. }
3. 定义三种不同快慢的漂浮速度:
[html] view plain copy
1. mFloatTransLowSpeed = (int) TypedValue.applyDimension(TypedValue.COMPLEX_UNIT_DIP, 0.5f,
2.         mResources.getDisplayMetrics());
3. mFloatTransMidSpeed = (int) TypedValue.applyDimension(TypedValue.COMPLEX_UNIT_DIP, 0.75f,
4.         mResources.getDisplayMetrics());
5. mFloatTransFastSpeed = (int) TypedValue.applyDimension(TypedValue.COMPLEX_UNIT_DIP, 1f,
6.         mResources.getDisplayMetrics());
4. 获取星球漂浮方向的方法:
[html] view plain copy
1. /**
2.  * 初始化星球运行方向
3.  */
4. private int getStarDirection() {
5. random = new Random();
6. randomInt = random.nextInt(4);
7. direction = 0;
8.     switch (randomInt) {
9.         case 0:
10. direction = LEFT;
11.             break;
12.         case 1:
13. direction = RIGHT;
14.             break;
15.         case 2:
16. direction = TOP;
17.             break;
18.         case 3:
19. direction = BOTTOM;
20.             break;
21.
22.         default:
23.             break;
24.     }
25.     return direction;
26. }
有了上面的数据和方法,我们首先初始化一定数量的星球数据:
[html] view plain copy
1. /**
2.  * 初始化星球信息
3.  */
4. private void initStarInfo() {
5.
6. starInfo = null;
7. random = new Random();
8. i = 0; i < mStarCount; i++) {
9.         // 获取星球大小比例
10. starSize = getStarSize(0.4f, 0.9f);
11.         // 初始化星球大小
12. starLocation = STAR_LOCATION[i];
13. starInfo = new StarInfo();
14. starInfo.sizePercent = starSize;
15.
16.         // 初始化漂浮速度
17. randomSpeed = random.nextInt(3);
18.         switch (randomSpeed) {
19.             case 0:
20. starInfo.speed = mFloatTransLowSpeed;
21.                 break;
22.             case 1:
23. starInfo.speed = mFloatTransMidSpeed;
24.                 break;
25.             case 2:
26. starInfo.speed = mFloatTransFastSpeed;
27.                 break;
28.
29.             default:
30. starInfo.speed = mFloatTransMidSpeed;
31.                 break;
32.         }
33.
34.         // 初始化星球透明度
35. starInfo.alpha = getStarSize(0.3f, 0.8f);
36.         // 初始化星球位置
37. starInfo.xLocation = (int) (starLocation[0] * mTotalWidth);
38. starInfo.yLocation = (int) (starLocation[1] * mTotalHeight);
39. xLocation = " + starInfo.xLocation + "--yLocation = "
40.                 + starInfo.yLocation);
41. stoneSize = " + starSize + "---stoneAlpha = "
42.                 + starInfo.alpha);
43.         // 初始化星球位置
44. starInfo.direction = getStarDirection();
45.         mStarInfos.add(starInfo);
46.     }
47.
48. }
有了这些数据,我们已经可以将星球绘制在屏幕上:
[html] view plain copy
1. private void drawStarDynamic(int count, StarInfo starInfo,
2.            Canvas canvas, Paint paint) {
3.
4. starAlpha = starInfo.alpha;
5. xLocation = starInfo.xLocation;
6. yLocation = starInfo.yLocation;
7. sizePercent = starInfo.sizePercent;
8.
9. xLocation = (int) (xLocation / sizePercent);
10. yLocation = (int) (yLocation / sizePercent);
11.
12. bitmap = null;
13. srcRect = null;
14. destRect = new Rect();
15.
16. 3 == 0) {
17.
18. bitmap = mStarOne;
19. srcRect = mStarOneSrcRect;
20.            destRect.set(xLocation, yLocation,
21.                    xLocation + mStarOneWidth, yLocation
22.                            + mStarOneHeight);
23. 2 == 0) {
24. bitmap = mStarThree;
25. srcRect = mStarThreeSrcRect;
26.            destRect.set(xLocation, yLocation, xLocation
27.                    + mStarThreeWidth, yLocation + mStarThreeHeight);
28.        } else {
29. bitmap = mStarTwo;
30. srcRect = mStarTwoSrcRect;
31.            destRect.set(xLocation, yLocation, xLocation
32.                    + mStarTwoWidth, yLocation + mStarTwoHeight);
33.        }
34.
35.        paint.setAlpha((int) (starAlpha * 255));
36.        canvas.save();
37.        canvas.scale(sizePercent, sizePercent);
38.        canvas.drawBitmap(bitmap, srcRect, destRect, paint);
39.        canvas.restore();
40.
41.    }
接下来要考虑的只是如何让星球动起来,有了以上数据和思路,相信大家让星球动起来就不是难事了,只需要根据星球运动的方向,每次重绘的时候将星球的x、y增加或减小对应大小即可:
[html] view plain copy
1. private void resetStarFloat(StarInfo starInfo) {
2.         switch (starInfo.direction) {
3.             case LEFT:
4. -= starInfo.speed;
5.                 break;
6.             case RIGHT:
7.                 starInfo.xLocation += starInfo.speed;
8.                 break;
9.             case TOP:
10. -= starInfo.speed;
11.                 break;
12.             case BOTTOM:
13.                 starInfo.yLocation += starInfo.speed;
14.                 break;
15.             default:
16.                 break;
17.         }
18.     }
这时候有部分同学可能会说了,尼玛, 星球直接移出屏幕了怎么办,这个问题相信大家都能解决,只是一个值的判断和重新修复,不再多言;
最后针对这一类动效小谈一下,其实很大一部分效果和上面的动效是类似的,不信?我举几个栗子:
1. 雪花飘落的效果
尼玛,扯淡呢!雪花和这类似?雪花从上往下飞,并且还旋转;
针对于此,我们只需要在抽取对象的时候加上旋转角度和旋转速度,至于从上往下飞的问题,我们只需要修改x、y的更新策略即可;
2. 很多桌面类应用的花瓣飘落、落英缤纷效果;
基本都是采用以上的分析和实现原理,重要的是对于数据的抽取和灵活运用,其他的也就是根据具体的需求动态的更新需要更新的数据,比如位置、大小、透明度等等;
所以,从上面来看,这一类效果其实并不复杂,我们所需要做的只是将复杂动效进行分解、抽取,然后找到每一个小点最适合的实现方式,大的动效化小,然后逐个击破;
我在写的过程中会尽可能的把思路描述清楚,因为在我看来,做动效,最主要的还是在于效果的拆解、衔接、解决的思路,思路清晰了,解决方案一般也就明了了;


