大家在手机应用中都用过很多menu,最直观的就是微信右上角弹出来的+号菜单。当我们要进行扫码,搜索等操作的时候,都会打开这个菜单。
接下来给大家分享一下这个菜单怎么用。更具体的文章我会在末尾给大家推荐几个blog,在这里我给各位像我一样的新手讲一下大概的用法。
定义menu,要在res文件夹下面创建一个子文件夹(menu),然后右键Menu resources file。如图:

我们可以用<item>、<menu>、<group>三种XML元素来定义Menu,下面是他们的定义:
内容来自:
<menu>
- 是菜单项的容器。
<menu>
- 元素必须是该文件的根节点,并且能够包含一个或多个
<item>
- 和
<group>
- 元素。
<item>
- 是菜单项,用于定义
MenuItem
- ,可以嵌套
<menu>
- 元素,以便创建子菜单。
<group>
- 是
<item>
- 元素的不可见容器(可选)。可以使用它对菜单项进行分组,使一组菜单项共享可用性和可见性等属性。
顾名思义,item是每一个菜单内的原子元素,我们可以通过id、title、icon、showAsAction等等标签来定义它。
下面我们来看具体的步骤:
我们创建一个ToolBar.XML:
<?xml version="1.0" encoding="utf-8"?>
<menu xmlns:android="http:///apk/res/android"
    xmlns:app="http:///apk/res-auto">

    <item
        android:id="@+id/backup"
        android:icon="@mipmap/ic_launcher"
        android:title="BackUp"
        app:showAsAction="always"
        />
    <item
        android:id="@+id/delete"
        android:title="Delete"
        android:icon="@mipmap/ic_launcher"
        app:showAsAction="always">

        <menu>
            <item
                android:id="@+id/choose_1"
                android:title="choose_1"/>
            <item
                android:id="@+id/choose_2"
                android:title="choose_2"/>

        </menu>

    </item>

    <item
        android:id="@+id/settings"
        android:title="Settings"
        android:icon="@mipmap/ic_launcher"
        app:showAsAction="always"/>
    <item
        android:id="@+id/other1"
        android:title="Other1"
        android:icon="@mipmap/ic_launcher"
        app:showAsAction="ifRoom"/>
    <item
        android:id="@+id/other2"
        android:title="Other2"
        android:icon="@mipmap/ic_launcher"
        app:showAsAction="ifRoom"/>

</menu>
item里可以嵌套menu,menu中可以有item,group,从而出现层次。
其中showAsAction的参数有:always(永远显示在ToolBar中,若空间不足则不显示)、never(永远显示在菜单中)、ifRoom(若屏幕足够,则显示在Toolbar中不够就在菜单中)。注意:在ToolBar中只会显示图标,在菜单中只会显示文字。
在菜单的item里也可以添加图标:
<item
    android:id="@+id/choose_2"
    android:icon="@mipmap/ic_launcher"
    app:showAsAction="ifRoom"
    android:title="choose_2"/>
大家自己测试的时候可以试一下所有的效果,因为我这里是随便写的所以层次比较乱。
大家可能会奇怪ToolBar是什么样的,菜单什么样的,有什么差别。给两张图大家就知道了:

这片蓝色的就是我们的toolbar。

这个单色的菜单里面有两个选项choose1和2,因为点选后要消失了所以透明,但是实际是不透明的。
完成toolbar.XML文件,我们就可以在activity_main.XML里添加了。(V7的ToolBar)
<?xml version="1.0" encoding="utf-8"?>
<android.support.constraint.ConstraintLayout xmlns:android="http:///apk/res/android"
    xmlns:app="http:///apk/res-auto"
    xmlns:tools="http:///tools"
    android:layout_width="match_parent"
    android:layout_height="match_parent"
    tools:context=".MainActivity">

    <android.support.v7.widget.Toolbar
        android:id="@+id/toolbar"
        android:background="@color/colorPrimary"
        android:theme="@style/ThemeOverlay.AppCompat.Dark.ActionBar"
        app:popupTheme="@style/ThemeOverlay.AppCompat.Light"
        android:layout_width="match_parent"
        android:layout_height="wrap_content">

    </android.support.v7.widget.Toolbar>

    <TextView
        android:layout_width="wrap_content"
        android:layout_height="wrap_content"
        android:text="Hello World!"
        app:layout_constraintBottom_toBottomOf="parent"
        app:layout_constraintLeft_toLeftOf="parent"
        app:layout_constraintRight_toRightOf="parent"
        app:layout_constraintTop_toTopOf="parent" />

</android.support.constraint.ConstraintLayout>
接下来在MainActivity.java中首先绑定控件,然后需要调用setSupportActionBar()来调用我们的ToolBar:
@Override
protected void onCreate(Bundle savedInstanceState) {
    super.onCreate(savedInstanceState);
    setContentView(R.layout.activity_main);
    android.support.v7.widget.Toolbar toolbar = (android.support.v7.widget.Toolbar) findViewById(.toolbar);
    setSupportActionBar(toolbar);
}
Ctrl加左键点击函数,我们可以看到文档:
大概意思是传入一个非空的值会返回一个可以控制的对象来控制我们的toolbar,没有设置toolbar我们的toolbar是看不得的。
/**
 * Support library version of {@link .Activity#getActionBar}.
 *
 * <p>Retrieve a reference to this activity's ActionBar.
 *
 * @return The Activity's ActionBar, or null if it does not have one.
 */
@Nullable
public ActionBar getSupportActionBar() {
    return getDelegate().getSupportActionBar();
}

/**
 * Set a {@link android.widget.Toolbar Toolbar} to act as the
 * {@link .ActionBar} for this Activity window.
 *
 * <p>When set to a non-null value the {@link #getActionBar()} method will return
 * an {@link .ActionBar} object that can be used to control the given
 * toolbar as if it were a traditional window decor action bar. The toolbar's menu will be
 * populated with the Activity's options menu and the navigation button will be wired through
 * the standard {@link android.#home home} menu select action.</p>
 *
 * <p>In order to use a Toolbar within the Activity's window content the application
 * must not request the window feature
 * {@link android.view.Window#FEATURE_ACTION_BAR FEATURE_SUPPORT_ACTION_BAR}.</p>
 *
 * @param toolbar Toolbar to set as the Activity's action bar, or {@code null} to clear it
 */
public void setSupportActionBar(@Nullable Toolbar toolbar) {
    getDelegate().setSupportActionBar(toolbar);
}
接下来我们要重写两个方法onCreateOptionsMenu()和onOptionsItemSelected()。
onCreateOptionsMenu()方法帮我们加载了toolbar.xml菜单文件。onOptionsItemSelected()响应了我们的点击。
@Override
public boolean onCreateOptionsMenu(Menu menu) {

    getMenuInflater().inflate(R.menu.toolbar,menu);
    return true;
}

public void showToast(String s){
    Toast.makeText(this,s,Toast.LENGTH_SHORT).show();
}

@Override
public boolean onOptionsItemSelected(MenuItem item) {
    switch (item.getItemId()){
        case .backup:
            showToast("you clicked backup");
            break;
        case .settings:
            showToast("you clicked settings");
            break;
        case .delete:
            showToast("you clicked delete");
            break;
        case .choose_1:
            showToast("you clicked choose_1");
            break;
        case .choose_2:
            showToast("you clicked choose_2");
            break;
        case .other1:
            showToast("you clicked other_1");
            break;
        case .other2:
            showToast("you clicked other_2");
            break;
    }
    return true;
}
在这里我们的菜单就可以刷新出来,而且还响应了我们的点击,在高级用法中我们在响应事件里可以做更多的事。
//-----------------------------------------------------------------------------------------------------------------------------
//-----------------ok,menu的用法大家已经差不多会用了接下来我们考虑一下微信那个效果怎么做-------------------------
其实大部分地方我们都不需要更改,只要在menu.XML里面改一改就可以了:
<?xml version="1.0" encoding="utf-8"?>
<menu xmlns:android="http:///apk/res/android"
    xmlns:app="http:///apk/res-auto">

    <item
        android:id="@+id/more"
        android:title="more"
        android:icon="@drawable/icon_plus"
        app:showAsAction="always">

        <menu>

            <item
                android:title="发起群聊"
                android:id="@+id/gourp_chart"
                app:showAsAction="never"/>
            <item
                android:title="添加好友"
                android:id="@+id/add_friends"
                app:showAsAction="never"/>
            <item
                android:title="扫一扫"
                android:id="@+id/scanner"
                app:showAsAction="never"/>
            <item
                android:title="收付款"
                android:id="@+id/about_money"
                app:showAsAction="never"/>
            <item
                android:title="帮助与反馈"
                android:id="@+id/help_and_feedback"
                app:showAsAction="never"/>

        </menu>


    </item>


</menu>
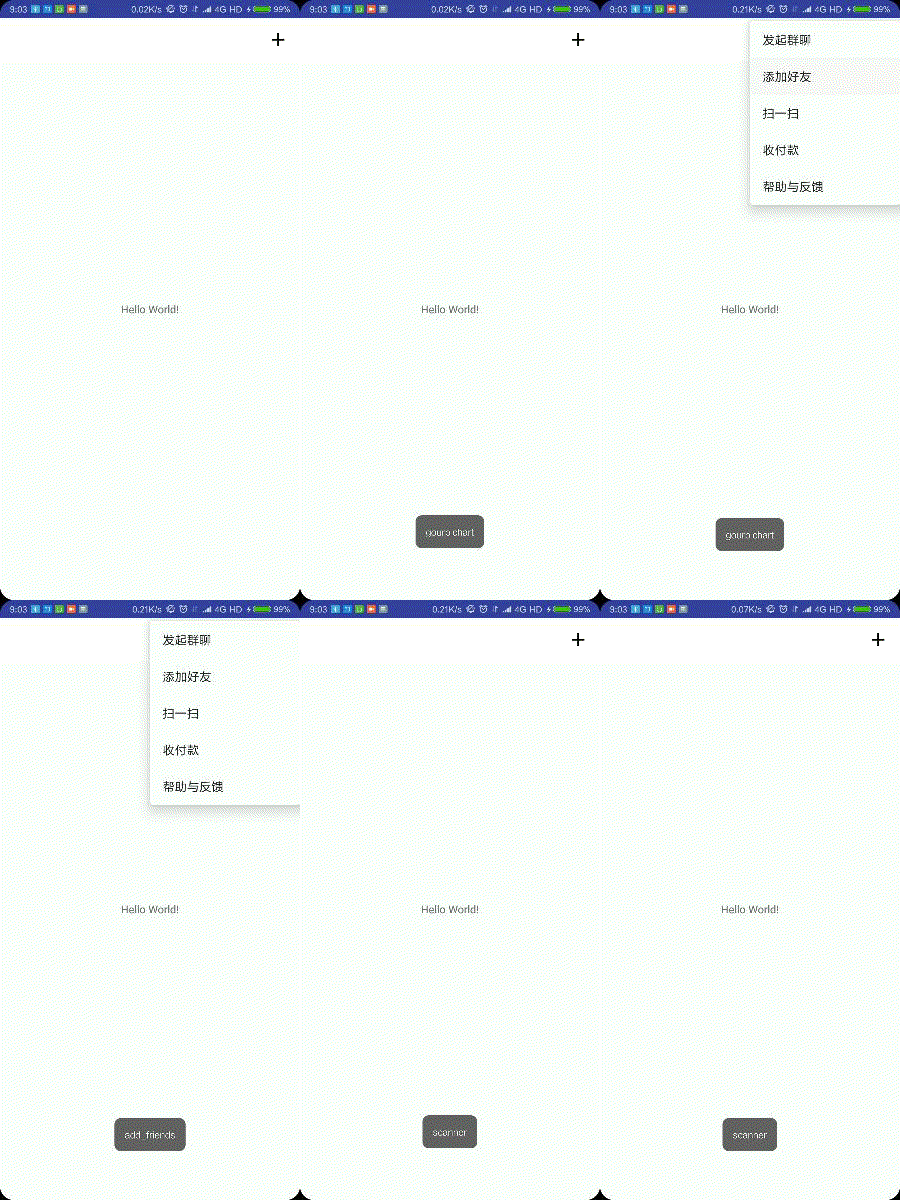
1、因为微信的效果是,右上角一个加号,然后点击出来一个列表即menu。所以来一个item_more,more里装menu,这样就可以了。
2、加号的效果我随便百度来了一张图,白底黑字,效果不太好看,所以有会的同学可以把颜色反转一下。
3、因为默认蓝底toolbar,很难看,所以我为了让他跟加号的底色相匹配,设置了底色。
<android.support.v7.widget.Toolbar
    android:id="@+id/toolbar"
    android:layout_width="match_parent"
    android:layout_height="wrap_content"
    android:background="#ffffff"
    android:theme="@style/ThemeOverlay.AppCompat.Dark.ActionBar"
    app:popupTheme="@style/ThemeOverlay.AppCompat.Light">
好啦,基本上就是这样的样式,至于菜单里的选项还有图标,我实在找不到这些图片而且随便胡一张上去意义也不大,所以就到此为止。接下来在main里面设置一下响应事件就好了。
BTW,因为toolbar的颜色变了,所以本来的白色字体可以另外设置。
下面给大家看下效果图:


