UITextField
一个UITextField对象在你的界面上显示一个可编辑的文本区域。你使用的文本字段收集文本输入使用屏幕键盘的用户。键盘是可配置的许多不同类型的输入,如纯文本,电子邮件,数字等。文本字段使用目标操作机制和一个委托对象来报告编辑过程中所做的更改。

UITextField,系统给我们提供了四中样式:

在使用上,我们可以使用系统提供样式,也可以自己定义。在使用上我们一般要注意键盘keyboardType和returnKeyType这两个属性,因为这两个在用户体验过伤会有比较大的影响。比如,一个手机号码输入框,我们不设置键盘类型,需要用户去切换,用户就会感觉不爽了。
func initUITextFeild(){
        let textFeild = UITextField.init()
        self.view.addSubview(textFeild)
        textFeild.frame = CGRectMake(60, 100, 200, 30) //UITextField的高度固定是30
        textFeild.clearButtonMode = UITextFieldViewMode.WhileEditing // 清除按钮模式
        textFeild.borderStyle = UITextBorderStyle.Line // 边框样式
        textFeild.secureTextEntry = true // 密文显示
        textFeild.placeholder = "我是UITextField" // 设置placeholder
        //设置placeholder的字体颜色
        textFeild.setValue(UIColor.blueColor(), forKeyPath: "placeholderLabel.textColor")
        textFeild.delegate = self // 关联代理
        textFeild.returnKeyType = UIReturnKeyType.Done  // 键盘右下角按钮类型
        textFeild.keyboardType = UIKeyboardType.NamePhonePad // 键盘类型
        textFeild.enabled = true // 是否可以编辑  true:可以编辑 false:不可以编辑  默认是true
        textFeild.font = UIFont.systemFontOfSize(15) // 字体大小
        textFeild.textColor = UIColor.redColor() // 字体颜色
        textFeild.textAlignment = NSTextAlignment.Center // 居中对齐
        // 左边图片
        let imageView = UIImageView.init(frame: CGRectMake(0, 0, 20, 20))
        imageView.image = UIImage.init(named: "2")
        textFeild.leftViewMode = UITextFieldViewMode.Always
        textFeild.leftView = imageView

//        textFeild.inputView // 自定义输入视图,可以是键盘
//        textFeild.inputAccessoryView // 自定义副键盘
    }
使用UITextField需要关联一个他的代理UITextFieldDelegate,在实际中,当我们不要他的代理事件的时候,我们可以不关联代理和实现代理方法。
//MARK: UITextFieldDelegate
    func textFieldShouldBeginEditing(textField: UITextField) -> Bool {
        print("textFieldShouldBeginEditing")
        return true   // true:可以编辑 false:不可以编辑 和enabled功能相似
    }
    func textFieldDidBeginEditing(textField: UITextField) {
        print("textFieldDidBeginEditing")
    }
    func textFieldShouldEndEditing(textField: UITextField) -> Bool {
        print("textFieldShouldEndEditing")
        return true // true:可以结束编辑 false:不可以结束编辑
    }
    func textFieldDidEndEditing(textField: UITextField) {
        print("textFieldDidEndEditing")
    }
    func textFieldShouldClear(textField: UITextField) -> Bool {
        print("textFieldShouldClear")
        return true
    }
    func textFieldShouldReturn(textField: UITextField) -> Bool {
        if textField.returnKeyType ==  UIReturnKeyType.Done{
            print("UIReturnKeyType.Done")
            textField.resignFirstResponder() // 收起键盘
        }
        print("text = \(textField.text)") // 打印输入的数据
        return true
    }
    func textField(textField: UITextField, shouldChangeCharactersInRange range: NSRange, replacementString string: String) -> Bool {
        print("shouldChangeCharactersInRange")
        return true
    }
在这里
//MARK:
是Swift里面的一个代码标记方法,类似于OC里面的#program mark -

但是个人觉得,由于不能联想,没有OC里面的Mark好使用。
UITextView(placeholder的制作)
一种文本视图接受并显示多行文本。文本视图支持滚动和文本编辑。您通常使用一个文本视图来显示大量的文本,例如电子邮件信息的主体。

UITextView在使用子和UITextField差不多,很多时候我们需要自己做类似UITextField的placeholder,其实我们只需要知道UITextView的几个代理方法的执行顺序就大概知道怎么做了,这里提供一种做法,还要更好的做法,大家可以自己去尝试。
func initUITextView(){
        let textView = UITextView.init()
        textView.frame = CGRectMake(60, 160, 200, 200)
        self.view.addSubview(textView)
        textView.layer.borderWidth = 1 // 设置边框 宽度
        textView.layer.borderColor = UIColor.grayColor().CGColor // 设置边框颜色
        textView.keyboardType = UIKeyboardType.EmailAddress // 键盘类型
        textView.returnKeyType = UIReturnKeyType.Done // 键盘右下键 按钮类型
        textView.delegate = self
        textView.showsVerticalScrollIndicator = false // 不显示垂直 滑动线
        textView.showsHorizontalScrollIndicator = false // 不显示 水平滑动线

//        textView.inputView // 自定义输入视图,可以是键盘
//        textView.inputAccessoryView // 自定义副键盘
        // 制作placeholder
        self.placeholderLabel = UILabel.init() // placeholderLabel是全局属性
        self.placeholderLabel.frame = CGRectMake(5 , 5, 100, 20)
        self.placeholderLabel.font = UIFont.systemFontOfSize(13)
        self.placeholderLabel.text = "我是placeholder"
        textView.addSubview(self.placeholderLabel)
        self.placeholderLabel.textColor = UIColor.init(colorLiteralRed: 72/256, green: 82/256, blue: 93/256, alpha: 1)
    }
UITextView也有几个代理方法:
//MARK: UITextViewDelegate
    func textViewShouldBeginEditing(textView: UITextView) -> Bool {
        print("textViewShouldBeginEditing")
        self.placeholderLabel.hidden = true // 隐藏
        return true
    }
    func textViewDidBeginEditing(textView: UITextView) {

    }
    func textViewShouldEndEditing(textView: UITextView) -> Bool {
        print("textViewShouldEndEditing")
        return true
    }
    func textViewDidEndEditing(textView: UITextView) {
        if textView.text.isEmpty {
            self.placeholderLabel.hidden = false  // 显示
        }
        else{
            self.placeholderLabel.hidden = true  // 隐藏
        }
        print("textViewDidEndEditing")
    }
    func textViewDidChange(textView: UITextView) {
        print("textViewDidChange")
    }
    func textView(textView: UITextView, shouldChangeTextInRange range: NSRange, replacementText text: String) -> Bool {
        print("shouldChangeTextInRange")
        if text == "\n"{ // 输入换行符时收起键盘
           textView.resignFirstResponder() // 收起键盘
        }
        return true
    }
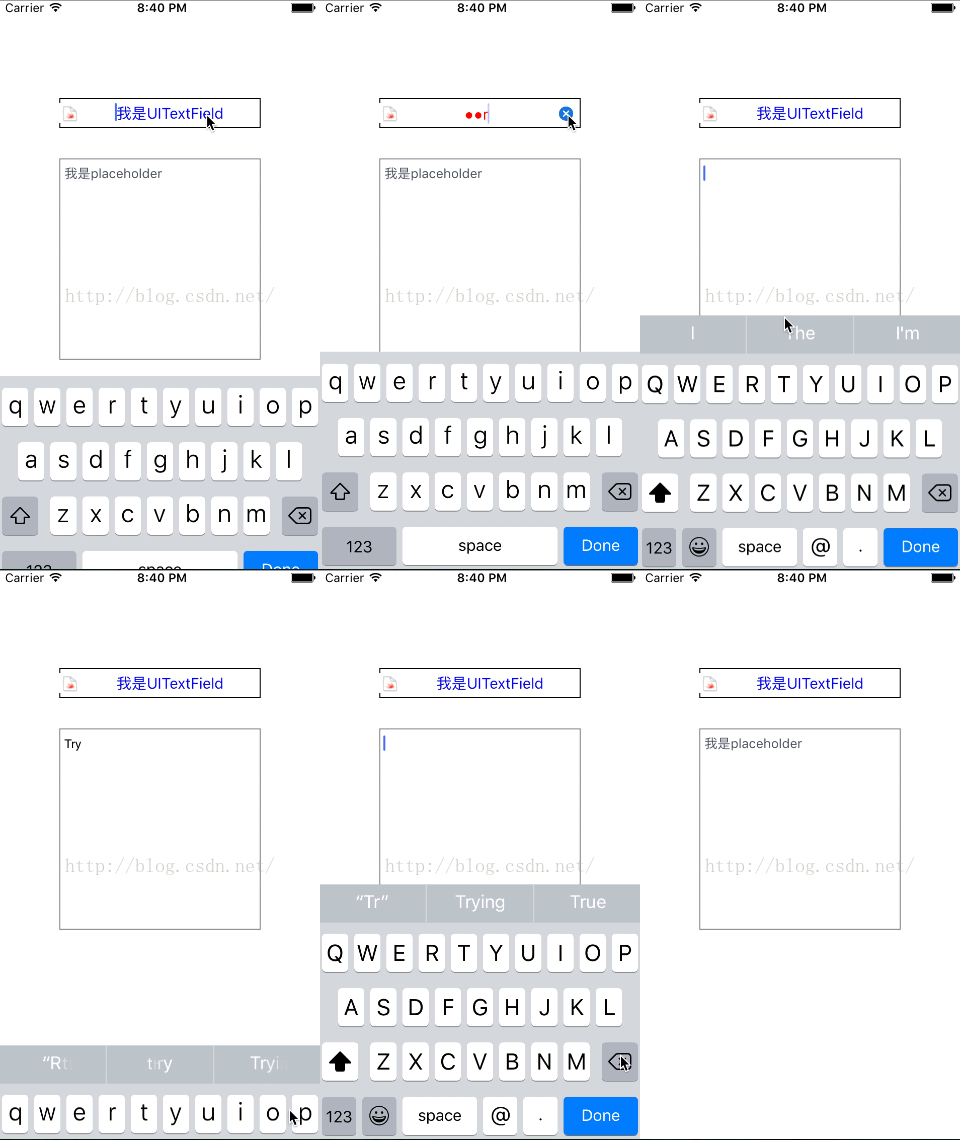
使用效果图:


