Au Design
AU Design是一种设计语言,是极光旗下⽤户体验中心推出(Jiguang Experience Design)简称JED,是一个综合体验设计团队,专业涵盖交互设计、视觉设计、效果⼴告设计等,负责极光全线产品的创意与体验设计,通过体验设计赋能业务。JED秉承做极致设计的理念,致力于打造一流的To B综合体验设计团队。

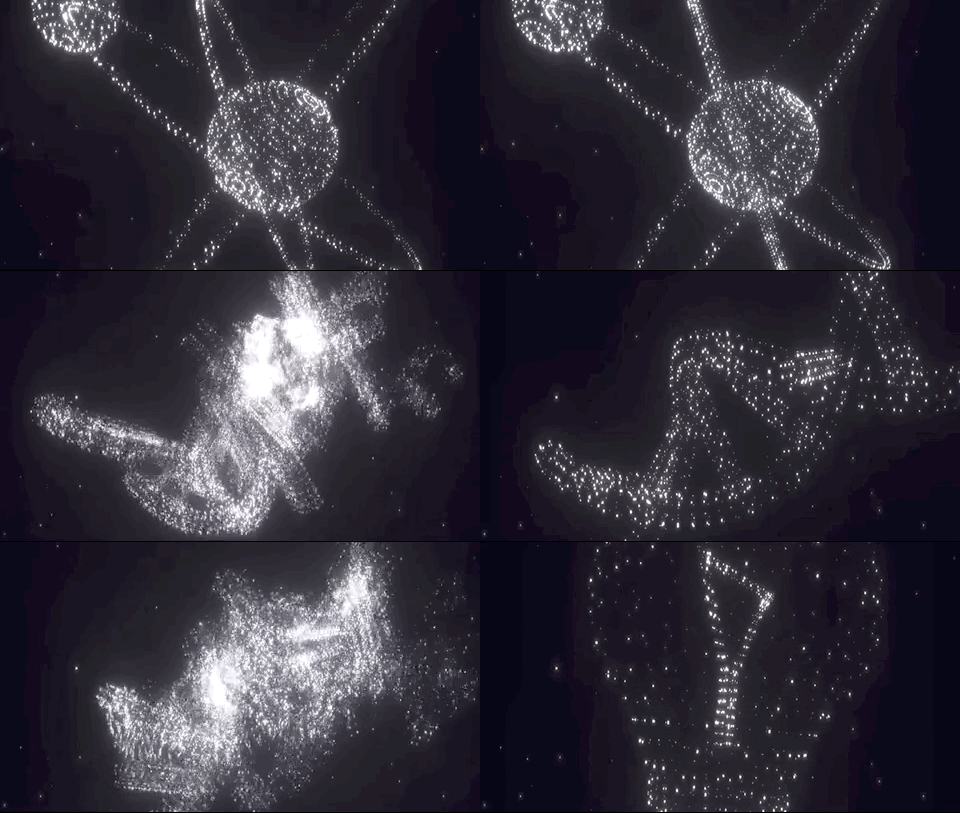
讲了这么多顶点着色器,片元着色器这些东西,终于来到有意思的部分了。来制作一个全程60fps的炫光动效模型切换效果。这个效果有CUP渲染跟GPU渲染两种实现,不过顶点太多的话,用CUP渲染性能下滑就会很严重。
分析特征
这个特效是由以下几种变换合成出来的
- 粒子平滑位移变换
- 粒子尺寸平滑变大或缩小
- 粒子透明度随Z轴变小而降低
- 辉光特效后处理
下面先来看看这个插件类的大概结构是长什么样的,其中涉及的着色器,模型,参数传递等等细节这里就不再啰嗦了。
结构
首先这个插件类继承了上两篇讲到并封装好的工具类,接下来会一步步实现当中的功能。
// ModelControl.ts
export default class ModelControl extends ThreeTool{
    // 模型列表
    public modelList: Array<IModel> = [];
    // 记录当前模型
    public currentModelIndex = 0;

    //...
    constructor(){
        super({
          canvas: document.getElementById("canvasFrame") as HTMLCanvasElement,
          container: document.getElementById("canvasWrap") as HTMLCanvasElement,
          mode: "dev",
          clearColor: new THREE.Color("#000"),
        });
    }
    //...
    // 生成粒子材质
    private createMainMaterial(){}

    // 生成默认几何体,用于之后保存粒子/顶点位置坐标
    private createInitGeometry(){}

    // 生成缓存模型
    private createInitModel(){}

    // 将当前模型切换至模型列表中的指定模型
    public changeModelByIndex(){}

    // 自动切换模型
    public autoPlay(){}

    // 加载自定义模型
    public async loaderModel(){}

    //...
}
复制代码这时候由于有工具类ThreeTool的帮助,我们不再需要关心相机,灯光,尺寸等等东西。
实现细节
- 由于是模型的切换特效,在任意时刻只存在一个模型即可。
- 模型保存有当前的顶点坐标
position与需要切换到的目标模型目标targetPosition,这之间的互相覆盖可以达到模型切换的效果。 - 在着色器中维护粒子的状态,使用GPU渲染。
- 使用一个列表去保存模型,方便循环切换。
- 使用Tweenjs生成连续的时间片段。
粒子运动
可以想象一下一个点在T时间内从A坐标移动到B坐标,那怎么表示出来?先理一下思路,其实就是在每一个时间间隔就从A向B方向前进一点点,最终到达B坐标的位置。在三维空间中也是一样的,只是将点的坐标分解到xyz三个维度而已。
这整个过程又有两种解法
- 第一种直观的解法是用
总时间T除以两点之间距离D求出速率S,每一帧就增加S*time这么多的距离。 - 第二种就是在AB坐标之间做线性变换,每一帧坐标的位置就是
xA + (xB - xA) * val,其中val的取值范围在[0,1]之间,这个val可以理解为变化速率。因为时间变化是线性的,直接这样使用的效果就是线性变换。如果觉得线性变换太过生硬,可以通过调整val的变化速率,做出各种缓动效果。
比如使用
xA + (xB - xA) * pow(val,2)就可以做出先慢后快的效果

两种解法其实本质是一样,只是第二种写法上更加简洁一些,下面来看看用第二种解法写的CPU与GPU渲染方案。
CPU渲染
render((time)=>{
    const val = (time * 0.0001) % 1;
    const x = xA + (xB - xA) * val;
    const y = yA + (yB - yA) * val;
    const z = zA + (zB - zA) * val;
    point.position.set(x,y,z);
})
复制代码
GPU渲染
uniform float uTime;
attribute vec3 targetPosition;

void main() {
  vec3 cPosition;
  cPosition.x = position.x + (targetPosition.x - position.x) * uTime;
  cPosition.y = position.y + (targetPosition.y - position.y) * uTime;
  cPosition.z = position.z + (targetPosition.z - position.z) * uTime;

  gl_PointSize = 2.
  gl_Position = projectionMatrix * modelViewMatrix * vec4(cPosition, 1.0);
}
复制代码
这里只要使用一段连续的时间变化即可做出平滑的运动效果
随机闪动
由于每个粒子/顶点的空间坐标都不一样,可以使用他们的空间坐标生成初始状态,比如这样cPosition.x*cPosition.y*cPosition.z。
粒子大小
粒子大小的平滑变化离不开sin/cos函数的帮助,其实就是调制成下图这样的波形。

gl_PointSize = (sin(cPosition.x*cPosition.y*cPosition.z+uTime)+1.)*2.;
复制代码
粒子渐变
跟粒子大小变化相同的思路,只是需要微调一下,透明度需要根据Z轴变小而降低。
float opacity = ((vZIndex+150.)/300.) - sin(curPos.z*curPos.x*curPos.y+uTime) + 0.3;
复制代码
炫光特效
炫光特效使用到的是后处理技术。这里简单来讲就是使用了threejs内置的炫光着色器,LuminosityHighPassShader,可以在shaders目录下找到。自己去写炫光着色器也是可以的,但没必要去重复造轮子。
// UnrealBloomPass的参数
// resolution: 炫光所覆盖的场景大小
// strength: 炫光的强度
// radius: 炫光散发的半径
// threshold: 炫光的阈值(场景中的光强大于该值就会产生炫光效果)
// 渲染函数的具体细节可以去看第一篇《关于封装Threejs工具类这档事》
public bloomRender(){
  const renderScene = new RenderPass(this.scene, this.camera);
  // 通道创建
  const bloomPass = new UnrealBloomPass(
    new THREE.Vector2(window.innerWidth, window.innerHeight),
    1.5,
    0.5,
    0.2
  );
  bloomPass.renderToScreen = true;
  bloomPass.strength = 1.5;
  bloomPass.radius = 0.5;
  bloomPass.threshold = 0.2;

  const composer = new EffectComposer(this.renderer);
  composer.setSize(window.innerWidth, window.innerHeight);
  composer.addPass(renderScene);
  // 通道bloomPass插入到composer
  composer.addPass(bloomPass);

  const render = (time: number) => {
    if (this.resizeRendererToDisplaySize(this.renderer)) {
      const canvas = this.renderer.domElement;
      this.css2drenderer.setSize(canvas.clientWidth, canvas.clientHeight);
      this.camera.aspect = canvas.clientWidth / canvas.clientHeight;
      this.camera.updateProjectionMatrix();
    }
    this.css2drenderer.render(this.scene, this.camera);
    composer.render();
    const t = time * 0.001;
    requestAnimationFrame(render);
  };
  render(0);
};
复制代码
模型加载
将模型加载到模型列表,同时统计顶点数最多的模型。
public loaderModel(geoPList: Array<Promise<IModel>>) {
  const modelList = await Promise.all(geoPList);
  this.modelList = modelList;
  const maxCount = Math.max(
    ...modelList.map((item) => item.attributes.position.count)
  );
  this.positionCache = new Float32Array(maxCount * 3);
  return modelList;
}
复制代码
模型切换
根据模型列表的下标去改变模型。将目标模型的顶点坐标覆盖到缓存模型的targetPosition中,在传入时间变化后this.tween.start(),粒子模型的各个顶点坐标将从当前坐标position变化到targetPosition。
public changeModelByIndex(current: number){
  this.currentModelIndex = current;
  const originModel = this.originModel;
  const targetModel = this.modelList[current];
  const targetPosition = targetModel.attributes.position.array;
  const positionCache = this.positionCache;

  // 上一次切换的目标坐标覆盖当前坐标
  if (originModel.geometry.attributes.targetPosition) {
    const position = new Float32Array(
      originModel.geometry.attributes.targetPosition.array
    );
    originModel.geometry.setAttribute(
      "position",
      new THREE.BufferAttribute(position, 3)
    );
    originModel.material.uniforms.uVal.value = 0;
  }
  // 覆盖目标模型的坐标
  for (let i = 0, j = 0; i < positionCache.length; i++, j++) {
    j %= targetPosition.length;
    positionCache[i] = targetPosition[j];
  }

  originModel.geometry.setAttribute(
    "targetPosition",
    new THREE.BufferAttribute(positionCache, 3)
  );

  // 生成时间变化
  this.tween.start();
  this.tween.onComplete(() => {
    this.currentVal.uVal = 0;
  });
  return originModel;
};
复制代码
自动播放
设置定时器,自动调用模型切换方法。
public autoPlay(time: number = 8000, current?: number){
  if (current !== undefined) {
    this.currentModelIndex = current;
  }

  const timer = setInterval(() => {
    this.changeModelByIndex(this.currentModelIndex);
    this.currentModelIndex =
      (this.currentModelIndex + 1) % this.modelList.length;
  }, time);
  this.timer = timer;
  return timer;
};
复制代码
结束
到这里为止,一个酷炫的粒子效果变换插件就完成了。下一篇会介绍各种着色器函数的使用已经能达到的效果《关于使用着色器内置函数与相关特效这档事》。


