1.官方文档
https://developer.android.com/reference/androidx/constraintlayout/classes
android系统中定义了一系列类,辅助ConstraintLayout 完成较复杂功能,如定边界线、分组、分层、排列等等。它们大多数都是直接继承ConstraintHelper,间接继承View,它们大多数都是不不完整的view.
- 不绘制onDraw为空
- 默认大小为0(mUseViewMeasure默认为fasle,自定义的时候可改)
- 无事件
- Layer、Flow有些例外

简介如下:
类 | 基类 | 功能 |
View | ConstraintLayout 基本介绍,包含位置、大小等约束。 | |
View ConstraintHelper | This class controls the visibility of a set of referenced widgets. 用来把多个view约定为同一分组,通过控制Group对象的可见性,能同时控制组内多个view的可见性。 | |
ConstraintHelper | | |
ConstraintHelper | A Barrier references multiple widgets as input, and creates a virtual guideline based on the most extreme widget on the specified side. | |
View | Utility class representing a Guideline helper object for ConstraintLayout | |
ConstraintHelper VirtualLayout | Flow virtual layout. | |
ImageView ImageButton AppCompatImageButton | An ImageButton that can display, combine and filter images. | |
ImageView AppCompatImageView | An ImageView that can display, combine and filter images. | |
MockView | View | A view that is useful for prototyping layouts. |
MotionLayout | ConstraintLayout | A subclass of ConstraintLayout for building animations. |
2.实用尺寸约束
2.1 尺寸的计算方式
- Fixed 固定大小
- Wrap Content 自适应大小
- Match Constraints 取最大可用值
- 宽/高 比例约束 一个方向为Match Constraints,另一个方向由比值计算
在未限定 宽/高比约束 情况时,点下图中箭头指的线就可以设置宽、高的计算模式。


图1. Fixed 图2. Wrap Content 图3. Match Constraints约束
2.2 layout_goneMarginStart
当左边依赖的view为GONE时,这个边距依然有效,不会向左移动。
2.3 layout_constraintWidth_min
仅当 Match Constraints 时有意义,用它指定一个最小宽度,它可取的值如下:
- dp
1     <TextView
2         android:layout_width="0dp"
3         android:layout_height="48dp"
4         app:layout_constraintWidth_min="16dp"
5         app:layout_constraintEnd_toEndOf="parent"
6         app:layout_constraintStart_toStartOf="parent"
7         app:layout_constraintWidth_percent="0.00001"
8 .../>- "wrap",此时和 android:layout_width="wrap_content" 一样
1     <TextView
2         android:layout_width="0dp"
3         android:layout_height="48dp"
4         app:layout_constraintWidth_min="wrap"
5         app:layout_constraintWidth_percent="0.0000001"
6         app:layout_constraintEnd_toEndOf="parent"
7         app:layout_constraintStart_toStartOf="parent"
8         />
其它事项
- 当 android:layout_width="wrap_content" 时使用android:minWidth,这时layout_constraintWidth_min无效
- app:layout_constraintWidth_max 与它同理
2.4 app:layout_constraintWidth_default
仅当约束为Match Constraints 时,它有意义,可取值的如下:
- percent 按百分比计算大小
- wrap 在限定的范围内自适应大小,内容不保证能完全显示。
- spread (默认) 取可用最大值
其中 app:layout_constraintWidth_default="wrap" 与 android:layout_width="wrap_content" 的对比如下图:

1     <TextView
 2         android:layout_width="0dp"
 3         android:layout_height="24dp"
 4         android:text="width default wrap faasdfasdfasdfasdfasdfasdf"
 5         app:layout_constraintEnd_toEndOf="@+id/ratioView4"
 6         app:layout_constraintStart_toStartOf="@+id/ratioView4"
 7         app:layout_constraintWidth_default="wrap"
 8         ... />
 9
10     <TextView
11         ...
12         android:layout_width="wrap_content"
13         android:layout_height="24dp"
14         android:text="layout_width = wrap_content faasdfasdfasdfasdfasdfasdf"
15         app:layout_constraintEnd_toEndOf="@+id/ratioView4"
16         app:layout_constraintStart_toStartOf="@+id/ratioView4"
17         ... />
2.5 app:layout_constraintWidth_percent
仅当约束为Match Constraints 时,它有意义,约定宽度是按照百分比计算,它的值是浮点数,表示百分比,如
1   <TextView
2         android:layout_width="0dp"
3         app:layout_constraintWidth_percent="0.2" .../>
2.6 app:layout_constraintDimensionRatio
当宽、高以 Match Constraints 方式计算时,此属性约定宽高按比值计算, 比值形式如下:
- "浮点数值"
app:layout_constraintDimensionRatio="1.5"- "宽:高"
app:layout_constraintDimensionRatio="3:1"- “H,浮点数值” 或者 "W,浮点数值"
app:layout_constraintDimensionRatio="W,2.5"W表示宽度通过比值计算得来,H表示高度通过比值计算得来- "H,宽:高" 或者 “W,宽:高”
app:layout_constraintDimensionRatio="W,2.5:1"W与H的含义与上方一样
其它事项
- W,H可以小写,
- 虽然是字符串,下面的都是错的
app:layout_constraintDimensionRatio="H,1.2:3:1"app:layout_constraintDimensionRatio="2:1a"app:layout_constraintDimensionRatio="world 2:1"app:layout_constraintDimensionRatio="w,2 ,h,1"等等
3.实用位置约束
3.1 角度对齐
按角度对齐控件,layout_constraintCircle、layout_constraintCircleRadius、layout_constraintCircleAngle 合在一起使用
<TextView
        android:id="@+id/pivot" .../>

    <TextView
        app:layout_constraintCircle="@+id/pivot"
        app:layout_constraintCircleAngle="60"
        app:layout_constraintCircleRadius="48dp"
        ... />
layout_constraintCircleAngle 取值是 0-360 ,顺时针。
官方图解如下:


3.2 链式对齐
多个控件组成一个链,app:layout_constraintVertical_chainStyle 和app:layout_constraintVertical_chainStyle 可指定它们之间的排列方式,可取的值有
- spread 默认 ,均匀分布
- spread_inside ,首尾图固定在链两端,中间的均匀分布
- packed 紧密向中心排列在一起
3.4 GuideLine
辅助类,相关属性
- android:orientation="horizontal" 指定方向
- app:layout_constraintGuide_percent="0.5" 百分比
- app:layout_constraintGuide_begin="32dp"
- app:layout_constraintGuide_end="32dp"
其中 layout_constraintGuide_percent和app:layout_constraintGuide_begin 等 都是相对根布局的,示例如下:
1         <androidx.constraintlayout.widget.Guideline
2             android:id="@+id/center_line"
3             android:layout_width="wrap_content"
4             android:layout_height="wrap_content"
5             app:layout_constraintGuide_percent="0.50"
6             android:orientation="horizontal" />
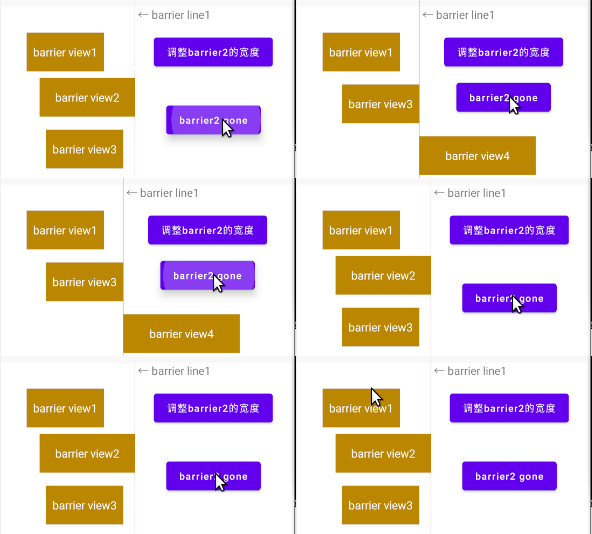
3.3 Barrier
给一组控件的最外边添加一条隐藏的边界线, 并且自己适应哪个控件的外边是最外边。其它控件可依赖这条线。
官方图示:

示例:
1     <androidx.constraintlayout.widget.Barrier
2         android:layout_width="wrap_content"
3         android:layout_height="wrap_content"
4         app:barrierDirection="end"
5         app:barrierAllowsGoneWidgets="true"
6         app:constraint_referenced_ids="barrier1,barrier2,barrier3"
7         />
app:barrierDirection="end" ,边界线的方位,取值:start end,top,bottom,left,right
app:constraint_referenced_tags="tag1,tag2" ,值是view的tag
app:constraint_referenced_ids="barrierView1,barrierView2,barrierView3",值只能是view的id,不能是group,layer,barrier等id
app:barrierAllowsGoneWidgets="true" ,这个属性的原文如下
If the barrier references GONE widgets, the default behavior is to create a barrier on the resolved position of the GONE widget.
If you do not want to have the barrier take GONE widgets into account, you can change this by setting the attribute
barrierAllowsGoneWidgets to false (default being true).
并没有看到true和false区别

代码如下:
1     <androidx.constraintlayout.widget.Barrier
2         ...
3         android:id="@+id/barrier1"
4         app:barrierDirection="end"
5         app:barrierAllowsGoneWidgets="false"
6         app:constraint_referenced_ids="barrierView1,barrierView2,barrierView3"
7         />
4.Group
4.1 简介
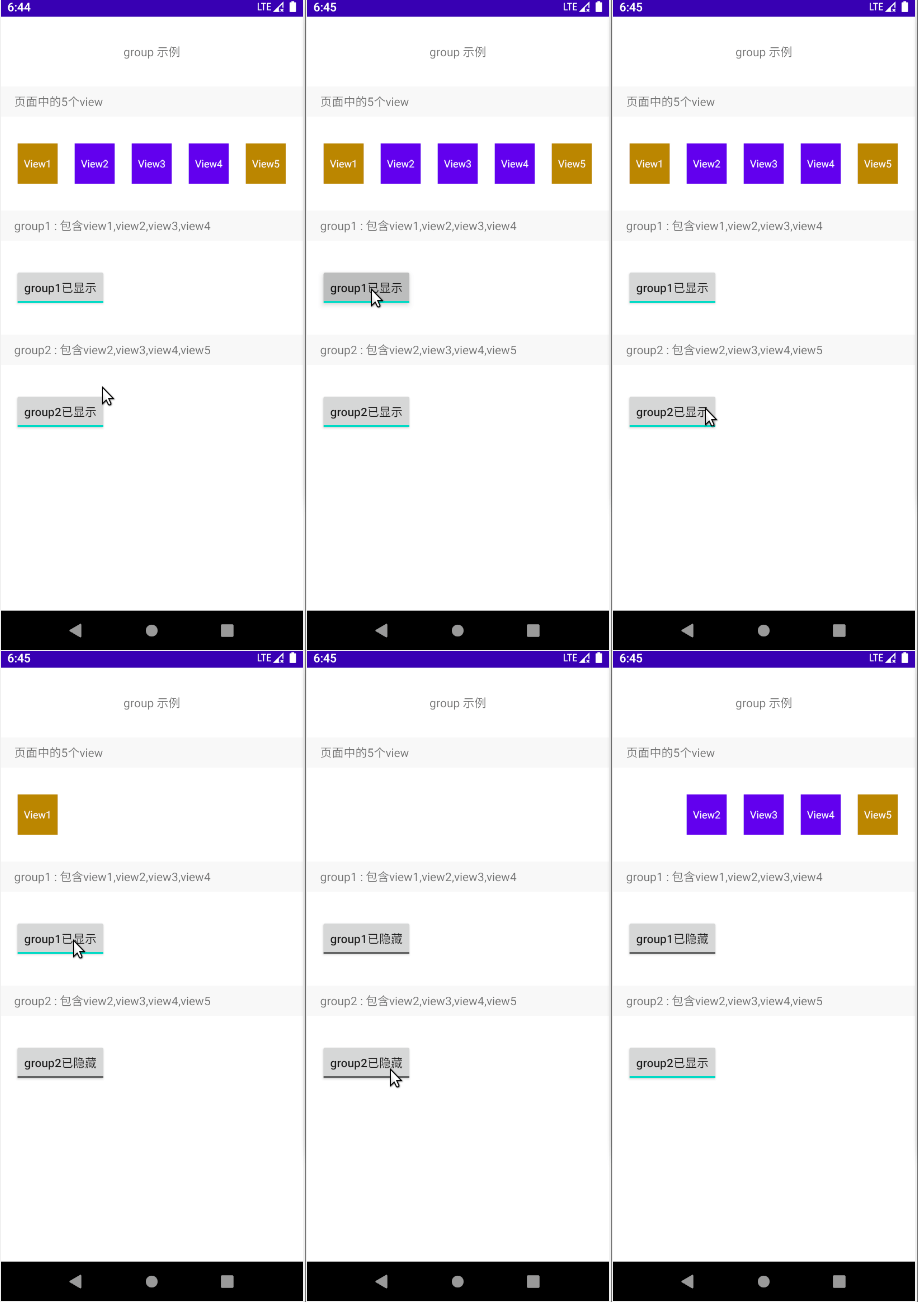
- 把多个view在约定为同一分组,通过控制Group对象的可见性,能同时控制组内多个view的可见性,不用分别操作每个view对象。
- 它是View的子类,但在界面中不显示,onDraw方法为空,颜色、事件等无意义。
- 宽高在layout中不能省略。
- 同一个view可加入到多个组中,该view的可见性由最后操作的那个组对象决定。
4.2 示例

- group1 对象 包含:view1,view2,view3,view4,这几个view,对它操作同时影响组内view
- goup2 对象同理
- view2,view3,view4同时在goup1,group2中,假设代码中有分别对group1,group2可见性的操作,那么最后一个操作决定它们3个的可见性。
代码
1     <TextView
 2         android:id="@+id/groupView1"
 3         android:text="View1"
 4         app:layout_constraintTag="view1".../>
 5
 6     <TextView
 7         android:id="@+id/groupView2"
 8         android:text="View2"
 9         app:layout_constraintTag="view2"... />
10
11     <TextView
12         android:id="@+id/groupView3"
13         android:text="View3"
14         app:layout_constraintTag="view3"... />
15
16     <TextView
17         android:id="@+id/groupView4"
18         android:text="View4"
19         app:layout_constraintTag="view4" .../>
20
21     <androidx.constraintlayout.widget.Group
22         android:id="@+id/group1"
23         android:layout_width="match_parent"
24         android:layout_height="48dp"
25         app:constraint_referenced_ids="groupView1,groupView2,groupView3,groupView4"
26 ... />- group 通过 app:constraint_referenced_ids 指定view的Id来分组
- 也可以通过 constraint_referenced_tags 来分组(这时要求控件要使用app:layout_constraintTag声明一个tag)
app:constraint_referenced_tags="view1,view2,view3,view4"- 同组内重复的控件id或者tag只算一个,且没有顺序要求
- id列表的只能基本它控件的id,layer、group、barrier、flow等不可以,tag同理。
按钮的事件,操作一个group对象就可以,不用分别操作4个对象。
1     private fun onGroup1BtnChanged(btn : CompoundButton, isChecked : Boolean){
2         binding.group1.visibility = if (isChecked) View.VISIBLE else View.INVISIBLE
3     }
5.Layer
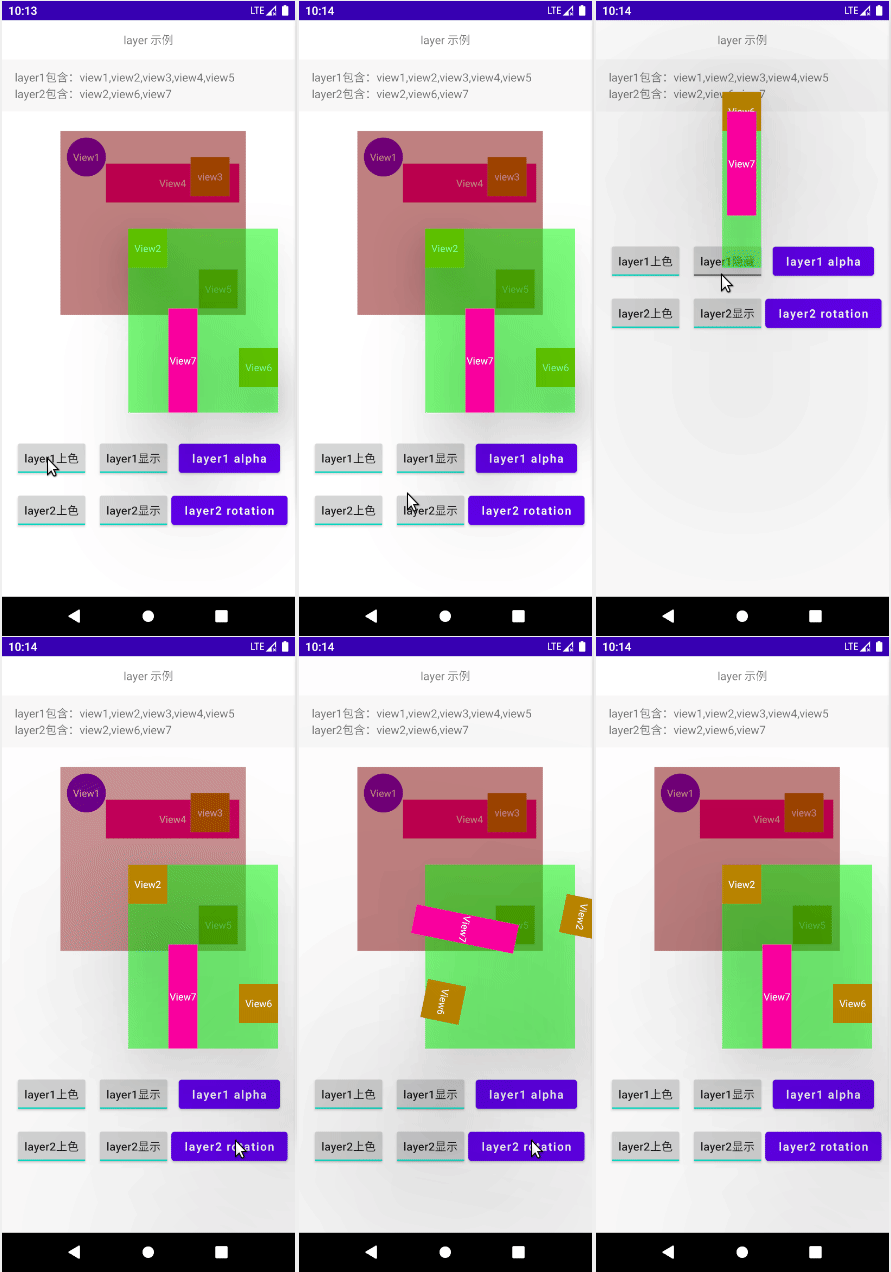
把一些控件组合在一起,当作一个图层,该图层自动计算边界,也是View的子类,但是功能不是完整的。
5.1 示例

1     <androidx.constraintlayout.helper.widget.Layer
 2         android:id="@+id/layer1"
 3         android:layout_width="match_parent"
 4         android:layout_height="match_parent"
 5         android:layout_marginTop="32dp"
 6         android:padding="8dp"
 7         android:visibility="visible"
 8         app:constraint_referenced_ids="layerView1,layerView2,layerView3,layerView4,layerView5"
 9         app:layout_constraintEnd_toEndOf="parent"
10         app:layout_constraintStart_toStartOf="parent"
11         app:layout_constraintTop_toBottomOf="@+id/textView4" />
1 <androidx.constraintlayout.helper.widget.Layer
2 android:id="@+id/layer2"
3 android:layout_width="match_parent"
4 android:layout_height="0dp"
5 android:elevation="48dp"
6 app:layout_constraintDimensionRatio="H,16:9"
7 app:layout_goneMarginTop="32dp"
8 app:constraint_referenced_ids="layerView2,layerView7,layerView6,layerView7"
9 app:layout_constraintEnd_toEndOf="parent"
10 app:layout_constraintStart_toStartOf="parent"
11 app:layout_constraintTop_toBottomOf="@+id/layerView7" />5.2 支持的操作
- 设置背景色
- 支持elevation属性
- 设置可见性
- 支持补间动画(alpha 是layer1动,scale,rotation,transaction是其中的每个控件同时动)
- 多个图层同时包含同一个控件
- 图层本身支持事
- 支持padding、不支持margin、不支持大小
6.Flow
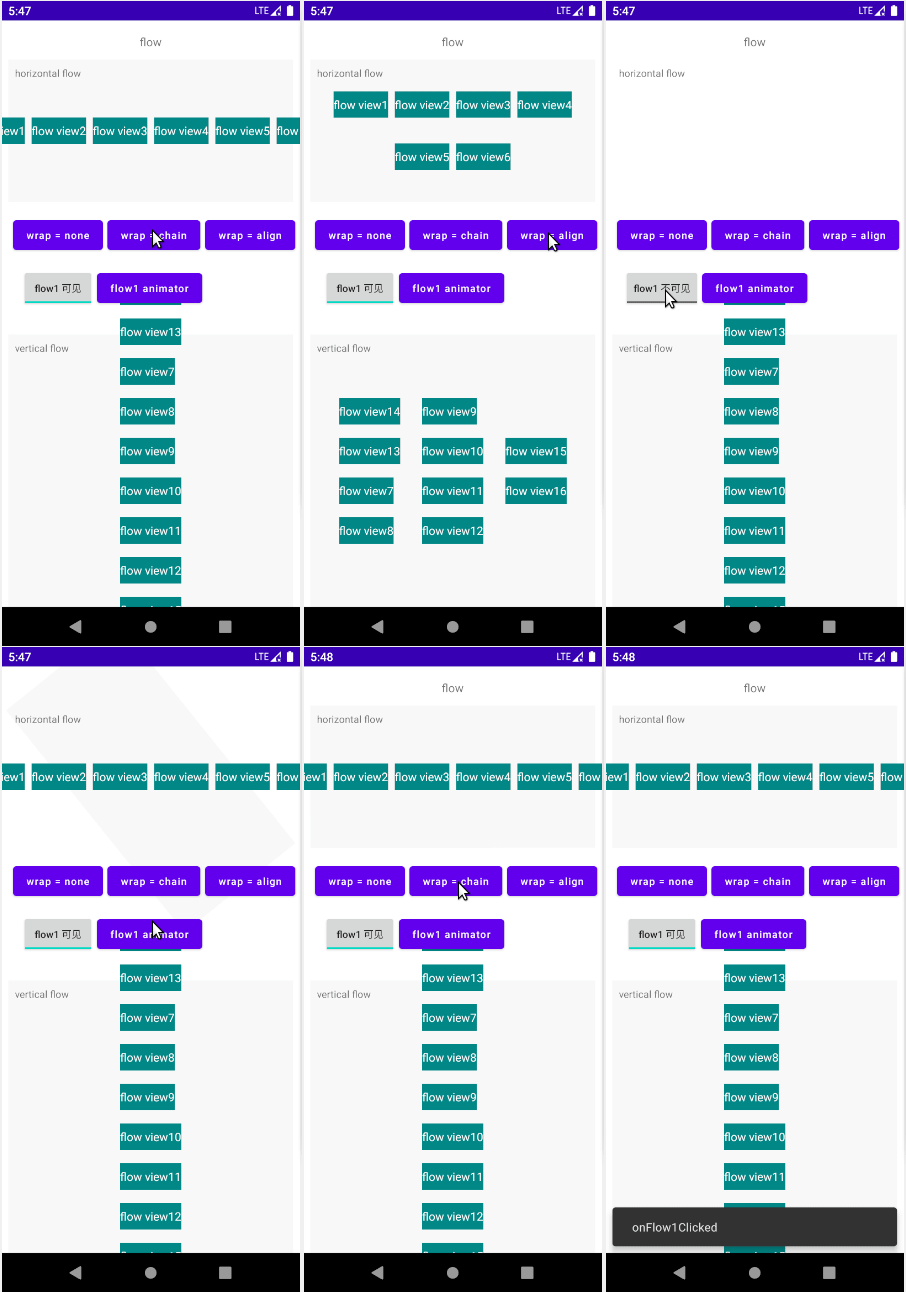
把一组控件按添加的流顺序一个接在一个后面,有横向、竖向两个方向,它是一个View但是比其它辅助类有更多的功能。
6.1 示例

flow1 代码:
1     <androidx.constraintlayout.helper.widget.Flow
 2         android:id="@+id/flow1"
 3         android:layout_width="0dp"
 4         android:layout_height="0dp"
 5         android:layout_marginStart="8dp"
 6         android:layout_marginLeft="8dp"
 7         android:layout_marginTop="12dp"
 8         android:layout_marginEnd="8dp"
 9         android:layout_marginRight="8dp"
10         android:background="#fff8f8f8"
11         android:orientation="horizontal"
12         android:padding="8dp"
13         android:visibility="visible"
14         app:flow_wrapMode="none"
15         app:constraint_referenced_ids="flowView1,flowView2,flowView3,flowView4,flowView5,flowView6"
16         app:flow_horizontalGap="8dp"
17         app:flow_horizontalBias="0.5"
18         app:flow_horizontalStyle="packed"
19         app:layout_constraintDimensionRatio="h,2:1"
20         app:layout_constraintEnd_toEndOf="parent"
21         app:layout_constraintStart_toStartOf="parent"
22         app:layout_constraintTop_toBottomOf="@+id/flowTitle" />
flow2 代码:
1 <androidx.constraintlayout.helper.widget.Flow
 2         android:id="@+id/flow2"
 3         android:layout_width="0dp"
 4         android:layout_height="0dp"
 5         android:layout_marginStart="8dp"
 6         android:layout_marginLeft="8dp"
 7         android:layout_marginTop="32dp"
 8         android:layout_marginEnd="8dp"
 9         android:layout_marginRight="8dp"
10         android:background="#f8f8f8"
11         android:padding="16dp"
12         android:visibility="visible"
13         android:orientation="vertical"
14         app:constraint_referenced_ids="flowView14,flowView13,flowView7,flowView8,flowView9,flowView10,flowView11,flowView12,flowView15,flowView16"
15         app:flow_horizontalAlign="start"
16         app:flow_horizontalGap="8dp"
17         app:flow_maxElementsWrap="4"
18         app:flow_verticalGap="16dp"
19         app:flow_verticalStyle="packed"
20         app:flow_wrapMode="aligned"
21         app:layout_constraintBottom_toBottomOf="parent"
22         app:layout_constraintEnd_toEndOf="parent"
23         app:layout_constraintStart_toStartOf="parent"
24 app:layout_constraintTop_toBottomOf="@+id/flow_1_visible" />- app:constraint_referenced_ids 指定引用的控件id或其它Flow 的id等,也可以通过tag引用
被引用的控件原来的方位约束会失效
按引用的顺序排列- app:flow_wrapMode指定控件排列时自适应方式,不同方式可用的配套属性也不一样。
- android:orientation 指定Flow的方向
6.1.1 app:flow_wrapMode = none(默认)
不自适应,不换行,超过的部分不显示,支持的属性如下:
- low_horizontalStyle = "spread|spread_inside|packed"
- flow_verticalStyle = "spread|spread_inside|packed"
- flow_horizontalBias = "float"
仅在 app:flow_horizontalStyle="packed" 时有效,控件链在Flow内显示的位置比例值,取值0-1app:flow_horizontalBias="0" 时

app:flow_horizontalBias="1"

- flow_verticalBias = "float"
道理同上- flow_horizontalGap = "dimension"
竖直排放控件时,控件的间距- flow_verticalGap = "dimension"
道理同上- flow_horizontalAlign = "start|end"
当flow为horizontal时,指定每个控件的对齐方式- flow_verticalAlign = "top|bottom|center|baseline
道理同上6.1.2 app:flow_wrapMode = chain
链式自适应换行,第1列/行 可以与其它列/行按不同样式排列,属性在none基础上新加如下几个:
- flow_firstVerticalStyle
指定第一列的排列方式,可选值 [ spread、packed、spread_inside ]- flow_firstHorizontalStyle
- flow_firstHorizontalBias
- flow_firstVerticalBias
- flow_maxElementsWrap
每行/列最大控件数6.1.3 app:flow_wrapMode = aligned
行列式自适应换行且对齐,属性在chain基础上减去首行相关的样式,如下
- flow_firstVerticalStyle
- flow_firstHorizontalStyle
- flow_firstHorizontalBias
- flow_firstVerticalBias
6.2 支持的操作
- 设置大小、背景、margin、padding
- 添加事件
- 控制可见性
- 动画(只对flow对象,而是不是对其引用的控件)
- 引用的Id也可以是其它Flow的id
7.ImageFilterView、ImageFilterButton
它们是带有简单滤镜的ImageView和ImageButton
对比效果如下:

代码如下:
1     <androidx.constraintlayout.utils.widget.ImageFilterView
 2         android:id="@+id/imageFilterView"
 3         ...
 4         android:background="@color/imageBg"
 5         android:src="@drawable/th"
 6         app:saturation="2"
 7         app:brightness="2"
 8         app:warmth="3"
 9         app:contrast="2"
10         app:crossfade="2"
11         app:roundPercent="1"
12         app:overlay="true"
13         />
14
15
16     <androidx.constraintlayout.utils.widget.ImageFilterButton
17         android:id="@+id/imageFilterButton"
18         ...
19         app:srcCompat="@drawable/th"
20         android:background="@color/imageBg"
21         app:saturation="0"
22         app:brightness="0"
23         app:warmth="5"
24         app:contrast="1"
25         app:crossfade="1"
26         app:roundPercent="0.3"
27         app:round="16dp"
28         app:overlay="true"
29         />
支持的滤镜或效果如下
altSrc | Provide and alternative image to the src image to allow cross fading |
saturation | Sets the saturation of the image. 0 = grayscale, 1 = original, 2 = hyper saturated |
brightness | Sets the brightness of the image. 0 = black, 1 = original, 2 = twice as bright |
warmth | This adjust the apparent color temperature of the image. 1=neutral, 2=warm, .5=cold |
contrast | This sets the contrast. 1 = unchanged, 0 = gray, 2 = high contrast |
crossfade | Set the current mix between the two images. 0=src 1= altSrc image |
round | (id) call the TransitionListener with this trigger id 不改图片加圆角 |
roundPercent | Set the corner radius of curvature as a fraction of the smaller side. For squares 1 will result in a circle 可以在不改变原图的情况下,实现圆角头像 |
overlay | Defines whether the alt image will be faded in on top of the original image or if it will be crossfaded with it. Default is true. Set to false for semitransparent objects |
8.本文源码
https://github.com/f9q/constraint2


