oauth2支持授权的方式有四种:授权码模式(authorization_code)、密码模式(password)、隐式模式(implicit)、客户端模式(client_credentials)。其中,比较常见的就是授权码模式和密码模式。
需要说明的是,授权码模式的过程大致如下:
1、封装参数,访问授权服务器登录与授权接口
   接口:http://localhost:8080/oauth/authorize
   参数:response_type client_id scope redirect_uri state
   返回值:code
2、拿到code,获取token
   接口:http://localhost:8080/oauth/token
   参数:client_id client_secret grant_type code redirect_uri state
   返回值:access_token
3、根据token,访问资源
   接口:http://localhost:8080/api/test/hello
   参数:access_token
密码模式的过程如下:
1、根据用户名密码等参数直接获取token
   接口:http://localhost:8080/oauth/token
   参数:username password grant_type client_id client_secret redirect_uri
   返回值:access_token
2、根据token,访问资源
   接口:http://localhost:8080/api/test/hello
   参数:access_token
可以看出,授权码模式和密码模式有些区别,授权码模式多了一步就是登陆。密码模式直接把用户名和密码交给授权服务器了,所以不用再人为登陆,这也要求用户非常信任该应用。
下面我们通过代码来实际感受一下他们的使用以及区别:
也是构建一个项目,这里就不用分开授权服务和资源服务,统一放在一起:
项目依赖主要还是security和oauth2:
<parent>
	<groupId>org.springframework.boot</groupId>
	<artifactId>spring-boot-starter-parent</artifactId>
	<version>2.1.4.RELEASE</version>
</parent>

<dependencies>
	<dependency>
		<groupId>org.springframework.boot</groupId>
		<artifactId>spring-boot-starter-web</artifactId>
	</dependency>
	<dependency>
		<groupId>org.springframework.boot</groupId>
		<artifactId>spring-boot-starter-security</artifactId>
	</dependency>
	<dependency>
		<groupId>org.springframework.security.oauth</groupId>
		<artifactId>spring-security-oauth2</artifactId>
		<version>2.3.4.RELEASE</version>
	</dependency>
</dependencies>
项目结构:

主要的代码:
AuthServerConfiguration.java
package org.oauthsample.config;
import org.springframework.beans.factory.annotation.Autowired;
import org.springframework.context.annotation.Configuration;
import org.springframework.http.HttpMethod;
import org.springframework.security.authentication.AuthenticationManager;
import org.springframework.security.crypto.password.PasswordEncoder;
import org.springframework.security.oauth2.config.annotation.configurers.ClientDetailsServiceConfigurer;
import org.springframework.security.oauth2.config.annotation.web.configuration.AuthorizationServerConfigurerAdapter;
import org.springframework.security.oauth2.config.annotation.web.configuration.EnableAuthorizationServer;
import org.springframework.security.oauth2.config.annotation.web.configurers.AuthorizationServerEndpointsConfigurer;
import org.springframework.security.oauth2.config.annotation.web.configurers.AuthorizationServerSecurityConfigurer;
@Configuration
@EnableAuthorizationServer
public class AuthServerConfiguration extends AuthorizationServerConfigurerAdapter{
	@Autowired
	private AuthenticationManager authenticationManager;
	@Autowired
	private PasswordEncoder passwordEncoder;

	@Override
	public void configure(AuthorizationServerEndpointsConfigurer endpoints) throws Exception {
		endpoints.authenticationManager(authenticationManager);
		endpoints.allowedTokenEndpointRequestMethods(HttpMethod.GET,HttpMethod.POST);
	}

	@Override
	public void configure(AuthorizationServerSecurityConfigurer security) throws Exception {
		security.realm("oauth2-resources")
				.tokenKeyAccess("permitAll()")
				.checkTokenAccess("isAuthenticated()")
				.allowFormAuthenticationForClients();
	}

	@Override
	public void configure(ClientDetailsServiceConfigurer clients) throws Exception {
		clients.inMemory()
			   .withClient("client")
			   .secret(passwordEncoder.encode("secret"))
			   .redirectUris("http://example.com")
			   .authorizedGrantTypes("authorization_code","password","refresh_token","implicit","client_credentials")
			   .scopes("all")
			   .autoApprove(true)
			   .resourceIds("oauth2-resource")
			   .accessTokenValiditySeconds(1200)
			   .refreshTokenValiditySeconds(50000);
	}
}
授权配置,这里指定了四种授权方式,外加一个刷新令牌(refresh_token)的方式,这个是在令牌(token)失效的情况下无需重新走一遍全部流程,只需要做一次刷新请求即可获得新的access_token。
ResourceServerConfiguration.java
package org.oauthsample.config;
import org.springframework.context.annotation.Configuration;
import org.springframework.security.config.annotation.web.builders.HttpSecurity;
import org.springframework.security.oauth2.config.annotation.web.configuration.EnableResourceServer;
import org.springframework.security.oauth2.config.annotation.web.configuration.ResourceServerConfigurerAdapter;
@Configuration
@EnableResourceServer
public class ResourceServerConfiguration extends ResourceServerConfigurerAdapter{
	@Override
	public void configure(HttpSecurity http) throws Exception {
		http.authorizeRequests()
			.antMatchers("/api/**").hasRole("ADMIN")
			.antMatchers("/test/**").authenticated()
			.anyRequest().authenticated();
	}
}
资源服务器设置了/api/**下的接口访问需要用户登录授权,还需要ADMIN角色,而/test/**仅仅需要用户登录授权即可。
SecurityConfiguration.java
package org.oauthsample.config;
import org.springframework.context.annotation.Bean;
import org.springframework.context.annotation.Configuration;
import org.springframework.security.authentication.AuthenticationManager;
import org.springframework.security.config.annotation.authentication.builders.AuthenticationManagerBuilder;
import org.springframework.security.config.annotation.web.builders.HttpSecurity;
import org.springframework.security.config.annotation.web.configuration.EnableWebSecurity;
import org.springframework.security.config.annotation.web.configuration.WebSecurityConfigurerAdapter;
import org.springframework.security.core.userdetails.User;
import org.springframework.security.core.userdetails.UserDetailsService;
import org.springframework.security.crypto.bcrypt.BCryptPasswordEncoder;
import org.springframework.security.crypto.password.PasswordEncoder;
import org.springframework.security.provisioning.InMemoryUserDetailsManager;
@Configuration
@EnableWebSecurity
//@Order(1)
public class SecurityConfiguration extends WebSecurityConfigurerAdapter{
	@Bean
	public PasswordEncoder passwordEncoder() {
		return new BCryptPasswordEncoder();
	}

	@Override
	@Bean
	public AuthenticationManager authenticationManagerBean() throws Exception {
		return super.authenticationManagerBean();
	}

	@Override
	protected UserDetailsService userDetailsService() {
		InMemoryUserDetailsManager manager = new InMemoryUserDetailsManager();
		manager.createUser(User.withUsername("admin").password(passwordEncoder().encode("admin")).roles("ADMIN").build());
		manager.createUser(User.withUsername("user").password(passwordEncoder().encode("123456")).roles("USER").build());
		return manager;
	}

	@Override
	protected void configure(AuthenticationManagerBuilder auth) throws Exception {
		auth.userDetailsService(userDetailsService()).passwordEncoder(passwordEncoder());
	}


	@Override
	protected void configure(HttpSecurity http) throws Exception {
		http.httpBasic().and()
			.authorizeRequests()
			.antMatchers("/oauth/**","/login")
			.permitAll()
			.anyRequest()
			.authenticated()
			//.and()
			//.formLogin()
			.and()
			.csrf().disable();
	}

}
Security配置了两个用户,一个ADMIN角色,另外一个USER角色,稍作区分,为后面的测试做准备。
HelloController.java
package org.oauthsample.web;
import org.springframework.web.bind.annotation.GetMapping;
import org.springframework.web.bind.annotation.RequestMapping;
import org.springframework.web.bind.annotation.RestController;
@RestController
@RequestMapping("/api/test")
public class HelloController {
	@GetMapping("/hello")
	public String hello() {
		return "hello,authenticated() with role ADMIN.";
	}
}
TestController.java
package org.oauthsample.web;

import org.springframework.web.bind.annotation.GetMapping;
import org.springframework.web.bind.annotation.RequestMapping;
import org.springframework.web.bind.annotation.RestController;
@RestController
@RequestMapping("/test")
public class TestController {

	@GetMapping("/hello")
	public String hello() {
		return "hello,authenticated().";
	}
}
这里两个测试接口,分别对应资源服务中设置的权限/api/test/hello不仅需要用户登录授权,还需要ADMIN角色,而/test/hello只需要用户登录授权即可,不需要角色。
Application.java
package org.oauthsample;
import org.springframework.boot.SpringApplication;
import org.springframework.boot.autoconfigure.SpringBootApplication;
@SpringBootApplication
public class Application {
    public static void main( String[] args ){
        SpringApplication.run(Application.class, args);
    }
}
application.yaml
server:
  port: 8080
默认端口可以不用配置。
代码准备完毕,可以运行起来,然后进行相关的测试:
我个人不太理解的是,这些个模式下的验证,理论上如果实现了,肯定都是代码来运行,而不是人为的去通过浏览器或者postman来获取参数,并且验证接口请求是否满足权限要求。
因为授权码模式需要在浏览器上进行登录,所以这里需要借助浏览器,另外一些post请求就借助postman来发送,所以呢需要的测试工具就是浏览器和postman。
先来看看直接访问接口:http://localhost:8080/test/hello或者http://localhost:8080/api/test/hello


因为都需要access_token参数才能访问,所以我们先获取,第一种通过authorization_code即授权码模式来获取:
http://localhost:8080/oauth/authorize?response_type=code&state=123456&client_id=client&scope=all&redirect_uri=http://example.com
这里有个参数state,他并不是一个必须的参数,有的文章说是用来防止攻击的,他可以是任意值。
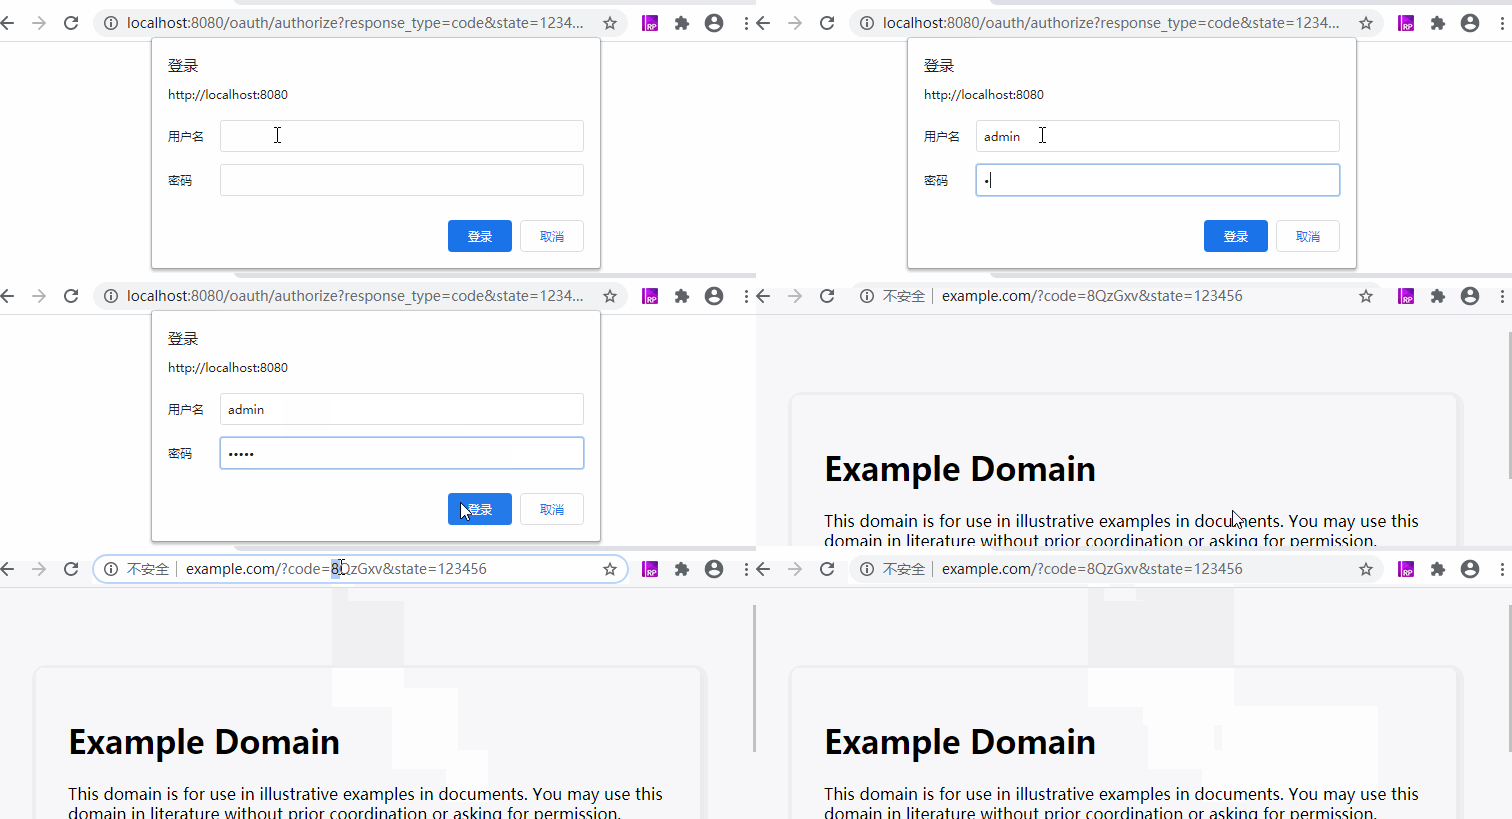
通过浏览器访问以上地址,第一次没有登录,会弹出登录提示框,输入用户名密码(admin/admin),然后会跳到redirect_uri参数指定的页面,这里是http://example.com,地址栏会携带参数code。如下所示:
http://example.com/?code=8QzGxv&state=123456
以上过程截图如下:

拿到code,我们在postman中发送post请求到http://localhost:8080/oauth/token接口,并携带如下参数:client_id,client_secret,grant_type,code,state,redirect_uri参数。

这时候,我们再将access_token=9536a51d-a597-415a-8aac-a220202ae460参数带上,分别访问接口/api/test/hello和/test/hello,看看效果:

因为是ADMIN角色,所以两个接口都可以访问。

我们再通过user/123456用户登录授权,获取的access_token来看看访问的效果:

返回的code是:zBY5RP,请求获取token

利用这个access_token,分别访问两个接口,得到结果:
访问普通登录授权即可的接口时,是OK的:

当访问需要ADMIN角色的接口时,报访问拒绝错误。

***********密码模式验证(password)********************************************************************
密码模式我们都通过postman来测试,就不需要浏览器了。我们看看结果就好:
开始的时候,不带参数access_token访问两个接口:

首先通过postman访问接口http://localhost:8080/oauth/token,参数就是grant_type,username,password,client_id,client_secret,redirect_uri。与authorization_code授权方式不同的是,这里的grant_type=password,而且增加了参数client_secret,和username,password,这就是密码模式的授权方式。

利用这个access_token=b02a9a11-1674-4bef-aaae-f334e973bbfd分别访问/api/test/hello和/test/hello接口也都正常:

另一个接口:

我们使用user/123456用户密码获取access_token:

得到的access_token=72f55af7-aa77-4af5-9e80-fcf6d1095bbe,通过该令牌,我们访问/api/test/hello与/test/hello接口:

访问需要ADMIN角色的接口,访问受限,而普通用户授权的就可以:

以上,通过大篇幅的测试,验证了authorization_code与password两种授权方式的可行性,以及他们的区别,还有两种模式下不同用户访问不同接口的不同响应。
在此,我也是体验了通过spring-boot与spring-security、spring-security-oauth2实现 oauth2的效果。个人对oauth2的理解也非常浅显,虽然验证了,但是还有很多不明白之处,尤其是资源服务器和权限管理之间启动的先后顺序,我们关注到,其实security和resource都有关于权限的部分,他们都会拦截请求url。
另外,这里虽然使用security实现了oauth2授权,但是在授权码模式下,用户登录并不是一个页面表单的形式,而是一个弹出框的表单形式,这一点我很诧异。


