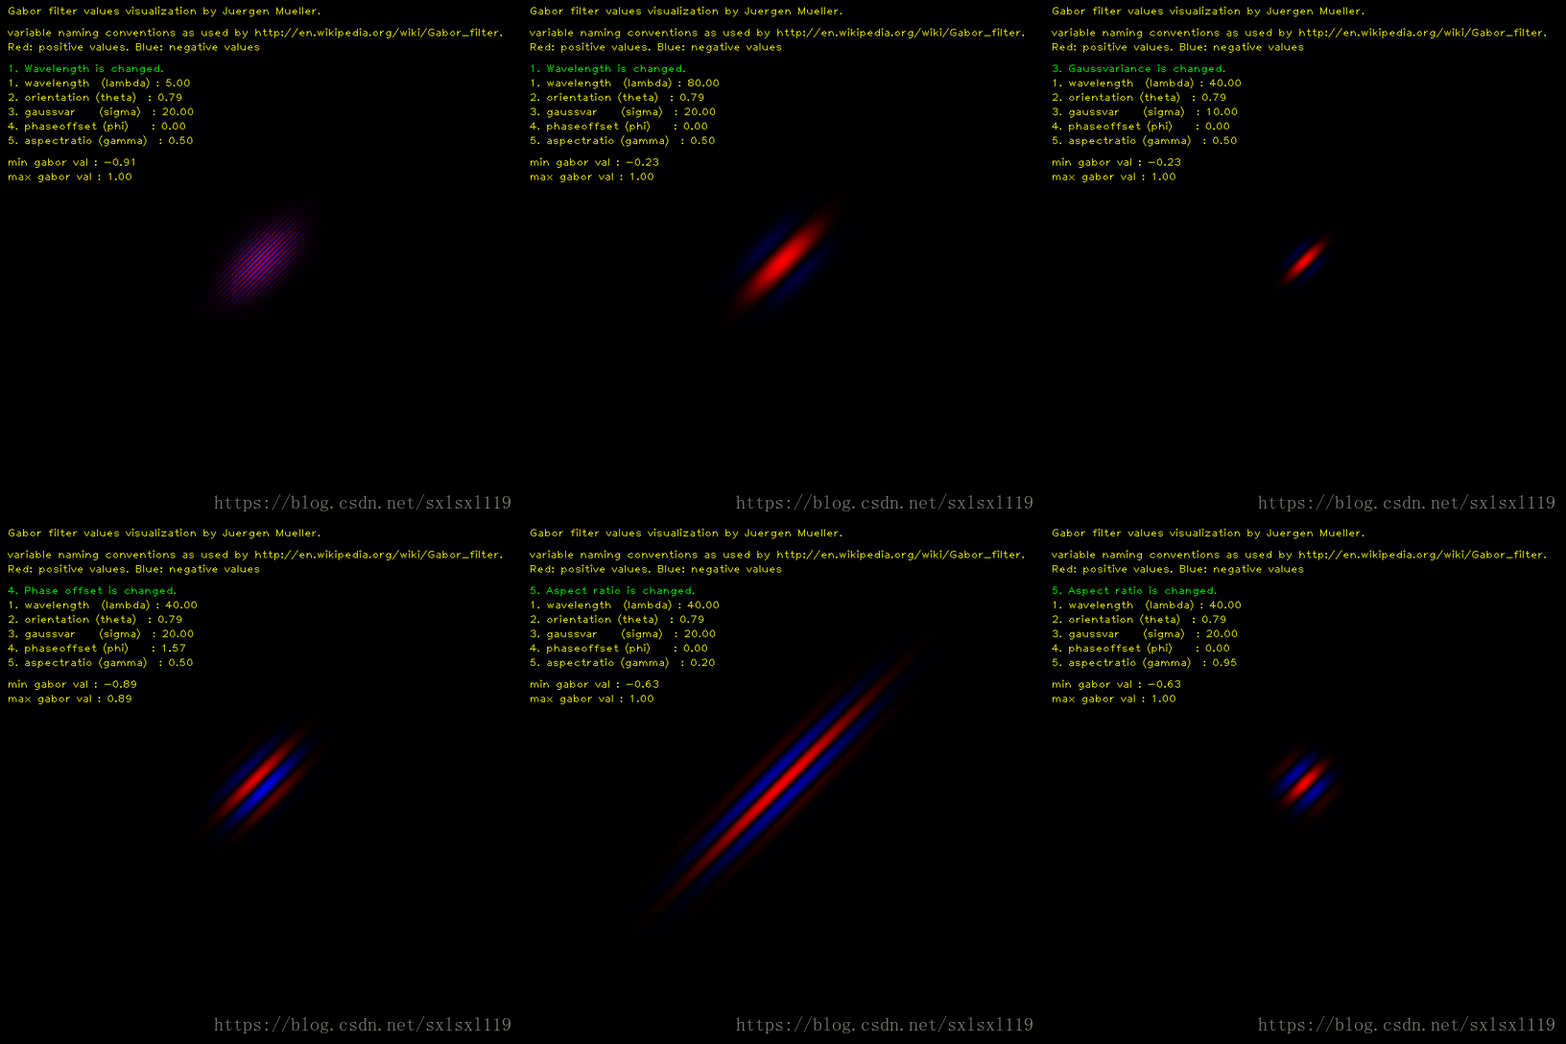
Gabor是一个用于边缘提取的线性滤波器,其频率和方向表达与人类视觉系统类似,能够提供良好的方向选择和尺度选择特性,而且对于光照变化不敏感,因此十分适合纹理分析。
理论和C++版本的Gabor实现看:
gabor参数说明:
波长(λ):它的值以像素为单位指定,通常大于等于2.但不能大于输入图像尺寸的五分之一。通常用的是它的倒数频率f大于等于0.2。
方向(θ):这个参数指定了Gabor函数并行条纹的方向,它的取值为0到360度
相位偏移(φ):它的取值范围为-180度到180度。其中,0he180度分别对应中心对称的center-on函数和center-off函数,而-90度和90度对应反对称函数。
长宽比(γ):空间纵横比,决定了Gabor函数形状(support,我翻译为形状)的椭圆率(ellipticity)。当γ= 1时,形状是圆的。当γ< 1时,形状随着平行条纹方向而拉长。
还有一个σ,它的话,在代码实现里常常是滤波器大小的一半。
在实际使用gabor的话,一般用的是它的实数部分。
这里用一张程序运行动态图可以清楚的显示出Gabor滤波核随各个参数变化的情况,

说一下环境,windows 10 64位系统,OpenCV版本为3.4.7, python 版本为3.6,IDE为 pycharm
# -*- coding: utf-8 -*-
import os
import cv2
import numpy as np
import pylab as pl
import random

def BuildGaborKernels(ksize = 5,lamda = 1.5,sigma = 1.0):
    '''
    @description:生成多尺度,多方向的gabor特征
    @参数参考opencv
    @return:多个gabor卷积核所组成的
    @author:SXL
    '''
    filters = []
    for theta in np.array([0,np.pi/4, np.pi/2,np.pi*3/4]):
        kern = cv2.getGaborKernel((ksize,ksize),sigma,
                theta,lamda,0.5,0,ktype=cv2.CV_32F)
        #kern /= 1.5*kern.sum()
        filters.append(kern)
    pl.figure(1)
    for temp in range(len(filters)):
        pl.subplot(4, 4, temp + 1)
        pl.imshow(filters[temp], cmap='gray')
    pl.show()
    return filters

def GaborFeature(image):
    '''
    @description:提取字符图像的gabor特征
    @image:灰度字符图像
    @return:滤波后的图
    @author:SXL
    '''
    # retval,binary = cv2.threshold(image,0,255,cv2.THRESH_OTSU)
    kernels = BuildGaborKernels(ksize = 7,lamda = 8,sigma = 4)
    dst_imgs = []
    for kernel in kernels:
        img = np.zeros_like(image)
        tmp = cv2.filter2D(image,cv2.CV_8UC3,kernel)
        img = np.maximum(img,tmp,img)
        dst_imgs.append(img)

    pl.figure(2)
    for temp in range(len(dst_imgs)):
        pl.subplot(4,1,temp+1) #第一个4为4个方向,第二个4为4个尺寸
        pl.imshow(dst_imgs[temp], cmap='gray' )
    pl.show()
    return dst_imgs


#字符图像的特征提取方法
#要求:1.无关图像大小;2.输入图像默认为灰度图;3.参数只有输入图像
def GetImageFeatureGabor(image):
    '''
    @description:提取经过Gabor滤波后字符图像的网格特征
    @image:灰度字符图像
    @return:长度为64字符图像的特征向量feature
    @author:SXL
    '''
    #----------------------------------------
    #图像大小归一化
    image = cv2.resize(image,(64,64))
    img_h = image.shape[0]
    img_w = image.shape[1]
    #----------------------------------------

    #-----Gabor滤波--------------------------
    resImg=GaborFeature(image)
    #-----Gabor滤波--------------------------

    #-----对滤波后的图逐个网格化提取特征-------
    feature = np.zeros(64)        # 定义特征向量
    grid_size=4
    imgcount=0
    for img in resImg:
        # 二值化
        retval, binary = cv2.threshold(img, 0, 255, cv2.THRESH_OTSU)
        imgcount+=1
        # pl.figure("dog")
        # pl.imshow(binary)
        # pl.show()

        # 计算网格大小
        grid_h = binary.shape[0] / grid_size
        grid_w = binary.shape[1] / grid_size
        for j in range(grid_size):
            for i in range(grid_size):
                # 统计每个网格中黑点的个数
                grid = binary[int(j * grid_h):int((j + 1) * grid_h), int(i * grid_w):int((i + 1) * grid_w)]
                feature[j * grid_size + i+(imgcount-1)*grid_size*grid_size] = grid[grid == 0].size

    return feature


#可以读取带中文路径的图
def cv_imread(file_path,type=0):
    cv_img=cv2.imdecode(np.fromfile(file_path,dtype=np.uint8),-1)
    if(type==0):
        cv_img = cv2.cvtColor(cv_img, cv2.COLOR_BGR2GRAY)
    return cv_img

#扫描输出图片列表
def eachFile(filepath):
    list = []
    pathDir = os.listdir(filepath)
    for allDir in pathDir:
        child = os.path.join(filepath, allDir)
        list.append(child)
    return list

#--------------批量读图------------------------------------------
list=eachFile(r"D:\sxl\处理图片\汉字分类\testImage/")
count1=0
# 读图
ImgFeatures=[]
ImgLabels=[]
for filename in list:
    # image = cv2.imread(filename, 0)
    image = cv_imread(filename,0)
    # 获取特征向量,传入灰度图
    feature = GetImageFeatureGabor(image)
结果展示如下:
4个滤波器核

滤波结果


