最近在写vue的项目中,遇到一个需求,点击编辑,显示弹框,在弹框中的富文本编辑器中编辑自定义文本样式,可以上传图片并回显。编辑完成确定后显示在页面上。


首先先写一个editor.vue的页面。(建议单独写一个页面,以后有其他需要用到的地方直接引用就可以了,另外我使用的wangeditor是4.3.0版本的,3.x.x版本是editor.customConfig.menus={}的方式创建)
<template>
  <div>
    <div ref="editor"></div>
  </div>
</template>

<script>
import E from 'wangeditor';
export default {
  name: 'editor',
  data() {
    return {};
  },
  props: {
    value: '',
  },
  mounted() {
    let editor = new E(this.$refs.editor);
    editor.config.menus = [
      'bold', // 粗体
      'fontSize', // 字号
      'fontName', // 字体
      'italic', // 斜体
      'underline', // 下划线
      'strikeThrough', // 删除线
      'foreColor', // 文字颜色
      'link', // 插入链接
      'list', // 列表
      'justify', // 对齐方式
      'quote', // 引用
      'image', // 插入图片
      'location', // 位置
    ];
    editor.config.onchange = html => {
      this.$emit('input', html);
    };
    editor.config.uploadImgServer = '图片上传地址';
    editor.config.uploadImgMaxSize = 10 * 1024 * 1024; // 将图片大小限制为 10M
    editor.config.uploadFileName = 'file'; //后端接受上传文件的参数名
    editor.config.uploadImgMaxLength = 1; // 限制一次最多上传 1 张图片
    editor.config.showLinkImg = false; //隐藏网络图片上传
    editor.config.uploadImgHooks = {
      fail: (xhr, editor, result) => {
        // 插入图片失败回调
        console.log(result);
      },
      success: (xhr, editor, result) => {
        // 图片上传成功回调
        console.log(result);
      },
      timeout: (xhr, editor) => {
        // 网络超时的回调
        console.log('网络超时');
      },
      error: (xhr, editor) => {
        // 图片上传错误的回调
        console.log('上传错误');
      },
      //回显
      customInsert: (insertImg, result, editor) => {
        console.log(result);
        let id = result.data.fileId;
        let a = result.data.fileName.split('.')[1];
        let str = id + '/' + a;
        let url =
          '图片下载地址?fileId=' +
          str;
        insertImg(url);
      },
    };
    editor.create();
    editor.txt.html(this.value);
  },
};
</script>

<style scoped>
</style>
这里面需要注意的地方是回显的功能我和后端商量过后是后端成功接收到图片后给我返回一个图片id和图片的格式(因为我的项目中图片上传的地址和下载的地址不是一个,所以用这种方式。如果是一个直接用返回的图片url就可以了),请求的时候把他们作为参数拼在请求路径后面。

需要的就是返回信息中的fileId和fileName中的jpg。

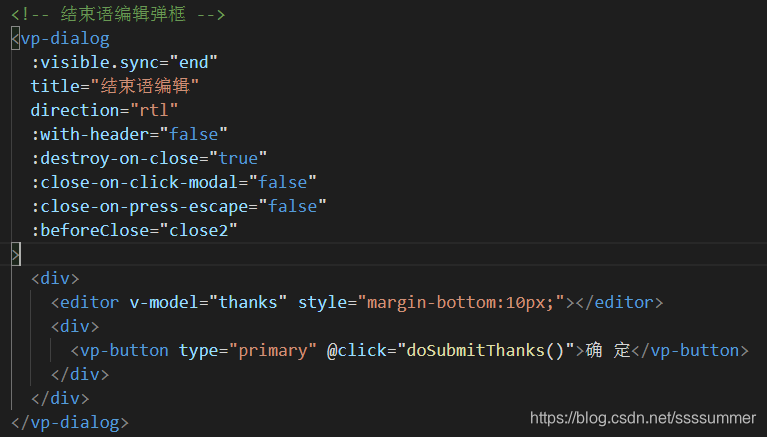
最后在你需要的页面将editor.vue作为组件引入,别忘了在components中注册组件。下面这张图是弹框中的editor组件,图中的value对应editor.vue页面中的value(父子组件传值)是为了提交过描述后再次访问时点击显示editor弹框时能够把调取到的描述数据再次渲染上去 ,方便做出修改。

确定后在页面需要的地方

显示就好了。注意上图v-model中绑定的变量要和v-html中的一致。
另外,我的代码中的vp-dialog和vp-button什么的你在用的时候会报错,不要忘记把vp改成el。不影响使用。


