
Nexus私服安装
第一步:下载nexus.war包,然后拷贝到tomcat下的webapps目录中
第二步:启动tomcat
第三步:访问http://localhost:8080/nexus-2.7.0-06/index.html#welcome显示如下:
第四步:点击右上角“log in” ,输入username:admin 和Password:admin123登录
第五步:登录成功
第六步:点击Views/Repositories 中Repositories
Nexus内置仓库说明:
(1)Maven Central:该仓库代理Maven中央仓库,其策略为Release,因此只会下载和缓存中央仓库中的发布版本构件。
(2)Releases:这是一种策略为Release的宿主类型仓库,用来部署组织内部的发布版本构件。
(3)Snapshots:这是一个策略为Snapshot的宿主类型仓库,用来部署组织内部的快照版本构件。
(4)3rd party:这是一个策略为Release的宿主类型仓库,用来部署无法从公共仓库获得的第三方发布版本构件。
(5)Public Repositories:该仓库组将上述所有策略为Release的仓库聚合并通过一致的地址提供服务。
第七步:创建宿主目录和代理仓库
Hosted:本地仓库,通常我们会部署自己的构件到这一类型的仓库。
包括3rd party仓库,Releases仓库,Snapshots仓库
Proxy:代理仓库,它们被用来代理远程的公共仓库,如maven中央仓库。
Group:仓库组,用来合并多个hosted/proxy仓库,通常我们配置maven依赖仓库组。
第八步:创建仓库组
点击Public Repositories仓库,在Configurations栏中选取需要合并的仓库,点击箭头加到左边保存即可
第九步:下载Index索引并进行构建搜索(GAV搜索)
第十步:配置所有构建均从私服下载,在~/.m2/setting.xml中配置如下:
<settings>
<mirrors>
<mirror>
<!--此处配置所有的构建均从私有仓库中下载 *代表所有,也可以写central -->
<id>nexus</id>
<mirrorOf>*</mirrorOf>
<url>http://192.168.1.100:8000/nexus/content/groups/public</url>
</mirror>
</mirrors>
<profiles>
<profile>
<id>nexus</id>
<!-- 所有请求均通过镜像 -->
<repositories>
<repository>
<id>central</id>
<url>http://central</url>
<releases><enabled>true</enabled></releases>
<snapshots><enabled>true</enabled></snapshots>
</repository>
</repositories>
<pluginRepositories>
<pluginRepository>
<id>central</id>
<url>http://central</url>
<releases><enabled>true</enabled></releases>
<snapshots><enabled>true</enabled></snapshots>
</pluginRepository>
</pluginRepositories>
</profile>
</profiles>
<activeProfiles>
<!--make the profile active all the time -->
<activeProfile>nexus</activeProfile>
</activeProfiles>
第十一步:部署构建到Nexus,包含Release和Snapshot, 在项目根目录中pom.xml中配置:
<distributionManagement>
<repository>
<id>releases</id>
<name>Internal Releases</name>
<url>http://localhost:8000/nexus/content/repositories/releases/</url>
</repository>
<snapshotRepository>
<id>snapshots</id>
<name>Internal Snapshots</name>
<url>http://localhost:8000/nexus/content/repositories/snapshots/</url>
</snapshotRepository>
</distributionManagement>
第十二步:Nexus的访问权限控制,在~/m2/setting.xml中配置如下:
<!-- 设置发布时的用户名 -->
<servers>
<server>
<id> releases </id>
<username>admin</username>
<password>admin123</password>
</server>
<server>
<id> snapshots </id>
<username>admin</username>
<password>admin123</password>
</server>
</servers>
私服是架设在局域网的一种特殊的远程仓库,目的是代理远程仓库及部署第三方构件。有了私服之后,当 Maven 需要下载构件时,直接请求私服,私服上存在则下载到本地仓库;否则,私服请求外部的远程仓库,将构件下载到私服,再提供给本地仓库下载。
我们可以使用专门的 Maven 仓库管理软件来搭建私服,比如:Apache Archiva,Artifactory,Sonatype Nexus。这里我们使用 Sonatype Nexus。
2 . 安装Nexus
2 . 1 . 下载Nexus
Nexus 专业版是需要付费的,这里我们下载开源版 Nexus OSS。Nexus 提供两种安装包,一种是包含 Jetty 容器的 bundle 包,另一种是不包含容器的 war 包。下载地址:http://www.sonatype.org/nexus/go。
2 . 2 . 使用bundle安装包安装Nexus
解压安装包nexus-2.8.1-bundle.zip,打开命令提示符,进入/nexus-2.8.1-01目录,键入nexus命令(为方便启动和退出Nexus,可将bin目录添加到环境变量):
执行 nexus install 将Nexus安装为Windows服务。可将服务启动方式设为手动,以后通过 nexus start 即可启动Nexus ,通过 nexus stop 退出Nexus:
打开浏览器,访问:http://localhost:8081/nexus/ (Jetty 默认端口号:8081):
点击右上角 Log In,使用用户名:admin ,密码:admin123 登录,可使用更多功能:
3 . Nexus预置的仓库
点击左侧 Repositories 链接,查看 Nexus 内置的仓库:
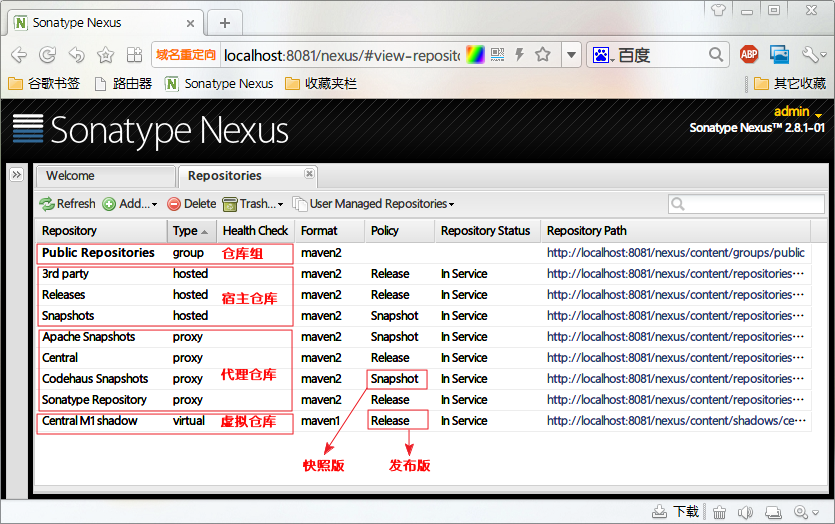
Nexus 的仓库分为这么几类:
hosted 宿主仓库:主要用于部署无法从公共仓库获取的构件(如 oracle 的 JDBC 驱动)以及自己或第三方的项目构件;
proxy 代理仓库:代理公共的远程仓库;
virtual 虚拟仓库:用于适配 Maven 1;
group 仓库组:Nexus 通过仓库组的概念统一管理多个仓库,这样我们在项目中直接请求仓库组即可请求到仓库组管理的多个仓库。
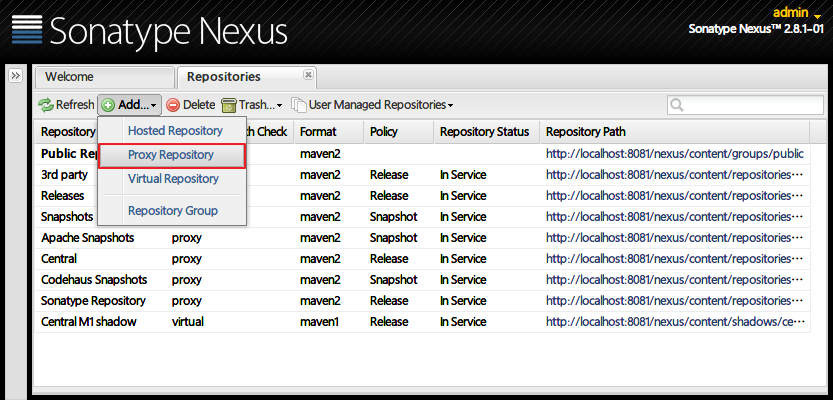
4 . 添加代理仓库
以 Sonatype 为例,添加一个代理仓库,用于代理 Sonatype 的公共远程仓库。点击菜单 Add - Proxy Repository :
填写Repository ID - sonatype;Repository Name - Sonatype Repository;
Remote Storage Location - http://repository.sonatype.org/content/groups/public/ ,save 保存:

将添加的 Sonatype 代理仓库加入 Public Repositories 仓库组。选中 Public Repositories,在 Configuration 选项卡中,将 Sonatype Repository 从右侧 Available Repositories 移到左侧 Ordered Group Repositories,save 保存:
5 . 搜索构件
为了更好的使用 Nexus 的搜索,我们可以设置所有 proxy 仓库的 Download Remote Indexes 为 true,即允许下载远程仓库索引。
索引下载成功之后,在 Browse Index 选项卡下,可以浏览到所有已被索引的构件信息,包括坐标、格式、Maven 依赖的 xml 代码:
有了索引,我们就可以搜索了:

6 . 配置Maven使用私服
私服搭建成功,我们就可以配置 Maven 使用私服,以后下载构件、部署构件,都通过私服来管理。
在 settings.xml 文件中,为所有仓库配置一个镜像仓库,镜像仓库的地址即私服的地址(这儿我们使用私服公共仓库组 Public Repositories 的地址):


