公司的虚拟化平台上的主机,用的是puppet进行管理,但是单个puppet有很大的瓶颈的问题~ puppetmaster默认使用的是ruby自带的web服务器WEBRick,它太过简陋,无法满足puppet客户端成百上千的并发性能很不好。
ruby又是一种解析型语言,性能肯定不会非常好;这样呢,我们也不能用高性能的语言把他重写了去,但我们可以在部分地方动手脚来进行性能优化
我的思路是 结合反向代理,puppetmaster承受能力至少可以提升数倍以上,相当于在很大程度上优化了puppet的处理能力。
个人总结,puppet很适合做 各个服务的配置~ 但是不适合文件的传送,比如你想发个环境安装包,让客户端安装,这就很蛋疼了~
puppet的版本
ruby的版本
系统的版本
Nginx的版本
第一步
yum install -y rubygem-mongrel
第二步
vim /etc/sysconfig/puppetmaster加入以下内容
PUPPETMASTER_PORTS=(8141 8142 8143 8144 8145)
PUPPETMASTER_EXTRA_OPTS="--servertype=mongrel --ssl_client_header=HTTP_X_SSL_SUBJECT"
第三步
yum -y install nginx
也可以编译安装
wget http://www.openssl.org/source/openssl-0.9.8l.tar.gz
tar zxf ./openssl-0.9.8l.tar.gz
cd ./openssl-0.9.8l
./config enable-tl***t
make && make install
cd ..
tar -xzf pcre-8.12.tar.gz
cd pcre-8.12
./configure && make && make install
cd ..
tar -xzf nginx-1.0.12.tar.gz
cd nginx-1.0.12
./configure --user=nobody--group=nobody--prefix=/usr/local/nginx \
--with-http_stub_status_module --with-http_gzip_static_module \
--with-pcre=../pcre-8.12 --with-http_ssl_module --with-openssl=../openssl-0.9.8l/
make && make install
第四步
配置 nginx.conf
user www;
worker_processes 8;
events {
worker_connections 65535;
}
http {
include mime.types;
default_type application/octet-stream;
sendfile on;
tcp_nopush on;
keepalive_timeout 65;
#定义puppet客户端访问puppet-server端日志格式
log_format main '$remote_addr - $remote_user [$time_local] "$request" $request_length $request_time $time_local'
'$status $body_bytes_sent $bytes_sent $connection $msec "$http_referer" '
'"$http_user_agent" $http_x_forwarded_for $upstream_response_time $upstream_addr $upstream_status ';
access_log /etc/nginx/logs/access.log main;
upstream puppetmaster {
server 127.0.0.1:8141;
server 127.0.0.1:8142;
server 127.0.0.1:8143;
server 127.0.0.1:8144;
server 127.0.0.1:8145;
}
server {
listen 8140;
root /etc/puppet;
ssl on;
ssl_session_timeout 5m;
#如下为puppetmaster服务器端证书地址
ssl_certificate /var/lib/puppet/ssl/certs/master.rui.com.pem;
"nginx.conf" 71L, 2660C 19,9 顶端
ssl_certificate_key /var/lib/puppet/ssl/private_keys/master.rui.com.pem;
ssl_client_certificate /var/lib/puppet/ssl/ca/ca_crt.pem;
ssl_crl /var/lib/puppet/ssl/ca/ca_crl.pem;
ssl_verify_client optional;
#File sections
location /production/file_content/files/ {
types { }
default_type application/x-raw;
#定义puppet推送路径别名
alias /etc/puppet/files/;
}
# Modules files sections
location ~ /production/file_content/modules/.+/ {
root /etc/puppet/modules;
types { }
default_type application/x-raw;
rewrite ^/production/file_content/modules/(.+)/(.+)$ /$1/files/$2 break;
}
location / {
##设置跳转到puppetmaster负载均衡
proxy_pass http://puppetmaster;
proxy_redirect off;
proxy_set_header Host $host;
proxy_set_header X-Real-IP $remote_addr;
proxy_set_header X-Forwarded-For $proxy_add_x_forwarded_for;
proxy_set_header X-Client-Verify $ssl_client_verify;
proxy_set_header X-SSL-Subject $ssl_client_s_dn;
proxy_set_header X-SSL-Issuer $ssl_client_i_dn;
proxy_buffer_size 10m;
proxy_buffers 1024 10m;
proxy_busy_buffers_size 10m;
proxy_temp_file_write_size 10m;
proxy_read_timeout 120;
}
}
}
第五步
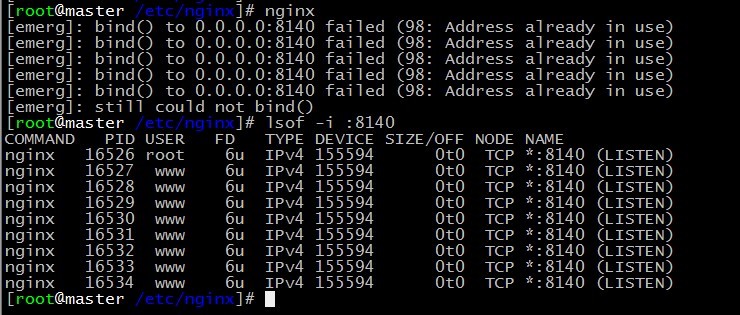
启动nginx 并看下端口情况~
第六步
启动 puppet服务端
另外大家也可以试试 用 unicorn 代替puppet本身的web~据说性能不错,最少github已经用了~
这个配置做完后,不知道性能不错的,但是运行几天后,会造成程序占资源~ 原因不明~
安装依赖:
yum install ruby-devel gcc make
安装unicron
gem install unicorn rack
复制一个puppet的rack配置文件
cp /usr/share/puppet/ext/rack/files/config.ru /etc/puppet/
vim /etc/puppet/unicorn.conf
worker_processes 8
working_directory "/etc/puppet"
listen '/var/run/puppet/puppetmaster_unicorn.sock', :backlog => 512
timeout 120
pid "/var/run/puppet/puppetmaster_unicorn.pid"
preload_app true
if GC.respond_to?(:copy_on_write_friendly=)
GC.copy_on_write_friendly = true
end
before_fork do |server, worker|
old_pid = "#{server.config[:pid]}.oldbin"
if File.exists?(old_pid) && server.pid != old_pid
begin
Process.kill("QUIT", File.read(old_pid).to_i)
rescue Errno::ENOENT, Errno::ESRCH
# someone else did our job for us
end
end
end
启动unicorn
unicorn -c unicorn.conf
vim /etc/nginx/nginx_puppet.conf
upstream puppetmaster_unicorn {
server unix:/var/run/puppet/puppetmaster_unicorn.sock fail_timeout=0;
}
server {
listen 8140;
server_name master.puppet.lightcloud.cn;
ssl on;
ssl_session_timeout 5m;
ssl_certificate /etc/puppet/ssl/certs/master.puppet.lightcloud.cn.pem;
ssl_certificate_key /etc/puppet/ssl/private_keys/master.puppet.lightcloud.cn.pem;
ssl_client_certificate /var/lib/puppet/ssl/ca/ca_crt.pem;
ssl_ciphers SSLv2:-LOW:-EXPORT:RC4+RSA;
ssl_verify_client optional;
root /usr/share/empty;
proxy_set_header Host $host;
proxy_set_header X-Real-IP $remote_addr;
proxy_set_header X-Forwarded-For $proxy_add_x_forwarded_for;
proxy_set_header X-Client-Verify $ssl_client_verify;
proxy_set_header X-Client-DN $ssl_client_s_dn;
proxy_set_header X-SSL-Issuer $ssl_client_i_dn;
proxy_read_timeout 120;
location / {
proxy_pass http://puppetmaster_unicorn;
proxy_redirect off;
}
}


