安装xcache,为php加速
[root@localhost ~]# tar xf xcache-3.0.1.tar.gz
[root@localhost ~]# cd xcache-3.0.1 //xcache是php的扩展,要使用php命令加载此扩展
[root@localhost xcache]# /usr/local/php/bin/phpize //phpize命令作用是要准备一个php扩展准备编译,所以扩展要先执行编译
[root@localhost xcache]#./configure --enable-xcache --with-php-config=/usr/local/php/bin/php-config
//php-config表示能够获取php的配置信息以及编译时的选项信息;
//由于不在默认路径下,xcache要获取php安装时所启用的功能,否则xcache会找不到php的路径
[root@localhost xcache]#make
[root@localhost xcache]#make install
安装结束时,会出现类似如下行:
Installing shared extensions: /usr/local/php/lib/php/extensions/no-debug-zts-20100525/
//安装共享扩展模块路径,先把这个路径复制下来,等一下复制到xcache的配置文件中
[root@localhost xcache]# mkdir /etc/php.d
[root@localhost xcache]# cp xcache.ini /etc/php.d //将xcache提供的样例配置导入php.ini
重启网络服务查看网页
[root@localhost xcache]#vim /etc/php.d/xcache.ini //可以查看下他的配置信息

[root@localhost xcache]#vim /etc/httpd/httpd.conf
#DocumentRoot "/usr/local/apache/htdocs" //一定要注释中心主机配置
Include /etc/httpd/extra/httpd-vhosts.conf //开启虚拟主机配置文件,默认有样例
LoadModule log_config_module modules/mod_log_config.so //开启mod_log功能,默认是启用的
保存退出
[root@localhost xcache]#vim /etc/httpd/extra/httpd-vhosts.conf //在提供的样例上修改
<VirtualHost *:80>
ServerName www.a.org
DocumentRoot "/www/a.org"
<Directory "/www/a.org">
Options none
AllowOverride none
Require all granted //定义任何都有访问权限
</Directory>
ErrorLog "/var/log/httpd/a.org-error_log"
CustomLog "/var/log/httpd/a.org-access_log" combined
</VirtualHost>
<VirtualHost *:80>
ServerName www.b.net
DocumentRoot "/www/b.net"
<Directory "/www/b.net">
Options none
AllowOverride none
Require all granted
</Directory>
ErrorLog "/var/log/httpd/b.net-error_log"
CustomLog "/var/log/httpd/b.net-access_log" common
</VirtualHost>
保存退出
[root@localhost xcache-3.0.1]# mkdir /www/{a.org,b.net} -pv
mkdir: created directory `/www'
mkdir: created directory `/www/a.org'
mkdir: created directory `/www/b.net'
[root@localhost xcache-3.0.1]# mkdir /var/log/httpd/
[root@localhost xcache]#echo "<h1>www.a.org</h1>" > /www/a.org/index.html
[root@localhost xcache]#echo "<h1>www.b.net</h1>" > /www/b.net/index.html
[root@localhost xcache]#httpd –t
过程:点击硬盘c盘---> Windows---> System32---> drivers---> etc--->hosts文件
添加如下内容:
172.16.111.1 www.a.org
172.16.111.1 www.b.net
//注意:不要忘记保存,点击保存按钮
[root@localhost xcache]#service httpd restart

[root@localhost xcache]#ab -c 10 -n 100 http://www.a.org/index.html

安装phpMyAdmin-3.5.1-all-languages.tar.bz2软件包到/www/b.net下
[root@localhost ~]#tar xf phpMyAdmin-3.5.1-all-languages.tar.bz2/ -C /www/b.net
[root@localhost ~]#cd /www/b.net
[root@localhost b.net]#mv phpMyAdmin-3.5.1-all-languages / pma
[root@localhost b.net]#cd pma
[root@localhost pma]#cp config.sample.inc.php config.inc.php //软件包提供默认配置文件,重命名配置文件名称
[root@localhost pma]#openssl rand -base64 10 //生成10位的随机数,把生成的随机数复制到配置文件中
[root@localhost pma]#vim config.inc.php //编辑配置文件,把生成的随机数写在下面的位置
$cfg['blowfish_secret'] = 'QkMTw3ZlpJlBKA'
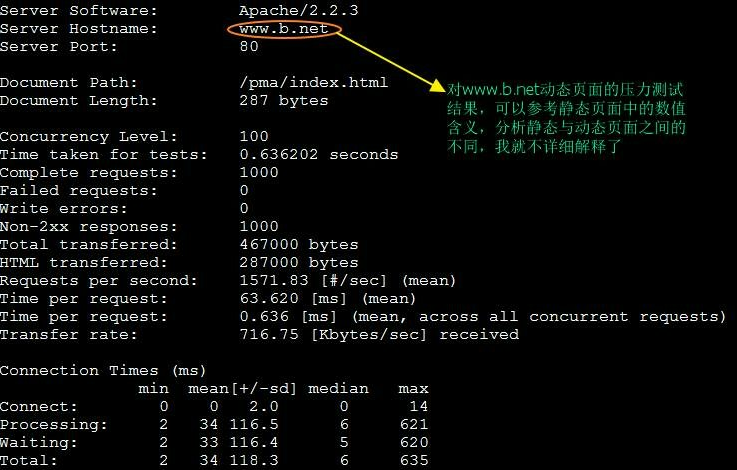
[root@localhost pma]#mysqladmin -uroot password 'redhat' //生成root用户的密码,登录站点www.b.net/pma不允许使用空密码
[root@localhost pma]#ab -c 100 -n 1000 http://www.b.net/pma/index.html //动态页面压力测试