NSTableView有比NSOutlineView使用起来要简单。
下面介绍一个简单用法。
这里简单使用一下dataSource就行了。
在AppDelegate里实现:
- -(void)awakeFromNib
- {
- NSTableColumn * columnCompany = [[NSTableColumn alloc] initWithIdentifier:@"2"].autorelease;
- [_table addTableColumn:columnCompany];
- NSInteger columnCount = [[_table tableColumns] count];
- for (int i = 0; i< columnCount; i++)
- {
- [[[_table tableColumns] objectAtIndex:i] setIdentifier:[NSString stringWithFormat:@"%d",i]];
- }
- }
这里_table是一个NSTableView的一个Outlet.它默认有两列,这里自己加一列。形成三列。
然后设置identify.这个identifier属性文档里有说明。
identifier
Returns the object used by the data source to identify the attribute corresponding to the receiver.
为dataSource提供标志column的一个属性id.但是文档没说是NSString类型的。我想它应该是NSString类型的吧。
在DataSource里实现
- -(void)awakeFromNib
- {
- self.doc = [[NSXMLDocument alloc] initWithData:[NSData dataWithContentsOfFile:@"tableSource.xml"] options:1<<10 error:nil];
- }
- -(NSInteger)numberOfRowsInTableView:(NSTableView *)tableView
- {
- return [self.doc.rootElement childCount];
- }
- -(id)tableView:(NSTableView *)tableView objectValueForTableColumn:(NSTableColumn *)tableColumn row:(NSInteger)row
- {
- NSInteger columnIndex = [[tableColumn identifier] intValue];
- return [[[self.doc.rootElement childAtIndex:row] childAtIndex:columnIndex] stringValue];
- }
这里xml内容是:
- <products>
- <product>
- <name>iPhone</name>
- <price>4,500</price>
- <company>apple</company>
- </product>
- <product>
- <name>Android</name>
- <price>2,000</price>
- <company>google</company>
- </product>
- <product>
- <name>N99</name>
- <price>1,500</price>
- <company>Nokia</company>
- </product>
- </products>
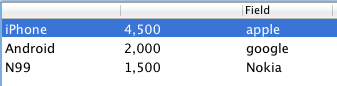
显示结果: