
关于Windows Phone Mango真真假假的图片、视频已经在网上流传很久了,微软发布的Windows Phone 7.1 SDK可以让我们看到一部分Mango支持的功能。
普通用户对Mango的关注更多停留在多语言、多任务等方面,但对于开发者来说,Mango还有很多有趣的功能。我会试着将自己感兴趣的一些功能写出来,变成一个系列。
首先,大家要安装Windows Phone 7的SDK和Windows Phone 7.1 SDK的Beta 版,下载地址如下:
http://www.microsoft.com/downloads/en/details.aspx?FamilyID=77586864-ab15-40e1-bc38-713a95a56a05
创建工程
关于Windows Phone 7.1的第一个功能是XNA与Silverlight的集成。Windows Phone里有两个Framework,Silverlight是做应用的,而XNA是做游戏开发的。Silverlight有一套非常好用的UI设计工具和控件体系,而XNA对于动画效果的处理又远远超过Silverlight。但是在WP7里,Silverlight和XNA必须是分开的,所以当Silverlight应用需要高性能显示,或者XNA游戏里需要编写UI时,都会碰到很多困难。
于是,在WP 7.1里,提供了XNA与Silverlight集成的功能。接下来,我们就来看一下,如何创建一个Silverlight和XNA集成的应用。
打开Visual Studio 2010,选择File-New Project,在Visual C#里找到Silverlight for Windows Phone,然后选择其中的“Windows Phone 3D Graphics Application”,这个名字有足够的迷惑性,XNA的2D也是支持的。如下图:

创建过程没有什么特殊的地方,创建完成后的工程如下图所示:
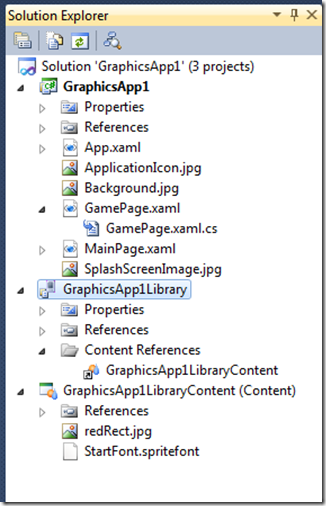
说实话,XNA与Silverlight集成的实现并不算优雅,有点叠床架屋的感觉。整个Solution里分为三个Project,其中GraphicsApp1是我们的主程序,主要的逻辑代码都是在这个工程里的,这是一个典型的Silverlight程序,包含了App.xaml和MainPage.xmal,多出来一个GamePage.xaml,这个是XNA的页面。除此之外,还有两个Library,分别叫做GraphicsApp1Library和GraphicsApp1LibraryContent,后边是XNA的Content库,前边一个应该是为了能够让Silverlight加载XNA资源所做的适配库。
直接运行程序,我们会看到下面的界面,点击HomePage的Play按钮,我们就进入了XNA的GamePage界面:

GamePage探秘
接下来,我们看一下GamePage.xaml的结构,看看这个看似普通的XAML页面里具体做了什么事情。首先是GamePage.xaml,如下:
- <phone:PhoneApplicationPage
- x:Class="GraphicsApp2.GamePage"
- xmlns="http://schemas.microsoft.com/winfx/2006/xaml/presentation" xmlns:x="http://schemas.microsoft.com/winfx/2006/xaml"
- xmlns:phone="clr-namespace:Microsoft.Phone.Controls;assembly=Microsoft.Phone"
- xmlns:shell="clr-namespace:Microsoft.Phone.Shell;assembly=Microsoft.Phone"
- xmlns:d="http://schemas.microsoft.com/expression/blend/2008"
- xmlns:mc="http:///markup-compatibility/2006"
- FontFamily="{StaticResource PhoneFontFamilyNormal}"
- FontSize="{StaticResource PhoneFontSizeNormal}"
- Foreground="{StaticResource PhoneForegroundBrush}"
- SupportedOrientations="Portrait" Orientation="Portrait"
- mc:Ignorable="d" d:DesignHeight="800" d:DesignWidth="480"
- shell:SystemTray.IsVisible="False">
- <!--No XAML content as the page is rendered entirely with XNA-->
- </phone:PhoneApplicationPage>
什么都没有……所有的显示都是由XNA控制的。接下来,我们去看GamePage.xaml.cs,首先来看引用程序集的部分:
- using Microsoft.Xna.Framework;
- using Microsoft.Xna.Framework.Content;
- using Microsoft.Xna.Framework.Graphics;
引用了三个XNA的命名空间,接下来是变量声明:
- GameTimer timer;
- ContentManager content;
- SpriteBatch spriteBatch;
- Texture2D texture;
- Vector2 spritePosition;
除了GameTimer是生面孔外,其他几个都是老熟人,GameTimer也好理解,Silverlight是事件驱动的Framework,如果想定时更新的话,必须要加入一个Timer。接下来,是GamePage的构造函数:
- public GamePage()
- {
- InitializeComponent();
- // Get the application's ContentManager
- content = (Application.Current as App).Content;
- // Create a timer for this page
- timer = new GameTimer();
- timer.UpdateInterval = TimeSpan.FromTicks(333333);
- timer.Update += OnUpdate;
- timer.Draw += OnDraw;
- }
ContentManager对象是来自于App的Content属性,我们不会再有一个派生自Microsoft.Xna.Framework.Game的Host类了。然后是GameTimer的初始化工作,指定更新时间间隔,然后为Update和Draw事件添加方法。我不知道理解的是否正确,但有可能是GameTimer类重新实现了XNA Framework的机制。
然后是两个重载的Navigated函数:
- protected override void OnNavigatedTo(NavigationEventArgs e)
- {
- // Set the sharing mode of the graphics device to turn on XNA rendering SharedGraphicsDeviceManager.Current.GraphicsDevice.SetSharingMode(true);
- // Create a new SpriteBatch, which can be used to draw textures.
- spriteBatch = new SpriteBatch(SharedGraphicsDeviceManager.Current.GraphicsDevice);
- // TODO: use this.content to load your game content here
- // Start the timer
- timer.Start();
- base.OnNavigatedTo(e);
- }
- protected override void OnNavigatedFrom(NavigationEventArgs e)
- {
- // Stop the timer
- timer.Stop();
- // Set the sharing mode of the graphics device to turn off XNA rendering SharedGraphicsDeviceManager.Current.GraphicsDevice.SetSharingMode(false);
- base.OnNavigatedFrom(e);
- }
OnNavigatedTo函数实现了LoadContent的功能,第一句话值得注意,我们要首先打开GraphicsDevice的SetSharingMode为true,才能够让XNA元素正常的显示出来。这句话也交代了XNA最主要的类GraphicsDeviceManager的去向,被放到一个静态的SharedGraphicsDeviceManager对象里去了。
创建SpriteBatch和加载资源的过程不再叙述,最后要调用GameTimer的Start方法,来启动XNA的时间驱动机制,与之对应的是OnNavigatedFrom函数中,我们还需要调用GameTimer的Stop方法,来关闭时间驱动机制。
最后是熟悉的OnUpdate和OnDraw方法,就数这两个函数原汁原味地保留了XNA的特点。
- /// <summary>
- /// Allows the page to run logic such as updating the world,
- /// checking for collisions, gathering input, and playing audio.
- /// </summary>
- private void OnUpdate(object sender, GameTimerEventArgs e)
- {
- // TODO: Add your update logic here
- }
- /// <summary>
- /// Allows the page to draw itself.
- /// </summary>
- private void OnDraw(object sender, GameTimerEventArgs e)
- { SharedGraphicsDeviceManager.Current.GraphicsDevice.Clear(Microsoft.Xna.Framework.Color.CornflowerBlue);
- // TODO: Add your drawing code here
- }
添加Silverlight控件
如果只是在Silverlight应用里添加一个XNA的页面,恐怕还没有太大的吸引力。我们还应该让XNA和Silverlight能够在一个页面上显示。首先我们要打开GamePage.xaml文件,找到下面的代码:
- <!--No XAML content as the page is rendered entirely with XNA-->
将下列代码替换上面的注释:
- <!-- LayoutRoot is the root grid where all page content is placed -->
- <Grid x:Name="LayoutRoot">
- <Grid.RowDefinitions>
- <RowDefinition Height="Auto"/>
- <RowDefinition Height="*"/>
- <RowDefinition Height="Auto"/>
- </Grid.RowDefinitions>
- <!-- Toggles the visibility of the ColorPanel -->
- <Button Grid.Row="0" x:Name="ColorPanelToggleButton" Click="ColorPanelToggleButton_Click" Margin="1,0,-1,0">Toggle Color Panel</Button>
- <!-- Arrange buttons in a horizontal line by using StackPanel -->
- <StackPanel x:Name="ColorPanel" Grid.Row="2" Height="100" Orientation="Horizontal" HorizontalAlignment="Center" Visibility="Visible">
- <!-- Buttons to set the rectangle to specific colors -->
- <Button Click="redButton_Click" HorizontalAlignment="Center" Height="75" VerticalAlignment="Center" BorderThickness="3" Background="Firebrick" Width="75" />
- <Button Click="greenButton_Click" HorizontalAlignment="Center" Height="75" VerticalAlignment="Center" BorderThickness="3" Background="Lime" Width="75" />
- <Button Click="blueButton_Click" HorizontalAlignment="Center" Height="75" VerticalAlignment="Center" BorderThickness="3" Background="Blue" Width="75" />
- </StackPanel>
- </Grid>
如果编译的话,会提示没有Button对应的事件处理函数。
添加代码
下面部分和MSDN提供的示例代码不同,我试图找到一种更简单的办法来更改颜色。首先,我们在GraphicsApp1LibraryContent工程里找到redRect.jpg,右键单击,选择Open With,然后在列表里选择Paint,用画图打开文件后,将整个图片涂成白色。做完这个工作后,记得一定要重新编译整个工程。
接下来,我们声明Color变量,并且在构造函数里赋初始值。
- Color bgColor;
- public GamePage()
- {
- // ...
- bgColor = Color.Red;
- }
然后我们增加事件处理函数,首先是控制颜色是否显示的控件:
- // Toggle the visibility of the StackPanel named "ColorPanel"
- private void ColorPanelToggleButton_Click(object sender, RoutedEventArgs e)
- {
- if (System.Windows.Visibility.Visible == ColorPanel.Visibility)
- {
- ColorPanel.Visibility = System.Windows.Visibility.Collapsed;
- }
- else
- {
- ColorPanel.Visibility = System.Windows.Visibility.Visible;
- }
- }
然后是切换颜色的几个Button的处理函数:
- // Switch to the red rectangle
- private void redButton_Click(object sender, RoutedEventArgs e)
- {
- bgColor = Color.Red;
- }
- // Switch to the green rectangle
- private void greenButton_Click(object sender, RoutedEventArgs e)
- {
- bgColor = Color.Green;
- }
- // Switch to the blue rectangle
- private void blueButton_Click(object sender, RoutedEventArgs e)
- {
- bgColor = Color.Blue;
- }
最后,我们在OnDraw函数里,找到下面的代码:
- spriteBatch.Draw(texture, spritePosition, Color.White);
换成下面的代码:
- spriteBatch.Draw(texture, spritePosition, bgColor);
这样我们就可以为白色的材质绘制出不同的颜色了。
现在程序可以编译通过了,但是运行程序后,Silverlight的控件却没办法显示出来。原因是Silverlight控件必须经过特殊的处理,才能够显示出来。首先要声明一个UIElementRenderer变量:
- // For rendering the XAML onto a texture
- UIElementRenderer elementRenderer;
然后,在GamePage的构造函数里,添加下面的代码:
- // Use the LayoutUpdate event to know when the page layout
- // has completed so we can create the UIElementRenderer
- LayoutUpdated += new EventHandler(GamePage_LayoutUpdated);
添加GamePage_LayoutUpdated的函数,在函数中创建UIElementRenderer的对象:
- void GamePage_LayoutUpdated(object sender, EventArgs e)
- {
- // Create the UIElementRenderer to draw the XAML page to a texture.
- // Check for 0 because when we navigate away the LayoutUpdate event
- // is raised but ActualWidth and ActualHeight will be 0 in that case.
- if (ActualWidth > 0 && ActualHeight > 0 && elementRenderer == null)
- {
- elementRenderer = new UIElementRenderer(this, (int)ActualWidth, (int)ActualHeight);
- }
- }
最后,在OnDraw函数里,添加下面的代码:
- /// <summary>
- /// Allows the page to draw itself.
- /// </summary>
- private void OnDraw(object sender, GameTimerEventArgs e)
- { SharedGraphicsDeviceManager.Current.GraphicsDevice.Clear(Color.Black);
- // TODO: Add your drawing code here
- // Render the Silverlight controls using the UIElementRenderer
- elementRenderer.Render();
- // Draw the sprite
- spriteBatch.Begin();
- spriteBatch.Draw(texture, spritePosition, bgColor); //Color.White);
- spriteBatch.DrawString(StartFont, "Hello, XNA", new Vector2(50), Color.Blue);
- // Using the texture from the UIElementRenderer,
- // draw the Silverlight controls to the screen
- spriteBatch.Draw(elementRenderer.Texture, Vector2.Zero, Color.White);
- spriteBatch.End();
- }
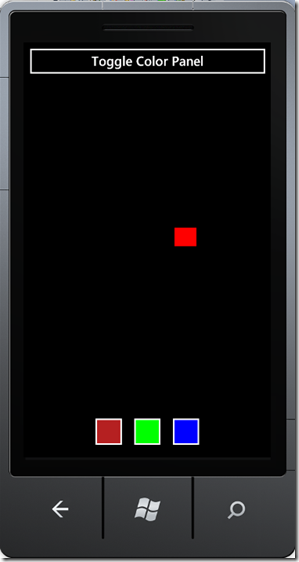
再运行程序时,我们就可以看到Silverlight控件了,点击颜色控件,方块会切换成对应的颜色。如下图所示:
加载XNA资源
到这里,我们的体验基本上告一段落了,但是我试了一下是否能够正常加载XNA的字体,所以就写了最后这部分。
右键点击GraphicsApp1LibraryContent,选择Add – New Item。在对话框中选择Sprite Font,我们将字体命名为StartFont。在打开的字体文件中,我们将Size改成30,如下面所示:
- <!--
- Size is a float value, measured in points. Modify this value to change
- the size of the font.
- -->
- <Size>30</Size>
回到GamePage.xaml.cs文件中,我们首先声明SpriteFont变量:
- SpriteFont StartFont;
然后,在OnNavigatedTo函数中,添加字体加载的代码:
- protected override void OnNavigatedTo(NavigationEventArgs e)
- {
- // Set the sharing mode of the graphics device to turn on XNA rendering
- SharedGraphicsDeviceManager.Current.GraphicsDevice.SetSharingMode(true);
- spriteBatch = new SpriteBatch(SharedGraphicsDeviceManager.Current.GraphicsDevice);
- // TODO: use this.content to load your game content here
- texture = content.Load<Texture2D>("redRect");
- StartFont = content.Load<SpriteFont>("StartFont");
最后,在OnDraw函数里,添加字体的绘制函数:
- spriteBatch.DrawString(StartFont, "Hello, XNA", new Vector2(50), Color.Blue);
程序运行的效果如下:

另一条路
除了在Silverlight for Windows Phone创建Windows Phone 3D Graphics Application外,我们还能够通过另一种方式创建XNA与Silverlight整合的应用程序。
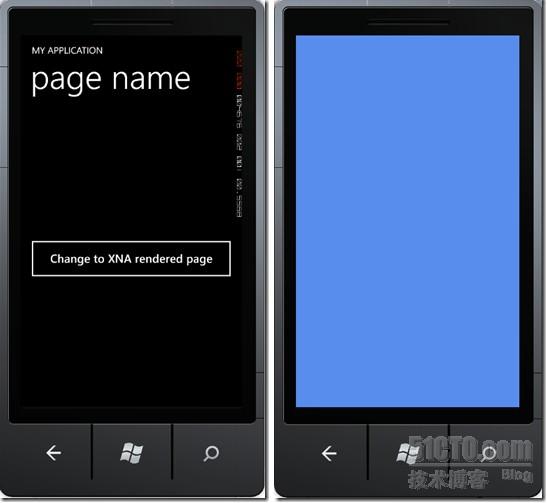
XNA Game Studio 4.0中,选择Windows Phone Rich Graphics Application:

通过这个向导创建的程序,与上面创建的程序大同小异,只是界面略有不同。运行界面如下:
写在最后
好了,到这里,我们正式将Windows Phone 7.1中的Silverlight与XNA整合应用介绍完了。在XNA游戏中,我们可以使用Silverlight来创建界面;也可以在Silverlight应用中编写高性能的3D界面。
OpenXLive杯Windows Phone游戏开发大赛

OpenXLive杯Windows Phone游戏开发大赛,是由OpenXLive联合国内知名的开发者社区:DevDiv、智机网、WPMind、Silverlight银光中国和XNA游戏世界,一起举办的针对Windows Phone游戏开发的比赛。


