CentOS上安装Zabbix
*检查防火墙iptables状态
# service iptables status
*为web 和mysql 添加防火墙策略
# vi /etc/sysconfig/iptables
如下所示:
-A INPUT -m state --state NEW -m tcp -p tcp --dport 22 -j ACCEPT
-A INPUT -m state --state NEW -m tcp -p tcp --dport 80 -j ACCEPT #允许80(http)端口通过防火墙
-A INPUT -m state --state NEW -m tcp -p tcp --dport 3306 -j ACCEPT #允许3306(mysql)端口通过防火墙
-A INPUT -m state --state NEW -m tcp-p tcp --dport 10050 -j ACCEPT #zabbix agent
-A INPUT -m state --state NEW -m tcp-p udp --dport 10050 -j ACCEPT #zabbix agent
-A INPUT -m state --state NEW -m tcp-p tcp --dport 10051 -j ACCEPT #zabbix trapper
-A INPUT -m state --state NEW -m tcp-p udp --dport 10051 -j ACCEPT #zabbix trapper
(备注: 很多网友把这两条规则添加到防火墙配置的最后一行,导致防火墙启动失败,正确的应该是添加到默认的22端口这条规则的下面。)
*关闭SELINUX
#vi /etc/selinux/config
如下所示:
#This file controls the state of SELinux on the system.
# SELINUX= can take one of these threevalues:
# enforcing - SELinuxsecurity policy is enforced.
# permissive - SELinuxprints warnings instead of enforcing.
# disabled - No SELinux policyis loaded.
#SELINUX=enforcing #注释掉强制
SELINUX=disabled #关闭
# SELINUXTYPE= can take one of these twovalues:
# targeted - Targetedprocesses are protected,
# mls - Multi LevelSecurity protection.
#SELINUXTYPE=targeted #注释掉
:wq #保存退出
*重启系统
#reboot
*安装插件,寻找最快的源:
#yum install yum-fastestmirror –y
*安装apache:
#rpm –qa |grep httpd
#yum install httpd http-manual
#service httpd start
#chkconfig httpd on
#service httpd restart
#service httpd status
*安装mysql:
#rpm –qa |grep mysql
#yum -yinstall mysql mysql-server
#service mysqld start
#chkconfig mysqld on
#cp /etc/my.cnf /etc/my.cnfbak
#cp /usr/share/mysql/my-medium.cnf /etc/my.cnf 出现选择y
为root账户设置密码
#mysql_secure_installation
NOTE:RUNNING ALL PARTS OF THIS SCRIPT IS RECOMMENDED FOR ALL MySQL
SERVERS IN PRODUCTIONUSE! PLEASE READ EACH STEP CAREFULLY!
In order to log into MySQL to secure it,we'll need the current
password for the root user. Ifyou've just installed MySQL, and
you haven't set the root password yet,the password will be blank,
so you should just press enter here.
Enter current password for root (enterfor none): #按回车键
OK,successfully used password, moving on...
Setting the root password ensures thatnobody can log into the MySQL
root user without the proper authorisation.
Set root password? [Y/n] y #输入y
New password: #输入新密码
Re-enter new password: #重输入新密码
Password updated successfully!
Reloading privilege tables..
... Success!
By default, a MySQL installation has ananonymous user, allowing anyone
to log into MySQL without having to havea user account created for
them. This is intended only fortesting, and to make the installation
go a bit smoother. You shouldremove them before moving into a
production environment.
Remove anonymous users? [Y/n] y #输入y
... Success!
Normally, root should only be allowed toconnect from 'localhost'. This
ensures that someone cannot guess at theroot password from the network.
Disallow root login remotely? [Y/n]y #输入y
... Success!
By default, MySQL comes with a databasenamed 'test' that anyone can
access. This is also intended onlyfor testing, and should be removed
before moving into a productionenvironment.
Remove test database and access to it?[Y/n] y #输入y
- Dropping test database...
... Success!
- Removing privileges on testdatabase...
... Success!
Reloading the privilege tables will ensurethat all changes made so far
will take effect immediately
Reload privilege tables now? [Y/n]y #输入y
... Success!
Cleaning up...
All done! If you've completed all of theabove steps, your MySQL
installation should now be secure.
Thanks for using MySQL! #最后出现:Thanks for using MySQL!
MySql密码设置完成,重新启动 MySQL:
#service mysqld restart
#service mysqld stop
#service mysqld start
*安装PHP
#rpm –qa |grep php
#yum -y install php
安装PHP组件,使 PHP 支持 MySQL
#yum install php-mysql php-gd libjpeg* php-imap php-ldap php-odbcphp-pear php-xmlphp-xmlrpc php-mbstring php-mcrypt php-bcmath php-mhash libmcrypt
重启MySql
#service mysqld restart
重启Apche
#service httpd restart
*Apache配置
#cp /etc/httpd/conf/httpd.conf /etc/httpd/conf/httpd.confbak #备份
#vi /etc/httpd/conf/httpd.conf
44ServerTokens OS #在44行 修改为:ServerTokens Prod (在出现错误页的时候不显示服务器操作系统的名称)
536 ServerSignature On #在536行 修改为:ServerSignature Off (在错误页中不显示Apache的版本)
331 OptionsIndexes FollowSymLinks #在331行 修改为:Options Includes ExecCGI FollowSymLinks(允许服务器执行CGI及SSI,禁止列出目录)(这一行改了可能出问题,你可以自己试试看)
796 #AddHandler cgi-script .cgi #在796行 取消“#” 修改为:AddHandler cgi-script .cgi .pl (允许扩展名为.pl的CGI脚本运行)
338 AllowOverride None #在338行 修改为:AllowOverride All (允许.htaccess)
759 AddDefaultCharset UTF-8 #在759行 修改为:AddDefaultCharset GB2312 (添加GB2312为默认编码)
554 Options Indexes MultiViews FollowSymLinks#在554行 修改为 Options MultiViewsFollowSymLinks(不在浏览器上显示树状目录结构)
402 DirectoryIndex index.html index.html.var #在402行 修改为:DirectoryIndexindex.html index.htm Default.html Default.htm index.php Default.phpindex.html.var (设置默认首页文件,增加index.php)
76 KeepAlive Off #在76行 修改为:KeepAlive On (允许程序性联机)
83 MaxKeepAliveRequests 100 #在83行 修改为:MaxKeepAliveRequests1000 (增加同时连接数)
小提示:
:set nu #显示行号
:set nonu #取消行号
pgUp #上一页
pgDn #下一页
重启
service httpdrestart
#cp /etc/httpd/conf.d/welcome.conf /etc/httpd/conf.d/welcome.confbak #备份
#cp /var/www/error/noindex.html /var/www/error/noindex.htmlbak #备份
#rm -f/etc/httpd/conf.d/welcome.conf /var/www/error/noindex.html
#service httpd restart
浏览器访问:http://ip
*php配置
#cp /etc/php.ini /etc/php.ini.bak
#vi /etc/php.ini
946 ;date.timezone = PRC #在946行 把前面的分号去掉,改为date.timezone = PRC
386 disable_functions = #在386行 添加disable_functions =passthru,exec,system,chroot,scandir,chgrp,chown,shell_exec,proc_open,proc_get_status,ini_alter,ini_alter,ini_restore,dl,openlog,syslog,readlink,symlink,popepassthru,stream_socket_server,escapeshellcmd,dll,popen,disk_free_space,checkdnsrr,checkdnsrr,getservbyname,getservbyport,disk_total_space,posix_ctermid,posix_get_last_error,posix_getcwd,posix_getegid,posix_geteuid,posix_getgid,posix_getgrgid,posix_getgrnam,posix_getgroups,posix_getlogin,posix_getpgid,posix_getpgrp,posix_getpid,posix_getppid,posix_getpwnam,posix_getpwuid, posix_getrlimit,posix_getsid,posix_getuid,posix_isatty,posix_kill,posix_mkfifo,posix_setegid,posix_seteuid,posix_setgid,posix_setpgid,posix_setsid,posix_setuid,posix_strerror,posix_times,posix_ttyname,posix_uname列出PHP可以禁用的函数,如果某些程序需要用到这个函数,可以删除,取消禁用。
432 expose_php = On #在432行 修改为:expose_php = Off禁止显示php版本的信息
745 magic_quotes_gpc = Off #在745行 修改为:magic_quotes_gpc = On打开magic_quotes_gpc来防止SQL注入
229 short_open_tag = Off #在229行 修改为short_open_tag = On,支持php短标签
380 ;open_basedir = #在380行 把前面的分号去掉,改为open_basedir = .:/tmp/ 设置表示允许访问当前目录(即PHP脚本文件所在之目录)和/tmp/目录,可以防止php木马跨站,如果改了之后安装程序有问题,可以注销此行,或者直接写上程序的目录/data/www.osyunwei.com/:/tmp/
重启MySql
#service mysqld restart
重启Apche
#service httpd restart
在/var/www/html/目录下,创建一个index.php文件,并且编辑
#vi /var/www/html/index.php
<?php
phpinfo();
?>
保存退出, 在客户端浏览器输入服务器:http://ip地址,可以看到相关的配置信息!
(注意:apache默认的程序目录是/var/www/html
权限设置:chown apache.apache -R/var/www/html)
*下载zabbix
#wget http://sourceforge.net/projects/zabbix/files/ZABBIX%20Latest%20Stable/2.0.0/zabbix-2.0.0.tar.gz
#cp zabbix-2.0.0.tar.gz /usr/local/src/
#cd /usr/local/src
#gunzip zabbix-2.0.0.tar.gz &&tar -xvfzabbix-2.0.0.tar
#cd zabbix-2.0.0
#./configure --enable-server --enable-agent --with-mysql --with-net-snmp --with-libcurlll
#make install
*导入zabbix数据库
#mysql -uroot -pdbadmin
createdatabase zabbix;
showdatabases;
grantall on zabbix.* to zabbix@localhost identified by 'qq55754206';
#cd /usr/local/src/zabbix-2.0.0/database/mysql/
#ls
#mysql -uzabbix –pqq55754206 zabbix < schema.sql
#mysql -uzabbix-qq55754206 zabbix < p_w_picpaths.sql
#mysql -uzabbix–pqq55754206 zabbix < data.sql
(检查下zabbix数据库
#mysql -uroot -pdbadmin
use zabbix;
show tables;
exit)
备份zabbix 相关配置文件
#cd /usr/local/etc/
#cp zabbix_server.conf /home/share/zabbix_server.conf.bak
#cp zabbix_agentdconf /home/share/zabbix_agentd.conf.bak
创建日志文件
# touch /var/log/zabbix_server.log
# chmod 777 /var/log/zabbix_server.log
# touch /var/log/zabbix_agentd.log
# chmod 777 /var/log/zabbix_agentd.log
#vi /etc/services
在末尾添加:
zabbix-agent 10050/tcp # zabbix-agent
zabbix-agent 10050/udp # zabbix-agent
zabbix-trapper 10051/tcp # zabbix-trapper
zabbix-trapper 10051/udp # zabbix-trapper
#vi zabbix_server
修改如下内容:
-------------
LogFile=/var/log/zabbix_server.log ###修改默认日志路径
DBHost=localhost
DBName=zabbix
DBUser=zabbix
DBPassword=qq55754206
#vi zabbix_agentd
LogFile=/var/log/zabbix_agentd.log
Server=127.0.0.1 ###或者192.168.2.116
UnsafeUserParameters=1
*安装zabbix
# cd /usr/local/src/zabbix-2.0.0
# cp misc/init.d/tru64/zabbix_server /etc/init.d/zabbix_server
# cp misc/init.d/tru64/zabbix_agentd /etc/init.d/zabbix_agentd
# cd /etc/init.d/
#chomd 755 zabbix_*
# vi zabbix_server
# vi zabbix_agentd
在文件头部的#!/bin/sh行下分别添加如下两行:
#chkconfig: 35 95 95
#description:zabbix Agent server
#chkconfig --add zabbix_server
#chkconfig --add zabbix_agentd
#chkconfig zabbiz_server on
#chkconfig zabbiz_agentd on
#service zabbix_server start
#service zabbix_agentd start
#cd /home/share
#rpm -ivh fping-2.4-1.b2.3.el6.rf.i686.rpm
复制PHP文件
#cd /usr/local/src/zabbix-2.0.0/frontends/php/
#mkdir /var/www/html/zabbix
#cp -a . /var/www/html/zabbix/
#service httpd restart
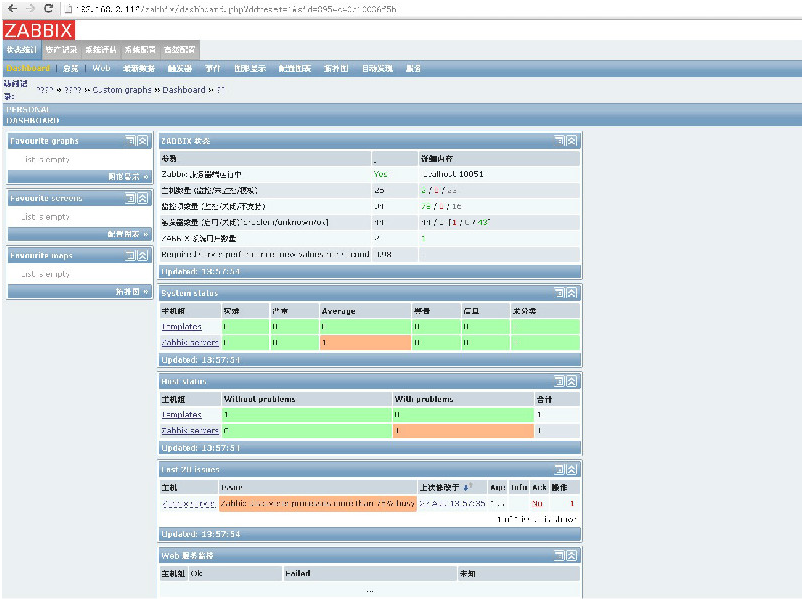
在你的浏览器中,输入url:http://192.168.2.116/zabbix,你将看到前端安装向导的第一个画面。
修改php.ini文件
#vi /etc/php.ini
#service httpd restart
拷贝zabbi.conf.php文件
#cd /home/share #### (samba共享目录,可匿名访问)
#cp zabbix.conf.php /var/www/html/zabbix/conf/
zabbix前端已经安装就绪,默认的用户名是Admin,密码是zabbix。
http://192.168.2.116/zabbix,登录到zabbix 。


