
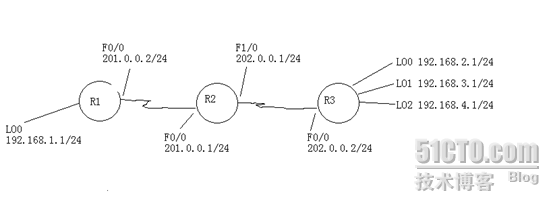
实验拓扑:如上图。
实验目的:配置站点到站点的×××,并在各自站点上配置OSPF路由协议,同时在×××隧道上打开虚拟接口,让两边的站点能够通过虚拟接口(Tunnel)学习到对端的路由表,从而实现各个网段互通。
实验操作过程和配置:
网络连接方式:
Router1 F0/0 <----> Router2 F0/0
Router2 F1/0 <----> Router3 F0/0
IP地址分配:
R1 F0/0 201.0.0.2/24 LO0 192.168.1.1/24
R2 F0/0 201.0.0.1/24 F1/0 202.0.0.1/24
R3 F0/0 202.0.0.2/24 LO0 192.168.2.1/24 LO1 192.168.3.1/24 LO2 192.168.4.1/24
第一步:在各个路由器上配置IP地址
R1:
r1(config)#int f0/0
r1(config-if)#ip add 201.0.0.2 255.255.255.0
r1(config-if)#int lo0
r1(config-if)#ip add 192.168.1.1 255.255.255.0
r1(config-if)#no shut
r1(config-if)#end
R2:
r2(config)#int f0/0
r2(config-if)#ip add 201.0.0.1 255.255.255.0
r2(config-if)#no shut
r2(config-if)#int f1/0
r2(config-if)#ip add 202.0.0.1 255.255.255.0
r2(config-if)#no shut
r2(config-if)#end
R3:
r3(config)#int f0/0
r3(config-if)#ip add 202.0.0.2 255.255.255.0
r3(config-if)#no shut
r3(config-if)#int lo
r3(config-if)#ip add 192.168.2.1 255.255.255.0
r3(config-if)#no shut
r3(config)#int lo1
r3(config-if)#ip add 192.168.3.1 255.255.255.0
r3(config-if)#no shut
r3(config-if)#int lo2
r3(config-if)#ip add 192.168.4.1 255.255.255.0
r3(config-if)#no shut
r3(config-if)#end
第二步:把R2看作是INTERNET使用,分别的R1 和R3 上配置默认路由。
r1(config)#ip route 0.0.0.0 0.0.0.0 f0/0
r1(config)#end
r3(config)#ip route 0.0.0.0 0.0.0.0 f0/0
r3(config)#end
注:配置默认路由的目的是为了使两个站点的外网接口互通。
第三步:配置×××
R1:
r1#conf t
Enter configuration commands, one per line. End with CNTL/Z.
r1(config)#crypto isakmp enable
r1(config)#crypto isakmp policy 10
r1(config-isakmp)#authentication pre-share
r1(config-isakmp)#end
r1#conf t
Enter configuration commands, one per line. End with CNTL/Z.
r1(config)#crypto isakmp key 0 qqq111,,, address 202.0.0.2
r1(config)#end
r1#conf t
Enter configuration commands, one per line. End with CNTL/Z.
r1(config)#crypto ipsec transform-set forvpn esp-des esp-md5-hmac
r1(cfg-crypto-trans)#crypto ipsec profile site2site
r1(ipsec-profile)#set transform-set forvpn
r1(ipsec-profile)#end
r1#conf t
Enter configuration commands, one per line. End with CNTL/Z.
r1(config)#interface tunnel 0
r1(config-if)#ip add 1.1.1.1 255.255.255.0
r1(config-if)#tunnel source f0/0
r1(config-if)#tunnel destination 202.0.0.2
r1(config-if)#tunnel protection ipsec profile site2site
r1(config-if)#no shut
r1(config-if)#end
R3:
r3#conf t
Enter configuration commands, one per line. End with CNTL/Z.
r3(config)#crypto isakmp enable
r3(config)#crypto isakmp policy 10
r3(config-isakmp)#authentication pre-share
r3(config-isakmp)#end
r3#conf t
Enter configuration commands, one per line. End with CNTL/Z.
r3(config)#crypto isakmp key 0 qqq111,,, address 201.0.0.2
r3(config)#end
r3#conf t
Enter configuration commands, one per line. End with CNTL/Z.
r3(config)#crypto ipsec transform-set forvpn esp-des esp-md5-hmac
r3(cfg-crypto-trans)#crypto ipsec profile site2site
r3(ipsec-profile)#set transform-set forvpn
r3(ipsec-profile)#end
r3#conf t
Enter configuration commands, one per line. End with CNTL/Z.
r3(config)#interface tunnel 0
r3(config-if)#ip add 1.1.1.2 255.255.255.0
r3(config-if)#tunnel source f0/0
r3(config-if)#tunnel destination 201.0.0.2
r3(config-if)#tunnel protection ipsec profile site2site
r3(config-if)#no shut
r3(config-if)#end
第四步:配置OSPF路由协议。
R1:
r1(config)#router ospf 10
r1(config-router)#network 192.168.1.1 0.0.0.0 a 0
r1(config-router)#network 1.1.1.1 0.0.0.0 a 0
r1(config-router)#end
R3:
r3(config)#router ospf 100
r3(config-router)#network 192.168.2.1 0.0.0.0 a 0
r3(config-router)#network 1.1.1.2 0.0.0.0 a 0
r3(config-router)#network 192.168.3.1 0.0.0.0 a 0
r3(config-router)#network 192.168.4.1 0.0.0.0 a 0
r3(config-router)#end
第五步:查看路由表。
r1#show ip route
Codes: C - connected, S - static, R - RIP, M - mobile, B - BGP
D - EIGRP, EX - EIGRP external, O - OSPF, IA - OSPF inter area
N1 - OSPF NSSA external type 1, N2 - OSPF NSSA external type 2
E1 - OSPF external type 1, E2 - OSPF external type 2
i - IS-IS, su - IS-IS summary, L1 - IS-IS level-1, L2 - IS-IS level-2
ia - IS-IS inter area, * - candidate default, U - per-user static route
o - ODR, P - periodic downloaded static route
Gateway of last resort is 0.0.0.0 to network 0.0.0.0
1.0.0.0/24 is subnetted, 1 subnets
C 1.1.1.0 is directly connected, Tunnel0
C 201.0.0.0/24 is directly connected, FastEthernet0/0
192.168.4.0/32 is subnetted, 1 subnets
O 192.168.4.1 [110/11112] via 1.1.1.2, 00:21:25, Tunnel0
C 192.168.1.0/24 is directly connected, Loopback0
192.168.2.0/32 is subnetted, 1 subnets
O 192.168.2.1 [110/11112] via 1.1.1.2, 00:21:25, Tunnel0
192.168.3.0/32 is subnetted, 1 subnets
O 192.168.3.1 [110/11112] via 1.1.1.2, 00:21:25, Tunnel0
S* 0.0.0.0/0 is directly connected, FastEthernet0/0
r3#show ip route
Codes: C - connected, S - static, R - RIP, M - mobile, B - BGP
D - EIGRP, EX - EIGRP external, O - OSPF, IA - OSPF inter area
N1 - OSPF NSSA external type 1, N2 - OSPF NSSA external type 2
E1 - OSPF external type 1, E2 - OSPF external type 2
i - IS-IS, su - IS-IS summary, L1 - IS-IS level-1, L2 - IS-IS level-2
ia - IS-IS inter area, * - candidate default, U - per-user static route
o - ODR, P - periodic downloaded static route
Gateway of last resort is 0.0.0.0 to network 0.0.0.0
1.0.0.0/24 is subnetted, 1 subnets
C 1.1.1.0 is directly connected, Tunnel0
C 202.0.0.0/24 is directly connected, FastEthernet0/0
C 192.168.4.0/24 is directly connected, Loopback2
192.168.1.0/32 is subnetted, 1 subnets
O 192.168.1.1 [110/11112] via 1.1.1.1, 00:21:50, Tunnel0
C 192.168.2.0/24 is directly connected, Loopback0
C 192.168.3.0/24 is directly connected, Loopback1
S* 0.0.0.0/0 is directly connected, FastEthernet0/0
第六步:测试各个网段的连通性。
r1#ping 192.168.2.1 source 192.168.1.1
Type escape sequence to abort.
Sending 5, 100-byte ICMP Echos to 192.168.2.1, timeout is 2 seconds:
Packet sent with a source address of 192.168.1.1
!!!!!
Success rate is 100 percent (5/5), round-trip min/avg/max = 124/144/192 ms
r1#ping 192.168.3.1 source 192.168.1.1
Type escape sequence to abort.
Sending 5, 100-byte ICMP Echos to 192.168.3.1, timeout is 2 seconds:
Packet sent with a source address of 192.168.1.1
!!!!!
Success rate is 100 percent (5/5), round-trip min/avg/max = 132/160/204 ms
r1#ping 192.168.4.1 source 192.168.1.1
Type escape sequence to abort.
Sending 5, 100-byte ICMP Echos to 192.168.4.1, timeout is 2 seconds:
Packet sent with a source address of 192.168.1.1
!!!!!
Success rate is 100 percent (5/5), round-trip min/avg/max = 88/134/172 ms
r1#
r3#ping 192.168.1.1 source 192.168.2.1
Type escape sequence to abort.
Sending 5, 100-byte ICMP Echos to 192.168.1.1, timeout is 2 seconds:
Packet sent with a source address of 192.168.2.1
!!!!!
Success rate is 100 percent (5/5), round-trip min/avg/max = 96/144/212 ms
r3#ping 192.168.1.1 source 192.168.3.1
Type escape sequence to abort.
Sending 5, 100-byte ICMP Echos to 192.168.1.1, timeout is 2 seconds:
Packet sent with a source address of 192.168.3.1
!!!!!
Success rate is 100 percent (5/5), round-trip min/avg/max = 96/148/208 ms
r3#ping 192.168.1.1 source 192.168.4.1
Type escape sequence to abort.
Sending 5, 100-byte ICMP Echos to 192.168.1.1, timeout is 2 seconds:
Packet sent with a source address of 192.168.4.1
!!!!!
Success rate is 100 percent (5/5), round-trip min/avg/max = 92/125/152 ms
r3#
到此站点到站点的×××配置完成,如果有新的网段加入,只需开启OSPF路由协议,把此网段宣告到相同的区域就可以相互通信。
本文来自CSDN博客,转载请标明出处:file:///G:/MM/桌面/新建文件夹/站点到站点×××配置方法%20-%20贾伟的专栏%20-%20CSDN博客.htm


