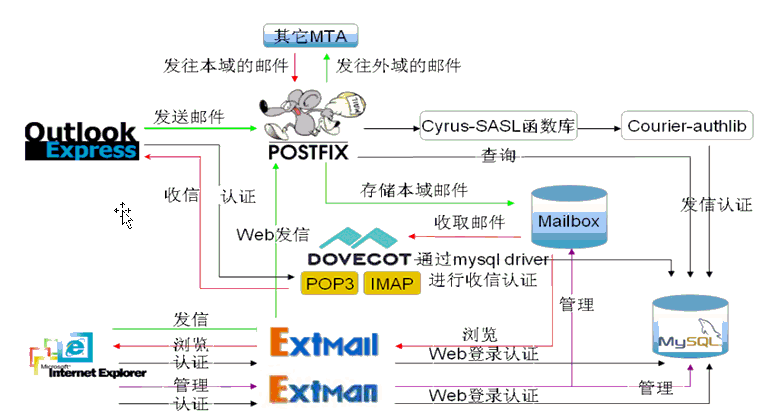
利用邮箱收发信件已经成为我们日常生活不可或缺的一部分,而其基本的工作流程又是什么样的呢,带着这样的疑问,便对其基本的工作流程做了一下总结。
首先要明白需要那些包:
httpd, php, php-mysql, mysql, mysql-server, mysql-devel, openssl-devel, dovecot, perl-DBD-MySQL, tcl, tcl-devel, libart_lgpl, libart_lgpl-devel, libtool-ltdl, libtool-ltdl-devel, expect
但是在安装前要关闭系统自带的sendmail,并将它的随系统自动启动功能关闭:
service sendmail stop chkconfig sendmail off
然后利用 yum grouplist命令来检查下面的开发包组:
Development Libraries Development Tools Legacy Software Development X Software Development
如果没有的话,利用如下命令来安装上即可:yum groupinstall "packge_group_name"
下面来安装这些包。为了可以使用到各模块的最新功能,mysql 和apache采用源码来安装。而Mysql的源码安装,其官方还为我们提供了二进制版的,为我们省去了不少“麻烦”,对于我这样的懒人,当然不会“自找麻烦了”,这里就采用二进制版来安装。
首先来进行拆包: tar -zxvf mysql-5.5.15-linux2.6-i686.tar.gz -C /usr/local/切换到解压的目录可以看到解压出的目录名字很长,为了操作的方便,这里为其做一个软连接:
ln -s mysql-5.5.15-linux2.6-i686/ mysql
然后切换到mysql目录下,可以看到官方提供的安装文档INSTALL-BINARY,根据里面的步骤做就好
创建组:groupadd -r mysql
创建用户:useradd -r -g mysql mysql -M
改变所有者:chown -R mysql .
改变所属组:chgrp -R mysql .
初始化:scripts/mysql_install_db --user=mysql
然后把权限改回来: chown -R root . chown -R mysql data
然后拷贝并生成mysql配置文档:cp support-files/my-medium.cnf /etc/my.cnf
拷贝并生成mysql的控制文件:cp support-files/mysql.server /etc/init.d/mysqld,赋予其可执行权限:chmod a+x /etc/init.d/mysqld
利用 chkconfig --add mysqld来把其加入开机启动进程。
启动mysql。
在profile文件中加入mysql环境变量

然后执行: . /etc/profile
把库文件的路径加入变量里vim /etc/ld.so.conf.d/mysql.conf:/usr/local/mysql/lib
然后执行ldconfig命令来刷新,接着来看能不能找到库文件

然后对头文件include做一个软连接:ln -s include /usr/include/mysql
启动mysql,且为root用户设置密码:mysqladmin -u root -p password 'wgz0224gz'
到此,mysql的搭建就完成了。
接下来安装apache,这里我下载的是httpd-2.4.4,要安装需要额外安装另外两个文件apr,apr-util,所以先来安装这两个包(注意:如果系统里安装的有apache的话是要先卸载的)
tar -zxvf apr-1.4.6.tar.gz -C /usr/local/src/
cd /usr/local/src/apr-1.4.6/
./configure --prefix=/usr/local/apr(有可能提示缺少gcc,这时用光盘提供的rpm装上然后再执行./configure即可)
make
make install
tar -zxvf apr-util-1.4.1.tar.gz -C /usr/local/src/
cd /usr/local/src/apr-util-1.4.1/
./configure --with-apr=/usr/local/apr/bin/apr-1-config
make
make install
此外,还要安装一个pcre-devel的包,这里我利用yum装的rpm包
接下来就来安装apache,这里我下载的版本为httpd-2.4.4,
tar -jxvf httpd-2.4.4.tar.bz2 -C /usr/local/src/
切换到刚解压的目录
./configure --prefix=/usr/local/apache --sysconfdir=/etc/httpd --enable-so --enable-ssl --enable-rewrite apr=/usr/local/apr/bin/apr-1-config --with-apr-util=/usr/local/apr/bin/apu-1-config --with-pcre -with-z --enable-mpms-shared=all
(执行过程中可能出现这个错误:
checking for OpenSSL version >= 0.9.7... FAILED
configure: WARNING: OpenSSL version is too old
no
checking whether to enable mod_ssl... configure: error: mod_ssl has been requested but can not be built due to prerequisite failures
这时要安装一个包:yum install openssl-devel然后再执行以上命令即可)
make
make install
接着要把apachectl的路径放到man的路径当中去vim /etc/man.config

然后对apache的include做一个符号链接
ln -s /usr/local/apache/include /usr/include/apache
接下来就要去做apache的脚本了,并把其拷贝到/etc/init.d/目录下,并附加其可执行的权限
root@localhost ~]# cp httpd /etc/init.d/
[root@localhost ~]# chmod a+x /etc/init.d/httpd
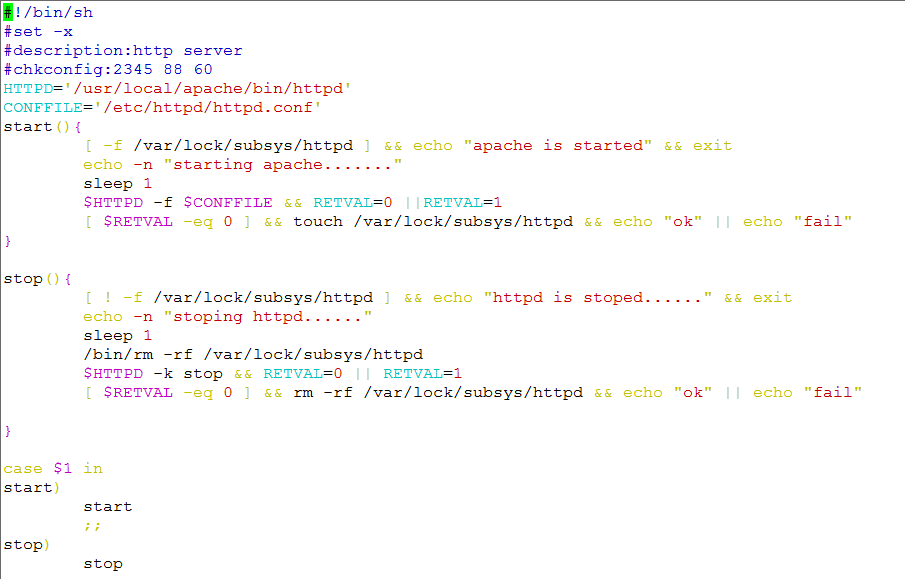

service httpd start
chkconfig --add httpd
chkconfig httpd on
然后就是安装其他的包了,这里直接用yum来安装即可。
yum install dovecot tcl tcl-devel libart_lgpl libart_lgpl-devel libtool-ltdl libtool-ltdl-devel expect
接下来来安装DNS:
yum install bind bind-chroot caching-nameserver
然后执行如下命令:

然后编辑配置文件:vim named.conf


接着编辑区域的声明文件: vim named.rfc1912.zones
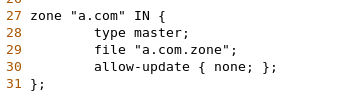
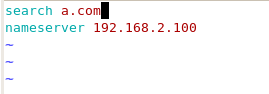
接着生成a.com.zone文件:

编辑该文件vim a.com.zone(192.168.2.100为机器的地址)

启动DNS

做DNS指向vim /etc/resolv.conf :
修改主机名:
vim /etc/sysconfig/network
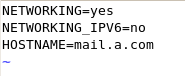
vim /etc/hosts

这时可以不重启机器,直接执行hostname mail.a.com命令即可。
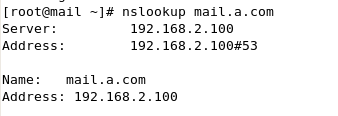
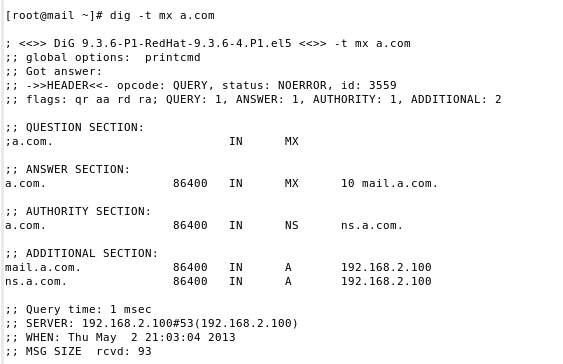
测试一下DNS:
到此,准备工作已经就绪了。
接着来安装postfix
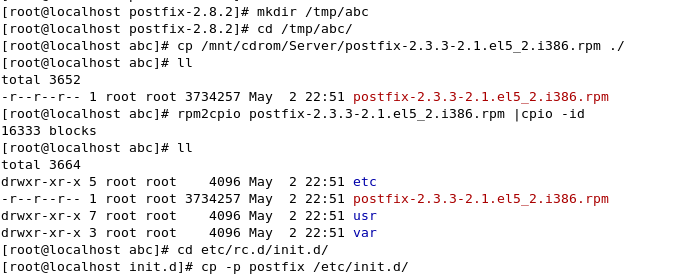
解压缩:tar -zxvf postfix-2.8.2.tar.gz -C /usr/local/src/
到解压目录:cd /usr/local/src/postfix-2.8.2/
创建用户和组:

然后执行如下命令:
make makefiles 'CCARGS=-DHAS_MYSQL -I/usr/local/mysql/include -DUSE_SASL_AUTH -DUSE_CYRUS_SASL -I/usr/include/sasl -DUSE_TLS ' 'AUXLIBS=-L/usr/local/mysql/lib/ -lmysqlclient -lz -lm -L/usr/lib/sasl2 -lsasl2 -lssl -lcrypto'
make && make install
然后执行:/usr/bin/newaliases
然后产生配置文件:
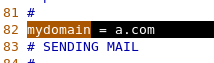
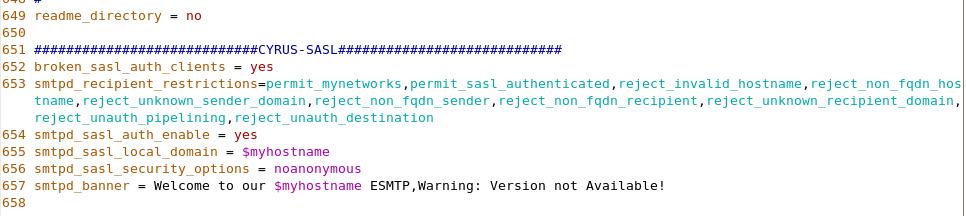
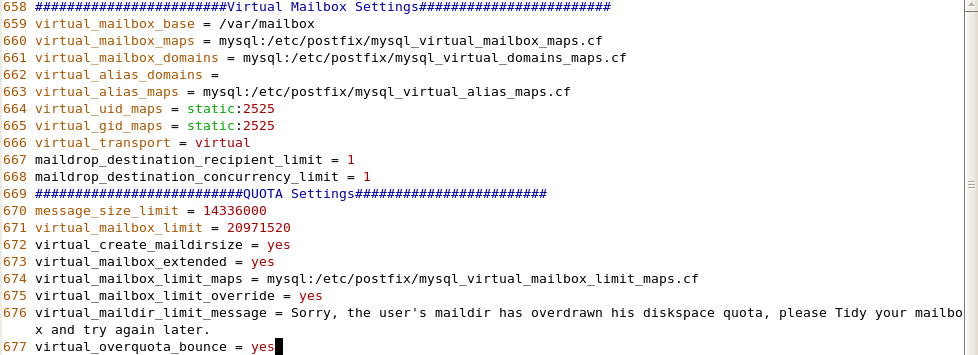
要想使postfix能正常工作,需要编辑一个文件:vim /etc/postfix/main.cf


启动postfix:service postfix start
接着cd /usr/lib/sasl2/

启动sasl:

安装courier-authlib
tar -jxvf courier-authlib-0.63.0.tar.bz2 -C /usr/local/src/
切换到解压目录执行如下命令
./configure \
--prefix=/usr/local/courier-authlib \
--sysconfdir=/etc \
--with-authmysql \
--with-mysql-libs=/usr/local/mysql/lib \
--with-mysql-includes=/usr/local/mysql/include \
--with-redhat \
--with-authmysqlrc=/etc/authmysqlrc \
--with-authdaemonrc=/etc/authdaemonrc \
--with-ltdl-lib=/usr/lib \
--with-ltdl-include=/usr/include
make && make install
接着做如下操作

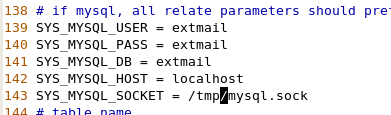
然后编辑文件:vim authdaemonrc


然后编辑文件:vim authmysqlrc


生成控制脚本:

启动服务:

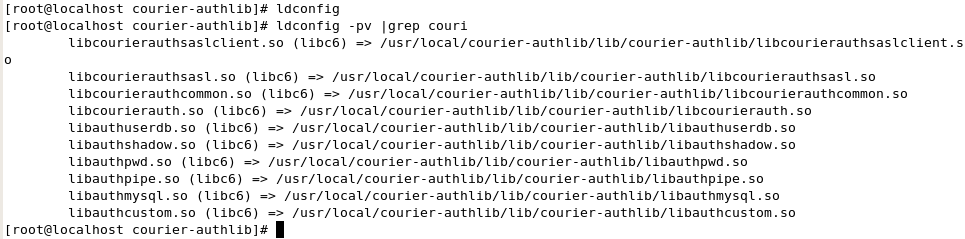
对头文件和库文件做相应的操作
cd /usr/local/courier-authlib/
vim /etc/ld.so.conf.d/courier-authlib.conf


让postfix支持虚拟域和虚拟用户
编辑/etc/postfix/main.cf,添加如下内容:

使用extman源码目录下docs目录中的extmail.sql和init.sql建立数据库
# tar zxvf extman-1.1.tar.gz
cd extman-1.1/docs
mysql -u root -p <extmail.sql
mysql -u root -p <init.sql
cp mysql* /etc/postfix/
授予用户extmail访问extmail数据库的权限

重启postfix:service postfix restart
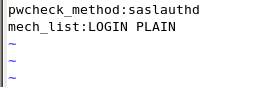
vim /usr/lib/sasl2/smtpd.conf

重新启动下各个服务。
配置dovecot
首先创建目录:

vim /etc/dovecot.conf


创建/etc/dovecot-mysql.conf
vim /etc/dovecot-mysql.conf

接下来启动dovecot服务:
service dovecot start
chkconfig dovecot on
安装Extmail
tar -zxvf extmail-1.2.tar.gz
为extmail、extman创建主目录:
mkdir -pv /var/www/extsuite/
把解压出来的extmail、extman移到该主目录下
mv extmail-1.2 /var/www/extsuite/extmail
mv extman-1.1 /var/www/extsuite/extman
进入extmail目录:
cp webmail.cf.default webmail.cf
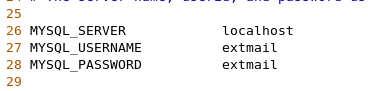
编辑此文件vim webmail.cf:


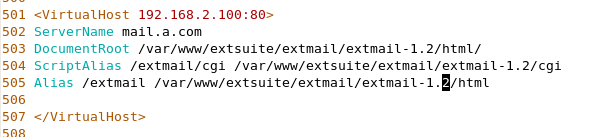
编辑apache的配置文件vim /etc/httpd/httpd.conf

修改 cgi执行文件属主为apache运行身份用户:
chown -R postfix.postfix /var/www/extsuite/extmail/extmail-1.2/cgi/
依赖关系的解决
extmail将会用到perl的Unix::syslogd功能,可以去http://search.cpan.org搜索下载原码包进行安装。
tar -zxvf Unix-Syslog-0.100.tar.gz -C /usr/local/src/
perl Makefile.PL
make
make install
配置Extman-1.1
cd /var/www/extsuite/extman/
cp webman.cf.default webman.cf
编辑给文件vim webman.cf

修改cgi目录的属主:
chown -R postfix.postfix /var/www/extsuite/extman/cgi/
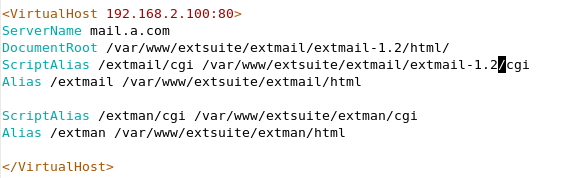
在apache的主配置文件中Extmail的虚拟主机部分,添加如下两行:
ScriptAlias /extman/cgi /var/www/extsuite/extman/cgi
Alias /extman /var/www/extsuite/extman/html
创建其运行时所需的临时目录,并修改其相应的权限:
#mkdir -pv /tmp/extman
#chown postfix.postfix /tmp/extman
此时,还要编辑一文件vim /etc/postfix/main.cf注释掉开始时打开的那一行

重启各个服务。下面就可以测试了。
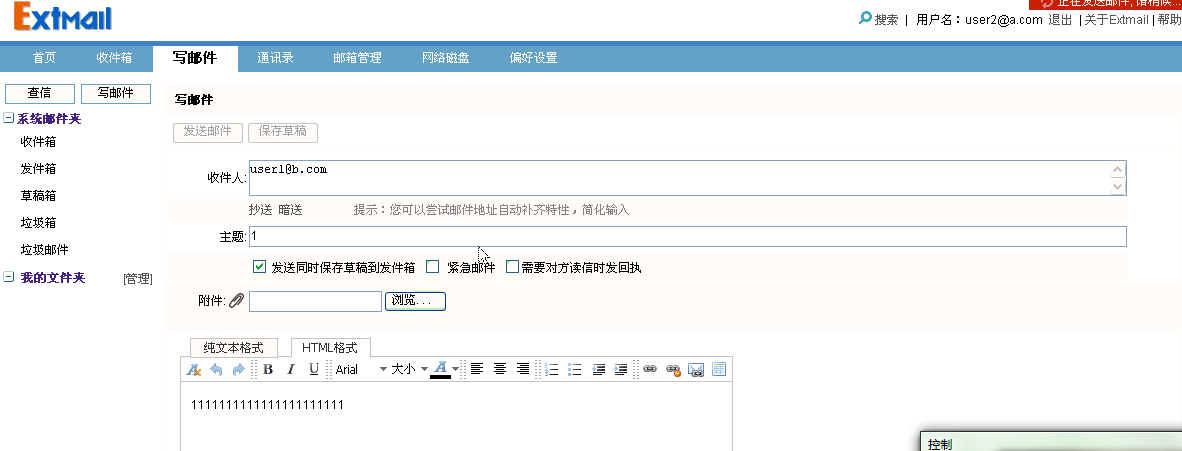
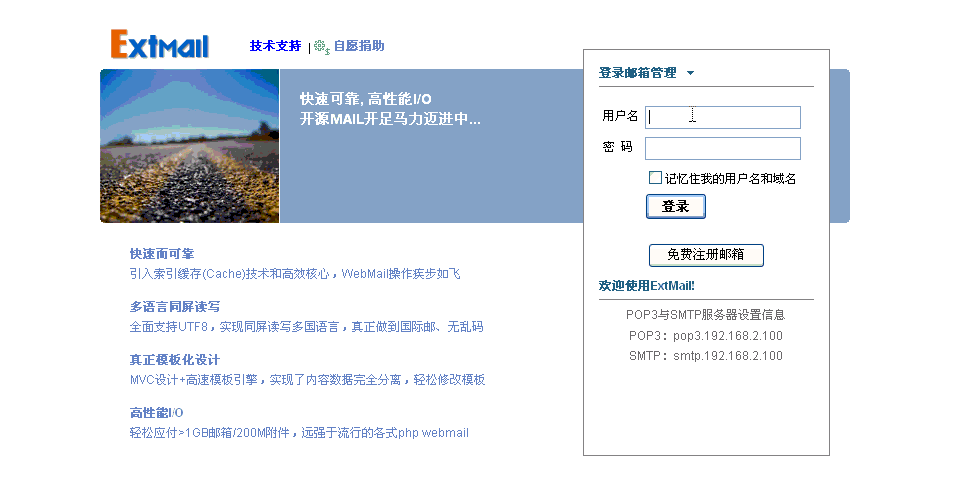
Extmail 登录页面
登陆进去
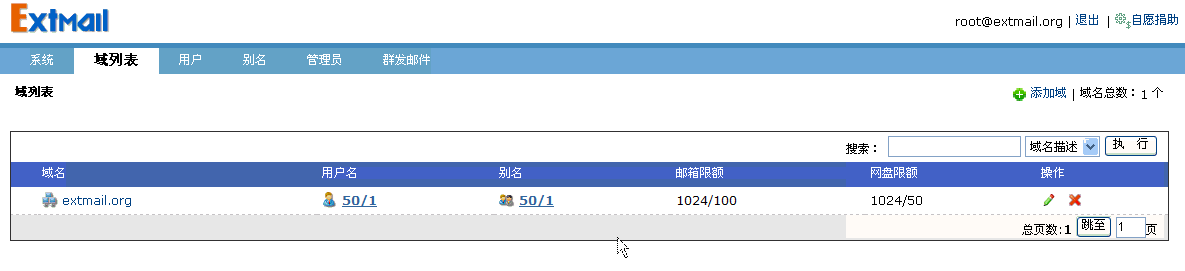
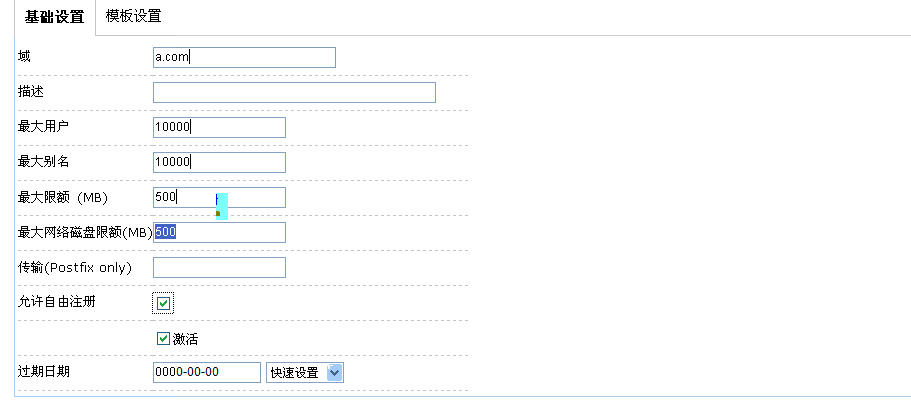
添加域
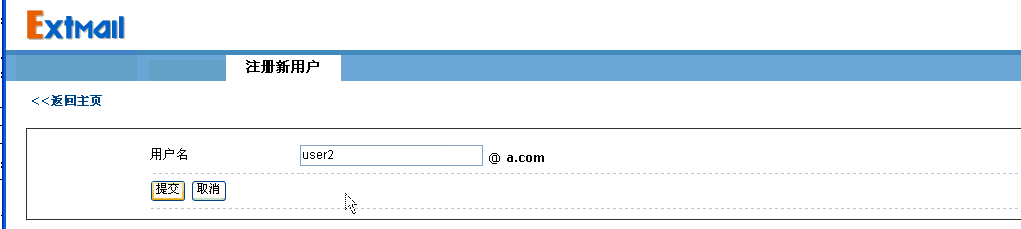
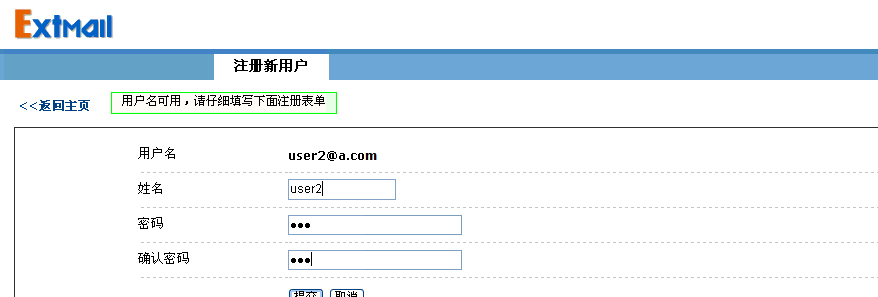
注册新用户
发信: