第一步安装apache
[root@localhost ~]# yum install httpd –y
Install 1 Package(s)
Update 0 Package(s)
Remove 0 Package(s)
Total download size: 1.2 M
Downloading Packages:
Running rpm_check_debug
Running Transaction Test
Finished Transaction Test
Transaction Test Succeeded
Running Transaction
Installing : httpd
Installed:
httpd.i386 0:2.2.3-31.el5
Complete!
第二步安装mysql 个mysql服务器
[root@localhost ~]# yum install mysql mysql-server –y
Total 100 MB/s | 15 MB 00:00
Running rpm_check_debug
Running Transaction Test
Finished Transaction Test
Transaction Test Succeeded
Running Transaction
Installing : perl-DBI 1/4
Installing : mysql 2/4
Installing : perl-DBD-MySQL 3/4
Installing : mysql-server 4/4
Installed:
mysql.i386 0:5.0.77-3.el5 mysql-server.i386 0:5.0.77-3.el5
Dependency Installed:
perl-DBD-MySQL.i386 0:3.0007-2.el5 perl-DBI.i386 0:1.52-2.el5
Complete!
第三步安装php
(1) 首先搜索一下关于php的软件
[root@localhost ~]# yum list all |grep php
This system is not registered with RHN.
RHN support will be disabled.
php.i386 (php主程序) 5.1.6-23.2.el5_3 rhel-erver
php-bcmath.i386 5.1.6-23.2.el5_3 rhel-erver
php-cli.i386 5.1.6-23.2.el5_3 rhel-erver
php-common.i386 5.1.6-23.2.el5_3 rhel-erver
php-dba.i386 5.1.6-23.2.el5_3 rhel-erver
php-devel.i386 5.1.6-23.2.el5_3 rhel-erver
php-gd.i386 5.1.6-23.2.el5_3 rhel-erver
php-imap.i386 5.1.6-23.2.el5_3 rhel-erver
php-ldap.i386 5.1.6-23.2.el5_3 rhel-erver
php-mbstring.i386 (需要安装) 5.1.6-23.2.el5_3 rhel-erver
php-mysql.i386 (需要安装) 5.1.6-23.2.el5_3 rhel-erver
php-ncurses.i386 5.1.6-23.2.el5_3 rhel-erver
php-odbc.i386 5.1.6-23.2.el5_3 rhel-erver
php-pdo.i386 5.1.6-23.2.el5_3 rhel-erver
php-pear.noarch 1:1.4.9-6.el5 rhel-erver
php-pgsql.i386 5.1.6-23.2.el5_3 rhel-erver
php-snmp.i386 5.1.6-23.2.el5_3 rhel-erver
php-soap.i386 5.1.6-23.2.el5_3 rhel-erver
php-xml.i386 5.1.6-23.2.el5_3 rhel-erver
php-xmlrpc.i386 5.1.6-23.2.el5_3 rhel-erver
(2) 开始安装php软件包
[root@localhost ~]# yum install php php-mysql php-mbstaing -y
Total 529 MB/s | 3.5 MB 00:00
Running rpm_check_debug
Running Transaction Test
Finished Transaction Test
Transaction Test Succeeded
Running Transaction
Installing : php-common 1/5
Installing : php-cli 2/5
Installing : php-pdo 3/5
Installing : php-mysql 4/5
Installing : php 5/5
Installed:
php.i386 0:5.1.6-23.2.el5_3 php-mysql.i386 0:5.1.6-23.2.el5_3
Dependency Installed:
php-cli.i386 0:5.1.6-23.2.el5_3 php-common.i386 0:5.1.6-23.2.el5_3 php-pdo.i386 0:5.1.6-23.2.el5_3
第四步
root@localhost ~]# service httpd start
Starting httpd: [ OK ]
You have new mail in /var/spool/mail/root
[root@localhost ~]# chkconfig httpd on (设置开机启动)
[root@localhost ~]#
[root@localhost ~]#
[root@localhost ~]# service mysqld start
Initializing MySQL database: Installing MySQL system tables...
120821 0:35:56 [Warning] option 'max_join_size': unsigned value 18446744073709551615 adjusted to 4294967295
120821 0:35:56 [Warning] option 'max_join_size': unsigned value 18446744073709551615 adjusted to 4294967295
OK
Filling help tables...
120821 0:35:56 [Warning] option 'max_join_size': unsigned value 18446744073709551615 adjusted to 4294967295
120821 0:35:56 [Warning] option 'max_join_size': unsigned value 18446744073709551615 adjusted to 4294967295
OK
To start mysqld at boot time you have to copy
support-files/mysql.server to the right place for your system
PLEASE REMEMBER TO SET A PASSWORD FOR THE MySQL root USER !
To do so, start the server, then issue the following commands:
/usr/bin/mysqladmin -u root password 'new-password'
/usr/bin/mysqladmin -u root -h localhost.localdomain password 'new-password'
Alternatively you can run:
/usr/bin/mysql_secure_installation
which will also give you the option of removing the test
databases and anonymous user created by default. This is
strongly recommended for production servers.
See the manual for more instructions.
You can start the MySQL daemon with:
cd /usr ; /usr/bin/mysqld_safe &
You can test the MySQL daemon with mysql-test-run.pl
cd mysql-test ; perl mysql-test-run.pl
Please report any problems with the /usr/bin/mysqlbug script!
The latest information about MySQL is available on the web at
http://www.mysql.com
Support MySQL by buying support/licenses at http://shop.mysql.com
[ OK ]
Starting MySQL: [ OK ]
[root@localhost ~]# chkconfig mysqld on (设置开机启动)
[root@localhost ~]#
第五步测试一下安装的lamp是否成功
[root@localhost ~]# cd /var/www/html/
[root@localhost html]#
[root@localhost html]# vim index.php (编辑一个测试页面)
[root@localhost html]#
测试apache调用php是否成功结果图

测试php调用mysql
[root@localhost html]# vim index.php
<?php
$link=mysql_connect('127.0.0.1','root','');
if ($link)
echo "ok";
else
echo "not";
?>
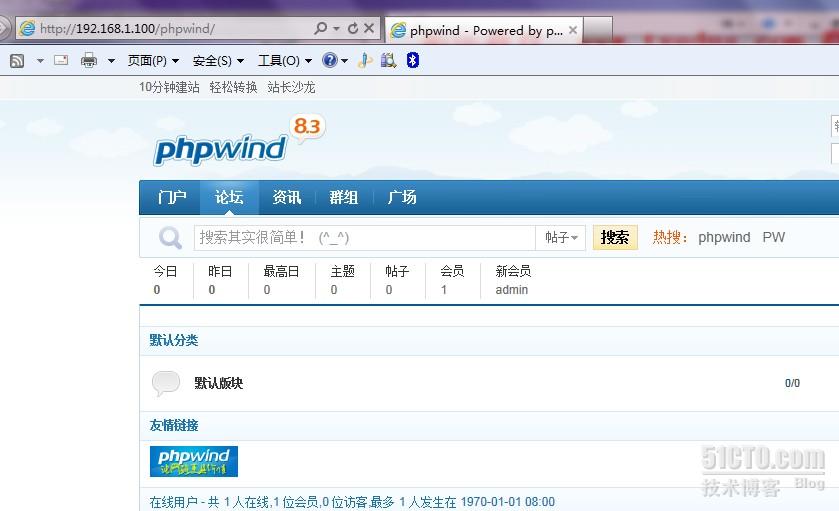
案例一利用phpwid架设论坛
把phpwind_GBK_8.3复制到linux中
[root@localhost ~]# unzip phpwind_GBK_8.3 (解压缩)
打开目录后
[root@localhost ~]# ll phpwind_GBK_8.3
total 5
drwxr-xr-x 4 root root 4096 Dec 21 2010 docs
drwxr-xr-x 22 root root 4096 Dec 21 2010 upload
[root@localhost html]# mv upload/ /var/www/html/phpwind
(把unload复制到/var/www/html/目录下)
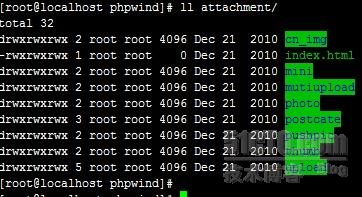
按照页面给出的提示修改目录的权限
[root@localhost phpwind]# chmod -R 777 p_w_upload
[root@localhost phpwind]# chmod -R 777 data
[root@localhost phpwind]# chmod -R 777 html
(利用—R递归比较方便
在mysql中创建一个数据库
[root@localhost phpwind]# mysql
mysql> create database phpwind ;
Query OK, 1 row affected (0.08 sec)
mysql> show databases ;
+--------------------+
| Database |
+--------------------+
| information_schema |
| mysql |
| phpwind |
| test |
+--------------------+
4 rows in set (0.05 sec)
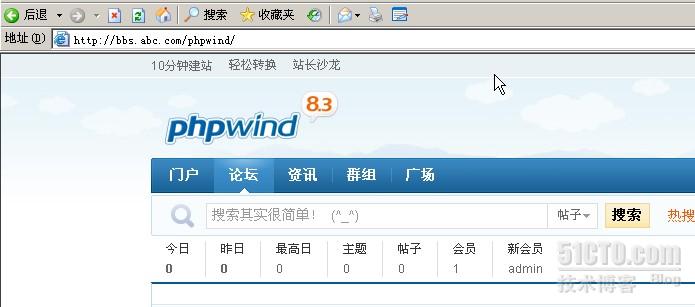
第一步
[root@localhost ~]# vim /etc/httpd/conf/httpd.conf (编辑apache文件)
992 <VirtualHost 192.168.145.100:80>
993 ServerAdmin webmaster@dummy-host.example.com
994 DocumentRoot /var/www/html/phpwind
995 ServerName bbs.abc.com
996
997 ErrorLog logs/phpwind-error_log
998 CustomLog logs/phpwind-access_log common
999 </VirtualHost>
[root@localhost ~]# service httpd restart (重启服务)
Stopping httpd: [ OK ]
Starting httpd: [ OK ]
[root@localhost ~]#
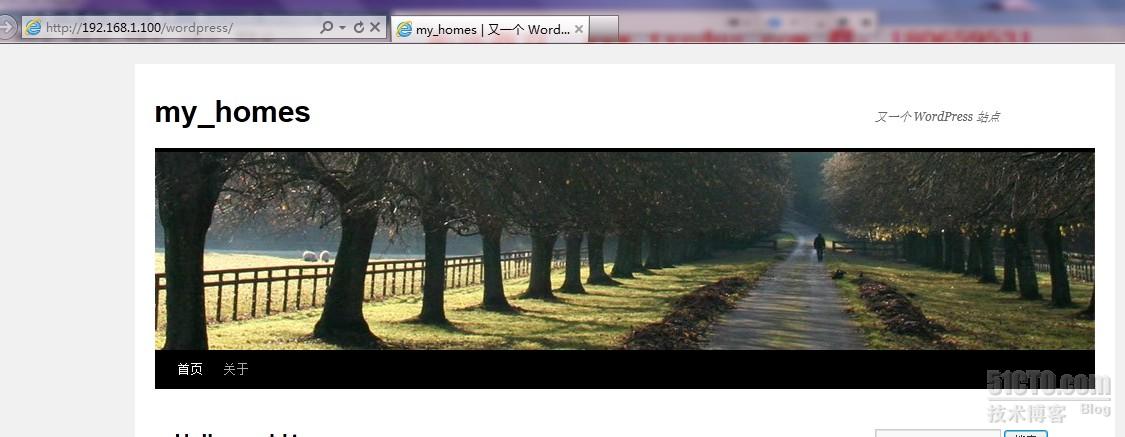
案例二利用wordpress架设网站
第一步解压缩
[root@localhost ~]# unzip wordpress_v3.0.5-zh_CN.zip
第二步
[root@localhost wordpress-3.0.5-zh_CN]# mv wordpress/ /var/www/html/
创建文件
[root@localhost wordpress]# cp wp-config-sample.php wp-config.php
修改权限
[root@localhost wordpress]# chown apache.apache wp-config.php
创建数据库
[root@localhost wordpress]# mysql -u root -p
Enter password:
修改文件
[root@localhost wordpress]# vim wp-config.php
19 define('DB_NAME', 'wordpress');^M
20 ^M
21 /** MySQL 数据库用户名 */^M
22 define('DB_USER', 'root');^M
23 ^M
24 /** MySQL 数据库密码 */^M
25 define('DB_PASSWORD', '123');^M
26 ^M
27 /** MySQL 主机 */^M
28 define('DB_HOST', 'localhost');^M
29 ^M
测试