
DHCP简介
DHCP(Dynamic Host Configuration Protocol,动态主机配置协议)是一种基于客户/服务器模式的服务协议。工作原理其实很简单,就是在安装有DHCP服务器的两种网络中,客户端启动时自动与DHCP服务器通信,要求服务器提供自动分配ip地址的服务,而安装了DHCP服务软件的服务器响应这个要求。并向客户端发送出合法的IP地址。
DHCP工作流程

DHCP ip地址租约
1. 限定租期
2. 永久租用
DHCP 租约的更新
1. 开机在关机后ip地址更新
2. 租期到50%后发送dhcp请求更新地址租约
3. 如果更新未成功到租期的87.5%是在发送dhcp请求更新租约
4. 如果以上两次都未成功租约到期后重新更新租约
DHCP安装前的准备工作
1. 通过命令确认系统中是否已经安装DHCP服务
[root@localhost ~]# rpm -qa |grep dhcp
dhcp-3.0.5-21.el5
dhcpv6-client-1.0.10-17.el5
2. 配置dhcrelay守护进程
如果dhcp服务器需要用于远程网络,那么必须把dhcrelay守护进程配置在局域网之间的路由器/网关计算机上。
3. 把dhcp服务器的ip地址设置成为静态ip地址

案例一(dhcp单区域)
1.挂在光盘
[root@localhost ~]#mkdir /mnt/cdrom 创建一个用户挂载的光盘目录
[root@localhost ~]#mount /dev/cdrom /mnt/cdrom 挂在光盘
2. 安装dhcp服务
[root@localhost ~]#cd /mnt/cdrom
[root@localhost ~]#prm –ivh dhcp-3.0.5-13.e15.i386.rpm 安装dhcp服务的命令
3.配置dhcp服务器的配置文件
[root@localhost ~]# vim /etc/dhcpd.conf 进入配置目录
1 #
2 ddns-update-style interim; #配置使用过度性DHCP-DNS互动模式。
3 ignore client-updates; #忽略客户端更新
4
5 subnet 192.168.1.0 netmask 255.255.255.0 { 网段声明
6
7 # --- default gateway
8 option routers 192.168.1.254; 定义网关
9 option subnet-mask 255.255.255.0; 定义子网掩码
10
11 option nis-domain "domain.org"; 设置nis域名
12 option domain-name "domain.org"; 设置域名
13 option domain-name-servers 222.88.88.88; (这里是电信的dns)
14
15 option time-offset -18000; # 设置时间偏移
16 # option ntp-servers 192.168.1.1; 设置ntp服务器
17 # option netbios-name-servers 192.168.1.1;
18 # --- Selects point-to-point node (default is hybrid). Don't change this unless
19 # -- you understand Netbios very well
20 # option netbios-node-type 2; 设置nis服务的节点(不建议修改)
21
22 range dynamic-bootp 192.168.0.128 192.168.0.254; 设置地址池
23 default-lease-time 21600; 设置默认租期
24 max-lease-time 43200; 设置最大租期
25
26 # we want the nameserver to appear at a fixed address
27 host ns {
28 next-server marvin.redhat.com;
29 hardware ethernet 12:34:56:78:AB:CD;
30 fixed-address 207.175.42.254;
31 }
32 }
33 # DHCP Server Configuration file.
34 # see /usr/share/doc/dhcp*/dhcpd.conf.sample
35 #
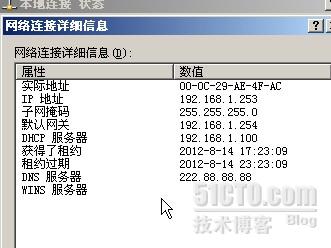
4.利用一个客户机测试的结果
案例二(dhcp超级作用域)
我们知道一个C类的地址能为254台PC提供ip地址上网用,如果一个公司的电脑数量多于254台这是用一个C类的地址就不够用了。对于这种情况有两种解决方案一种是用一个B类的地址,第二种是建立一个由C类地址主城的超级作用域。
1. 第一步 跟案例一一样
2. 第二部 跟案例一一样
3.配置dhcp服务器的配置文件
[root@localhost ~]# vim /etc/dhcpd.conf 进入配置目录
5 shared-network zzdx { 配置的超级作用域zzdx是超级作用域的名称
6 subnet 192.168.1.0 netmask 255.255.255.0 {
7
8 # --- default gateway
9 option routers 192.168.1.254;
10 option subnet-mask 255.255.255.0;
11
12 option nis-domain "domain.org";
13 option domain-name "abc.com";
14 option domain-name-servers 222.88.88.88;
15
16 option time-offset -18000; # Eastern Standard Time
17 # option ntp-servers 192.168.1.1;
18 # option netbios-name-servers 192.168.1.1;
19 # --- Selects point-to-point node (default is hybrid). Don't change this unless
20 # -- you understand Netbios very well
21 # option netbios-node-type 2;
22
23 range dynamic-bootp 192.168.1.2 192.168.1.253;
24 default-lease-time 21600;
25 max-lease-time 43200;
26
27 # we want the nameserver to appear at a fixed address
28 host ns {
29 next-server marvin.redhat.com;
30 hardware ethernet 12:34:56:78:AB:CD;
31 fixed-address 207.175.42.254;
32 }
33 }
34 subnet 192.168.2.0 netmask 255.255.255.0 { 配置第二个ip池
35 option routers 192.168.2.254;
36 option subnet-mask 255.255.255.0;
37 option domain-name-servers 222.88.88.88;
38 range dynamic-bootp 192.168.2.2 192.168.2.253;
39 default-lease-time 21600;
40 max-lease-time 43200;
4 测试由于超级作用域的ip取值是先从一个作用域内取值知道一个作用域内的ip地址用完后才开始从第二个ip地址池内取地址。测试时可以把超级作用域中的两个地址池都改为一个ip地址。
案例三(dhcp中继)
案例拓补图


第一步 跟案例一一样
第二步 跟案例二一样
第三步 .配置dhcp服务器的配置文件
[root@localhost ~]# vim /etc/dhcpd.conf 进入配置目录
subnet 192.168.3.0 netmask 255.255.255.0 { vlan30的地址池
# --- default gateway
option routers 192.168.3.254;
option subnet-mask 255.255.255.0;
option domain-name "jisu.com";
option domain-name-servers 222.88.88.88;
option time-offset -18000; # Eastern Standard Time
default-lease-time 21600;
max-lease-time 43200;
host ns {
next-server marvin.redhat.com;
hardware ethernet 12:34:56:78:AB:CD;
fixed-address 207.175.42.254;
}
}
subnet 192.168.2.0 netmask 255.255.255.0 { vlan20的地址池
# --- default gateway
option routers 192.168.2.254;
option subnet-mask 255.255.255.0;
option domain-name "caiwu.com";
option domain-name-servers 222.88.88.88;
option time-offset -18000; # Eastern Standard Time
default-lease-time 21600;
max-lease-time 43200;
host www {
next-server marvin.redhat.com;
hardware ethernet 12:34:56:78:AB:CD;
fixed-address 207.175.42.254;
}
}
subnet 192.168.1.0 netmask 255.255.255.0 { 服务器集群的地址池
}
配置dhcp中继服务器
网卡配置
eth0 Link encap:Ethernet HWaddr 00:0C:29:86:4E:97
inet addr:192.168.1.254 Bcast:192.168.1.255 Mask:255.255.255.0
inet6 addr: fe80::20c:29ff:fe86:4e97/64 Scope:Link
UP BROADCAST RUNNING MULTICAST MTU:1500 Metric:1
RX packets:288 errors:0 dropped:0 overruns:0 frame:0
TX packets:180 errors:0 dropped:0 overruns:0 carrier:0
collisions:0 txqueuelen:1000
RX bytes:67880 (66.2 KiB) TX bytes:38315 (37.4 KiB)
Interrupt:67 Base address:0x2000
eth1 Link encap:Ethernet HWaddr 00:0C:29:86:4E:A1
inet addr:192.168.2.254 Bcast:192.168.2.255 Mask:255.255.255.0
inet6 addr: fe80::20c:29ff:fe86:4ea1/64 Scope:Link
UP BROADCAST RUNNING MULTICAST MTU:1500 Metric:1
RX packets:232 errors:0 dropped:0 overruns:0 frame:0
TX packets:145 errors:0 dropped:0 overruns:0 carrier:0
collisions:0 txqueuelen:1000
RX bytes:48752 (47.6 KiB) TX bytes:31455 (30.7 KiB)
Interrupt:67 Base address:0x2080
eth2 Link encap:Ethernet HWaddr 00:0C:29:86:4E:AB
inet addr:192.168.3.254 Bcast:192.168.3.255 Mask:255.255.255.0
inet6 addr: fe80::20c:29ff:fe86:4eab/64 Scope:Link
UP BROADCAST RUNNING MULTICAST MTU:1500 Metric:1
RX packets:128 errors:0 dropped:0 overruns:0 frame:0
TX packets:144 errors:0 dropped:0 overruns:0 carrier:0
collisions:0 txqueuelen:1000
RX bytes:73164 (71.4 KiB) TX bytes:31871 (31.1 KiB)
Interrupt:75 Base address:0x2400
中继服务器的路由表
root@localhost ~]# route -n
Kernel IP routing table
Destination Gateway Genmask Flags Metric Ref Use Iface
192.168.3.0 0.0.0.0 255.255.255.0 U 0 0 0 eth2
192.168.2.0 0.0.0.0 255.255.255.0 U 0 0 0 eth1
192.168.1.0 0.0.0.0 255.255.255.0 U 0 0 0 eth0
169.254.0.0 0.0.0.0 255.255.0.0 U 0 0 0 eth2
打开路由功能
[root@localhost ~]# vim /etc/sysctl.conf
7 net.ipv4.ip_forward = 1
8
9 # Controls source route verification
10 net.ipv4.conf.de
[root@localhost ~]# sysctl –p 配置完后打卡路由功能的命令
net.ipv4.ip_forward = 1
net.ipv4.conf.default.rp_filter = 1
net.ipv4.conf.default.accept_source_route = 0
kernel.sysrq = 0
kernel.core_uses_pid = 1
net.ipv4.tcp_syncookies = 1
kernel.msgmnb = 65536
kernel.msgmax = 65536
kernel.shmmax = 4294967295
kernel.shmall = 268435456
配置dhcp中继服务
[root@localhost ~]# vim /etc/sysconfig/dhcrelay dhcp中继的配置文件
# Command line options here
INTERFACES="eth0 eth1 eth2"
DHCPSERVERS="192.168.1.100"
开启dhcp中继服务
[root@localhost ~]# service dhcrelay start
Starting dhcrelay: [ OK ]


