大家在使用Web网站的时候,经常会发现有个验证码需要输入,这里验证码用来做什么事情呢?其实很简单,验证码图片的作用是让用户通过肉眼来观察图片,把图片中的内容填写到输入框中,在登录的时候,如果验证码内容输入不正确,就算你的登录用户名和密码都正确也不行,这样可以很好的防治有人用程序不停的猜测别人的帐号和密码,因为程序难以从一个图片中提取验证码的内容,从而难以使用程序来进行重复猜测,这样只是凭人工的办法,是很难在短时间内猜出帐号和密码的。所以验证码图片实际是为了保护用户的权益。那么到底如何在web开发中使用验证码图片呢?
验证码图片是由程序动态产生的,每次访问的内容都是随机的。那么如何采用程序动态产生图片,并能够显示在客户端页面中呢?原理很简单,对于java而言,我们首先开发一个Servlet,这个Servlet的任务就是给客户端产生一个验证码图片的输入,示例代码如下:
- package com.web.servlet;
- import java.awt.Color;
- import java.awt.Graphics;
- import java.awt.p_w_picpath.BufferedImage;
- import java.io.IOException;
- import javax.servlet.ServletException;
- import javax.servlet.ServletOutputStream;
- import javax.servlet.http.HttpServletRequest;
- import javax.servlet.http.HttpServletResponse;
- import com.sun.p_w_picpath.codec.jpeg.JPEGCodec;
- import com.sun.p_w_picpath.codec.jpeg.JPEGImageEncoder;
- public class ValidateImgServlet extends javax.servlet.http.HttpServlet implements
- javax.servlet.Servlet {
- private static final long serialVersionUID = 1L;
- protected void doGet(HttpServletRequest request, HttpServletResponse response)
- throws ServletException, IOException {
- response.setContentType("p_w_picpath/jpeg");
- //产生四位验证码
- StringBuffer sb = new StringBuffer(4);
- for(int i=0; i<4; i++) {
- int n = (int)(Math.random() * 10);
- sb.append(n);
- }
- String validateCode = sb.toString();
- //将验证码记录在session中,便于用户输入之后的验证
- request.getSession().setAttribute("ValidateCode", validateCode);
- //创建缓存图片
- BufferedImage p_w_picpath = new BufferedImage(80, 25, BufferedImage.TYPE_INT_RGB);
- Graphics g = p_w_picpath.getGraphics();
- g.setColor(Color.LIGHT_GRAY);
- g.fillRect(0, 0, 80, 25);
- g.setColor(Color.BLACK);
- g.drawString(validateCode, 10, 20);
- g.dispose();
- ServletOutputStream outStream = response.getOutputStream();
- JPEGImageEncoder encoder = JPEGCodec.createJPEGEncoder(outStream);
- encoder.encode(p_w_picpath);
- outStream.close();
- }
- }
在web.xml中对这个Servlet进行配置,配置信息如下:
- <servlet>
- <description></description>
- <display-name>ValidateImgServlet</display-name>
- <servlet-name>ValidateImgServlet</servlet-name>
- <servlet-class>com.web.servlet.ValidateImgServlet</servlet-class>
- </servlet>
- <servlet-mapping>
- <servlet-name>ValidateImgServlet</servlet-name>
- <url-pattern>/validateimg.jpg</url-pattern>
- </servlet-mapping>
好了,现在我们可以在登录页面中使用这个动态的验证码图片了,login.jsp页面内容如下:
- <%@ page language="java" contentType="text/html; charset=UTF-8"
- pageEncoding="UTF-8"%>
- <!DOCTYPE html PUBLIC "-//W3C//DTD HTML 4.01 Transitional//EN" "http://www.w3.org/TR/html4/
- loose.dtd">
- <html>
- <head>
- <meta http-equiv="Content-Type" content="text/html; charset=UTF-8">
- <title>Insert title here</title>
- </head>
- <body>
- 请输入登录信息:<br />
- <form name="login_form" method="post" action="login.action">
- 用户名称:<input type="text" name="username" /><br />
- 用户密码:<input type="password" name="password" /><br />
- 验证码:<input type="text" name="validatecode" /><img src="validateimg.jpg" border="0" />
- <br />
- <input type="submit" value="登录" />
- </form>
- </body>
- </html>
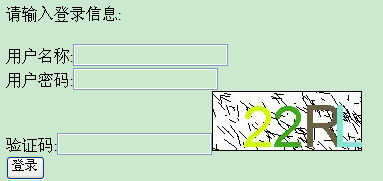
到这里,如果你在web容器中运行这个jsp,你将会在浏览器中看见一个带有验证码图片的登录表单,后续的验证任务就交给你了。祝你好运!

但是这个 验证码不是很美观,完全有理由弄得更真实些。修改代码:
- package com.servlet;
- import java.awt.Color;
- import java.awt.Font;
- import java.awt.Graphics2D;
- import java.awt.p_w_picpath.BufferedImage;
- import java.util.Random;
- import javax.p_w_picpathio.ImageIO;
- import javax.servlet.ServletException;
- import javax.servlet.ServletOutputStream;
- import javax.servlet.http.HttpServlet;
- import javax.servlet.http.HttpServletRequest;
- import javax.servlet.http.HttpServletResponse;
- import javax.servlet.http.HttpSession;
- /**
- * 生成随机验证码
- *
- * @author bitiliu
- *
- */
- public class ValidateCodeServlet extends HttpServlet {
- private static final long serialVersionUID = 1L;
- // 验证码图片的宽度。
- private int width = 160;
- // 验证码图片的高度。
- private int height = 20;
- // 验证码字符个数
- private int codeCount = 4;
- private int x = 0;
- // 字体高度
- private int fontHeight;
- private int codeY;
- char[] codeSequence = { 'A', 'B', 'C', 'D', 'E', 'F', 'G', 'H', 'I', 'J',
- 'K', 'L', 'M', 'N', 'O', 'P', 'Q', 'R', 'S', 'T', 'U', 'V', 'W',
- 'X', 'Y', 'Z', '0', '1', '2', '3', '4', '5', '6', '7', '8', '9' };
- /**
- * 初始化验证图片属性
- */
- public void init() throws ServletException {
- // 从web.xml中获取初始信息
- // 宽度
- String strWidth = this.getInitParameter("width");
- // 高度
- String strHeight = this.getInitParameter("height");
- // 字符个数
- String strCodeCount = this.getInitParameter("codeCount");
- // 将配置的信息转换成数值
- try {
- if (strWidth != null && strWidth.length() != 0) {
- width = Integer.parseInt(strWidth);
- }
- if (strHeight != null && strHeight.length() != 0) {
- height = Integer.parseInt(strHeight);
- }
- if (strCodeCount != null && strCodeCount.length() != 0) {
- codeCount = Integer.parseInt(strCodeCount);
- }
- } catch (NumberFormatException e) {
- }
- x = width / (codeCount + 1);
- fontHeight = height - 2;
- codeY = height - 4;
- }
- protected void service(HttpServletRequest req, HttpServletResponse resp)
- throws ServletException, java.io.IOException {
- // 定义图像buffer
- BufferedImage buffImg = new BufferedImage(width, height,
- BufferedImage.TYPE_INT_RGB);
- Graphics2D g = buffImg.createGraphics();
- // 创建一个随机数生成器类
- Random random = new Random();
- // 将图像填充为白色
- g.setColor(Color.WHITE);
- g.fillRect(0, 0, width, height);
- // 创建字体,字体的大小应该根据图片的高度来定。
- Font font = new Font("Fixedsys", Font.PLAIN, fontHeight);
- // 设置字体。
- g.setFont(font);
- // 画边框。
- g.setColor(Color.BLACK);
- g.drawRect(0, 0, width - 1, height - 1);
- // 随机产生160条干扰线,使图象中的认证码不易被其它程序探测到。
- g.setColor(Color.BLACK);
- for (int i = 0; i < 160; i++) {
- int x = random.nextInt(width);
- int y = random.nextInt(height);
- int xl = random.nextInt(12);
- int yl = random.nextInt(12);
- g.drawLine(x, y, x + xl, y + yl);
- }
- // randomCode用于保存随机产生的验证码,以便用户登录后进行验证。
- StringBuffer randomCode = new StringBuffer();
- int red = 0, green = 0, blue = 0;
- // 随机产生codeCount数字的验证码。
- for (int i = 0; i < codeCount; i++) {
- // 得到随机产生的验证码数字。
- String strRand = String.valueOf(codeSequence[random.nextInt(36)]);
- // 产生随机的颜色分量来构造颜色值,这样输出的每位数字的颜色值都将不同。
- red = random.nextInt(255);
- green = random.nextInt(255);
- blue = random.nextInt(255);
- // 用随机产生的颜色将验证码绘制到图像中。
- g.setColor(new Color(red, green, blue));
- g.drawString(strRand, (i + 1) * x, codeY);
- // 将产生的四个随机数组合在一起。
- randomCode.append(strRand);
- }
- // 将四位数字的验证码保存到Session中。
- HttpSession session = req.getSession();
- session.setAttribute("validateCode", randomCode.toString());
- // 禁止图像缓存。
- resp.setHeader("Pragma", "no-cache");
- resp.setHeader("Cache-Control", "no-cache");
- resp.setDateHeader("Expires", 0);
- resp.setContentType("p_w_picpath/jpeg");
- // 将图像输出到Servlet输出流中。
- ServletOutputStream sos = resp.getOutputStream();
- ImageIO.write(buffImg, "jpeg", sos);
- sos.close();
- }
- }
web.xml 内容为:
- <body>
- 请输入登录信息:<br />
- <form name="login_form" method="post" action="login.action">
- 用户名称:<input type="text" name="username" /><br />
- 用户密码:<input type="password" name="password" /><br />
- 验证码:<input type="text" name="validatecode" /><img src="validateCodeServlet"
- border="0" /><br />
- <input type="submit" value="登录" />
- </form>
- </body>