简介
ConstraintLayout也就是约束布局,通过约束来实现布局,感觉有点类似与RelatedLayout,但是比之更加的强大,使用ConstraintLayout可以减少布局的嵌套层数,尽量的扁平化。传统的布局我们都是采用xml来操作,但是使用ConstraintLayout可以实现可视化的拖动来操作,我使用后某些时候拖动也不能完全准确,所以我认为可以采用拖动加xml方式来布局。
本文首先完成拖动布局的基本操作,然后分析ConstraintLayout的xml属性
可视化基本操作
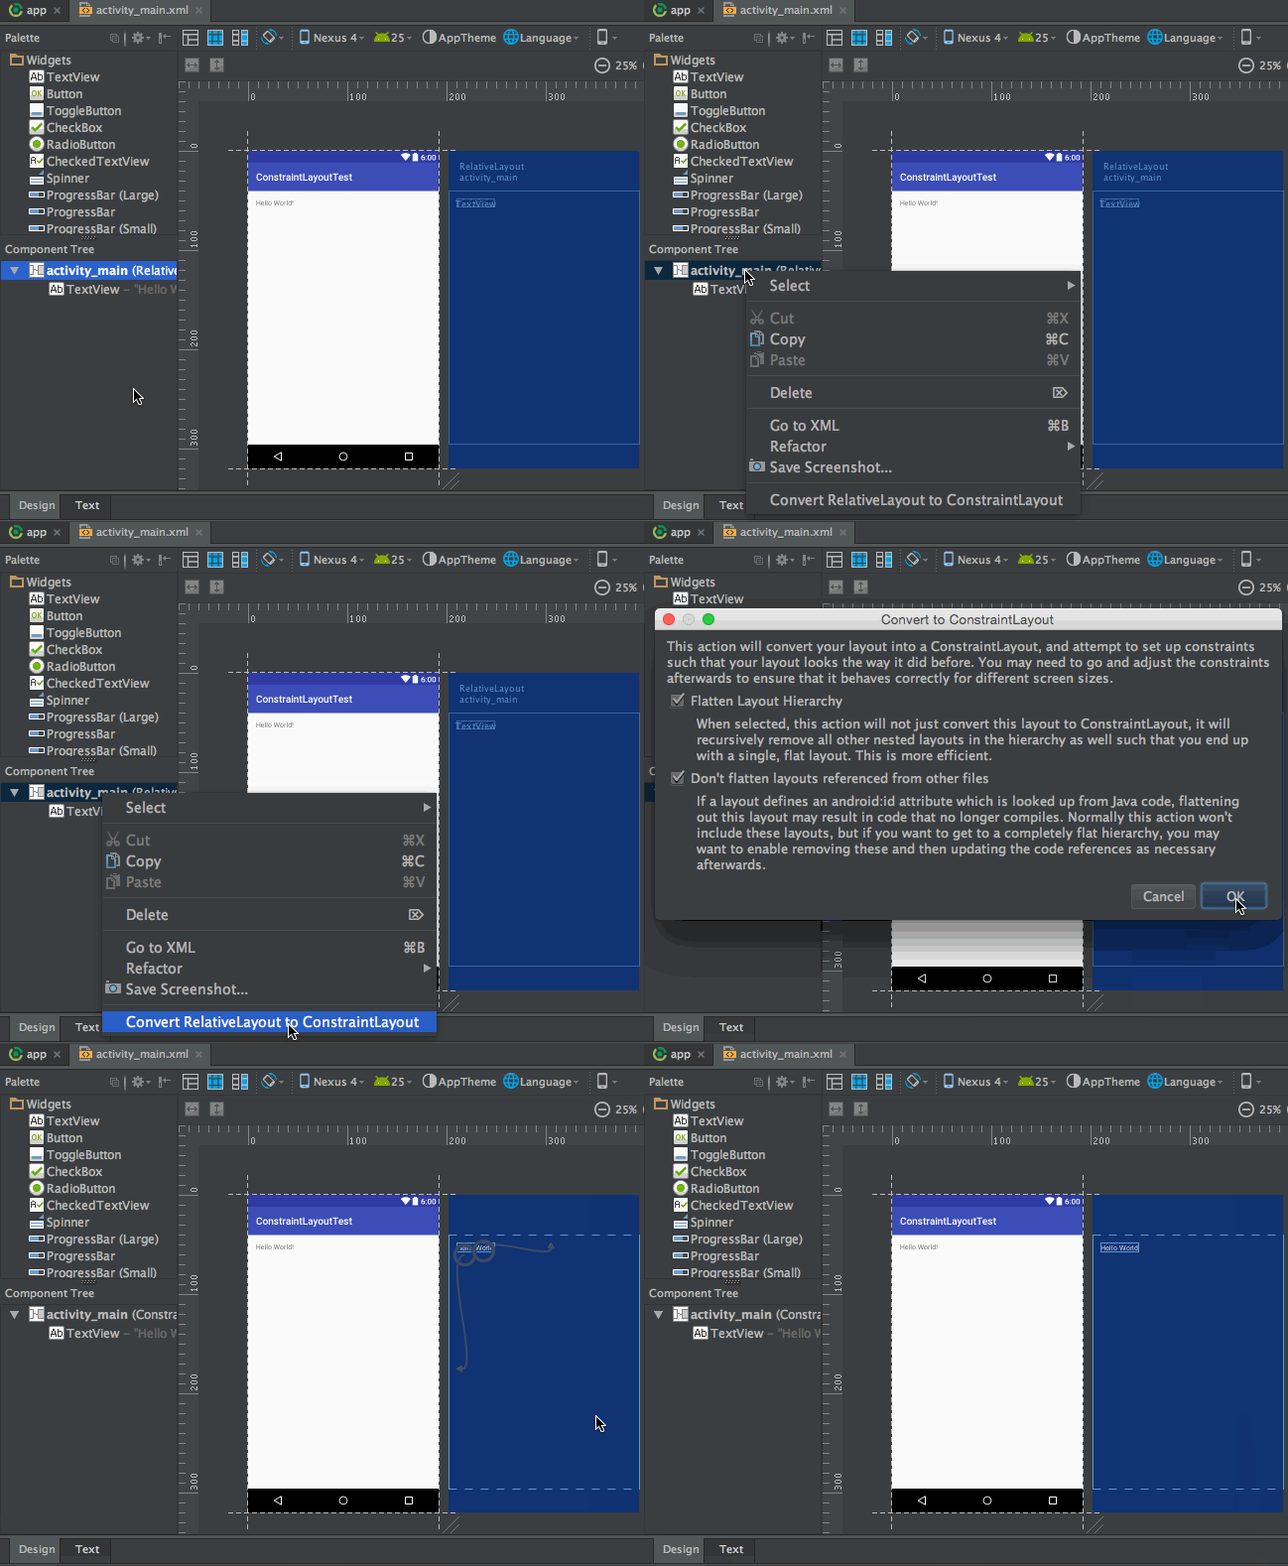
转换布局
如果Android Studio自动默认创建的是传统布局,比如RelativeLayout,我们可以通过如下操作将它转换成ConstraintLayout。
添加控件
比如我们想要向布局中添加一个按钮,那么只需要从左侧的Palette区域拖一个Button进去就可以了,如下图所示。
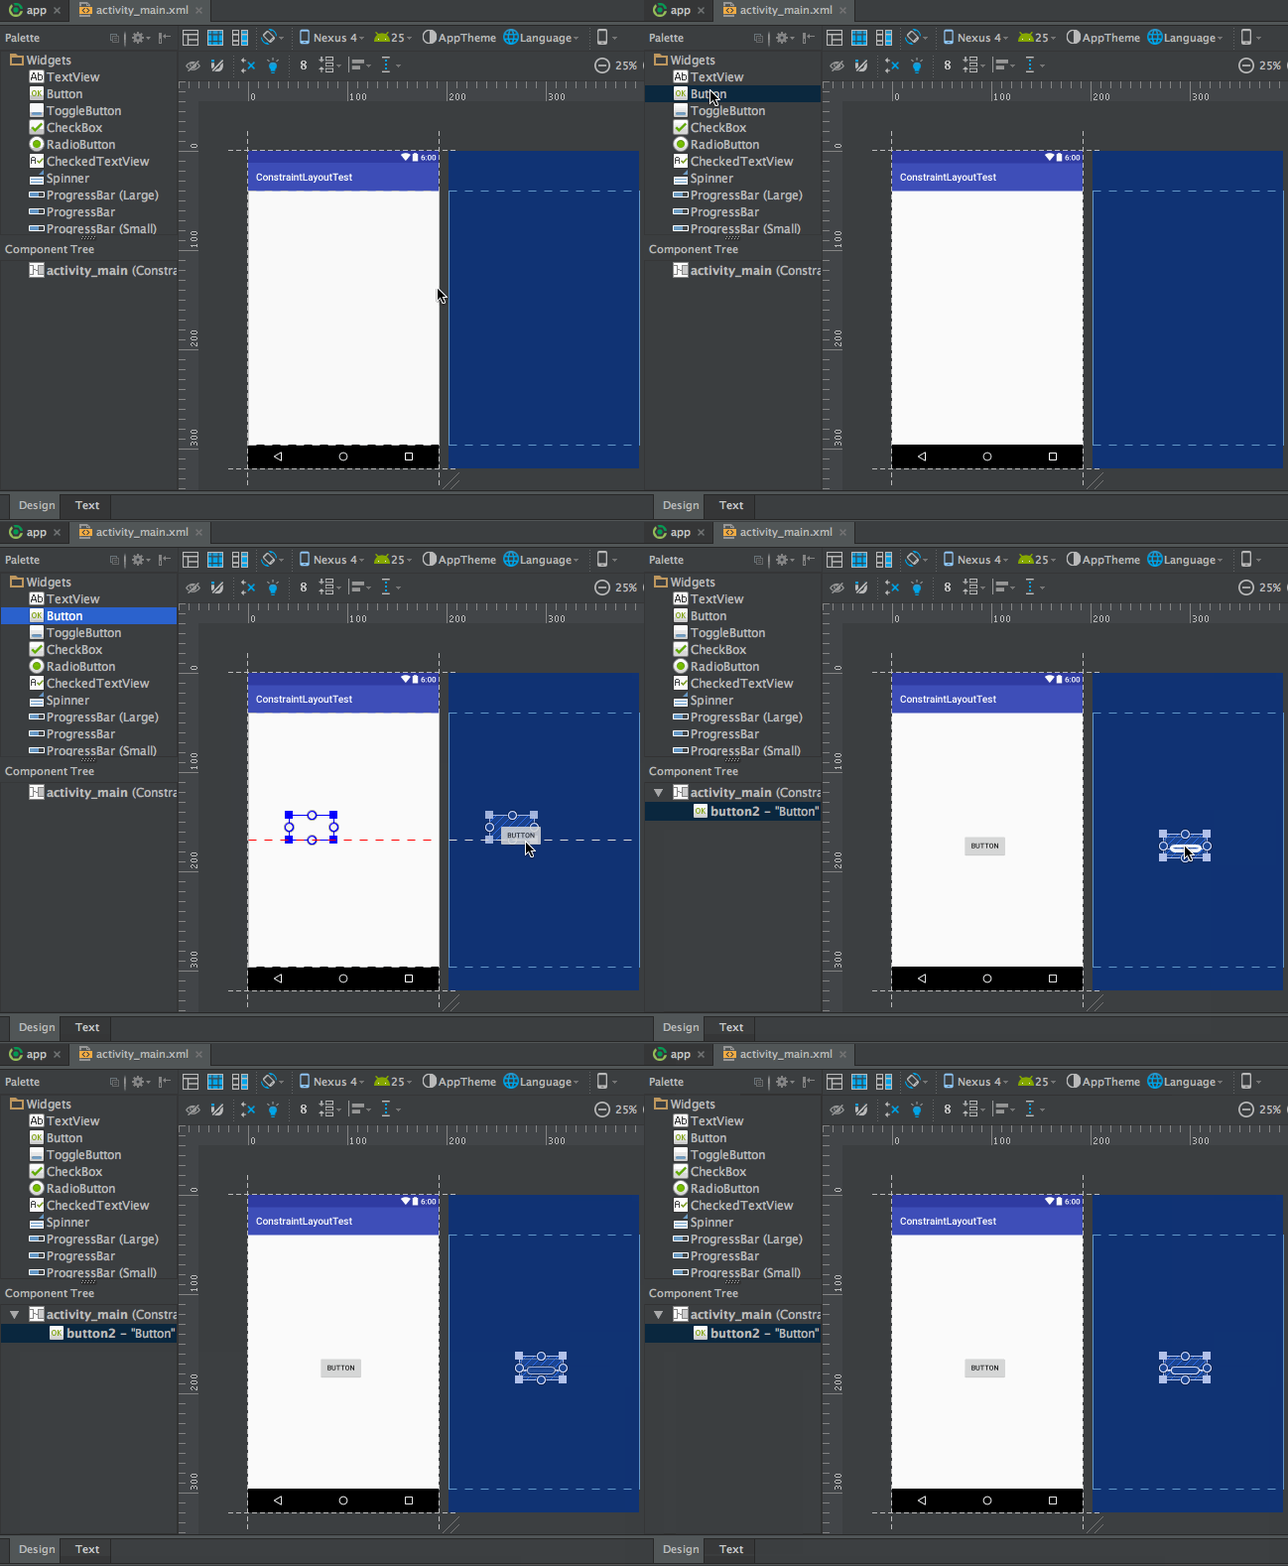
这时新拖动的Button并没有任何约束,左下角对应的Button有个红色的感叹号,鼠标放上去显示缺少约束,切换到xml也可以看到这个Button报错,如下图所示:

添加约束
Button没有约束,并不知道显示出现的位置,右边的视图叫BluePrint可以看到Button周围有一些小圆圈、小点,如图:

正方形实心点拖动可以调整大小,小圆点为四个方向添加约束
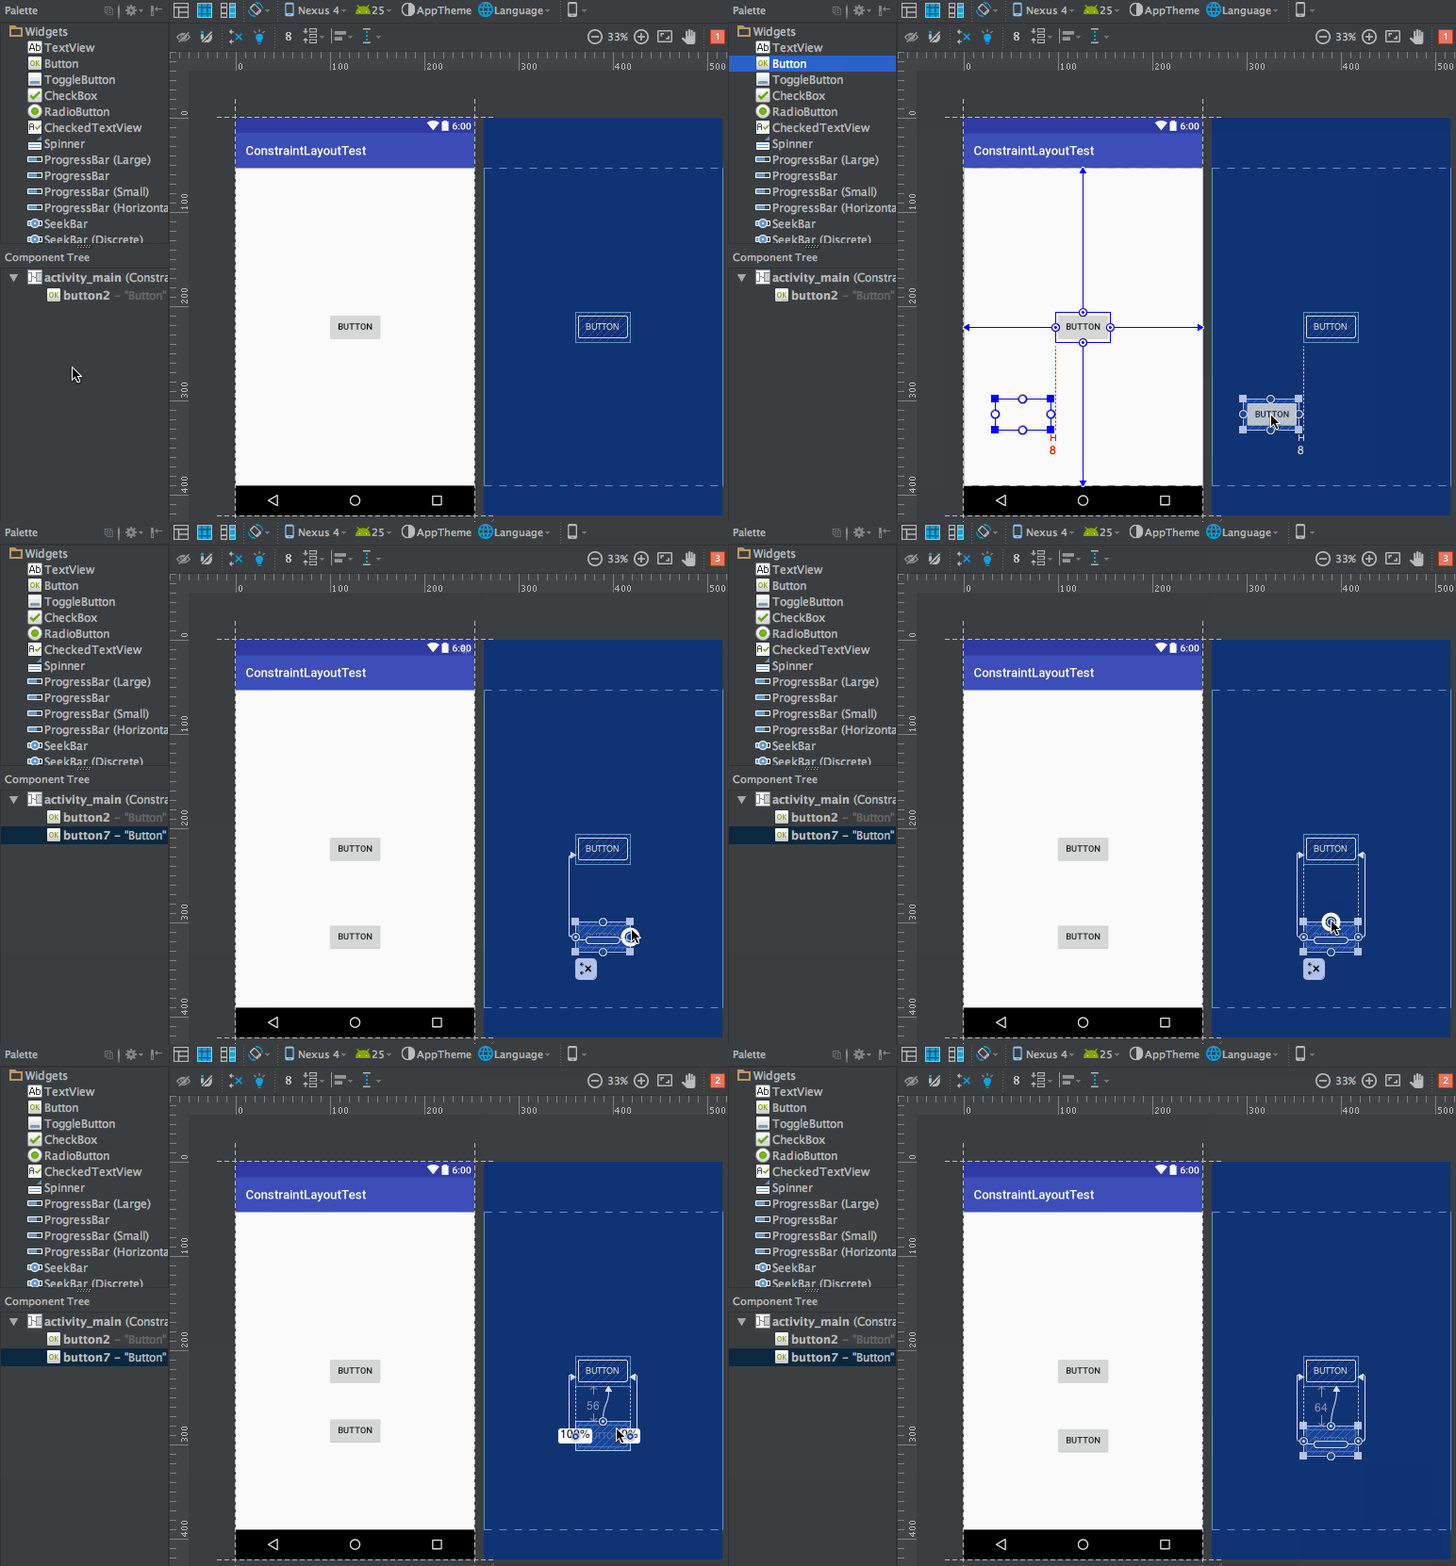
除此之外,我们还可以使用约束让一个控件相对于另一个控件进行定位。比如说,我们希望再添加一个Button,让它位于第一个Button的正下方,并且间距64dp,那么操作如下所示。
删除约束
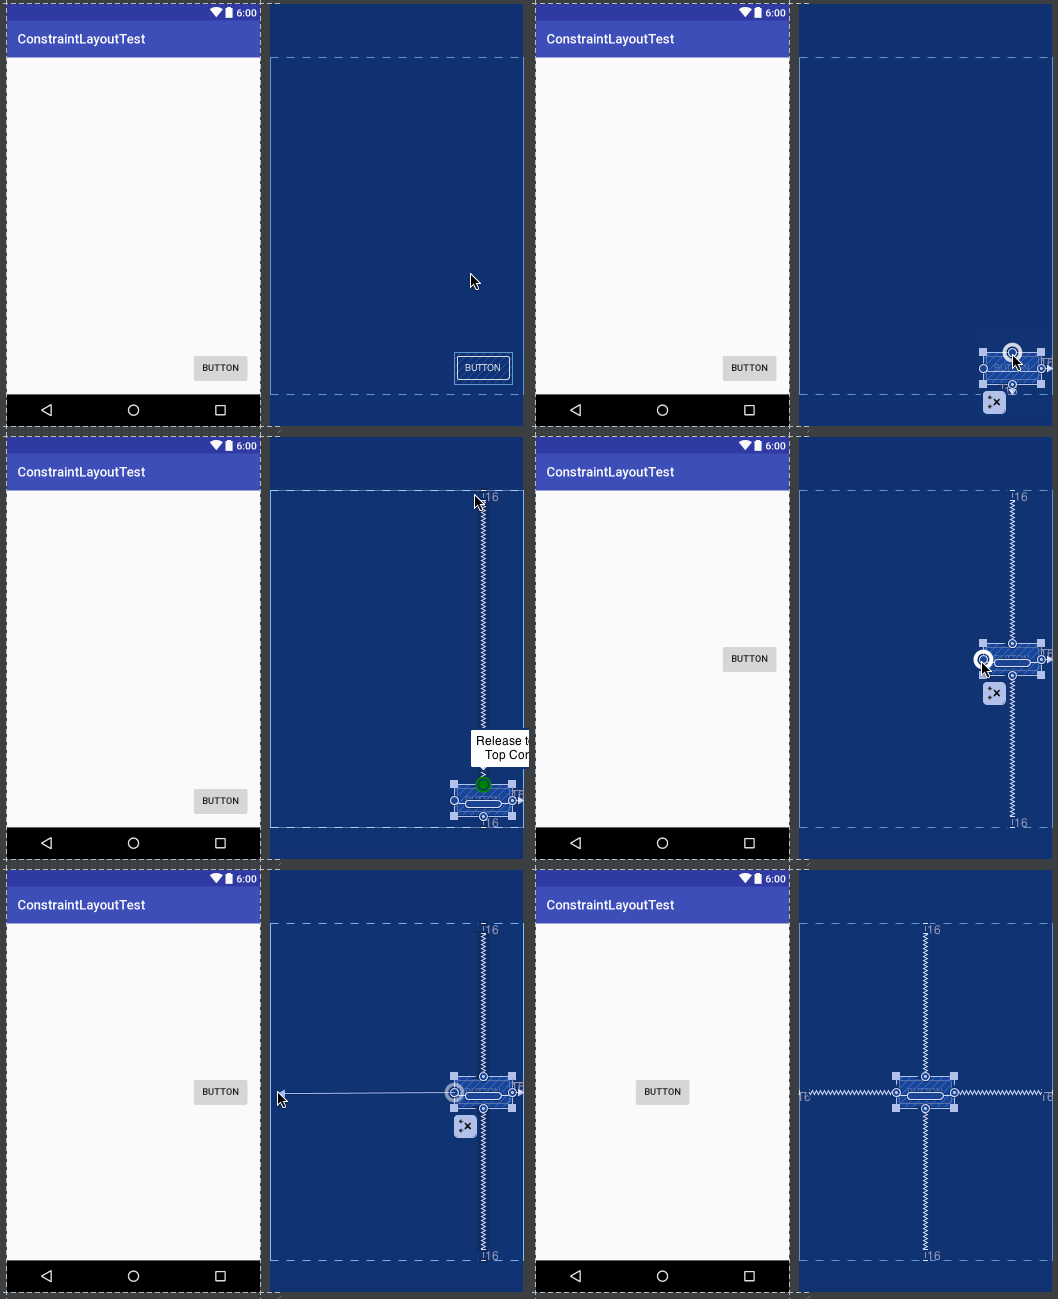
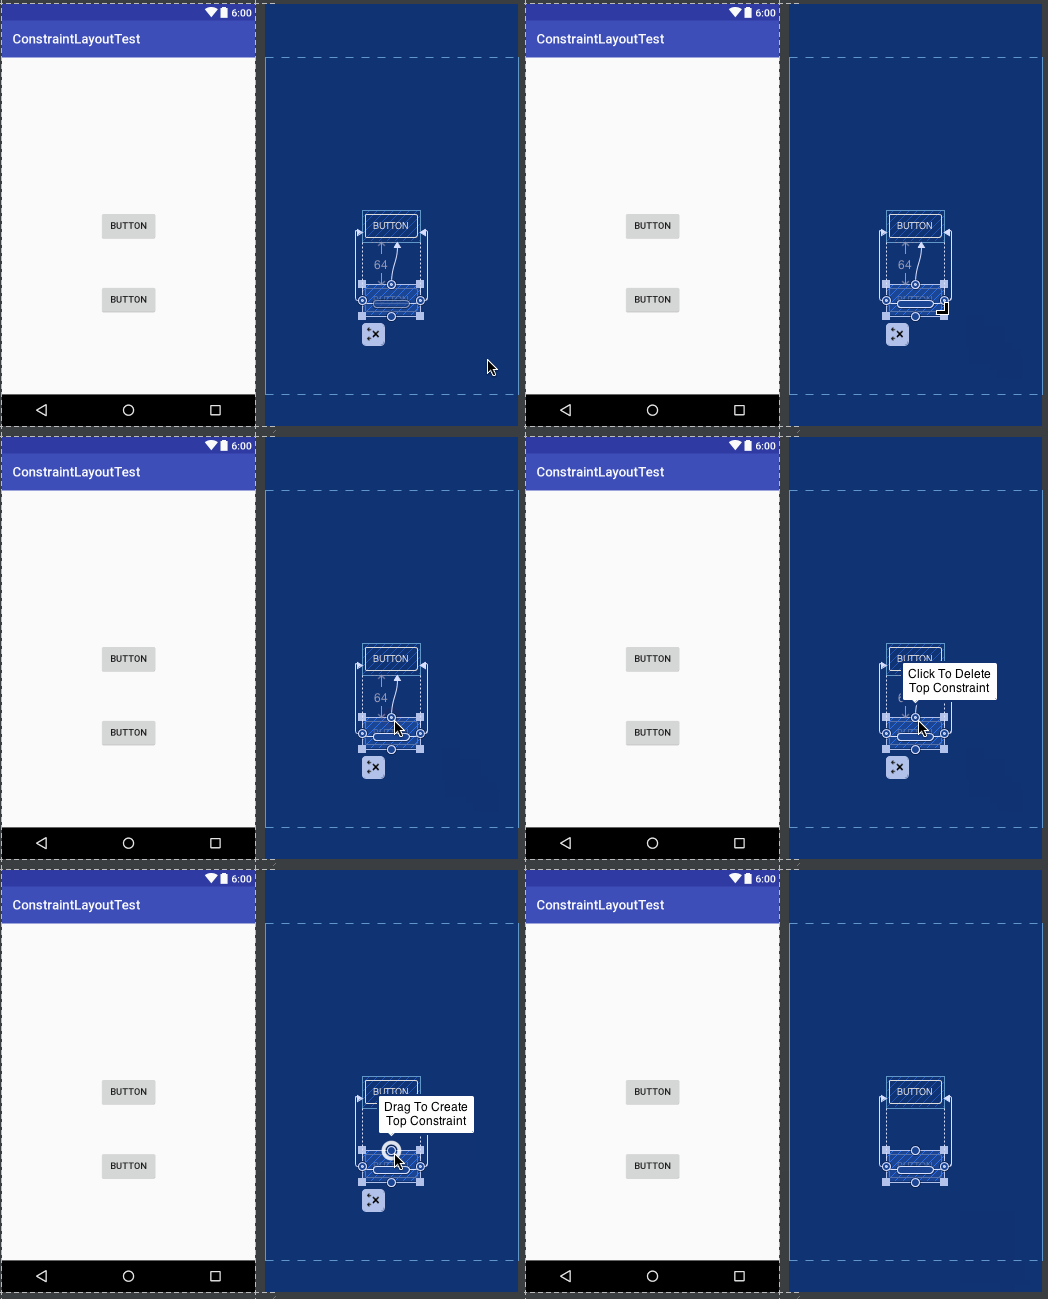
删除约束的方式一共有三种,第一种用于删除一个单独的约束,将鼠标悬浮在某个约束的圆圈上,然后该圆圈会变成红色,这个时候单击一下就能删除了,如下图所示。
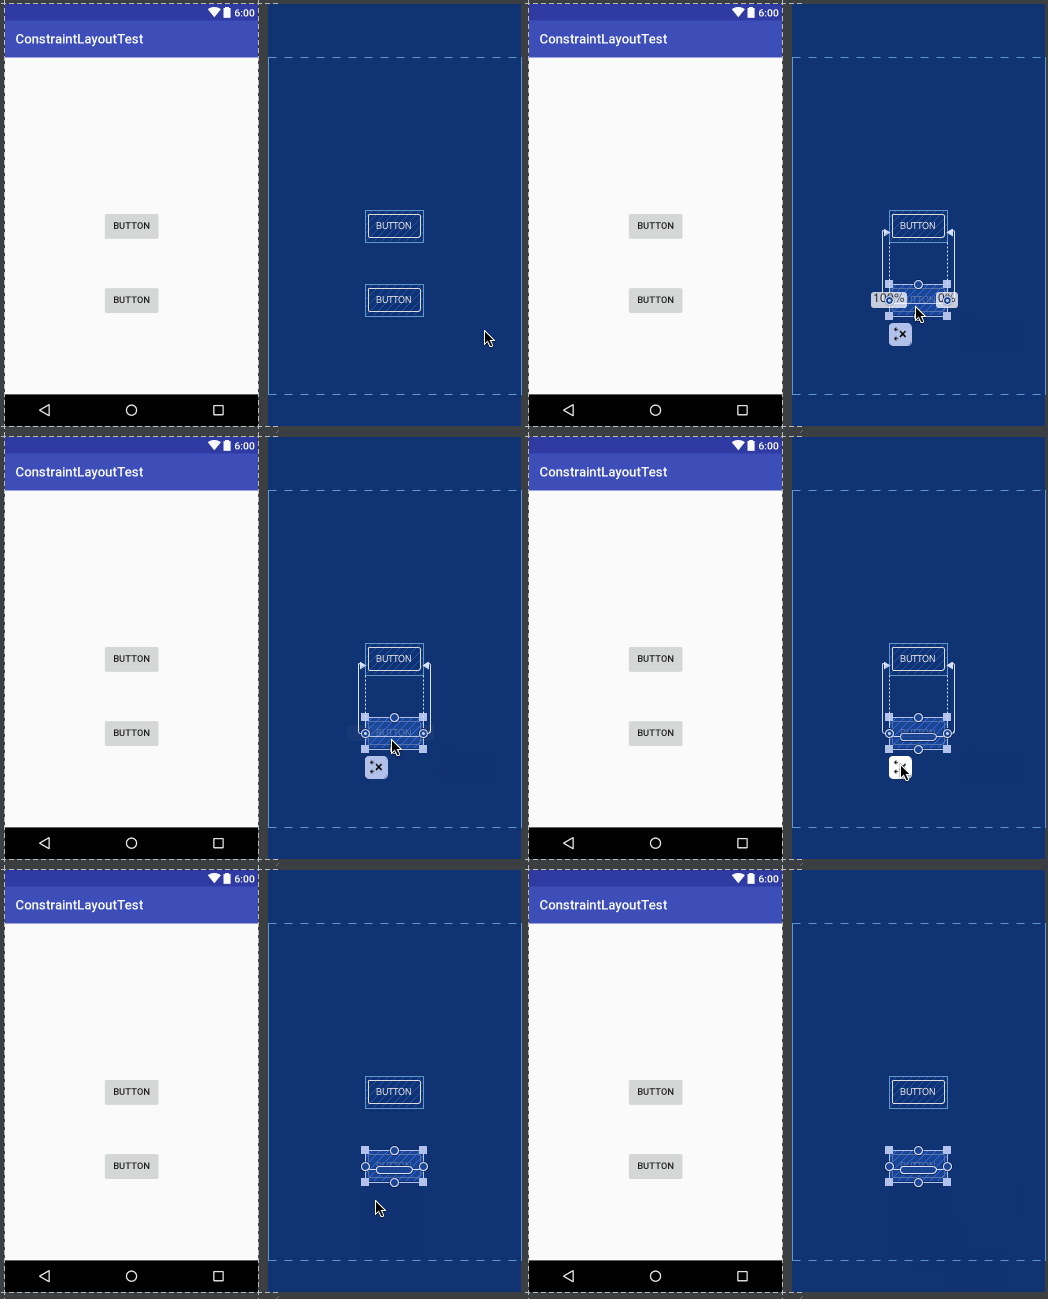
第二种用于删除某一个控件的所有约束,选中一个控件,然后它的左下角会出现一个删除约束的图标,点击该图标就能删除当前控件的所有约束了,如下所示。
第三种用于删除当前界面中的所有约束,点击工具栏中的删除约束图标即可,如下图所示。

自动添加约束
不过如果界面中的内容变得复杂起来,给每个控件一个个地添加约束也是一件很繁琐的事情。为此,ConstraintLayout中支持自动添加约束的功能,可以极大程度上简化那些繁琐的操作。
自动添加约束的方式主要有两种,一种叫Autoconnect,一种叫Inference,我们先来看第一种。
想要使用Autoconnect,首先需要在工具栏中将这个功能启用,默认情况下Autoconnect是不启用的,如下图所示。

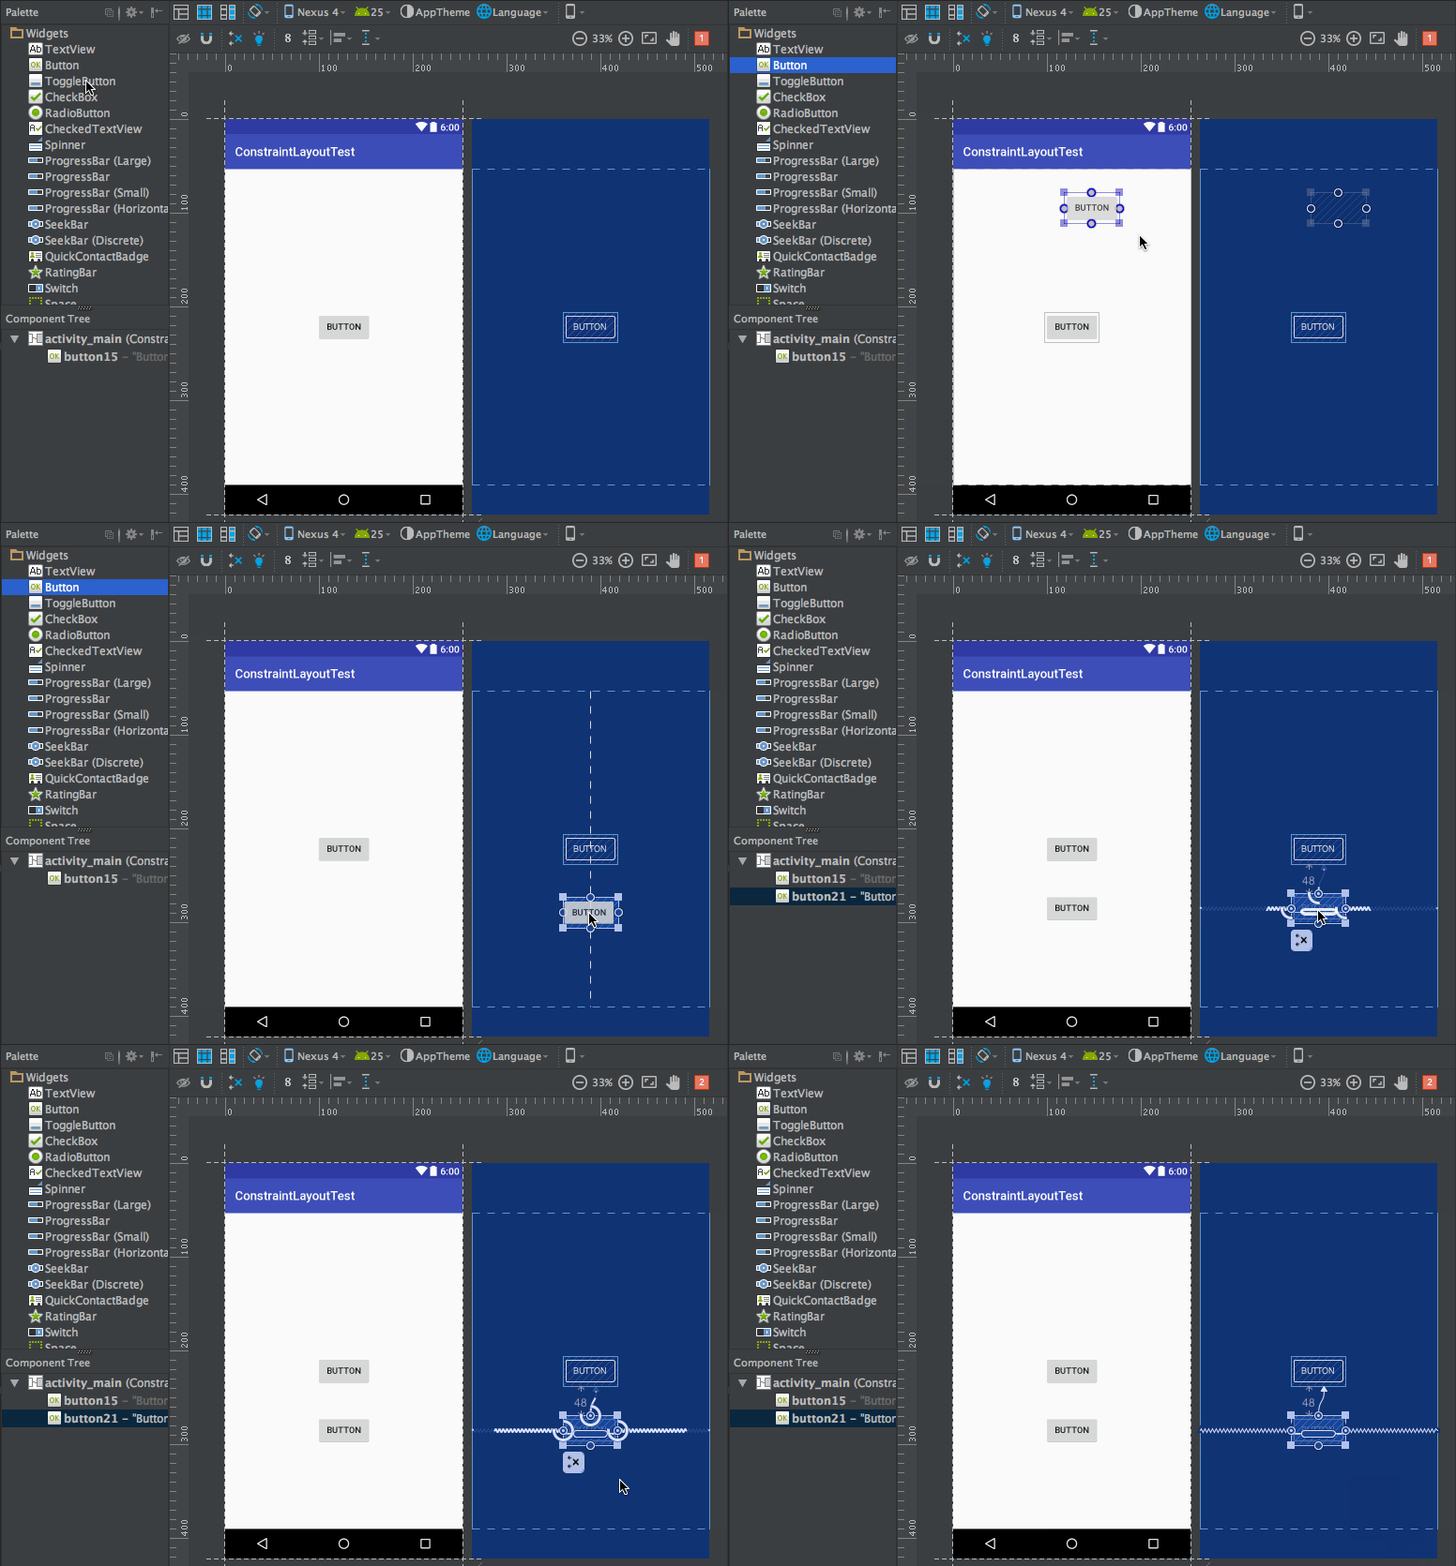
Autoconnect可以根据我们拖放控件的状态自动判断应该如何添加约束,比如我们将Button放到界面的正中央,那么它的上下左右都会自动地添加上约束,如下图所示
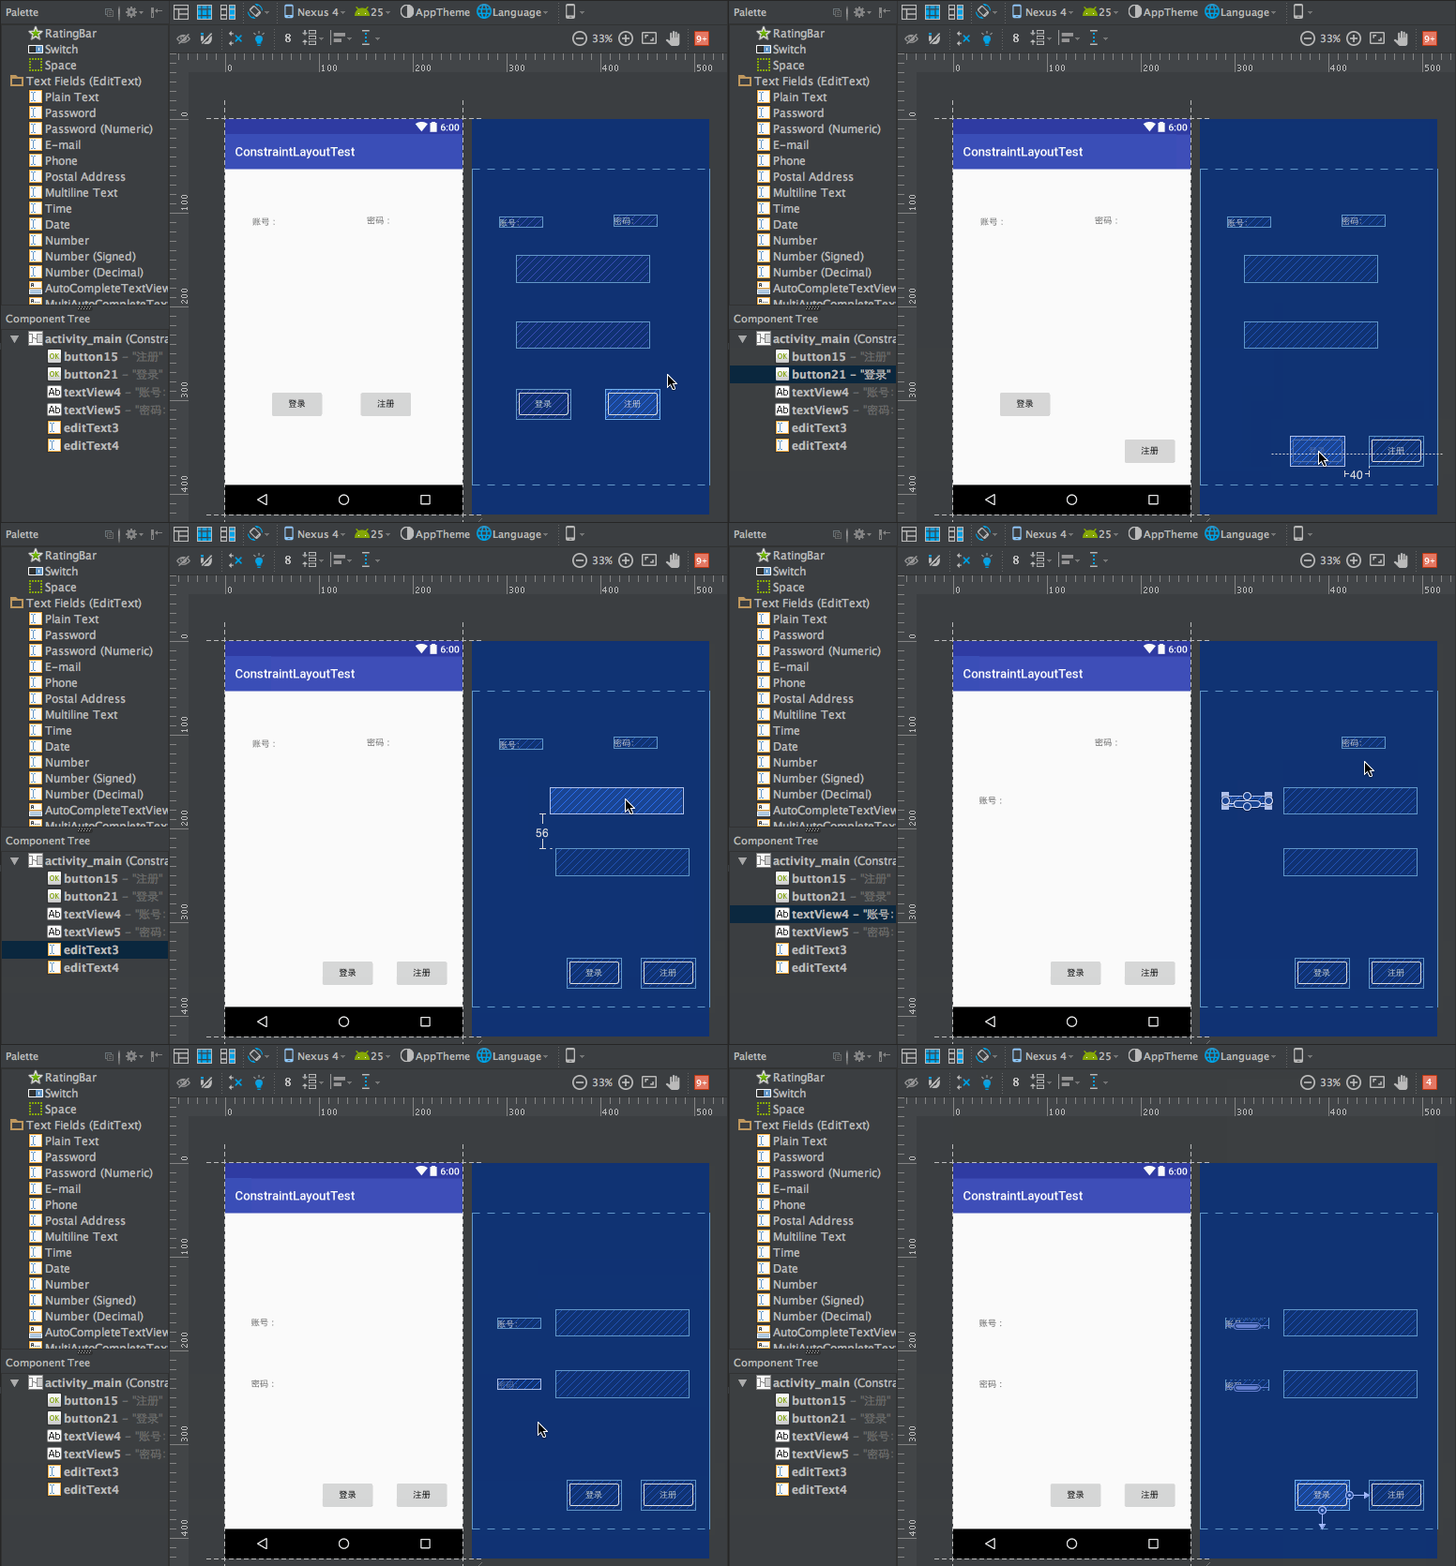
接下来我们看一下Inference的用法。Inference也是用于自动添加约束的,但它比Autoconnect的功能要更为强大,因为AutoConnect只能给当前操作的控件自动添加约束,而Inference会给当前界面中的所有元素自动添加约束。因而Inference比较适合用来实现复杂度比较高的界面,它可以一键自动生成所有的约束。下面我们就通过一个例子来演示一下Inference的用法,比如界面上现在有两个TextView,两个EditText,和两个Button,我们把控件放置到合适的位置,然后点击Inference按钮,如下图所示。
对齐方式
在工具栏中可以选择控件的对齐方式,展开后有多种选择方式,也可以右键选择

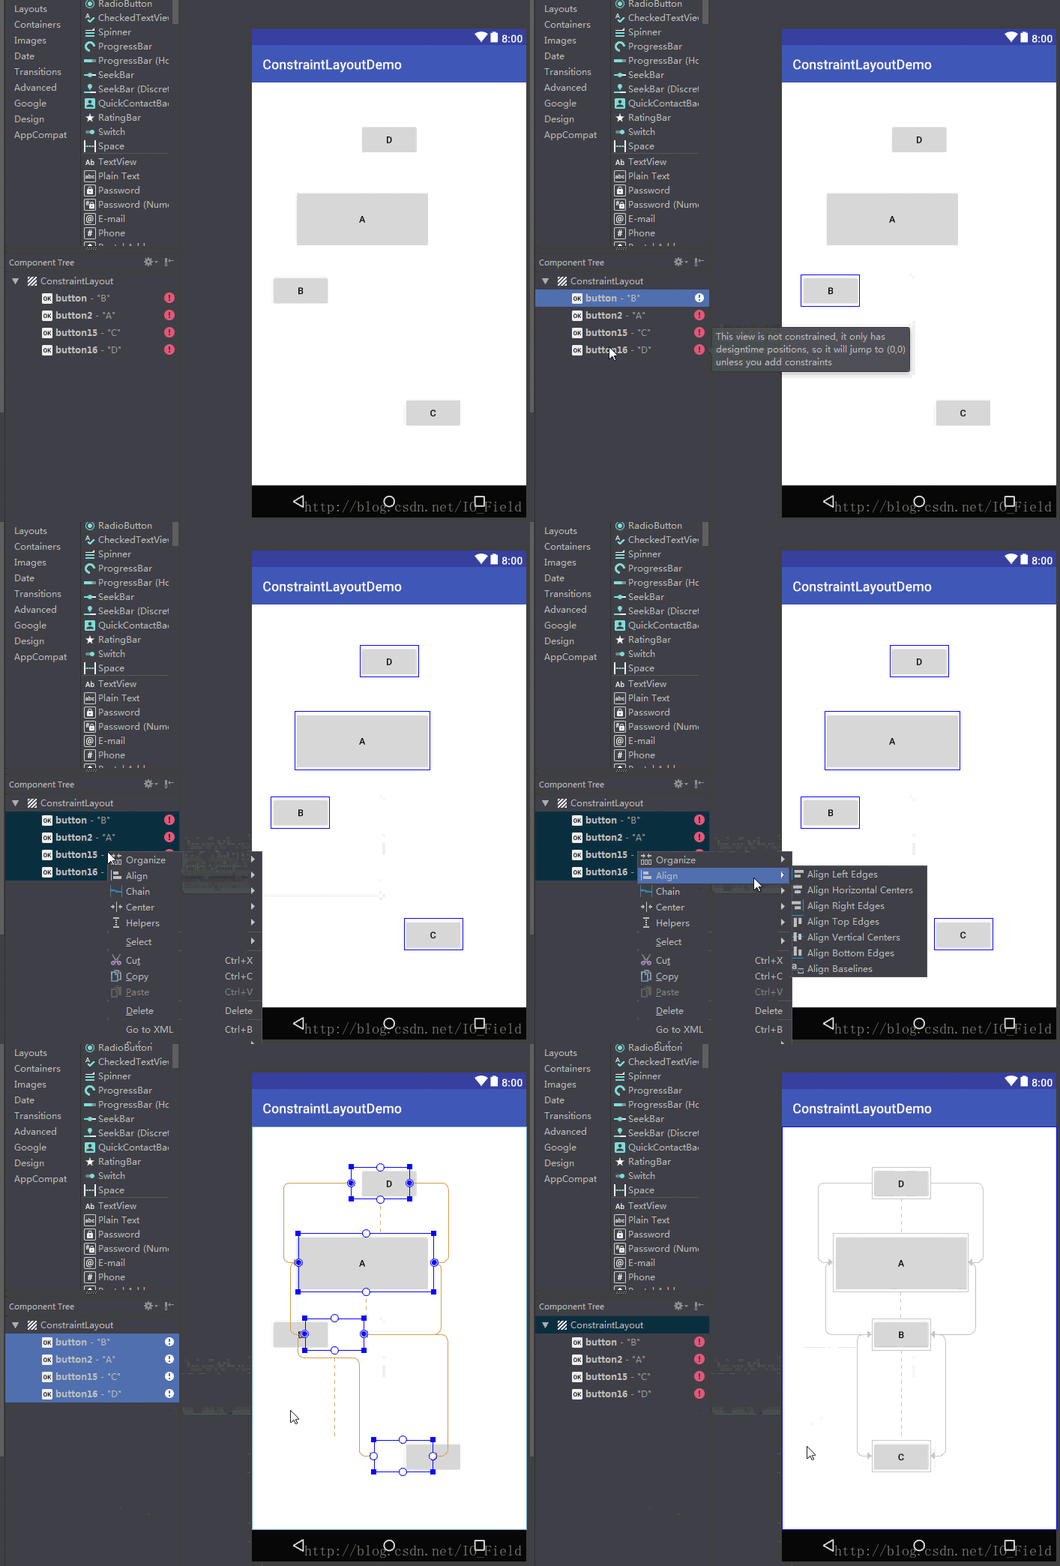
Guidelines
Guideline是ConstraintLayout的Guideline辅助对象的实用程序类,该辅助对象不会显示在设备上,它被默认是View.GONE,而且不可改。另外,Guideline是专门为ConstraintLayout创建的,也就是它仅也只能用于ConstraintLayou布局。GuideLine其实就是一种约束规则,供其他视图使用,以统一处理距离ConstraintLayout边缘的距离,而不用单独处理约束偏差。
首先来创建一个GuideLines,单位可以是dp,百分比,点击进行切换
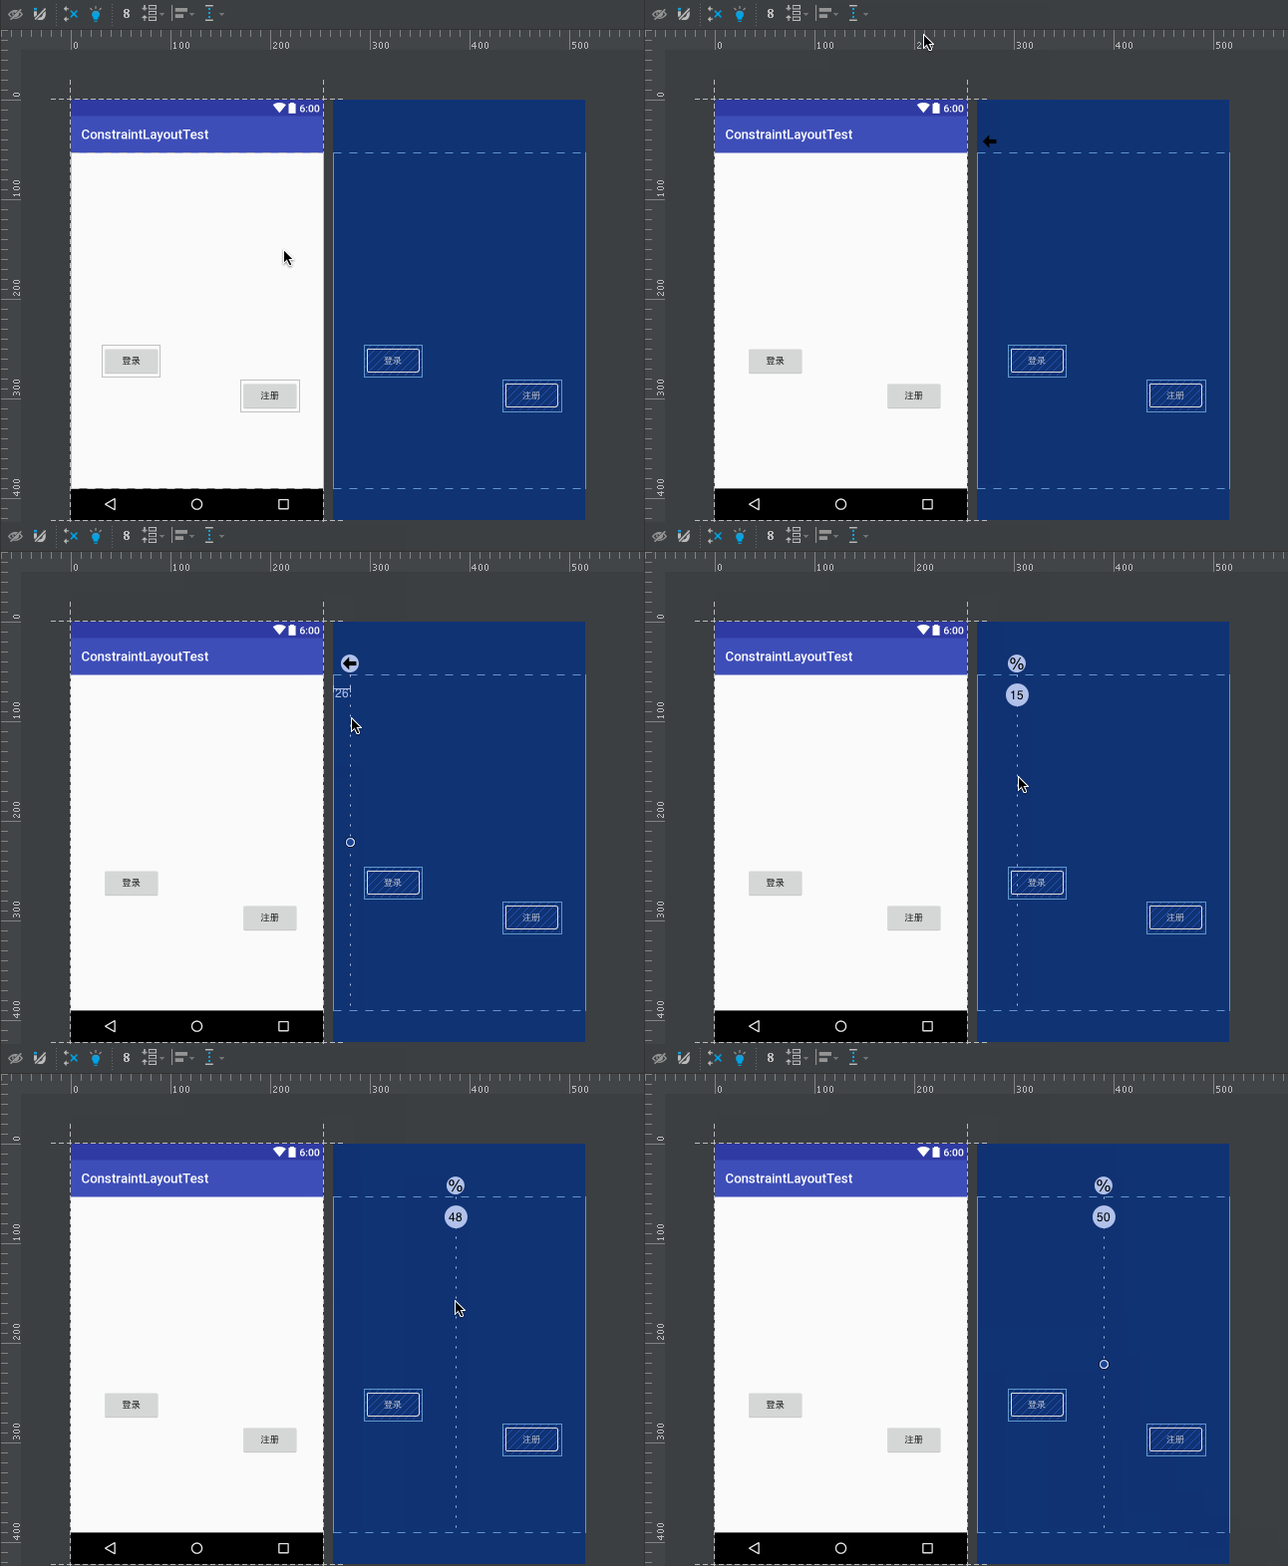
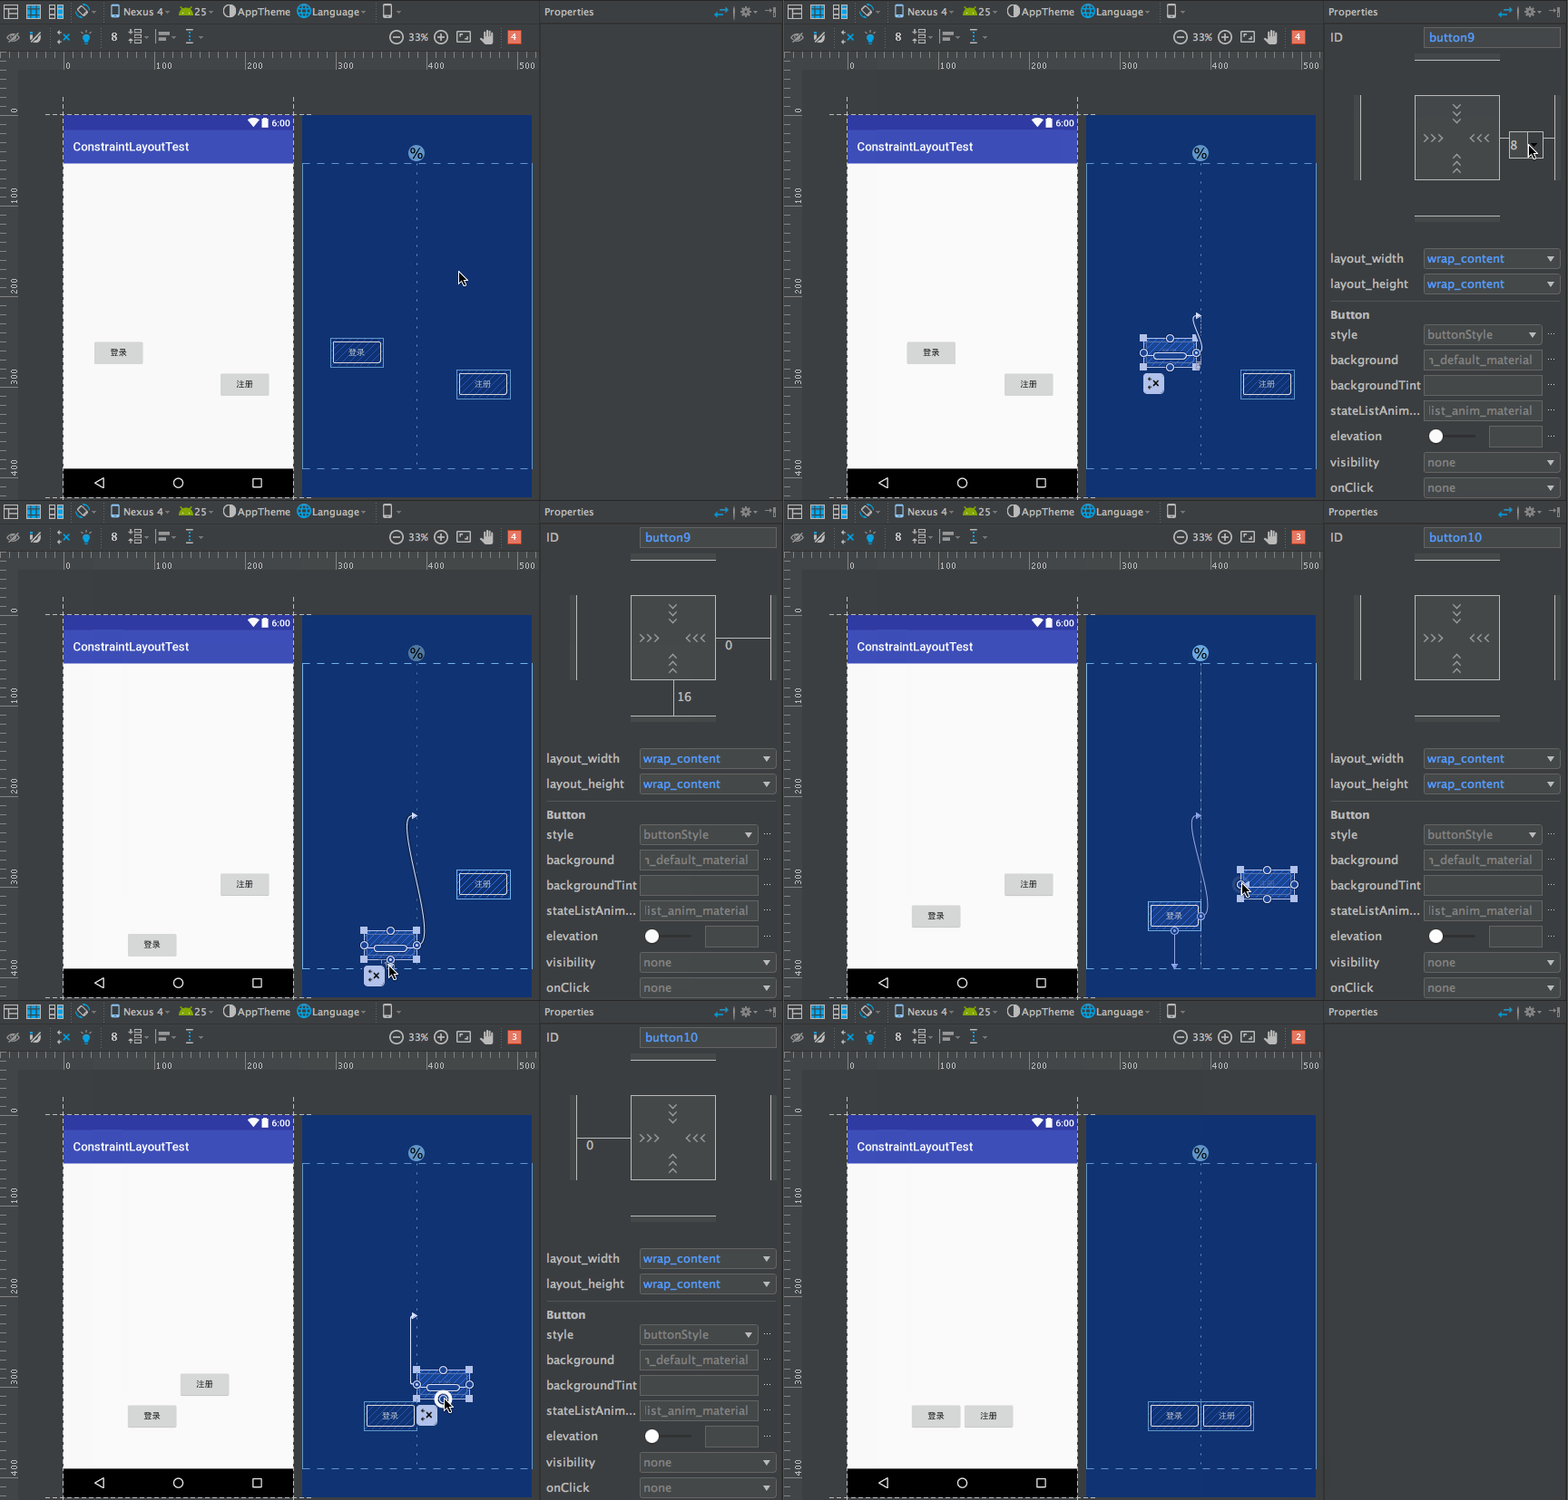
可以看到,我们给登录按钮的右边向Guideline添加约束,登录按钮的下面向底部添加约束,并拖动按钮让它距离底部64dp。然后给注册按钮的左边向Guideline添加约束,注册按钮的下面向登录按钮的下面添加约束。这样就实现了让两个按钮在水平方向上居中显示,在垂直方向上都距离底部64dp的功能了。
Inspector
“Attributes”窗口在顶部显示视图的inspector,位于src和contentDescription的视图属性上方。inspector显示UI元素的约束和边距,以及用于调整元素沿水平和垂直轴的位置偏差的进度条。

①hide:使用此按钮关闭“Attributes”窗口
②margin:通过单击值并选择不同的值来更改边距
③height/width类型:表示控件的宽度和长度
③Bias:使用进度来改变具有相反约束的元素的水平和垂直约束偏移
④尺寸比(ratio):尺寸大小的比例
⑤约束:表示当前侧面的约束,单击后可以删除约束 我们构建UI如下图所示:
可以通过滑动bias的值,这个是代表占比,下面会讲到

也可以在Inspect中修改宽高,Margin,Ratio,match_parent,wrap_content,fixed等,可以自行研究
相对定位属性
- layout_constraintLeft_toLeftOf
- layout_constraintLeft_toRightOf
- layout_constraintRight_toLeftOf
- layout_constraintRight_toRightOf
- layout_constraintTop_toTopOf
- layout_constraintTop_toBottomOf
- layout_constraintBottom_toTopOf
- layout_constraintBottom_toBottomOf
- layout_constraintBaseline_toBaselineOf
- layout_constraintStart_toEndOf
- layout_constraintStart_toStartOf
- layout_constraintEnd_toStartOf
- layout_constraintEnd_toEndOf
该属性都形如layout_constraintXXX_toYYYOf,XXX代表自身的哪一边(top,left,bottom,right),YYY表示相对于某个View的哪一边,例如app:layout_constraintLeft_toRightOf=”@id/button1” ,表示的是控件自身的左侧在button1的右侧,app:layout_constraintBottom_toBottomOf=”parent”,表示控件自身底端和父控件底端对齐。
gone_margin
- layout_goneMarginStart
- layout_goneMarginEnd
- layout_goneMarginLeft
- layout_goneMarginTop
- layout_goneMarginRight
- layout_goneMarginBottom
举例,当A控件 约束 在B控件的左边,B控件GONE了,此时A会额外拥有一个margin的能力,来“补充”B消失的导致的“位移”。
下面看个例子:

把左边的Button设置为GONE之后:

可以看到右边Button并没有移动,这时的goneMarginLeft起作用了。
居中效果和bias
- 父容器居中
想要在父容器中居中,如果水平居中,给左边界和右边界添加约束,添加parent约束,以下代码:
<Button
        android:id="@+id/button7"
        android:layout_width="100dp"
        android:layout_height="wrap_content"
        android:text="Button"
        app:layout_constraintLeft_toLeftOf="parent"
        app:layout_constraintRight_toRightOf="parent"
        app:layout_constraintTop_toTopOf="parent"
/>- 在同级View之间居中
如果想在居中在两个View之间,类似的,把top约束到上面View的bottom,bottom约束到下面View的Top,就可以实现在这两个View之间居中显示
Bias
Bias代表倾向,分为横向和纵向的,默认等于0.5,要使用这个属性需要添加View的上下或者左右的约束
app:layout_constraintHorizontal_bias="0.5"
        app:layout_constraintVertical_bias="0.5"
上面我们设置的居中显示,默认为0.5所以它是居中,我们可以更改这个值显示在不同的位置,下图是拖动方式来改变横竖方向的Bias实现显示的位置改变:
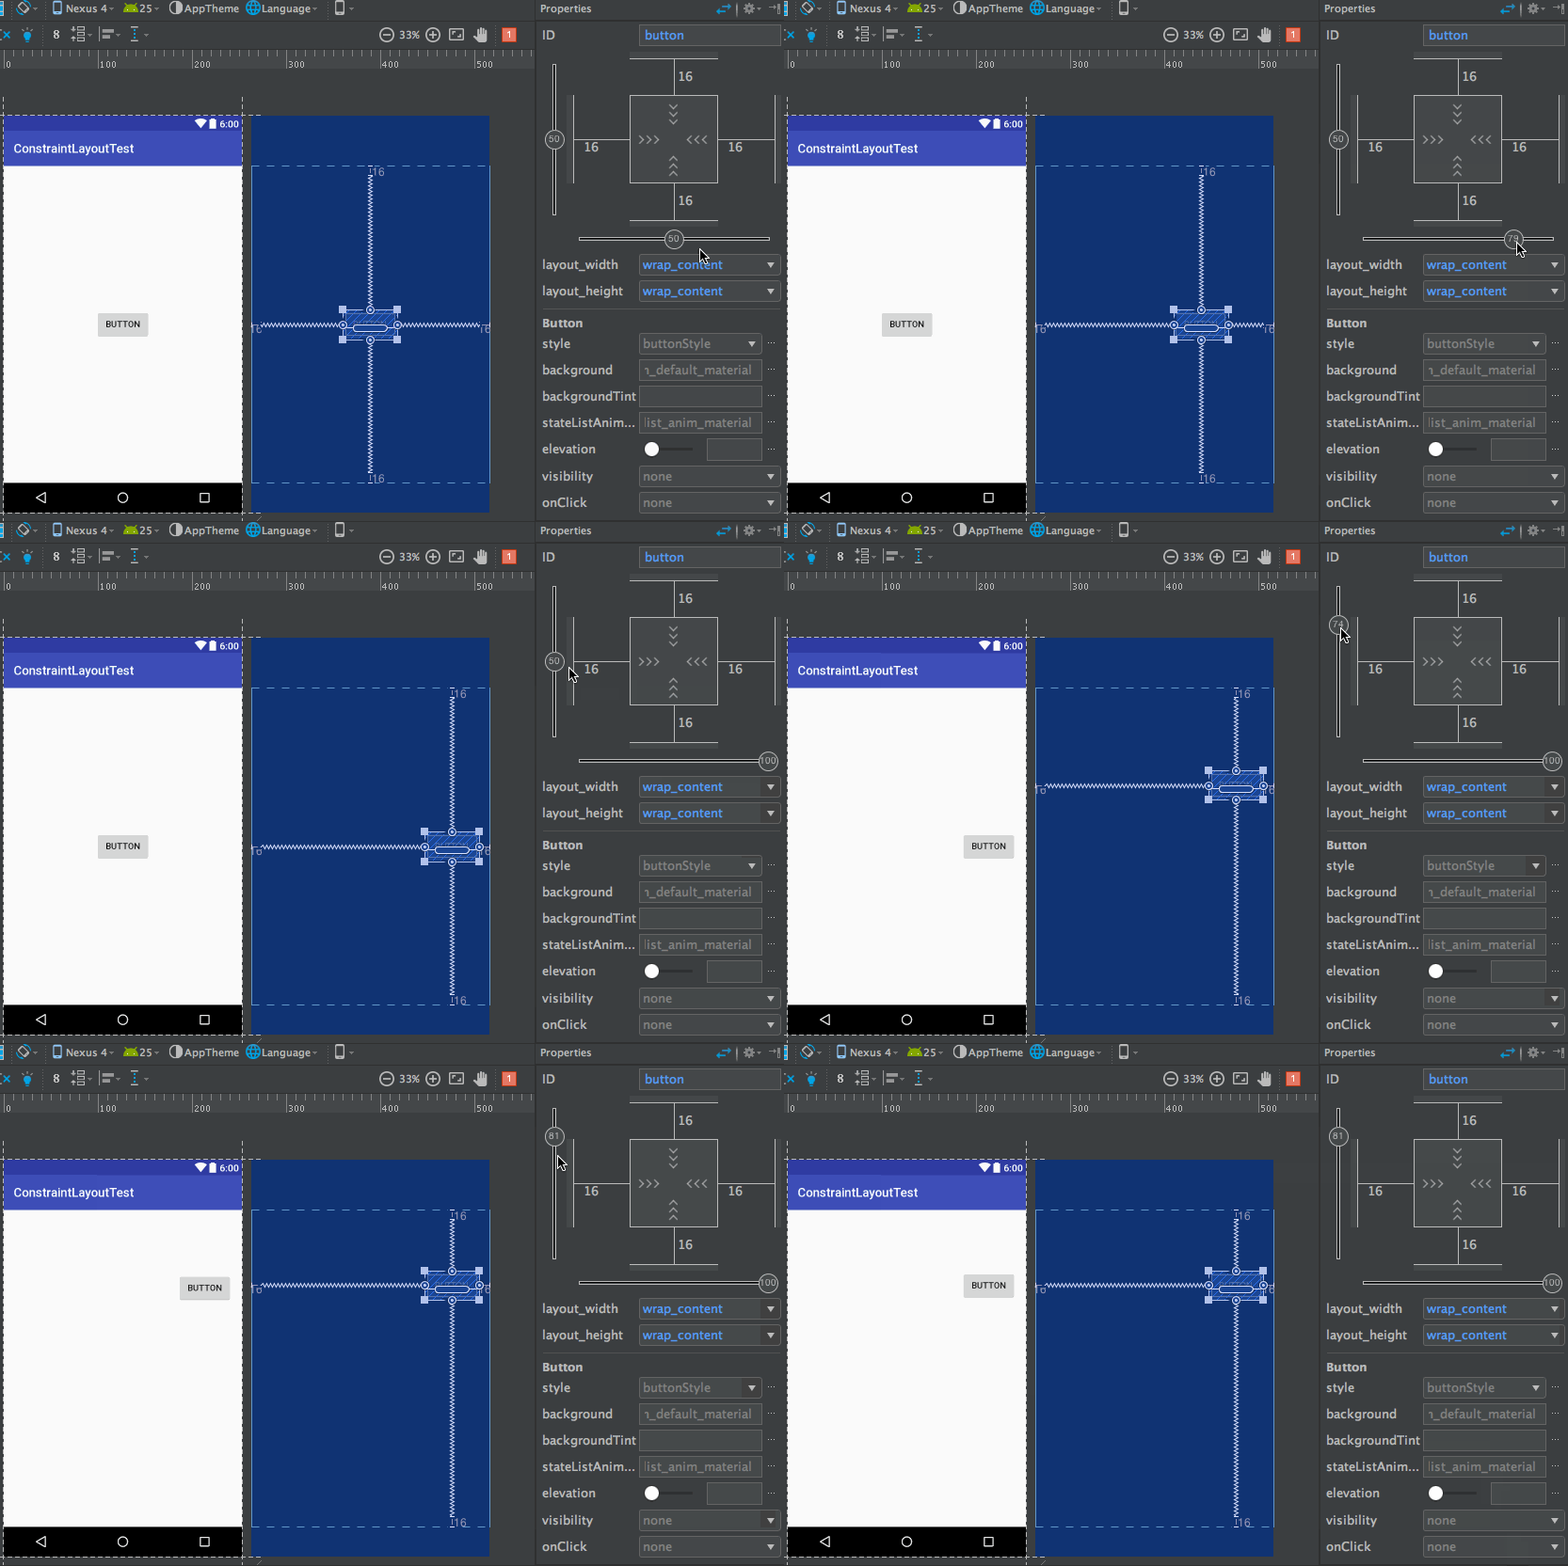
角度定位
角度定位是ConstraintLayout所特有的一种布局方式,它可以约束一个控件的中心相对于另一个的角度和距离
layout_constraintCircle: 角度定位相对的另一个控件的id
layout_constraintCircleRadius: 到相对控件中心的距离
layout_constraintCircleAngle: 控件相对于另一个控件的角度
比例(Ratio)
当只有一个方向的约束时,可以使用ratio来定义View的宽高,例如:
<Button
        android:layout_width="200dp"
        android:layout_height="0dp"
        android:text="Ratio"
        app:layout_constraintBottom_toBottomOf="parent"
        app:layout_constraintDimensionRatio="2:1"
        app:layout_constraintTop_toTopOf="parent"/>
Chain链
Chain 链是由多个 Views 组合的,分为水平和竖直的,所以要创建一个 Chain 链就需要先选择多个想要链接到一起的 Views ,然后再右键选择 ‘Center Horizontally’ 或者 ‘Center Vertically’ 来创建水平链或者垂直链。如下,创建一个水平链:
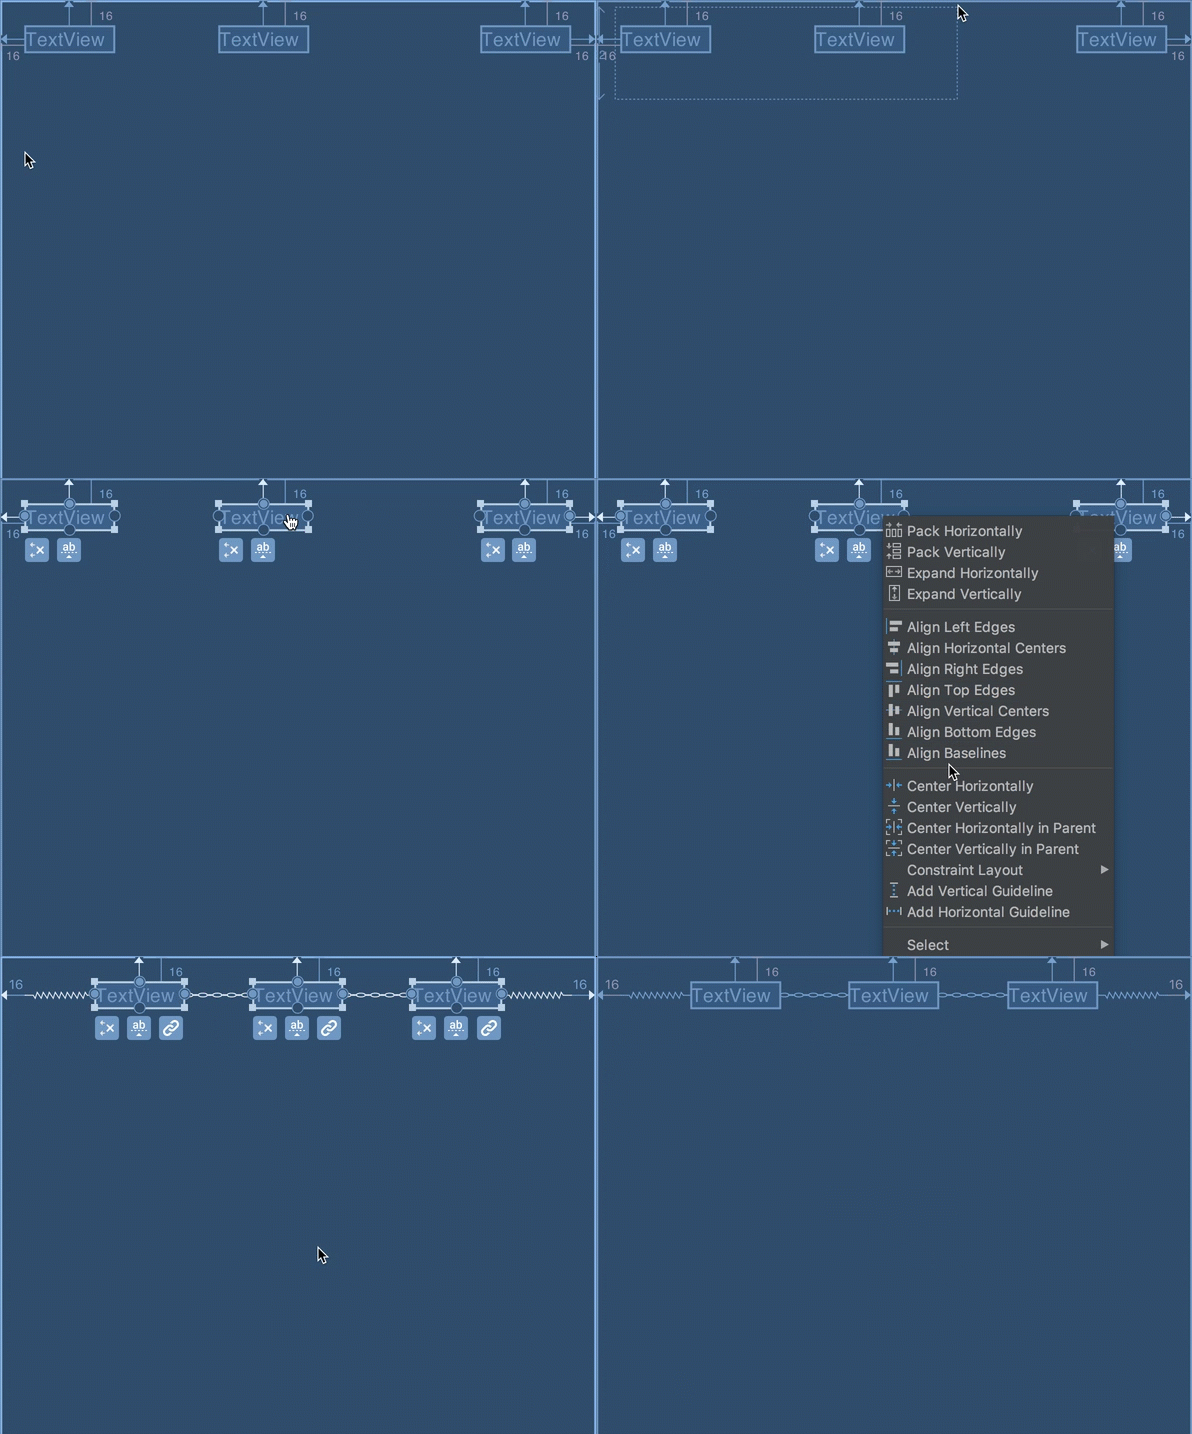
Chain 链模式一共有三种,分别为:spread ,spread_inside 和 packed
- spread:Chain 链的默认模式就是 spread 模式,它将平分间隙让多个 Views 布局到剩余空间。
- spread inside:它将会把两边最边缘的两个 View 到外向父组件边缘的距离去除,然后让剩余的 Views 在剩余的空间内平分间隙布局。
- packed:它将所有 Views 打包到一起不分配多余的间隙(当然不包括通过 margin 设置多个 Views 之间的间隙),然后将整个组件组在可用的剩余位置居中:
Chain也可以像LinearLayout一样设置权重 app:layout_constraintHorizontal_weight="1"


