前言
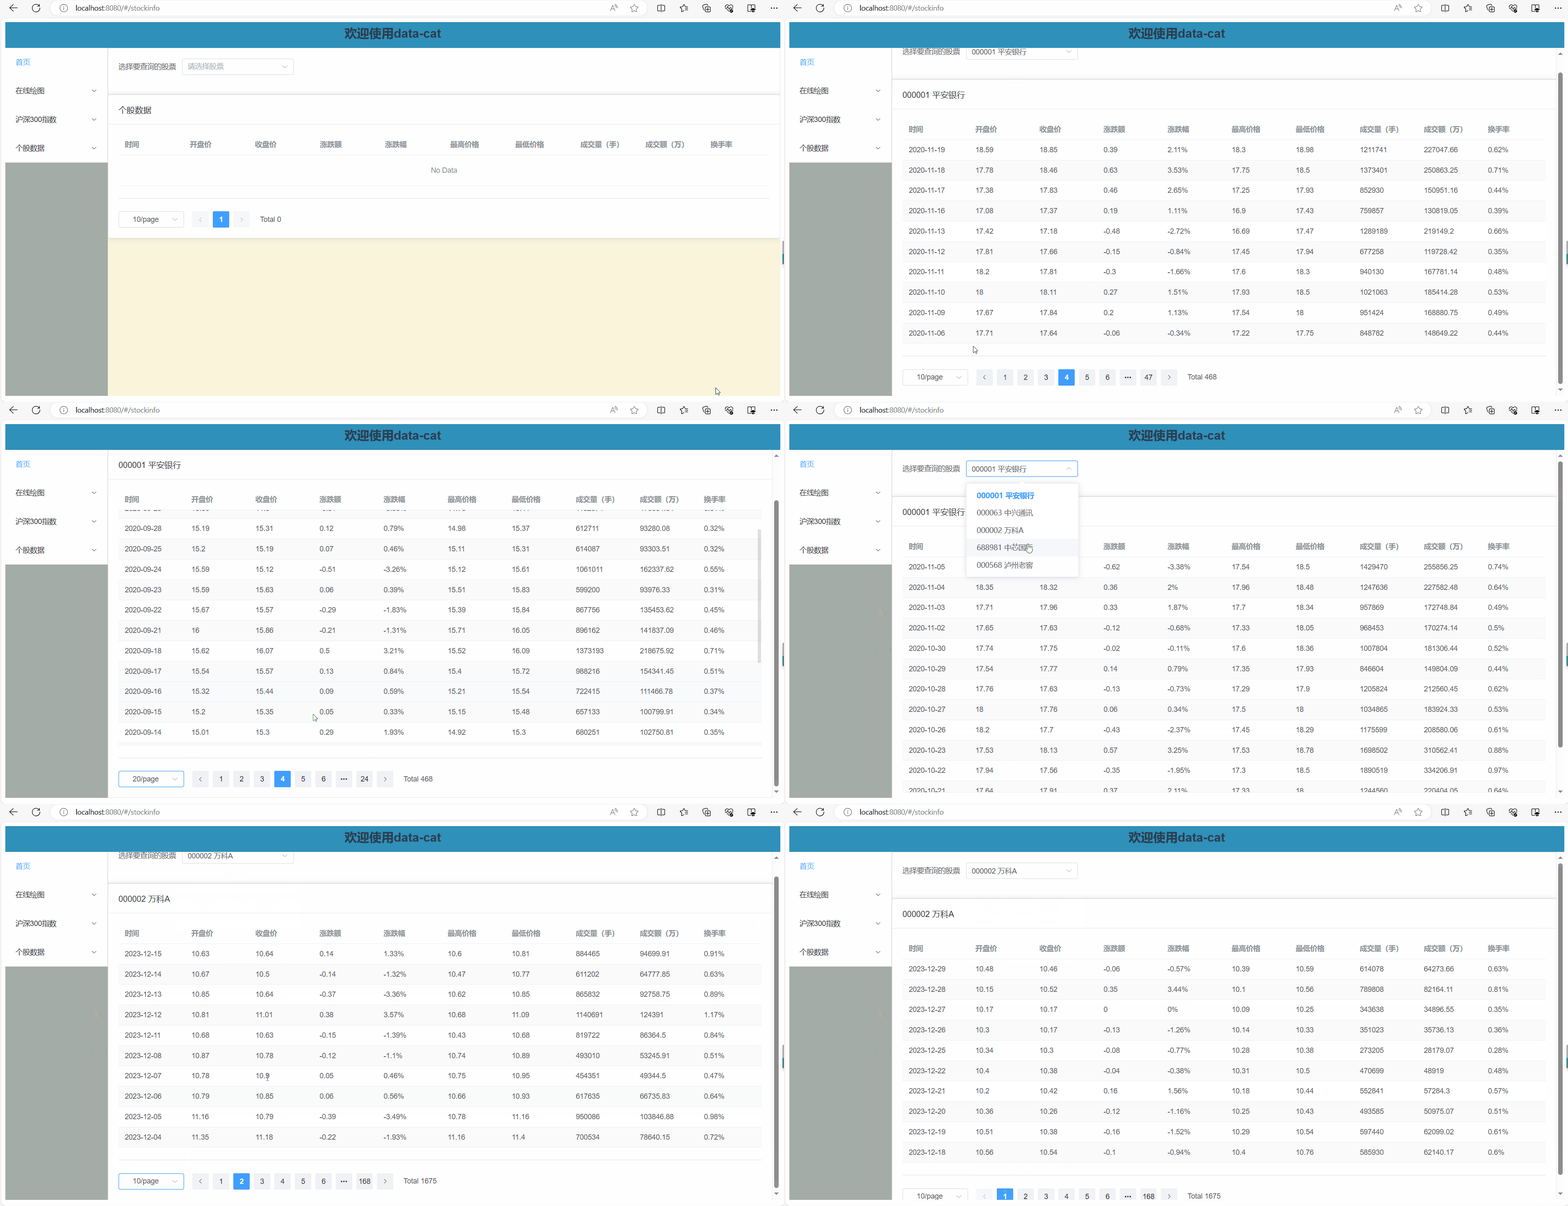
前面的文章我们讲述了获取详细个股数据的方法,并且使用echarts对个股的价格走势图进行了展示,本文将编写一个页面,对个股详细数据进行展示。别问涉及到了element-plus中分页的写法,对于这部分知识将会做重点讲解。
首先看一下效果

之前我一直认为前端分页很难写,不过今天写完这个页面之后我发现,有了element-plus这样的框架,前端真的变得非常简单。
获取所有有数据的股票代码
我们的页面主要分为两个部分,第一部分是获取所有有数据的股票代码,一旦选择了某一个股票代码,就会进行相对应数据的展示

本节我们先来说一下获取所有可展示的数据
和本页面相关的数据表一共有两张,一张是沪深300成分股表,表中记录了股票代码和股票名称

另一张表是个股详细数据表,就是我们在之前的文章介绍过的表

这样表对应的详细信息如下图所示

我们要分页展示的也是这张表中的数据,之所以需要两张表联动,是因为这张表中没有股票名称,为了能够同时将股票代码和股票名称查出来,我们需要首先查询个股数据表,然后再从沪深300成分股表中查询出股票代码对应的股票名称
public List<StockOptionVO> getAllCode() {
        List<StockEntity> stockEntities = sqLiteStockDao.queryAllCode();
        List<CSI300Entity> csi300Entities = sqlIteCSI300Dao.queryAllItems();
        List<StockOptionVO> stockOptionVOList = new ArrayList<>();
        for (int i=0; i<stockEntities.size(); i++) {
            StockOptionVO stockOptionVO = new StockOptionVO();
            stockOptionVO.setCode(stockEntities.get(i).getCode());
            for (int j=0; j<csi300Entities.size(); j++) {
                if (csi300Entities.get(j).getCode().equals(stockEntities.get(i).getCode())) {
                    stockOptionVO.setName(csi300Entities.get(j).getName());
                    break;
                }
            }
            stockOptionVOList.add(stockOptionVO);
        }
        return stockOptionVOList;
    }
其中两个SQL语句都很简单,就是SELECT查询数据
@Override
    public List<StockEntity> queryAllCode() {
        String sql = "SELECT DISTINCT code FROM " + TABLE_NAME;
        log.info("执行sql:" + sql);
        List<StockEntity> stockEntities = jdbcTemplate.query(sql, new Object[]{}, new BeanPropertyRowMapper<>(StockEntity.class));
        return stockEntities;
    }
@Override
public List<CSI300Entity> queryAllItems() {
String sql = "SELECT * FROM " + tableName;
List<CSI300Entity> csi300Entities = jdbcTemplate.query(sql, new Object[]{}, new BeanPropertyRowMapper<CSI300Entity>(CSI300Entity.class));
return csi300Entities;
}控制层代码如下
// 获取所有有详细数据的股票代码
    @RequestMapping("/queryCodeOptions")
    @ResponseBody
    public String queryCodeOptions() {
        List<StockOptionVO> stockOptionVOList = stockService.getAllCode();
        return JSON.toJSONString(stockOptionVOList);
    }
该接口调用的结果如下所示
[{"code":"000001","name":"平安银行"},{"code":"000063","name":"中兴通讯"},{"code":"000002","name":"万科A"},{"code":"688981","name":"中芯国际"},{"code":"000568","name":"泸州老窖"}]然后我们回到前端,我们使用了<el-select>组件进行多个选项的选择,其中<el-option>是对应的选项,我们使用v-for将后端请求到的数据渲染成选项
<el-card>
        <el-form label-width="auto">
          <el-form-item label="选择要查询的股票">
            <el-select v-model="code" placeholder="请选择股票">
              <el-option
                @click="handleSelect(item)"
                v-for="item in options"
                :label="item.code + ' ' + item.name"
                :value="item.code"
                :key="item.code"
              ></el-option>
            </el-select>
          </el-form-item>
        </el-form>
      </el-card>
注意看,<el-option>中有一个@click选项,就是我们点击的时候会触发的相应操作,实际上这个函数的逻辑就是点击后就进行相对应股票数据的查询。
获取个股详细数据并分页展示
分页有非常多好处,在SQL端主要就是使用LIMIT和OFFSET这两个关键字来实现的
接口层面接收三个参数,分别是股票代码,每一页的数据量和当前页数
// 分页查询某一只股票的详细数据
    @RequestMapping("/queryDataByPage/{code}/{pagesize}/{page}")
    @ResponseBody
    public String queryDataByPage(@PathVariable("code") String code,
                                  @PathVariable("pagesize") Integer pagesize,
                                  @PathVariable("page") Integer page) {
        List<StockEntity> stockEntities = stockService.queryDataByPage(code, pagesize, page);
        return JSON.toJSONString(stockEntities);
    }
在Service层将页数转换为SQL语句中的LIMIT和OFFSET,其中LIMIT是固定的,就是你的每一页的数据量,OFFSET的计算公式为(page - 1) * pagesize
// 分页查询某一只股票的详细数据
    public List<StockEntity> queryDataByPage(String code, Integer pagesize, Integer page) {
        Integer limit = pagesize;
        Integer offset = (page - 1) * pagesize;
        List<StockEntity> stockEntities = sqLiteStockDao.queryDataByPage(code, limit, offset);
        return stockEntities;
    }
最后就是DAO层的代码
@Override
    public List<StockEntity> queryDataByPage(String code, Integer limit, Integer offset) {
        String sql = "SELECT * FROM " + TABLE_NAME +" WHERE code=? ORDER BY record_date DESC LIMIT ? OFFSET ?";
        log.info("执行sql:" + sql);
        List<StockEntity> stockEntities = jdbcTemplate.query(sql, new Object[]{code, limit, offset},
                new BeanPropertyRowMapper<>(StockEntity.class));
        return stockEntities;
    }
这样一来我们就编写好了分页查询的后端接口。
我们还需要一个获取数据总量的接口,从控制层到服务层再到Dao层的代码如下
// 查询数据的总条数
    @RequestMapping("/queryNumByCode/{code}")
    @ResponseBody
    public Integer queryNumByCode(@PathVariable("code") String code) {
        int num = stockService.queryNumByCode(code);
        return num;
    }
// 查询数据的总条数
public int queryNumByCode(String code) {
return sqLiteStockDao.queryNumByCode(code);
}@Override
public int queryNumByCode(String code) {
String sql = "SELECT COUNT(id) FROM " + TABLE_NAME + " WHERE code=?";
log.info("执行sql:" + sql);
int num = jdbcTemplate.queryForObject(sql, new Object[]{code},
Integer.class);
return num;
}下面来看一下前端的分页组件,element-plus提供了<el-pagintion>进行分页,我们拿一个官网的例子来讲解这个组件的用法

从上到下依次为:
- current-page:表示当前页数,这是一个动态的值
- page-size:表示每一页的数据量,这也是一个动态的值
- small:是否采用小型分页样式
- disabled:是否禁用分页
- background:是否为分页按钮添加背景颜色(添加了背景颜色会更好看)
- layout:组件的排版方式
- total:总的数据量(这是需要提前获取的)
- size-change:当每一页的数据量变化时触发的事件
- current-change:当前页面变化时触发的事件
关于这个样式,我给大家举一个例子,比如我是这样写的

可以看到从左到右分别是sizes,prev,pager,next和total,那么对应的呈现的效果如下

这样子说不知道大家是否能更好地理解这个属性的用法。
那么有了基本的样式后,我们还需要编写当前页和每一页数据量这两个变量改变时的响应事件,其实逻辑都很简单,就是改变一下变量的值,然后再请求新的数据
handleSizeChange(number) {
      this.current_size = number;
      var url =
        "http://localhost:9001/stock/queryDataByPage/" +
        this.current_code +
        "/" +
        this.current_size +
        "/" +
        this.current_page;
      this.loading = true;
      axios
        .get(url)
        .then((response) => {
          this.table_data = response.data;
          console.log(response);
          this.loading = false;
        })
        .catch((error) => {
          console.log(error);
          this.loading = false;
        });
    },
    handleCurrentChange(number) {
      this.current_page = number;
      var url =
        "http://localhost:9001/stock/queryDataByPage/" +
        this.current_code +
        "/" +
        this.current_size +
        "/" +
        this.current_page;
      this.loading = true;
      axios
        .get(url)
        .then((response) => {
          this.table_data = response.data;
          console.log(response);
          this.loading = false;
        })
        .catch((error) => {
          console.log(error);
          this.loading = false;
        });
    },
下面展示一下前端页面的完整代码
<template>
  <el-container>
    <el-main>
      <el-card>
        <el-form label-width="auto">
          <el-form-item label="选择要查询的股票">
            <el-select v-model="code" placeholder="请选择股票">
              <el-option
                @click="handleSelect(item)"
                v-for="item in options"
                :label="item.code + ' ' + item.name"
                :value="item.code"
                :key="item.code"
              ></el-option>
            </el-select>
          </el-form-item>
        </el-form>
      </el-card>
      <el-card>
        <template #header>
          <div class="card-header">
            <span>{{ table_title }}</span>
          </div>
        </template>
        <el-table
          v-loading="loading"
          :data="table_data"
          :show-header="true"
          :max-height="500"
          stripe
        >
          <el-table-column prop="record_date" label="时间"></el-table-column>
          <el-table-column prop="open_price" label="开盘价"></el-table-column>
          <el-table-column prop="close_price" label="收盘价"></el-table-column>
          <el-table-column prop="change_ament" label="涨跌额"></el-table-column>
          <el-table-column
            prop="change_range"
            label="涨跌幅"
            :formatter="formatter1"
          ></el-table-column>
          <el-table-column prop="max_price" label="最高价格"></el-table-column>
          <el-table-column prop="min_price" label="最低价格"></el-table-column>
          <el-table-column prop="volume" label="成交量(手)"></el-table-column>
          <el-table-column
            prop="turnover"
            label="成交额(万)"
          ></el-table-column>
          <el-table-column
            prop="turnover_rate"
            label="换手率"
            :formatter="formatter2"
          ></el-table-column>
        </el-table>
        <el-divider />
        <el-pagination
          :current-page="current_page"
          :page-size="current_size"
          :page-sizes="[10, 20, 30]"
          :small="false"
          :background="true"
          layout="sizes, prev, pager, next, total"
          :total="total_num"
          @size-change="handleSizeChange"
          @current-change="handleCurrentChange"
        />
      </el-card>
    </el-main>
  </el-container>
</template>

<script>
import axios from "axios";
import { getCurrentInstance } from "vue";
export default {
  data() {
    return {
      update_status: "未开始",
      loading: false,
      // 当前选中的股票
      code: "",
      // 所有的选项
      options: [],
      table_title: "个股数据",
      // 个股详细信息
      table_data: [],
      // 分页相关选项
      // 当前查询的股票代码
      current_code: "",
      // 当前页
      current_page: 1,
      // 每一页的数量
      current_size: 10,
      // 数据总数
      total_num: 0,
      echarts: getCurrentInstance().appContext.config.globalProperties.$echarts,
    };
  },
  mounted() {
    this.init();
  },
  methods: {
    init() {
      var url = "http://localhost:9001/stock/queryCodeOptions";
      axios
        .get(url)
        .then((response) => {
          this.options = response.data;
          console.log(response);
        })
        .catch((error) => {
          console.log(error);
        });
    },
    handleSelect(item) {
      this.current_code = item.code;
      this.current_page = 1;
      // 获取表格详细数据
      var url1 =
        "http://localhost:9001/stock/queryDataByPage/" +
        this.current_code +
        "/" +
        this.current_size +
        "/" +
        this.current_page;
      this.loading = true;
      this.table_title = item.code + " " + item.name;
      axios
        .get(url1)
        .then((response) => {
          this.table_data = response.data;
          console.log(response);
          this.loading = false;
        })
        .catch((error) => {
          console.log(error);
          this.loading = false;
        });
      // 获取当前股票数据总数
      var url2 = "http://localhost:9001/stock/queryNumByCode/" + item.code;
      axios
        .get(url2)
        .then((response) => {
          this.total_num = response.data;
          console.log(response);
        })
        .catch((error) => {
          console.log(error);
        });
    },
    formatter1(row) {
      return row.change_range + "%";
    },
    formatter2(row) {
      return row.turnover_rate + "%";
    },
    handleSizeChange(number) {
      this.current_size = number;
      var url =
        "http://localhost:9001/stock/queryDataByPage/" +
        this.current_code +
        "/" +
        this.current_size +
        "/" +
        this.current_page;
      this.loading = true;
      axios
        .get(url)
        .then((response) => {
          this.table_data = response.data;
          console.log(response);
          this.loading = false;
        })
        .catch((error) => {
          console.log(error);
          this.loading = false;
        });
    },
    handleCurrentChange(number) {
      this.current_page = number;
      var url =
        "http://localhost:9001/stock/queryDataByPage/" +
        this.current_code +
        "/" +
        this.current_size +
        "/" +
        this.current_page;
      this.loading = true;
      axios
        .get(url)
        .then((response) => {
          this.table_data = response.data;
          console.log(response);
          this.loading = false;
        })
        .catch((error) => {
          console.log(error);
          this.loading = false;
        });
    },
  },
};
</script>

<style scoped>
.card-header {
  display: flex;
  justify-content: space-between;
  align-items: center;
}
</style>
还有一点需要额外说一下,大家可以看一下我们表格中的数据

这两列是由百分号,但是数据库中存的数据是没有百分号的,我们选择在前端进行处理,在表格相应的列中添加一个formatter属性,属性的值是一个函数,函数返回值就是最后渲染到页面上的字符串。

这两个函数的具体实现如下

结语
本文介绍了后端分页接口以及基于element-plus的分页实现方法,希望对你有所帮助。


