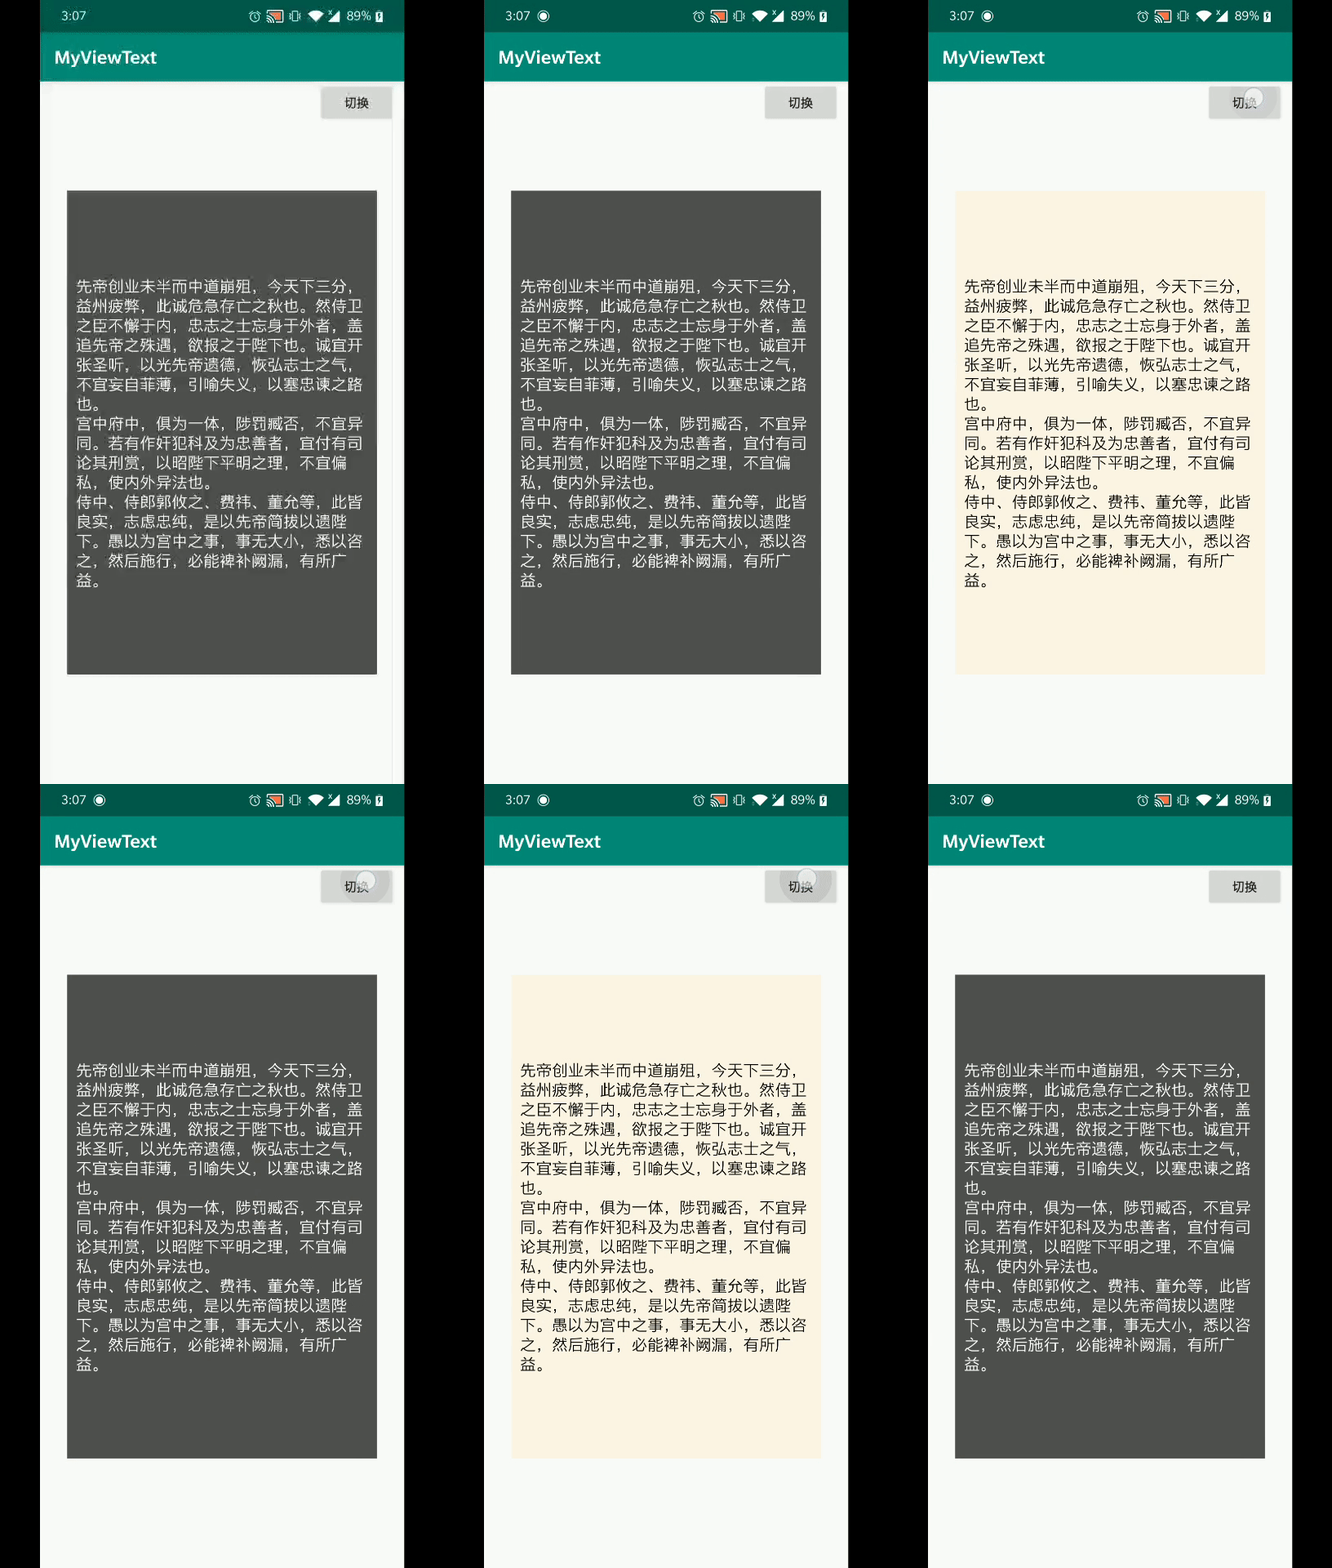
先看效果图:

想要实现这种效果,首先要了解下Xfermode图像混合模式中的PorterDuff.Mode.CLEAR,它可以用来清除原图像的部分绘制内容,可以理解为它是一块橡皮,可以擦去图像上的任意一块地方。
其次,canvas中的也有着图层的概念。图层是什么,简单来说就是一层一层的图片叠加在同一个地方,比如有一幢摩天大楼,它有一层,两层,三层......十八层等等,我们如果从大楼正上方俯瞰大楼,因为它的下面几层都被最上层压住了,所以我们只能看到它的最上层。图层的概念也一样,我们正常情况只能看到最上层的图层,其它层都被覆盖住了。
所以,大家应该已经猜到了这个动画效果的实现原理,没错,我们一共需要两层,第一层保留着主题更改前的效果图,第二层就是主题更改后的效果图,然后我们用PorterDuff.Mode.CLEAR这个模式,通过drawCircle画圆的方式来擦去旧样式。旧样式被擦去以后,我们就能看见被压在下面的新样式,也就是主题被更改以后的样式。
大致原理如下图:(注意:旧样式在最上层,是后面新添加进来的图层)

下面来说说代码实现。
1、我们需要获取到更改前界面的样式,并用bitmap保存下来,同时得到我们需要用来擦除旧图层的圆的半径:
//将View当前的样式截图保存在bg中
private void createbg(){
    rootView=(ViewGroup)((Activity)getContext()).getWindow().getDecorView();
    totalRadius=rootView.getMeasuredWidth()>rootView.getMeasuredHeight()?rootView.getMeasuredWidth():rootView.getMeasuredHeight();
    rootView.setDrawingCacheEnabled(true);
    bg=Bitmap.createBitmap(rootView.getDrawingCache(), 0, 0, rootView.getMeasuredWidth(), rootView.getMeasuredHeight());
    rootView.setDrawingCacheEnabled(false);
    attachToRootView();
}
rootView:原界面Activity的View
totalRadius:总共需要绘制的圆的半径
bg:用来保存原界面样式的Bitmap
attachToRootView():将该View添加到rootView中的方法(即动态添加该布局控件)
2、通过saveLayer方法添加新图层来保存旧样式,并以动画形式擦除旧样式(注意,添加后的操作都是在新图层上进行的)
@Override
protected void onDraw(Canvas canvas) {
    super.onDraw(canvas);
    //是否开始绘制
    if(!start)return;
    //如果已绘制的半径超过需要绘制的半径,则绘制完毕
    if(radius>totalRadius){
        animateFinish();
        return;
    }
    //在新图层上进行绘制
    int layer = canvas.saveLayer(0, 0, getWidth(), getHeight(), null);
    canvas.drawBitmap(bg, 0, 0, null);
    canvas.drawCircle(0, 0, radius+perRadius, paint);
    radius+=perRadius;
    canvas.restoreToCount(layer);
    postInvalidateDelayed(5);
}

//绘制完毕,动画结束
private void animateFinish(){
    start=false;
    bg.recycle();
    radius=0;
}
3、在Activity中完成点击按钮的监听和新样式的更新
private void initView(){
    animatorThemeView=new MyAnimatorThemeView(this);
    textView=findViewById(R.id.tv_name);
    findViewById(R.id.btn_change).setOnClickListener(new View.OnClickListener() {
        @Override
        public void onClick(View v) {
            if(!animatorThemeView.hasStart()){
                clickNum++;
                //开始绘制
                animatorThemeView.start();
                //更新textView的样式
                textView.setTextColor(getResources().getColor(tvColors[clickNum%2]));
                textView.setBackground(getDrawable(bgColors[clickNum%2]));
            }
        }
    });
}
下面是完整的自定义View代码:
import android.app.Activity;
import android.content.Context;
import android.graphics.Bitmap;
import android.graphics.Canvas;
import android.graphics.Paint;
import android.graphics.PorterDuff;
import android.graphics.PorterDuffXfermode;
import android.view.View;
import android.view.ViewGroup;

public class MyAnimatorThemeView extends View {
    private Paint paint;
    private Bitmap bg;
    private ViewGroup rootView;
    private boolean start=false;
    private int radius=0,totalRadius=3000,perRadius=55;   //当前已绘制的圆的半径;需要绘制出的圆的半径;每次绘制的半径

    public MyAnimatorThemeView(Context context){
        super(context);
        init();
    }

    private void init(){
        paint=new Paint();
        paint.setXfermode(new PorterDuffXfermode(PorterDuff.Mode.CLEAR));
    }

    @Override
    protected void onDraw(Canvas canvas) {
        super.onDraw(canvas);
        //是否开始绘制
        if(!start)return;
        //如果已绘制的半径超过需要绘制的半径,则绘制完毕
        if(radius>totalRadius){
            animateFinish();
            return;
        }
        //在新的图层上面绘制
        int layer = canvas.saveLayer(0, 0, getWidth(), getHeight(), null);
        canvas.drawBitmap(bg, 0, 0, null);
        canvas.drawCircle(0, 0, radius+perRadius, paint);
        radius+=perRadius;
        canvas.restoreToCount(layer);
        postInvalidateDelayed(5);
    }

    //开启动画
    public void start(){
        if(!start){
            createbg();
            start=true;
            invalidate();
        }
    }

    //将View当前的样式截图保存在bg中
    private void createbg(){
        rootView=(ViewGroup)((Activity)getContext()).getWindow().getDecorView();
        totalRadius=rootView.getMeasuredWidth()>rootView.getMeasuredHeight()?rootView.getMeasuredWidth():rootView.getMeasuredHeight();
        rootView.setDrawingCacheEnabled(true);
        bg=Bitmap.createBitmap(rootView.getDrawingCache(), 0, 0, rootView.getMeasuredWidth(), rootView.getMeasuredHeight());
        rootView.setDrawingCacheEnabled(false);
        attachToRootView();
    }

    //当前View添加到布局中
    private void attachToRootView() {
        if(this.getParent()==null){
            this.setLayoutParams(new ViewGroup.LayoutParams(ViewGroup.LayoutParams.MATCH_PARENT, ViewGroup.LayoutParams.MATCH_PARENT));
            rootView.addView(this);
        }
    }

    //绘制完毕,动画结束
    private void animateFinish(){
        start=false;
        bg.recycle();
        radius=0;
    }

    //向外提供检查是否开始的方法
    public boolean hasStart(){
        return start;
    }
}
Activity类的代码:
public class MyAnimatorThemeAct extends AppCompatActivity {
    private MyAnimatorThemeView animatorThemeView;
    private TextView textView;
    private int clickNum=0;
    private int[] tvColors={R.color.white,R.color.black};
    private int[] bgColors={R.color.light_black,R.color.blue};
    @Override
    protected void onCreate(@Nullable Bundle savedInstanceState) {
        super.onCreate(savedInstanceState);
        setContentView(R.layout.act_animator_theme);
        initView();
    }

    private void initView(){
        animatorThemeView=new MyAnimatorThemeView(this);
        textView=findViewById(R.id.tv_name);
        findViewById(R.id.btn_change).setOnClickListener(new View.OnClickListener() {
            @Override
            public void onClick(View v) {
                if(!animatorThemeView.hasStart()){
                    clickNum++;
                    animatorThemeView.start();
                    textView.setTextColor(getResources().getColor(tvColors[clickNum%2]));
                    textView.setBackground(getDrawable(bgColors[clickNum%2]));
                }
            }
        });
    }
}
xml布局文件如下:
<?xml version="1.0" encoding="utf-8"?>
<RelativeLayout
    android:id="@+id/relative"
    xmlns:android="http://schemas.android.com/apk/res/android"
    android:layout_width="match_parent"
    android:layout_height="match_parent">
    <Button
        android:id="@+id/btn_change"
        android:layout_width="wrap_content"
        android:layout_height="wrap_content"
        android:layout_alignParentRight="true"
        android:layout_marginRight="10dp"
        android:text="切换"/>

    <TextView
        android:id="@+id/tv_name"
        android:layout_width="350dp"
        android:layout_height="550dp"
        android:paddingHorizontal="10dp"
        android:text="@string/str1"
        android:layout_centerInParent="true"
        android:textSize="18sp"
        android:gravity="center_vertical"
        android:textColor="@color/white"
        android:background="@color/light_black"/>
</RelativeLayout>


