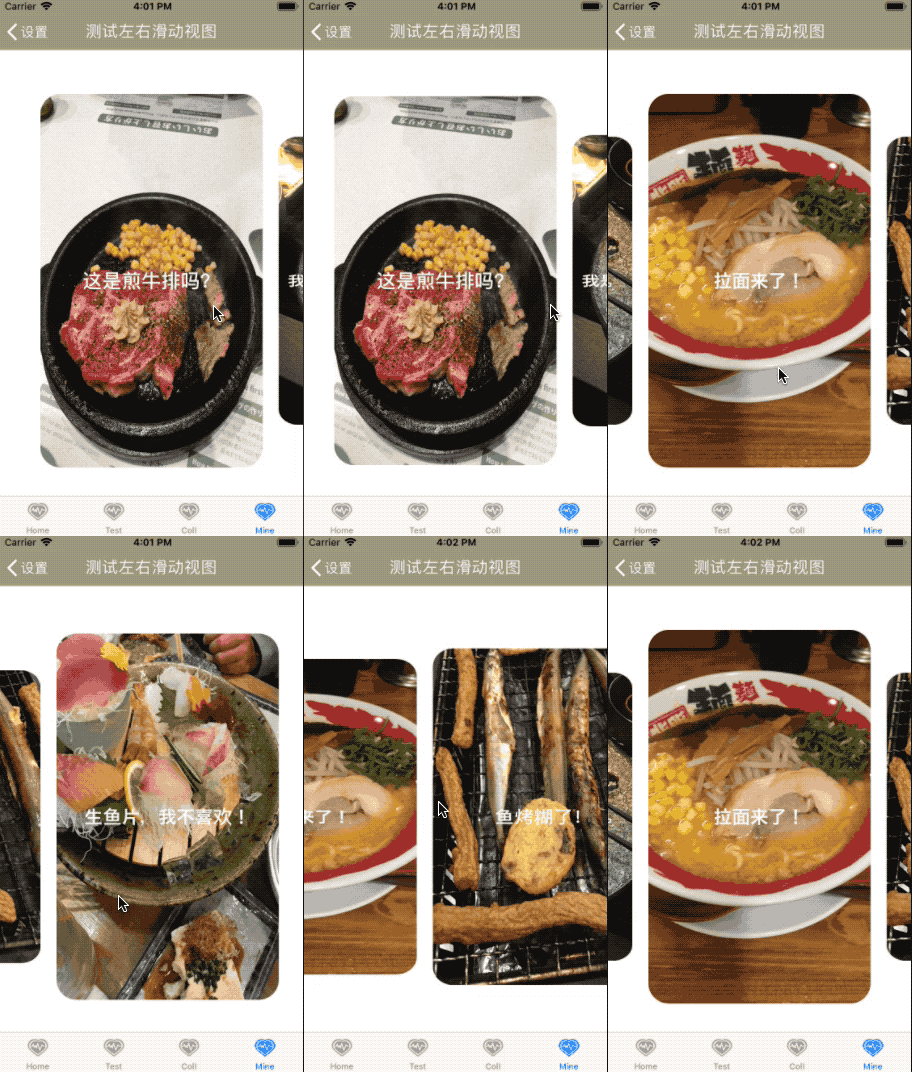
今天使用UICollectionView+UICollectionViewFlowLayout+UICollectionViewCell做了一个横向滑动查看图片的功能,屏幕中间始终显示一张图片,左右2张缩小显示部分内容。
先看看效果吧。

怎么样,还可以吧。
好了,下面分享代码内容。
先新建一个UIViewController,View里添加一个UICollectionView,主要代码如下:
func initCollectionView() -> Void {
        let padding_top:CGFloat = navHeight()+space_height;
        let padding_bottom:CGFloat = tabbarHeight();
        let main_width:CGFloat = self.view.frame.size.width;
        let main_height:CGFloat = self.view.frame.size.height;
        let collectionView_width:CGFloat = main_width;
        let collectionView_height:CGFloat = main_height - padding_top - space_height*2 - padding_bottom;
        //布局
        let flowLayout : TestLeftRightCollectionViewFlowLayout = TestLeftRightCollectionViewFlowLayout.init(width: collectionView_width, height: collectionView_height);

        let collectionView_x:CGFloat = 0.0;
        let collectionView_y:CGFloat = padding_top;
        创建UICollectionView
        collectionView = UICollectionView(frame: CGRect(x: collectionView_x, y: collectionView_y, width: collectionView_width, height: collectionView_height), collectionViewLayout: flowLayout);
        collectionView.backgroundColor = UIColor.clear;
        //不开启分页(pagingEnable的效果会覆盖[targetContentOffset(forProposedContentOffset]的效果)
        collectionView.isPagingEnabled = false;
        //设置代理
        collectionView.delegate = self;
        collectionView.dataSource = self;
        //不显示滚动条
        collectionView.showsHorizontalScrollIndicator = false;
        //弹簧效果设置
        collectionView.bounces = false;
        self.view.addSubview(collectionView);
        //注册cell
        collectionView.register(TestLeftRightCollectionViewCell.classForKeyedArchiver(), forCellWithReuseIdentifier: "testLeftRightCollectionViewCell");
    }
上面用到了一个自定义的FlowLayout,新建TestLeftRightCollectionViewFlowLayout继承UICollectionViewFlowLayout,初期化代码如下:
init(width:CGFloat,height:CGFloat) {
        super.init();
        //对每条边向内方向的偏移量
        let padding:CGFloat = 50.0;
        //设置cell的尺寸(宽度和高度)
        self.itemSize = CGSize(width: width-padding*2, height: height-padding);
        //设置水平滚动方向(默认是竖直方向)
        self.scrollDirection = .horizontal;
        //设置cell与cell之间的行距
        self.minimumLineSpacing = 20.0;
        //设置cell与cell之间的列距
        self.minimumInteritemSpacing = 0.0;
        //对每条边向内方向的偏移量,可以为正值(向内偏移)也可以为负值(向外偏移)
        sectionInset = UIEdgeInsets(top: 0, left: padding, bottom: 0, right: padding);
    }

    required init?(coder aDecoder: NSCoder) {
        fatalError("init(coder:) has not been implemented")
    }

    //是否需要更新布局
    //因为每次滑动都要缩放Cell,所以这了就直接返回true
    override func shouldInvalidateLayout(forBoundsChange newBounds: CGRect) -> Bool {
        return true;
    }
自定义Layout内计算缩放的方法,代码如下:
///根据当前滚动进行对每个cell进行缩放
    ///用来计算出rect这个范围内所有cell的UICollectionViewLayoutAttributes,
    override func layoutAttributesForElements(in rect: CGRect) -> [UICollectionViewLayoutAttributes]? {
        //首先获取 当前rect范围内的 attributes对象
        let collectionViewLayoutAttributes : [UICollectionViewLayoutAttributes] = super.layoutAttributesForElements(in: rect) ?? [];
        //计算缩放比  首先计算出整体中心点的X值 和每个cell的中心点X的值
        //用着两个x值的差值 ,计算出绝对值
        //
        //计算偏移colleciotnView中心点的X值 = X偏移量+colleciotnView的半宽
        let centerX =  (collectionView?.contentOffset.x)! + (self.collectionView?.bounds.width)!/2;
        // 可见矩阵
        let visiableRect = CGRect(x: self.collectionView!.contentOffset.x, y: self.collectionView!.contentOffset.y, width: self.collectionView!.frame.width, height: self.collectionView!.frame.height);

        //循环遍历每个attributes对象 对每个对象进行缩放
        for attr : UICollectionViewLayoutAttributes in collectionViewLayoutAttributes {
            // 不在可见区域的attributes不变化
            if !visiableRect.intersects(attr.frame) {continue}
            //计算每个对象cell中心点的X值
            let cell_centerX = attr.center.x;
            //计算两个中心点的偏移(距离=cell中心点X值-偏移的colleciotnView中心点X值)取绝对值,这个值应该是一个百位数(iPhone6S的With=375Ppt,偏离量最多375,所以缩放因子设为0.001是适合的)
            let distance = abs(cell_centerX-centerX);
            //距离越大缩放比越小,距离小 缩放比越大,缩放比最大为1,即重合
            let scale:CGFloat = 1/(1+distance*ScaleFactor);
            //缩放(基准点为中心点)
            //CATransform3DMakeScale (CGFloat sx, CGFloat sy, CGFloat sz)
            //sx:X轴缩放,代表一个缩放比例,一般都是0-1之间的数字。
            //sy:Y轴缩放。
            //sz:整体比例变换(sx==sy)时
            //      1.sz>1,图形整体缩小;
            //      2.0<sz<1,图形整体放大;
            //      3.sz<0,发生关于原点的对称等比变换。
            attr.transform3D = CATransform3DMakeScale(1.0, scale, 1.0);
        }

        return collectionViewLayoutAttributes;
    }
以375*667的屏为例分析一下,计算逻辑。
最初状态如下图所示

x坐标的偏移量:0,偏移后的中心点的x坐标:0+187.5=187.5
Cell1中心差:187.5-187.5=0
缩小比例:1/(1+0*0.001)=1–>无缩放
Cell2中心差:482.5-187.5=295
缩小比例:1/(1+2950.001)=1/1.295=0.7722
确保左右的Cell在屏幕上可见,只缩放height,结果如下:
这个就是我们才进去是显示的状态,能看到第一张图,后第二张图高度缩小后的一部分,第3~5张图不在屏幕上。
好了,我们继续分析开始向右滑动的情况。看下图:
此时,x坐标的偏移量:187.5,偏移后的中心x:187.5+187.5=375
Cell1中心差:187.5-375=-187.5取绝对值
缩小比例:1/(1+187.50.001)=1/1.1875=0.8421
Cell2中心差:482.5-375=107.5
缩小比例:1/(1+107.5*0.001)=1/1.1075=0.9302
缩放效果大体如下

第一张图缩小后显示一半,第二张图也缩小了显示出90%,第3~5张图还是未显示
可以看出来离中心越远被缩得越小(第3~5张图未显示在屏幕上,所以可以不缩小)继续右滑到第二张图到达屏幕中心时,如下图:

此时,x坐标的偏移量:295,偏移后的中心x:295+187.5=482.5
Cell1中心差:187.5-482.5=-295取绝对值
缩小比例:1/(1+295*0.001)=1/1.295=0.7722
Cell2中心差:482.5-482.5=0
缩小比例:1/(1+0*0.001)=1–>无缩放
Cell3中心差:777.5-482.5=295
缩小比例:1/(1+295*0.001)=1/1.295=0.7722
缩放效果如下图所示:

第一张图缩小后显示最右边一部分,第二张图无缩放显示在屏幕中间,第三张图缩小显示最左一部分,第4~5张图还是未显示
为了确保停止滑动后,始终能有一张图片显示在屏幕中央,我们需要在Layout内添加如下方法:
/// - Parameter proposedContentOffset: 当手指滑动的时候 最终的停止的偏移量
    /// - Returns: 返回最后位于屏幕最中央的Cell的中心点需要的偏移量
    /// 当停止滑动,确保有一Cell是位于屏幕最中央
    override func targetContentOffset(forProposedContentOffset proposedContentOffset: CGPoint, withScrollingVelocity velocity: CGPoint) -> CGPoint {
        // 可见范围
        let lastRect = CGRect(x: proposedContentOffset.x, y: proposedContentOffset.y, width: self.collectionView!.frame.width, height: self.collectionView!.frame.height)
        //获得collectionVIew中央的X值(即显示在屏幕中央的X)
        let centerX = proposedContentOffset.x + self.collectionView!.frame.width * 0.5;
        //这个范围内所有的属性
        let attributes : [UICollectionViewLayoutAttributes] = self.layoutAttributesForElements(in: lastRect)!;
        //需要移动的距离
        var adjustOffsetX = CGFloat(MAXFLOAT);
        var tempOffsetX : CGFloat;
        for attr in attributes {
            //计算出距离中心点 最小的那个cell 和整体中心点的偏移
            tempOffsetX = attr.center.x - centerX;
            if abs(tempOffsetX) < abs(adjustOffsetX) {
                adjustOffsetX = tempOffsetX;
            }
        }
        //偏移坐标
        return CGPoint(x: (proposedContentOffset.x + adjustOffsetX), y: proposedContentOffset.y);
    }
我们以上上面第一张图一半滑出屏幕为例(见下图),分析计算逻辑

这个时候手指离开屏幕,x坐标的偏移量:187.5,偏移后的中心x坐标:187.5+187.5=375
Cell1中心差:187.5-375.0=-187.5
Cell2中心差:482.5-375.0=107.5
Cell2中心离偏移后的中心最近
确定最后坐标:187.5+107.5=295(x偏移295)
结果应该是这样的(如下图),第二张图片显示在屏幕中央

我们的ViewController不要忘记实现UICollectionViewDelegate,主要代码:
func numberOfSections(in collectionView: UICollectionView) -> Int {
        return 1;
    }

    func collectionView(_ collectionView: UICollectionView, numberOfItemsInSection section: Int) -> Int {
        return 5;
    }

    func collectionView(_ collectionView: UICollectionView, cellForItemAt indexPath: IndexPath) -> UICollectionViewCell {

        let cell = collectionView.dequeueReusableCell(withReuseIdentifier: "testLeftRightCollectionViewCell", for: indexPath) as! TestLeftRightCollectionViewCell;
        cell.backgroundColor = UIColor.clear;
        switch indexPath.item {
        case 0:
            cell.setSectionTitle(title: "你是要煎牛排吗?");
            cell.setMainImage(imageNaem: "Kaorou1");
            break;
        case 1:
            cell.setSectionTitle(title: "我是一盘香喷喷的烤肉。");
            cell.setMainImage(imageNaem: "Kaorou2");
            break;
        case 2:
            cell.setSectionTitle(title: "拉面来了!");
            cell.setMainImage(imageNaem: "Lamian");
            break;
        case 3:
            cell.setSectionTitle(title: "鱼烤糊了!");
            cell.setMainImage(imageNaem: "Kaoyu");
            break;
        case 4:
            cell.setSectionTitle(title: "生鱼片,我不喜欢!");
            cell.setMainImage(imageNaem: "Shengyupian");
            break;
        default:
            cell.setSectionTitle(title: "");
            cell.setMainImage(imageNaem: "Shengyupian");
            break;
        }
        return cell;
    }
最后再自定义一个UICollectionViewCell吧
class TestLeftRightCollectionViewCell: UICollectionViewCell {

    var sectionLable : UILabel!
    var mainImageView : UIImageView!

    override init(frame: CGRect) {
        print("TestLeftRightCollectionViewCell inti")
        super.init(frame: frame);
        initView();
    }

    required init?(coder aDecoder: NSCoder) {
        fatalError("init(coder:) has not been implemented")
    }

    ///添加视图
    func initView() -> Void {

        let main_width:CGFloat = self.frame.size.width
        let main_height:CGFloat = self.frame.size.height;
        let btn_x:CGFloat = 0.0;
        let btn_y:CGFloat = 0.0;
        let btn_width:CGFloat = main_width;
        let btn_height:CGFloat = main_height;
        //图片视图
        mainImageView = UIImageView(frame: CGRect(x: btn_x, y: btn_y, width: btn_width, height: btn_height));
        mainImageView.backgroundColor = UIColor.green;
        //文字标签
        sectionLable = UILabel(frame: CGRect(x:0.0,y:0.0,width: btn_width,height:btn_height));
        sectionLable.textColor = UIColor.white;
        sectionLable.textAlignment = NSTextAlignment.center;
        sectionLable.font = UIFont.systemFont(ofSize: 24.0, weight: UIFont.Weight.bold);
        mainImageView.addSubview(sectionLable);
        mainImageView.layer.masksToBounds = true;
        mainImageView.layer.cornerRadius = 25.0;
        self.addSubview(mainImageView);
    }

    //设置文字
    func setSectionTitle(title:String) -> Void {
        sectionLable.text = title;
    }

    ///设置图片
    func setMainImage(imageNaem:String) -> Void {
        mainImageView.image = UIImage(named: imageNaem);
    }

}
好了,最后再看一下效果!


