
一个很简单的Demo,实现两个功能:
1.实现沉浸式,Flutter本身支持沉浸式,只不过状态栏默认为黑色半透明,很多小伙伴为此也是想尽了办法去掉这个状态栏的背景色,让其和标题栏颜色一致,其实非常的简单,下面将会和大家讲述!
2.因为业务需要,要实现标题栏颜色渐变,可能非常的简单,因为写了,所以就分享出来,不会的小伙伴可以参考一下,会的小伙伴,就别喷了,就当是路过啦!
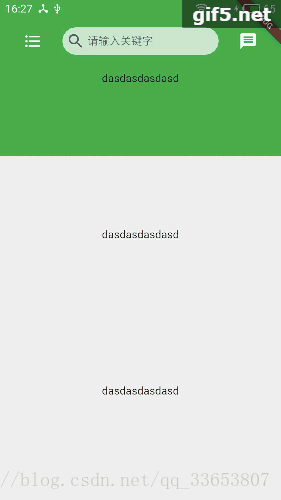
先看下效果:
下面给大家讲述功能:
第一个沉浸式:
因为android本身从4.4以后支持沉浸式,所以这个就十分简单,因为flutter主入口只有一个Activity,也就是说所有的Flutter页面都会运行这个Activity,那我们只需要在这个主入口判断一下版本号然后将状态栏颜色设置成透明,就可以了,因为他本身是黑色半透明,相关代码:
public class MainActivity extends FlutterActivity {
@Override
    protected void onCreate(Bundle savedInstanceState) {
        super.onCreate(savedInstanceState);
        if(Build.VERSION.SDK_INT>=Build.VERSION_CODES.LOLLIPOP)
        {//API>21,设置状态栏颜色透明
            getWindow().setStatusBarColor(0);
        }
        GeneratedPluginRegistrant.registerWith(this);

    }
第二标题栏颜色渐变:
思路:要实现状态栏渐变,那整个页面肯定可以滚动,能滚动就能拿到滚动的距离,有了滚动的距离就能计算当前状态栏的透明度从而实现颜色渐变,代码如下:
import 'package:flutter/material.dart';
import 'package:shms_app/components/CustomTitleBar.dart';
class TitleBarGradient extends StatefulWidget {
  @override
  State<StatefulWidget> createState() {
    // TODO: implement createState
    return new _TitleBarGradientState();
  }
}
class _TitleBarGradientState extends State<TitleBarGradient> {
  ScrollController _mScrollController = new ScrollController();
  GlobalKey<CustomTitleBarState>_mTitleKey = new GlobalKey();
  CustomTitleBarController _mCustomTitleBarController = new CustomTitleBarController();
  bool _isNeedSetAlpha = false;
  @override
  void initState() {
    super.initState();
    _mCustomTitleBarController.value.alpha = 0;
    _mScrollController.addListener(() {
      if (_mScrollController.offset < 80.0) {
        _isNeedSetAlpha = true;
        _mCustomTitleBarController.value.alpha =
            ((_mScrollController.offset / 80) * 255).toInt();
        _mTitleKey.currentState.setState(() {});
      } else {
        if (_isNeedSetAlpha) {
          _mCustomTitleBarController.value.alpha = 255;
          _mTitleKey.currentState.setState(() {});
          _isNeedSetAlpha = false;
        }
      }
    });
  }
  Widget build(BuildContext context) {
    return new Scaffold(
      body: new Stack(
        children: <Widget>[
          new Container(
            height: MediaQuery
                .of(context)
                .size
                .height,
            child: new Listener(
              onPointerDown: (dd) {},
              onPointerMove: (sss) {},
              onPointerUp: (ss) {},
              onPointerCancel: (s) {},
              child: new SingleChildScrollView(
                controller: _mScrollController,
                child: new Column(
                  children: <Widget>[
                    new Container(
                      color: Colors.green,
                      height: 200.0,
                      child: new Center(child: new Text("dasdasdasdasd"),),
                    ),
                    new Container(
                      height: 200.0,
                      child: new Center(child: new Text("dasdasdasdasd"),),
                    ),
                    new Container(
                      height: 200.0,
                      child: new Center(child: new Text("dasdasdasdasd"),),
                    ),
                    new Container(
                      height: 200.0,
                      child: new Center(child: new Text("dasdasdasdasd"),),
                    ),
                    new Container(
                      height: 200.0,
                      child: new Center(child: new Text("dasdasdasdasd"),),
                    ), new Container(
                      height: 200.0,
                      child: new Center(child: new Text("dasdasdasdasd"),),
                    ), new Container(
                      height: 200.0,
                      child: new Center(child: new Text("dasdasdasdasd"),),
                    )
                  ],
                ),
              ),
            ),
          ),
          new CustomTitleBar(
            height: 80.0,
            controller: _mCustomTitleBarController,
            key: _mTitleKey,
          ),
        ],
      ),
    );
  }
}
整体建议:
上面只是一个Demo,是实现颜色渐变的主要代码,并且颜色渐变的滚动距离是写死的,具体要根据项目实际而定。
可能细心的小伙伴会发现为撒要把标题栏单独抽出去new CustomTitleBar(),这个是因为如果把状态栏直接放在当前界面,那么当调用setState()方法去刷新标题栏的背景色的时候,你就会发现,整个页面会随着一起刷新,从而导致滑动会有卡顿的现象,如果页面元素比较少,可能相对不明显,如果元素较多,那就十分明显,所以为了解决滑动卡顿的问题,将标题栏单独抽出去,让他拥有自己的状态,在刷新的时候,只需要刷新他自己的状态,这样就能不刷新整个页面,从而达到不卡顿的效果。
下面是单独抽出的标题栏:
import 'package:flutter/material.dart';
import 'package:shms_app/components/FormItem.dart';

class CustomTitleBar extends StatefulWidget {
  final Key key;
  final double height;
  final CustomTitleBarController controller;
  final GestureTapCallback onMenuTap;
  final GestureTapCallback onMessageTap;

  CustomTitleBar({
    this.onMenuTap,
    this.onMessageTap,
    this.controller,
    this.height: 80.0,
    this.key
  }) :super(key: key);

  @override
  State<StatefulWidget> createState() {
    // TODO: implement createState
    return new CustomTitleBarState();
  }
}

class CustomTitleBarState extends State<CustomTitleBar> {
  TextEditingController _textController = new TextEditingController();
  CustomTitleBarController _controller;

  Widget _buildSearch() {
    Widget titleItem = null;
    titleItem = new Container(
      height: 80.0,
      alignment: Alignment.center,
      child: new Padding(
        padding: new EdgeInsets.only(top: 0.0),
        child: new Row(
          mainAxisAlignment: MainAxisAlignment.spaceBetween,
          children: <Widget>[
            new Padding(padding: new EdgeInsets.only(left: 1.0)),
            new Container(
              height: 35.0,
              width: 200.0,
              child: new Material(
                  color: Colors.white70,
                  borderRadius: new BorderRadius.horizontal(
                      left: new Radius.circular(20.0),
                      right: new Radius.circular(20.0)),
                  child: new Padding(
                    padding: new EdgeInsets.only(right: 5.0),
                    child: new Row(
                      children: <Widget>[
                        new Padding(
                            padding: new EdgeInsets.only(left: 5.0)),
                        new Icon(
                            Icons.search,
                            color: const Color(0xFF616161)),
                        new Padding(
                            padding: new EdgeInsets.only(left: 3.0)),
                        new Flexible(child: new TextField(
                          maxLines: 1,
                          controller: _textController,
                          onChanged: (v) {
//                            _handleOnSeachChange();
                          },
                          onSubmitted: (v) {
//                            _handleOnSeachChange();
                          },
                          style: new TextStyle(
                              color: const Color(0xFF616161),
                              fontSize: 14.0),
                          decoration: new InputDecoration.collapsed(
                              hintText: "请输入关键字"),
                        ),
                        ),
                      ],
                    ),)
              ),
            ),
            new Padding(padding: new EdgeInsets.only(left: 1.0)),
          ],
        ),),
    );
    return titleItem;
  }

  _buildTitle() {
    Widget mWidget = null;
    mWidget = new Container(
      height: widget.height,
      color: new Color.fromARGB(_controller.value.alpha, 25, 112, 183),
      child: new Padding(padding: new EdgeInsets.only(top: 25.0),
        child: new Row(
          mainAxisAlignment: MainAxisAlignment.spaceBetween,
          children: <Widget>[
            new Padding(padding: new EdgeInsets.only(right: 5.0)),

            new GestureDetector(
              onTap: widget.onMenuTap==null?(){}: widget.onMenuTap,
              child: new InkWell(
                child: new Icon(
                    Icons.format_list_bulleted, color: Colors.white),
              ),
            ),
            _buildSearch(),
            new GestureDetector(
              onTap: widget.onMessageTap==null?(){}: widget.onMessageTap,
              child: new InkWell(

                child: new Icon(Icons.message, color: Colors.white),
              ),
            ),
            new Padding(padding: new EdgeInsets.only(right: 5.0)),
          ],
        ),),
    );
    return mWidget;
  }


  @override
  Widget build(BuildContext context) {
    if (widget.controller == null) {
      _controller = new CustomTitleBarController();
      _controller.value.alpha = 0;
    } else {
      _controller = widget.controller;
    }
    return _buildTitle();
  }
}


class CustomTitleBarController extends ValueNotifier<ContomTitleAlphaValue> {
  CustomTitleBarController() :super(new ContomTitleAlphaValue());
}

class ContomTitleAlphaValue {
  int alpha;
}
好了,到此结束,如果有看不懂或者是有疑问,或者是更好想法的同学,欢迎给我留言!我会随时关注!


