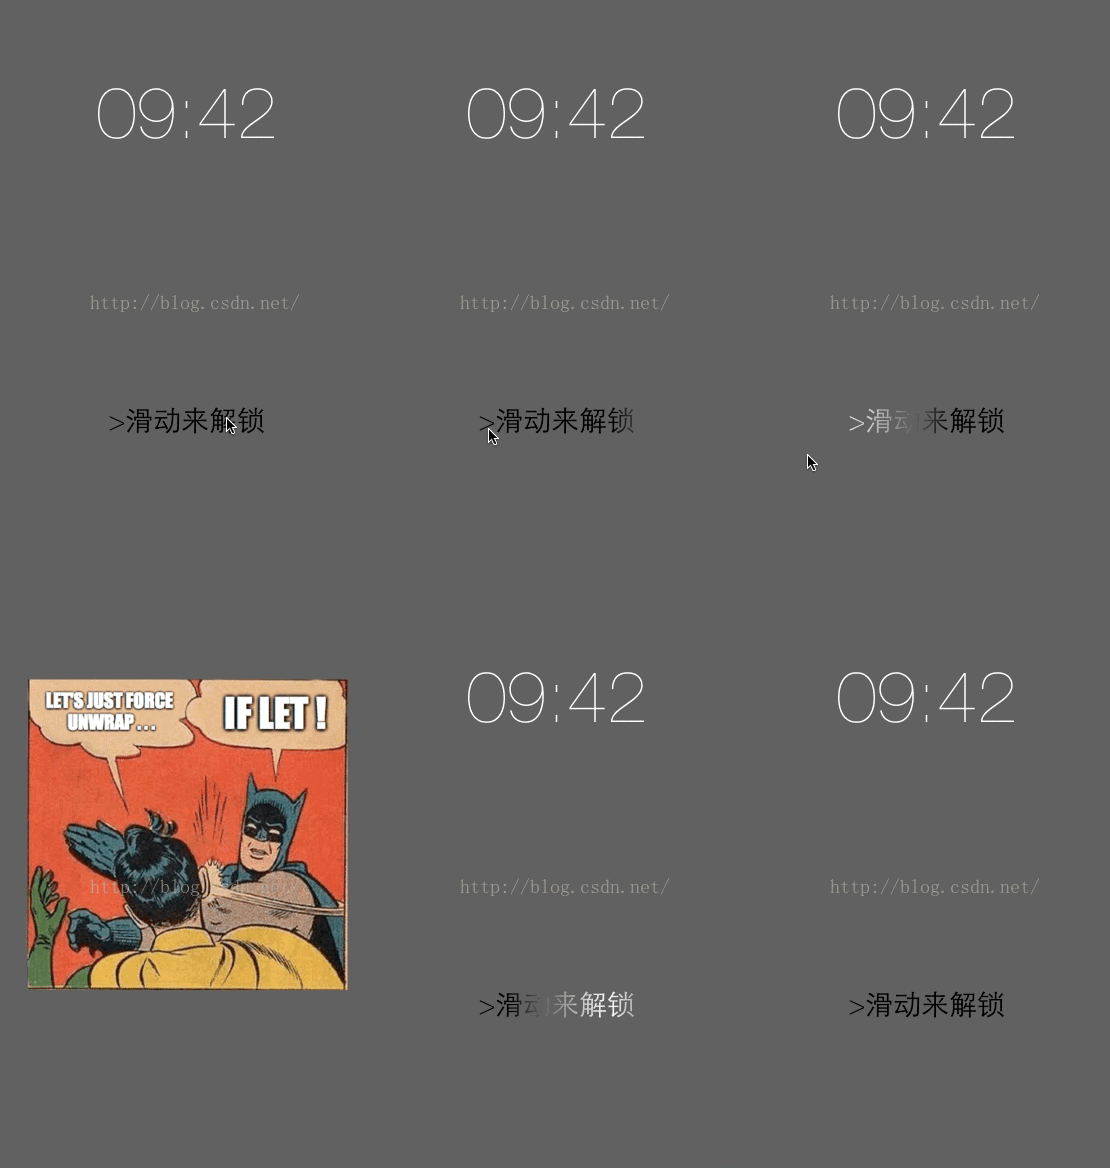
本节将为大家介绍的动画效果是渐变动画效果。其实这个例子,大家天天能够看到,就是手机屏幕锁定是,有一句“滑动来解锁”的文字,它上面有一种渐变的动画一直在其上面走过。先看看最终的效果图。

思路分析:
1. 普通UIView不可能有这样的渐变效果,所以我们应该自定义一个UIView来实现这样的效果。
2. 普通UIView没有这样的渐变动画,所以我们可以考虑使用图层动画,并且将渐变图层添加到自定义的UIView的layer上面。
3. 渐变效果只是颜色值的过度,并没有设计到文字。所以,我们可以再将文字封装到一个图层中,也添加到自定义的UIView的layer上面,而且这个图层的背景色应该是clearColor,因为它在渐变图层的上方,如果有背景色的话,会遮盖这渐变效果。
总的层级关系: UIView的layer --> 渐变layer --> 文本layer.
下面,我们就一步一步来实现这个效果。
1. 自定义UIView,命名为AnimatedMaskLabel,并且它又一个属性。
[objc] view plain copy
1. @property (nonatomic, copy) NSString
2. 我们书写它的初始化工作
[objc] view plain copy
1. - (instancetype)initWithCoder:(NSCoder
2. if (self = [super initWithCoder:aDecoder]) {
3. self initTask];
4.     }
5. return self;
6. }
7.
8. - (instancetype)initWithFrame:(CGRect)frame {
9. if (self = [super initWithFrame:frame]) {
10. self initTask];
11.     }
12. return self;
13. }
来分析initTask方法。
[objc] view plain copy
1. - (void)initTask {
2. self.gradientLayer = [CAGradientLayer layer];
3. self.gradientLayer.startPoint = CGPointMake(0, 0.5);
4. self.gradientLayer.endPoint = CGPointMake(1, 0.5);
5.
6. NSArray
7. id)[UIColor blackColor].CGColor,
8. id)[UIColor whiteColor].CGColor,
9. id)[UIColor blackColor].CGColor
10.                         ];
11. self.gradientLayer.colors
12.
13. NSArray
14. 0.25),
15. 0.50),
16. 0.75)
17.                            ];
18. self.gradientLayer.locations
19.
20. self.layer.frame = self.bounds;
21.
22. self.layer addSublayer:self.gradientLayer];
23. }
这里面的代码就是向layer图层上面添加 渐变图层。
CAGradientLayer的startPoint和endPoint的有效坐标范围是(0,0) 到 (1,1). 而代码中是(0,0.5) 到 (1, 0.5) 也就是沿着正中心进行渐变效果,如下图:

而colors和locations数组就是控制渐变图层的颜色和位置分布,就本例而言,分布效果图如下:

至此,我们在ViewController中的viewDidload方法中,添加如下代码
[objc] view plain copy
1. self.maskLabel.text = @">滑动来解锁";
并运行程序,可以看到如下效果:

接下来,我们将渐变图层“动起来”。
3. 渐变图层添加动画
[objc] view plain copy
1. - (void)didMoveToWindow {
2. super didMoveToWindow];
3. self gradientAnimation];
4. }
5.
6. - (void)gradientAnimation {
7. CABasicAnimation *anim = [CABasicAnimation animationWithKeyPath:@"locations"];
8. .fromValue = @[@(0.0),@(0.0),@(0.25)];
9. .toValue = @[@(0.75),@(1.0),@(1.0)];
10. .duration = 3.0;
11. .repeatCount
12. self.gradientLayer addAnimation:anim forKey:nil];
13. }
注意到fromValue和toValue的数组值,它表示的其实的0.0-0.75, 0.0-1.0,0.25-1.0 形成的渐变效果。

然后我们看看运行效果图:

这放佛不是我们要得效果。
因为渐变区域比较窄,并且不够均匀。我们可以将渐变区域拉长。试想一下,拉长到原来的3倍,并且左右侧留同样的宽度。设计图如下:

现在,我们将initTask方法中的
[objc] view plain copy
1. self.gradientLayer.frame = self.bounds;
更改为:
[objc] view plain copy
1. self.gradientLayer.frame = CGRectMake(- self.bounds.size.width, 0, 33 * self.bounds.size.width, self.bounds.size.height);
再运行看看结果。

4. 添加图层文字
由于自定义的AnimatedMaskLabel是UIView,所以它没有text属性,所以我自定义一个text属性,然后重绘图层,并作为gradientLayer的mask。代码如下:
[objc] view plain copy
1. - (void)setText:(NSString
2.  copy];
3. self setNeedsDisplay];
4. }
5.
6. - (void)drawRect:(CGRect)rect {
7. super drawRect:rect];
8. self.frame.size, false, 0);
9.
10. NSMutableParagraphStyle *style = [[NSMutableParagraphStyle alloc] init];
11. .alignment
12. NSDictionary
13.  fontWithName:@"HelveticaNeue-Thin" size:28.0],
14.                            NSParagraphStyleAttributeName : style
15.                            };
16.
17. self.text drawInRect:self.bounds withAttributes:dict];
18.
19. UIImage
20.     UIGraphicsEndImageContext();
21.
22. CALayer *maskLayer = [CALayer layer];
23. .backgroundColor = [UIColor clearColor].CGColor;
24. .frame = CGRectOffset(self.bounds, self.bounds.size.width, 0);
25. .contents = (__bridge id)(image.CGImage);
26. self.gradientLayer.mask
27. }
至此图层的动画就已完成了。
5. 滑动手势。由于此动画比较简单,我就不做解释了,viewController中的代码如下:
[objc] view plain copy
1. - (void)viewDidLoad {
2. super viewDidLoad];
3. self.maskLabel.text = @">滑动来解锁";
4.
5. UISwipeGestureRecognizer *swipe = [[UISwipeGestureRecognizer alloc] initWithTarget:self action:@selector(didSlide)];
6. self.maskLabel addGestureRecognizer:swipe];
7. }
8.
9. - (void)didSlide {
10. UIImageView *memeImageView = [[UIImageView alloc] initWithImage:[UIImage imageNamed:@"meme"]];
11. .center = self.view.center;
12. .centerX += self.view.width;
13. self.view addSubview:memeImageView];
14.
15.  animateWithDuration:0.33 delay:0.0 options:UIViewAnimationOptionCurveEaseIn animations:^{
16. .centerX -= self.view.width;
17. self.time.centerY -= 300;
18. self.maskLabel.centerY += 300;
19.  completion:nil];
20.
21.  animateWithDuration:0.33 delay:1.0 options:UIViewAnimationOptionCurveEaseIn animations:^{
22. .centerX += self.view.width;
23. self.time.centerY += 300;
24. self.maskLabel.centerY -= 300;
25.  completion:^(BOOL
26.  removeFromSuperview];
27.     }];
28. }


