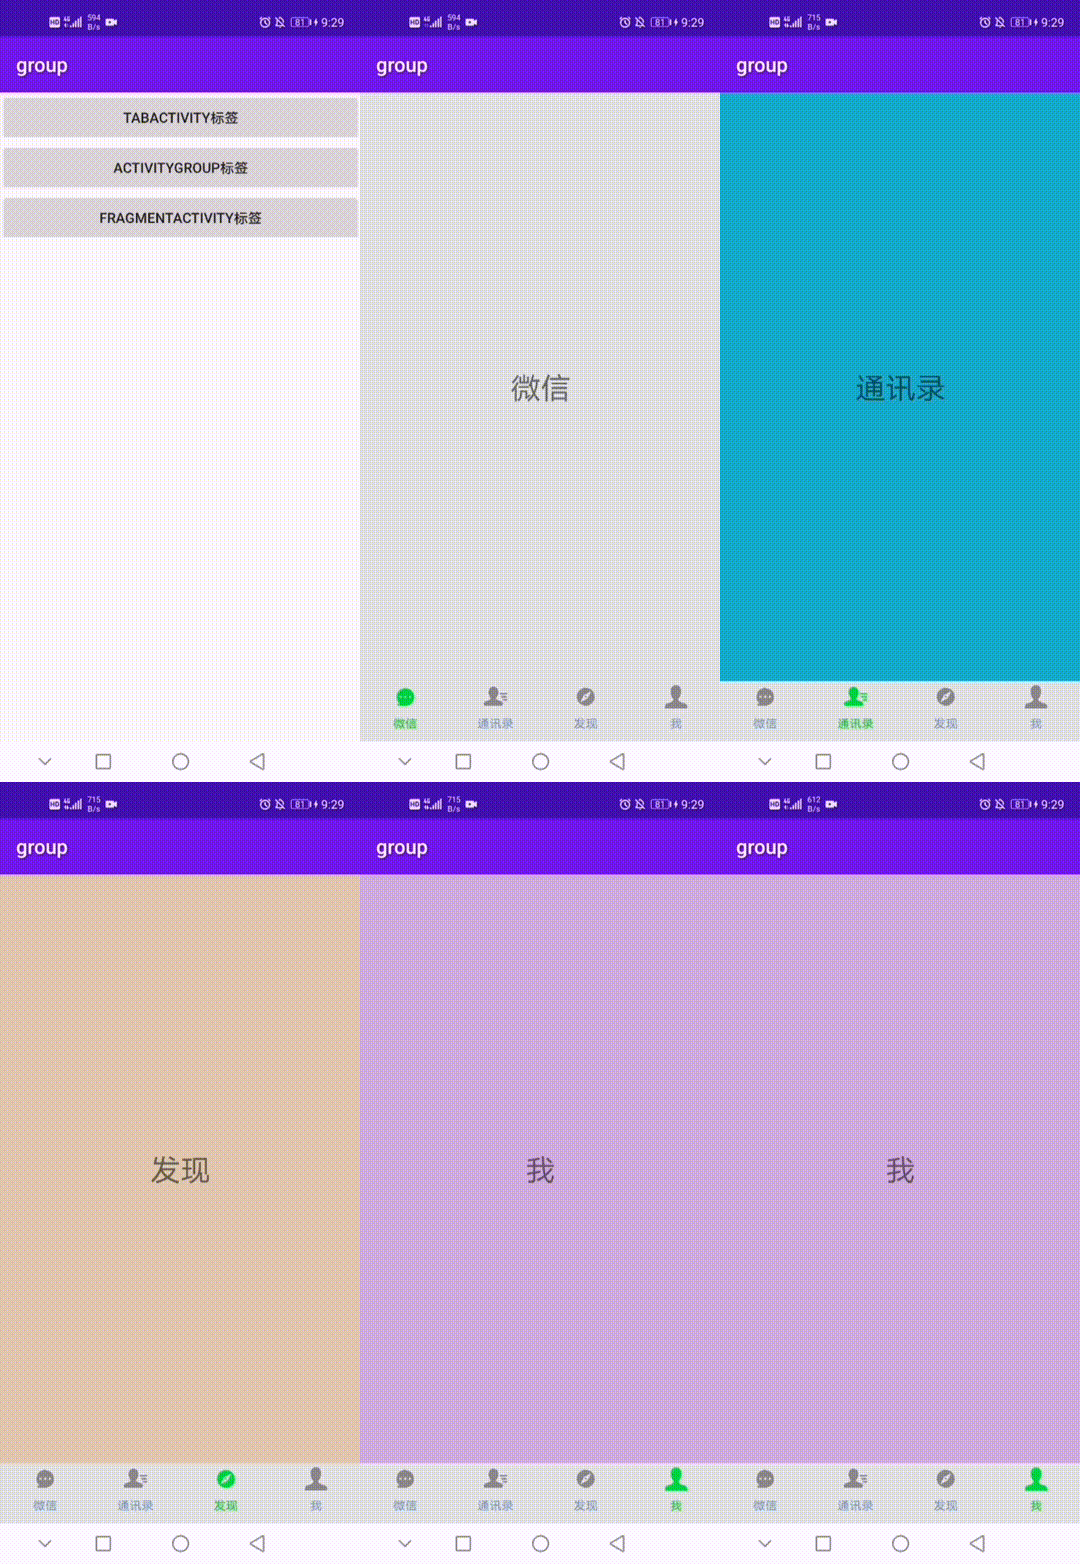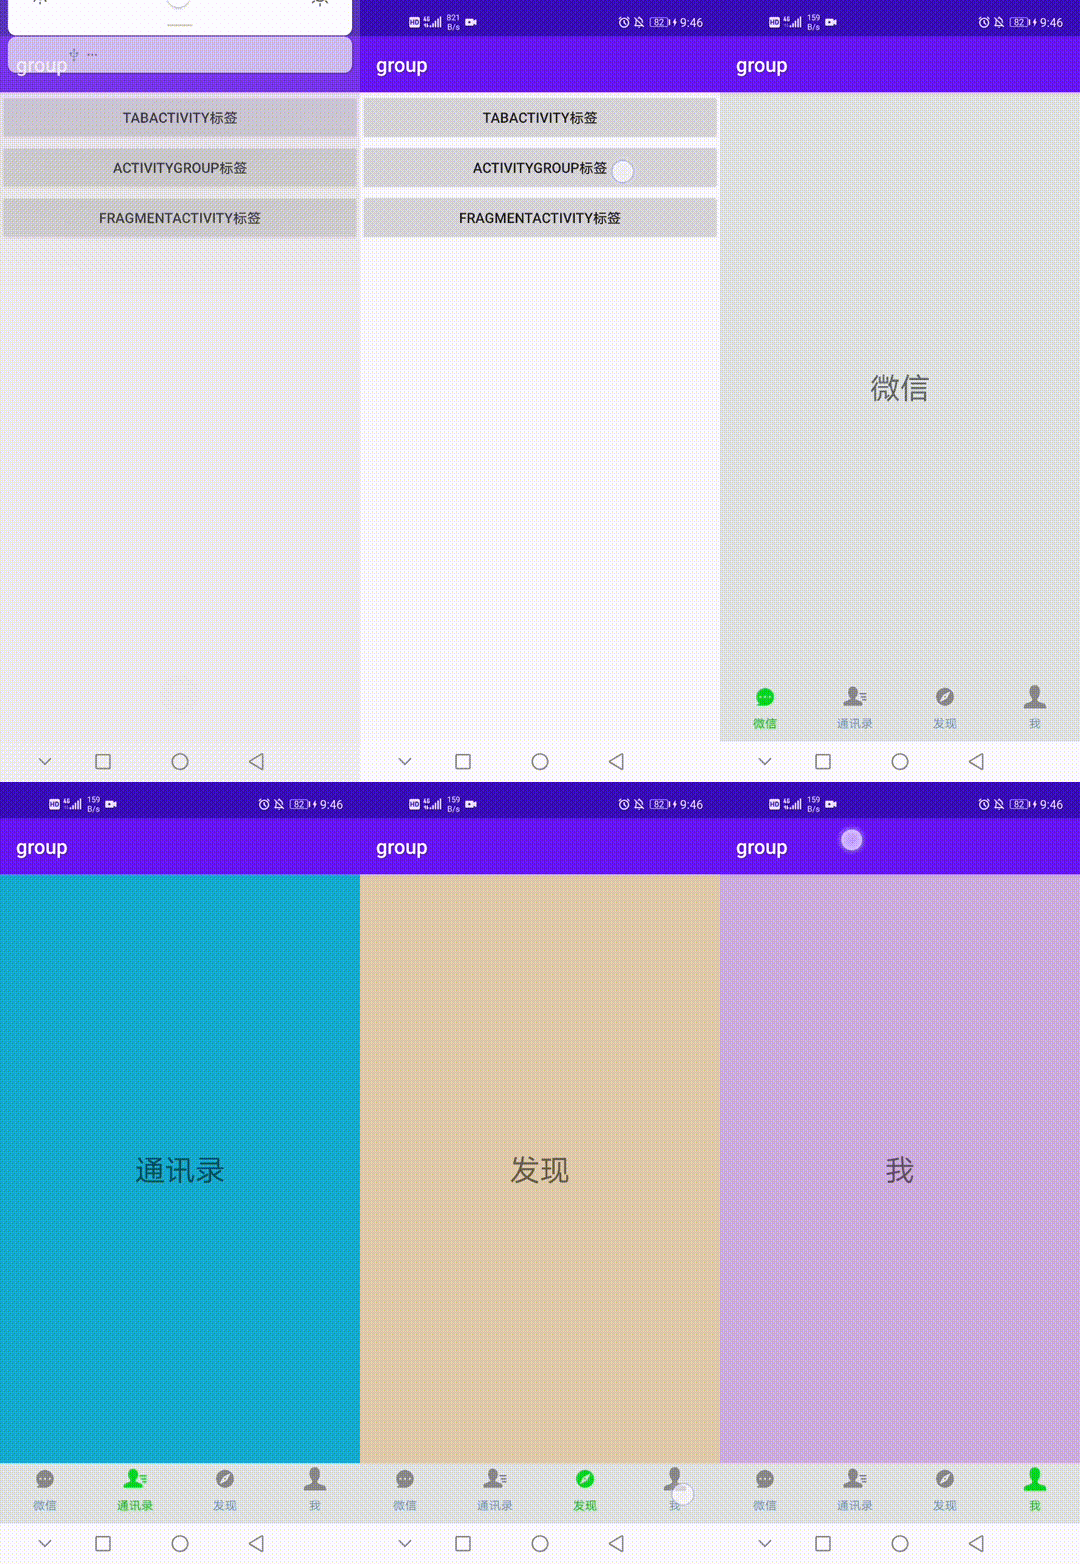
本文介绍三种底部标签栏的实现形式,分别有TabActivity、ActivityGroup、FragmentActivity,分别使用这三种形式实现底部标签。
准备:在分别实现之前,首先需要准备好状态图像的描述文件,取两个形状一样,颜色不同的icon作为Text的drawableTop引用文件。
①首先是文字点击效果,在文字被选中后更改颜色,drawable/tab_txt_select.xml文件如下:
<?xml version="1.0" encoding="utf-8"?>
<selector xmlns:android="http://schemas.android.com/apk/res/android">
    <item android:state_selected="true" android:color="@color/txt_selected"/>
    <item android:color="@color/txt_nomal"/>
</selector>
②接着是图片的点击更改,选中底部icon后更改图片,以drawable/tab_msg_selector.xml为例:
<?xml version="1.0" encoding="utf-8"?>
<selector xmlns:android="http://schemas.android.com/apk/res/android">
    <item android:state_selected="true" android:drawable="@drawable/tab_msg_selected"/>
    <item android:drawable="@drawable/tab_msg_normal"/>
</selector>
③当然,还可以增加背景颜色/图片的更改,等等。
④文字的相同属性可将其归纳在values/styles文件中:
<!-- Tab -->
<style name="TabButton">
    <item name="android:padding">1dp</item>
    <item name="android:layout_gravity">center</item>
    <item name="android:gravity">center</item>
    <item name="android:textSize">12sp</item>
    <item name="android:textStyle">normal</item>
    <item name="android:textColor">@drawable/tab_txt_select</item>
    <item name="android:layout_margin">3dp</item>
</style>
一、TabActivity
TabActivity具备固定框架,套用框架即可。
1.1 主页面activity_tb_tab.xml
主页面根节点必须为TabHost,二级节点为相对布局RelativeLayout,接着是内容页,采用FrameLayout(其id设置固定:android:id="@android:id/tabcontent),还需要有例行公事的TabWidget。
<?xml version="1.0" encoding="utf-8"?>
<TabHost xmlns:android="http://schemas.android.com/apk/res/android"
    android:id="@android:id/tabhost"
    android:layout_width="match_parent"
    android:layout_height="match_parent">
    <RelativeLayout
        android:layout_width="match_parent"
        android:layout_height="match_parent">
        <FrameLayout
            android:id="@android:id/tabcontent"
            android:layout_width="match_parent"
            android:layout_height="match_parent"
            android:layout_marginBottom="@dimen/tab_height"/>
        <!-- 这是例行公事的选项部件,实际隐藏掉了 -->
        <TabWidget
            android:id="@android:id/tabs"
            android:layout_width="match_parent"
            android:layout_height="wrap_content"
            android:visibility="gone" />
        <LinearLayout
            android:layout_width="match_parent"
            android:layout_height="@dimen/tab_height"
            android:gravity="bottom"
            android:layout_alignParentBottom="true"
            android:orientation="horizontal"
            android:background="#DFE4DF">
            <LinearLayout
                android:id="@+id/ll_msg"
                android:layout_width="0dp"
                android:layout_height="match_parent"
                android:layout_weight="1"
                android:orientation="vertical">
                <TextView
                    android:id="@+id/tv_msg"
                    android:layout_width="match_parent"
                    android:layout_height="match_parent"
                    style="@style/TabButton"
                    android:drawableTop="@drawable/tab_msg_selector"
                    android:text="微信"/>
            </LinearLayout>
            <LinearLayout
                android:id="@+id/ll_telnote"
                android:layout_width="0dp"
                android:layout_height="match_parent"
                android:layout_weight="1"
                android:orientation="vertical">
                <TextView
                    android:id="@+id/tv_telnote"
                    android:layout_width="match_parent"
                    android:layout_height="match_parent"
                    style="@style/TabButton"
                    android:drawableTop="@drawable/tab_telnote_selector"
                    android:text="通讯录"/>
            </LinearLayout>
            <LinearLayout
                android:id="@+id/ll_find"
                android:layout_width="0dp"
                android:layout_height="match_parent"
                android:layout_weight="1"
                android:orientation="vertical">
                <TextView
                    android:id="@+id/tv_find"
                    android:layout_width="match_parent"
                    android:layout_height="match_parent"
                    style="@style/TabButton"
                    android:drawableTop="@drawable/tab_find_selector"
                    android:text="发现"/>
            </LinearLayout>
            <LinearLayout
                android:id="@+id/ll_home"
                android:layout_width="0dp"
                android:layout_height="match_parent"
                android:layout_weight="1"
                android:orientation="vertical">
                <TextView
                    android:id="@+id/tv_home"
                    android:layout_width="match_parent"
                    android:layout_height="match_parent"
                    style="@style/TabButton"
                    android:drawableTop="@drawable/tab_home_icon_select"
                    android:text="我"/>
            </LinearLayout>
        </LinearLayout>
    </RelativeLayout>

</TabHost>
1.2 页面代码TbTabActivity.class
继承自TabActivity,大致可划分为包裹+视图显示与监听。
①包裹:设置一个包裹,用于存放该翻页视图的标记,并存放每个标签的意图。
private static final String TAG = "TbTabActivity";
private Bundle mBundle = new Bundle(); // 声明一个包裹对象
private String MSG_TAG = "msg"; // 第一个标签的标识串
private String TELNOTE_TAG = "telnote"; // 第二个标签的标识串
private String FIND_TAG = "find"; // 第三个标签的标识串
private String HOME_TAG = "home";
在onCreat中存入标记串:
mBundle.putString("tag", TAG); // 往包裹中存入名叫tag的标记串
存入标签意图,获取新的标签规格:
// 根据定制参数获得新的标签规格
private TabHost.TabSpec getNewTab(String spec, int label, int icon, Class<?> cls) {
    // 创建一个意图,并存入指定包裹
    Intent intent = new Intent(this, cls).putExtras(mBundle);
    // 生成并返回新的标签规格(包括内容意图、标签文字和标签图标)
    return tab_host.newTabSpec(spec).setContent(intent)
            .setIndicator(getString(label), getResources().getDrawable(icon));
}
②视图显示
// 内容视图改为展示指定的视图
private void changeContainerView(View v) {
    ll_msg.setSelected(false); // 取消选中第一个标签
    ll_telnote.setSelected(false); // 取消选中第二个标签
    ll_find.setSelected(false); // 取消选中第三个标签
    ll_home.setSelected(false);
    v.setSelected(true); // 选中指定标签
    if (v == ll_msg) {
        tab_host.setCurrentTabByTag(MSG_TAG); // 设置当前标签为第一个标签
    } else if (v == ll_telnote) {
        tab_host.setCurrentTabByTag(TELNOTE_TAG); // 设置当前标签为第二个标签
    } else if (v == ll_find) {
        tab_host.setCurrentTabByTag(FIND_TAG); // 设置当前标签为第三个标签
    } else if(v == ll_home){
        tab_host.setCurrentTabByTag(HOME_TAG);
    }
}
③视图监听
@Override
public void onClick(View v) {
    if (v.getId() == R.id.ll_msg || v.getId() == R.id.ll_telnote || v.getId() == R.id.ll_find || v.getId() == R.id.ll_home) {
        changeContainerView(v); // 点击了哪个标签,就切换到该标签对应的内容视图
    }
}
④更改图标大小
//设定底部图片大小
public void initTVImgSize(){
    setImgSize(tv_msg,getResources().getDrawable(R.drawable.tab_msg_selector));
    setImgSize(tv_telnote,getResources().getDrawable(R.drawable.tab_telnote_selector));
    setImgSize(tv_find,getResources().getDrawable(R.drawable.tab_find_selector));
    setImgSize(tv_home,getResources().getDrawable(R.drawable.tab_home_icon_select));
}
public void setImgSize(TextView tv, Drawable drawable){
    drawable.setBounds(0,0,70,70);
    tv.setCompoundDrawables(null,drawable,null,null);
}
⑤最后往标签栏添加标签
// 获取系统自带的标签栏,其实就是id为“@android:id/tabhost”的控件
tab_host = getTabHost();
// 往标签栏添加第一个标签,其中内容视图展示TabFirstActivity
tab_host.addTab(getNewTab(MSG_TAG, R.string.tab_msg,
        R.drawable.tab_msg_selector, TabMsg.class));
// 往标签栏添加第二个标签,其中内容视图展示TabSecondActivity
tab_host.addTab(getNewTab(TELNOTE_TAG, R.string.tab_telnote,
        R.drawable.tab_telnote_selector, TabTelnote.class));
// 往标签栏添加第三个标签,其中内容视图展示TabThirdActivity
tab_host.addTab(getNewTab(FIND_TAG, R.string.tab_find,
        R.drawable.tab_find_selector, TabFind.class));
tab_host.addTab(getNewTab(HOME_TAG,R.string.tab_home,
        R.drawable.tab_home_icon_select,TabHome.class));
changeContainerView(ll_msg); // 默认显示第一个标签的内容视图
1.3 TabActivity实现效果

二、ActivityGroup
2.1 布局页面
ActivityGroup与Activity就相当于Activity与Fragment,与上文一TabActivity的布局相比,做了三处改动。
①根布局采用LinearLayout代替TabHost;
②内容页采用LinearLayout代替FrameLayout;
③不需要例行公事的TabWidget。
2.2 页面代码
①把内容视图切换到指定活动页面
//把内容视图切换到指定活动页面
private void toActivity(String label,Class<?> cls){
    //创建视图存入包裹
    Intent intent = new Intent(this,cls).putExtras(mBundle);
    //移除所有视图
    ll_content.removeAllViews();
    //启动意图指向的活动
    View v = getLocalActivityManager().startActivity(label,intent).getDecorView();
    //设置布局
    v.setLayoutParams(new LinearLayout.LayoutParams(LinearLayout.LayoutParams.MATCH_PARENT, LinearLayout.LayoutParams.MATCH_PARENT));
    //添加该视图
    ll_content.addView(v);
}
②更改内容视图
//更改内容视图
private void changeContentView(View v){
    ll_ag_msg.setSelected(false);
    ll_ag_telnote.setSelected(false);
    ll_ag_find.setSelected(false);
    ll_ag_home.setSelected(false);
    v.setSelected(true);
    if(v == ll_ag_msg){
        toActivity(MSG_TAG,TabMsg.class);
    }else if(v == ll_ag_telnote){
        toActivity(TELNOTE_TAG,TabTelnote.class);
    }else if(v == ll_ag_find){
        toActivity(FIND_TAG,TabFind.class);
    }else if(v == ll_ag_home){
        toActivity(HOME_TAG,TabHome.class);
    }
}
2.3 ActivityGroup实现效果

三、FragmentActivity
也是固定模板,一个Activity对应多个Fragment。
3.1 页面布局
<?xml version="1.0" encoding="utf-8"?>
<LinearLayout xmlns:android="http://schemas.android.com/apk/res/android"
    xmlns:app="http://schemas.android.com/apk/res-auto"
    xmlns:tools="http://schemas.android.com/tools"
    android:layout_width="match_parent"
    android:layout_height="match_parent"
    android:orientation="vertical"
    tools:context=".FaTabActivity">
    <FrameLayout
        android:id="@+id/fl_content"
        android:layout_width="match_parent"
        android:layout_height="0dp"
        android:layout_weight="1"/>
    <androidx.fragment.app.FragmentTabHost
        android:id="@android:id/tabhost"
        android:layout_width="match_parent"
        android:layout_height="@dimen/tab_height">
        <FrameLayout
            android:id="@android:id/tabcontent"
            android:layout_width="0dp"
            android:layout_height="0dp"
            android:layout_weight="0"/>
    </androidx.fragment.app.FragmentTabHost>
</LinearLayout>
3.2 页面代码
①根据资源编号获得规格
//根据资源编号获得规格
private TabHost.TabSpec getTabView(int textId,int imgId){
    //设置规格
    String txt = getResources().getString(textId);
    Drawable drawable = getResources().getDrawable(imgId);
    drawable.setBounds(0,0,70,70);
    //根据布局文件item_tabbar生成标签按钮
    View item_tabbar = getLayoutInflater().inflate(R.layout.item_tab,null);
    TextView tv_item = item_tabbar.findViewById(R.id.tv_item_tab);
    tv_item.setText(txt);
    tv_item.setCompoundDrawables(null,drawable,null,null);
    //返回标签规格
    return tabHost.newTabSpec(txt).setIndicator(item_tabbar);
}
②添加标签碎片
//添加标签碎片
public void initTabFragment(){
    Bundle bundle = new Bundle();
    bundle.putString("tag",TAG);
    tabHost = findViewById(android.R.id.tabhost);
    tabHost.setup(this,getSupportFragmentManager(),R.id.fl_content);
    tabHost.addTab(getTabView(R.string.tab_msg,R.drawable.tab_msg_selector), MsgTabFragment.class,bundle);
    tabHost.addTab(getTabView(R.string.tab_telnote,R.drawable.tab_telnote_selector), TelnoteTabFragment.class,bundle);
    tabHost.addTab(getTabView(R.string.tab_find,R.drawable.tab_find_selector), FindTabFragment.class,bundle);
    tabHost.addTab(getTabView(R.string.tab_home,R.drawable.tab_home_icon_select), HomeTabFragment.class,bundle);
    tabHost.getTabWidget().setShowDividers(LinearLayout.SHOW_DIVIDER_NONE);//不显示分割线
}
3.3 FragmentActivity实现效果

[最后一个动图放上去浏览器就崩了是怎么回事,知乎的文章大小限制???]


