haas506开发教程-导学篇
- 1.下载并安装驱动
- 1.1 CH340 driver
- 1.2 8910 driver
- 2.下载并烧录固件
- 3.安装haas-studio插件
- 4.新建项目
- 5.烧录流水灯代码
- 6.结果
链接: 下载驱动&haas506固件 链接: 视频教程
1.下载并安装驱动
1.1 CH340 driver
(1)下载usb转串口驱动(ch340)
(2)安装ch340驱动

将usb转串口模块和开放板连接起来,设备管理器的端口会出现 USB-SERIALCH340(COM-X)

1.2 8910 driver
(1)下载usb烧录驱动:8910_module_usb_driver
(2)安装8910驱动:选择合适的win-x版本(win10/win7/win8)和位数(32bits/64bits)

当驱动安装完成后,用usb线连接开发板和电脑,打开电脑的设备管理器-端口,就会看到有8个Unisoc Usb Serial Port

当处于下载模式时,会出现SPRD U2S Diag端口

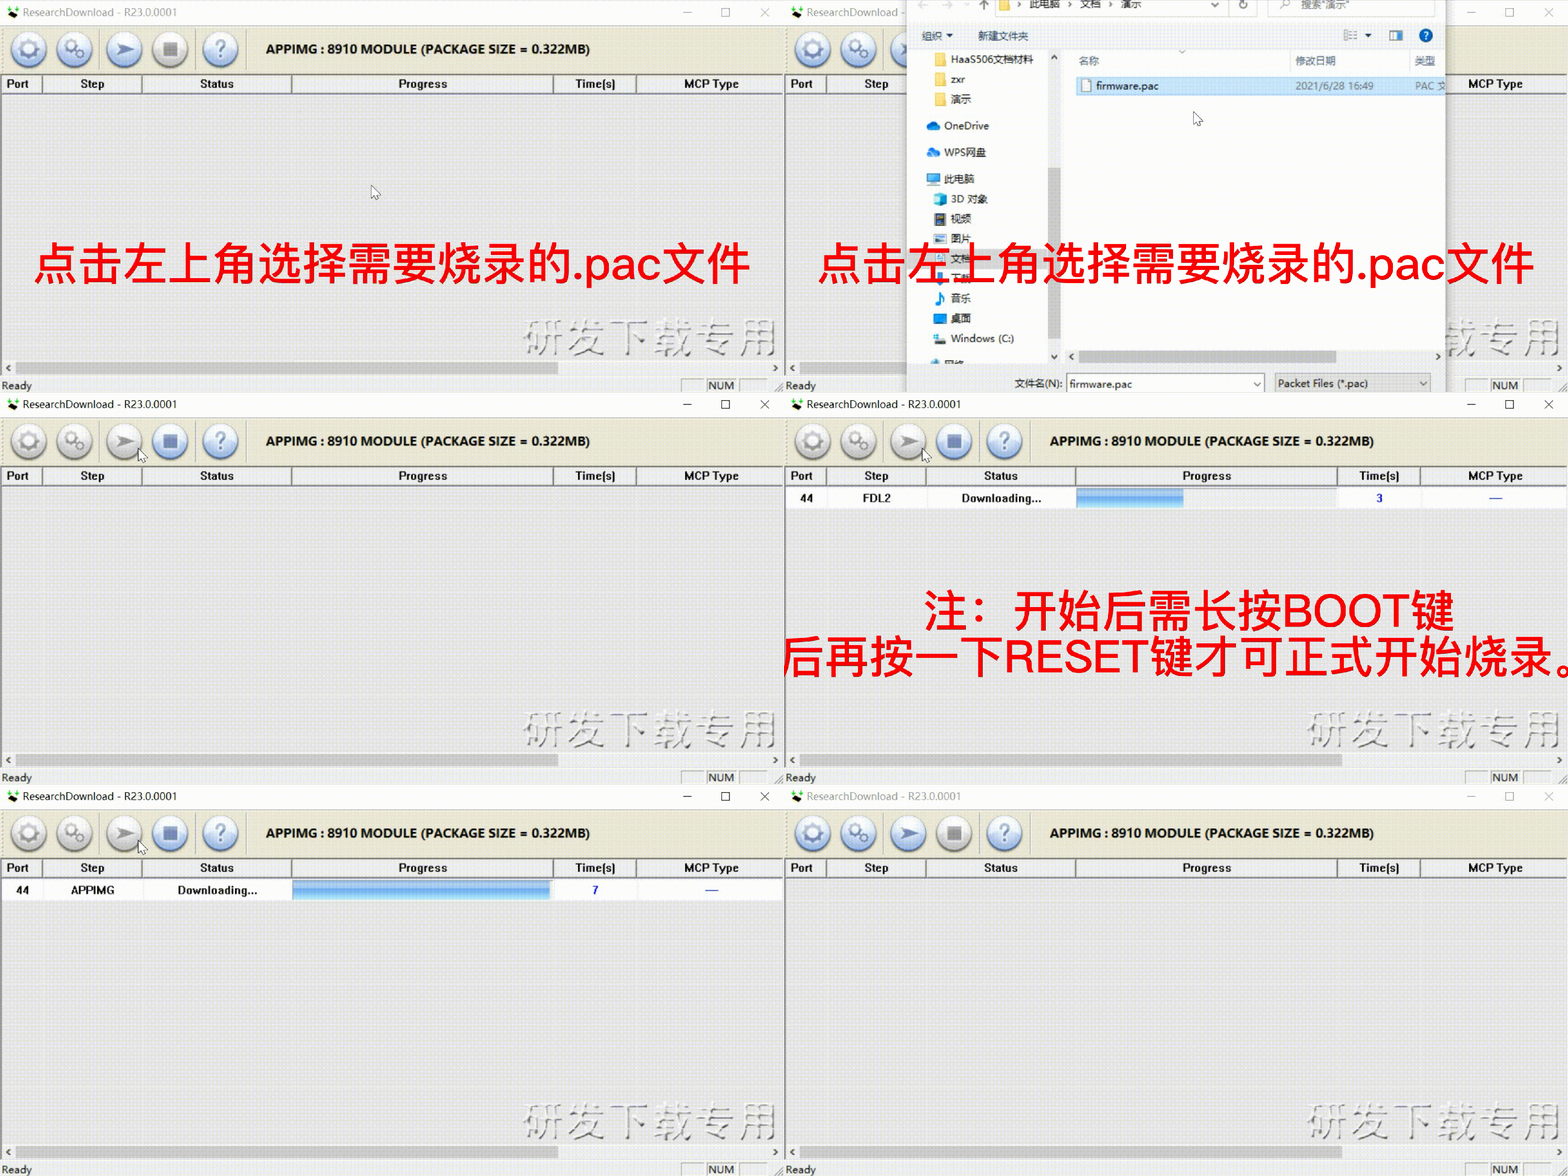
2.下载并烧录固件
(1)下载haas506固件
(2)下载烧录工具:ResearchDownload
(3)打开ResearchDownload.exe下载固件到开发板上

3.安装haas-studio插件
(1)安装Visual Studio Code
(2)打开vs-code的扩展,搜索haas-studio并安装

安装成功后,会出现快速开始界面

4.新建项目
(1)点击左下角的“快速开始”
(2)选择Python轻应用开发
(3)点击创建项目

(4)填写当前项目名称、选择工作区路径、选择硬件类型(haas506)、选择解决方案(python-gpio就可以),点击立即创建

(5)点击确认

项目创建成功

5.烧录流水灯代码
(1)在solutions文件夹下的test_demo文件夹下新建一个main.py和board.json文件
(2)配置board.json文件
{
    "version": "1.0.0",
    "io": {
        "led1": {
            "type": "GPIO",
            "port": 0,
            "dir": "output",
            "pull": "pullup"
            },
        "led2": {
            "type": "GPIO",
            "port": 6,
            "dir": "output",
            "pull": "pullup"
            },
        "led3": {
            "type": "GPIO",
            "port": 7,
            "dir": "output",
            "pull": "pullup"
            },
        "led4": {
            "type": "GPIO",
            "port": 8,
            "dir": "output",
            "pull": "pullup"
            },
        "led5": {
            "type": "GPIO",
            "port": 9,
            "dir": "output",
            "pull": "pullup"
            },
      "serial1": {
        "type": "UART",
        "port": 0,
        "dataWidth": 8,
        "baudRate": 115200,
        "stopBits": 1,
        "flowControl": "disable",
        "parity": "none",
        "timeout": 1000
      },
      "serial2": {
        "type": "UART",
        "port": 1,
        "dataWidth": 8,
        "baudRate": 9600,
        "stopBits": 1,
        "flowControl": "disable",
        "parity": "none",
        "timeout": 1000
      },
      "serial3": {
        "type": "UART",
        "port": 2,
        "dataWidth": 8,
        "baudRate": 115200,
        "stopBits": 1,
        "flowControl": "disable",
        "parity": "none",
        "timeout": 1000
      }
        },
    "debugLevel": "DEBUG"
    }
(3)编写main.py内容
# coding=utf-8
# This is a sample Python script.
from driver import GPIO
import utime as time
print("start led test")
leds=["led1","led2","led3","led4","led5"]
gpio=GPIO()
for i in range(5):
    for led in leds:
        gpio.open(led)
        gpio.write(1)
        time.sleep(1)
        gpio.write(0)
        time.sleep(1)
        gpio.close()
print("end led test")
(4)点击烧录
第一次点击烧录,需要配置一下本地更新、端口号、波特率

(5)配置com口
com号选择的是你的“电脑-设备管理器-端口”中的CH340的实际端口号

当前选的是com5

(6)波特率设置
将波特率设置为115200

(7)重启设备
在烧录的过程中出现“Please reboot the board manually."时,需要手动按一下开发板的重启按键(rst)。如果10s没有按下重启键,会自动结束烧录。需要重新点击左下角的”烧录“按键,重新烧录。

(8)烧录成功

6.结果
循环点亮板载led灯,当前循环次数为5,用户可以在for循环中自定义循环次数。


