scrollTo/scrollBy的区别
我们先来说说View的scrollTo和scrollBy方法,这是Android提供的View的滑动方法,滑动View的内容十分方便,直接调用即可,但是请注意,这里的滑动是指的View的内容,先来看看这两个方法的源码
/**
         * Set the scrolled position of your view. This will cause a call to
         * {@link #onScrollChanged(int, int, int, int)} and the view will be
         * invalidated.
         * @param x the x position to scroll to
         * @param y the y position to scroll to
         */
        public void scrollTo(int x, int y) {
            if (mScrollX != x || mScrollY != y) {
                int oldX = mScrollX;
                int oldY = mScrollY;
                mScrollX = x;
                mScrollY = y;
                invalidateParentCaches();
                onScrollChanged(mScrollX, mScrollY, oldX, oldY);
                if (!awakenScrollBars()) {
                    postInvalidateOnAnimation();
                }
            }
        }
      /**
         * Move the scrolled position of your view. This will cause a call to
         * {@link #onScrollChanged(int, int, int, int)} and the view will be``
         * invalidated.
         * @param x the amount of pixels to scroll by horizontally
         * @param y the amount of pixels to scroll by vertically
         */
        public void scrollBy(int x, int y) {
            scrollTo(mScrollX + x, mScrollY + y);
        }
简单解释一下,
scrollTo 是设置View的滑动位置,会调用onScrollChanged方法,view也会重新绘制,这里的x,y是相对于父布局的绝对地址
scrollBy 其实也是调用了scrollTO方法,只是这里的x,y是相对于父布局坐标的相对地址,源码里可以看出mScrollX是上一次滑动的x轴距离。
下面先来看看scrollTo和scrollBy的使用方法和区别
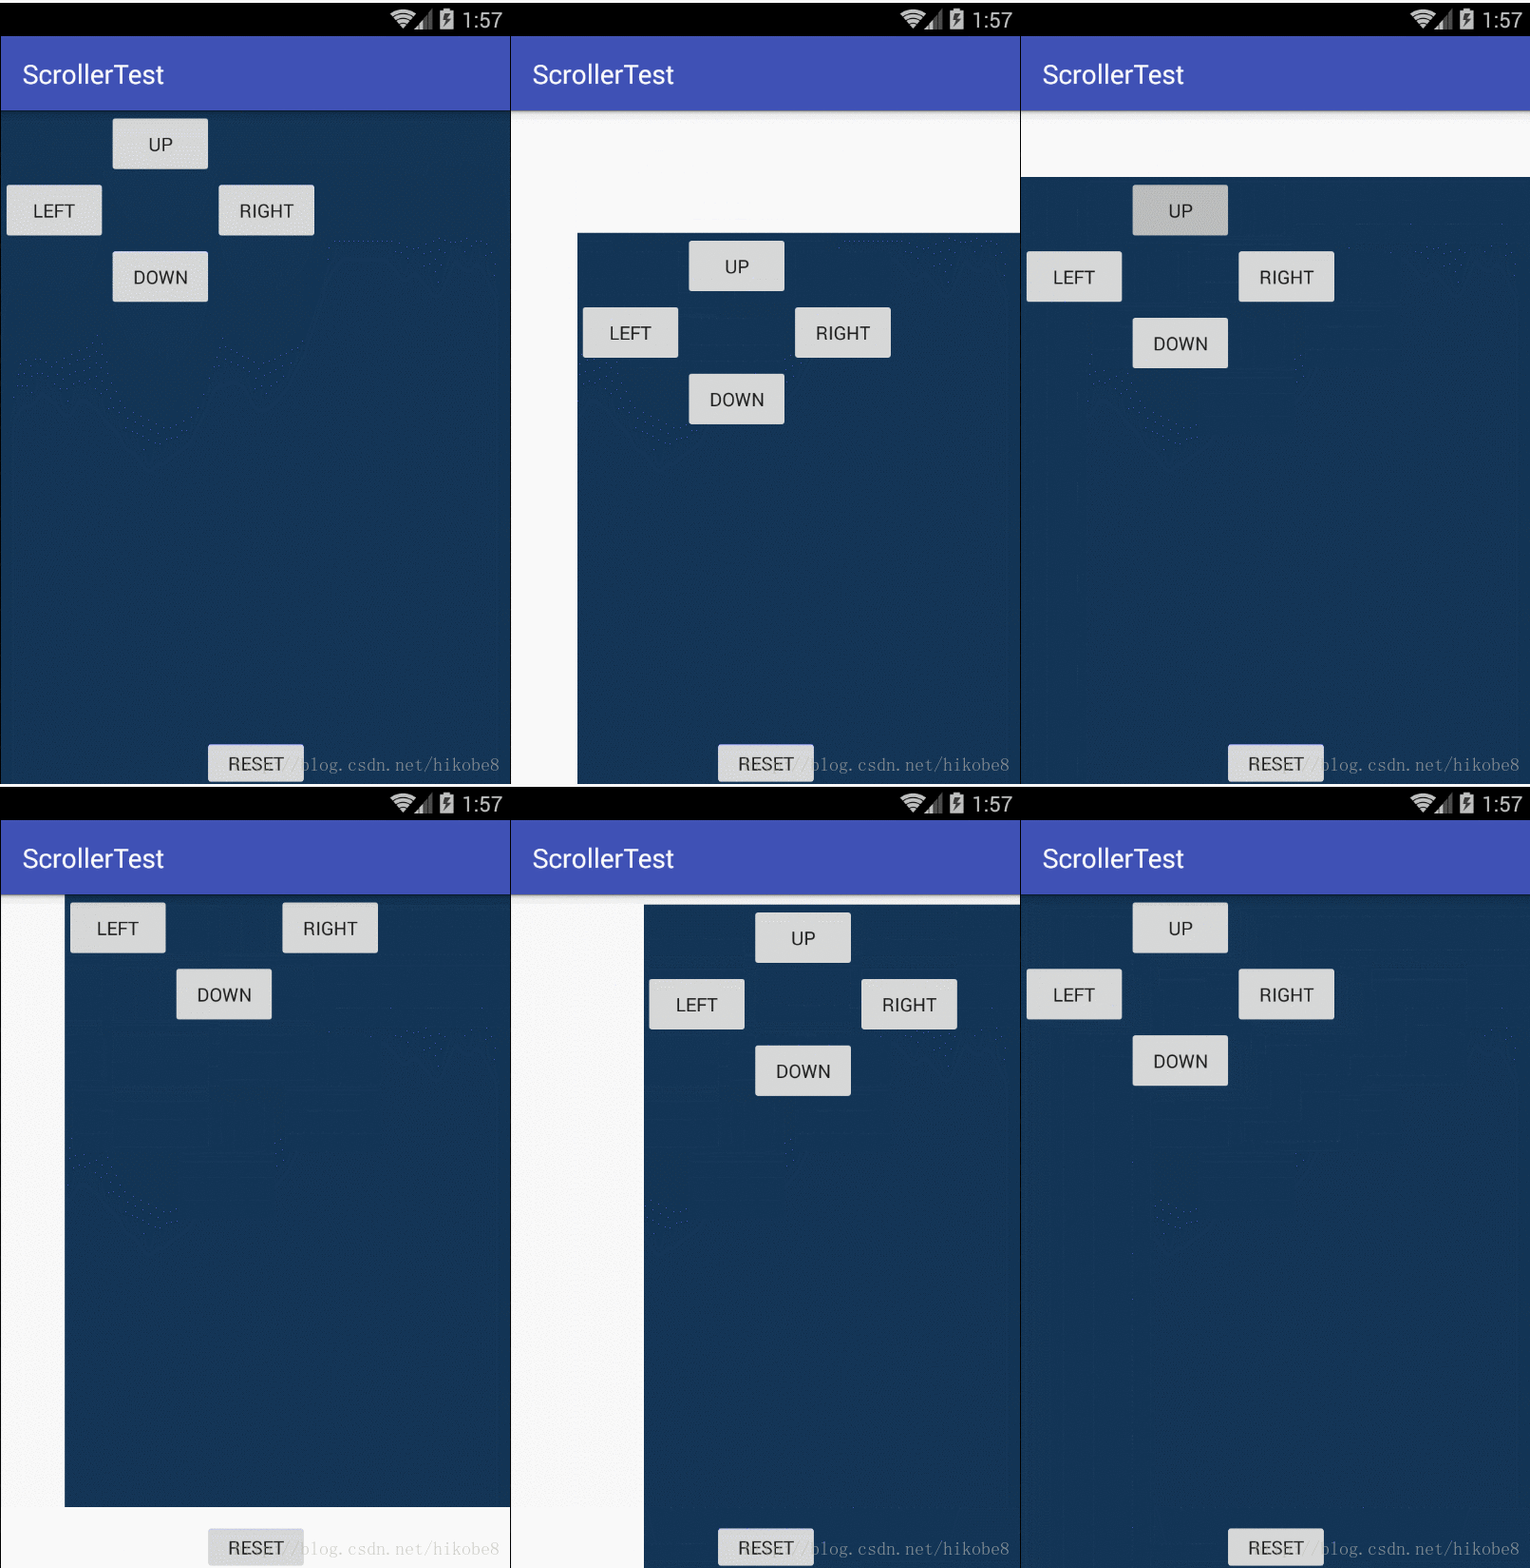
使用View.scrollBy/scrollTo的效果图
先上布局代码
<RelativeLayout
        xmlns:android="http://schemas.android.com/apk/res/android"
        xmlns:tools="http://schemas.android.com/tools"
        android:id="@+id/activity_main"
        android:layout_width="match_parent"
        android:layout_height="match_parent"
        tools:context="com.soda.scrollertest.MainActivity">
        <com.soda.scrollertest.scroller.MyRelativeLayout
            android:id="@+id/layout"
            android:background="@android:color/transparent"
            android:layout_width="match_parent"
            android:layout_height="match_parent">
            <ImageView
                android:layout_width="match_parent"
                android:layout_height="match_parent"
                android:src="#123456"/>
            <Button
                android:layout_marginTop="50dp"
                android:onClick="left"
                android:layout_width="80dp"
                android:layout_height="50dp"
                android:text="left"/>
            <Button
                android:layout_marginLeft="80dp"
                android:id="@+id/btn_up"
                android:onClick="up"
                android:layout_width="80dp"
                android:layout_height="50dp"
                android:text="up"/>
            <Button
                android:layout_marginLeft="80dp"
                android:layout_marginTop="100dp"
                android:onClick="down"
                android:layout_width="80dp"
                android:layout_height="50dp"
                android:text="down"/>
            <Button
                android:layout_marginLeft="160dp"
                android:layout_marginTop="50dp"
                android:onClick="right"
                android:layout_width="80dp"
                android:layout_height="50dp"
                android:text="right"/>
        </com.soda.scrollertest.scroller.MyRelativeLayout>
        <Button
            android:layout_centerHorizontal="true"
            android:layout_alignParentBottom="true"
            android:layout_width="80dp"
            android:layout_height="40dp"
            android:text="reset"
            android:onClick="reset"/>
    </RelativeLayout>
这里的布局文件和之后使用Scroller的一样,MyRelativeLayout其实就是对RelativeLayout添加了Scroller实现弹性滑动,这里先不用管它,就是一个RelativeLayout,然后上下左右四个按钮是属于MyRelativeLayout的,MyRelativeLayout的内容还包含一个填充全局的深蓝色imageview,所以看出了不管是scrollTo还是scrollBy都是对控件的内容进行滑动,而且滑动的x,y值的正负取值是跟android屏幕坐标系相反的,比如向右滑动是X轴正坐标,然而scrollBy/scrollTo传值为负数,向下滑动为Y轴正坐标,也是传值为负值,这里需要注意一下。上图中也可以看出scrollTo和scrollBy的区别,up down等方法是使用scrollBy,也就是使用相对坐标,才能继续滑动,View会记住上一次滑动到的坐标,然后调用scrollTo进行滑动。
public void up(View view) {
        mLayout.scrollBy(0, 100);
    }

    public void left(View view) {
        mLayout.scrollBy(100, 0);
    }

    public void down(View view) {
        mLayout.scrollBy(0, -100);
    }

    public void right(View view) {
        mLayout.scrollBy(-100, 0);
    }
但是scrollTo则是绝对坐标,这里的reset按钮对应的就是复位到控件的初始坐标.
/**
     * 复位到初始坐标
     * 调用scrollTO/scrollBy方法值是对内容进行滑动,不会改变控件的初始x,y值
     * @param view
     */
    public void reset(View view) {
        mLayout.scrollTo((int) mLayout.getX(), (int)mLayout.getY());
    }
Scroller实现弹性滑动
上面的调用scrollBy/scrollTo的效果图实在是太挫了,这样的滑动别说UI,BOSS不满意了,就算是作为码农的我们也觉得太Low,下面我们就用Scroller来改造上面的例子来实现弹性滑动.
Scroller的一般写法
我们先来学会怎么使用scroller,先学会使用,才能更好的理解原理,这好像说反了,天才而言,可以直接看原理,然后使用起来更是6的飞起,当然我们平常人,也是先用好了,才会有更深层次的探讨了,扯远了,还是先来看看怎么使用scroller。
Scroller的一般使用套路一般分为三步,
1 . 当然是创建Scroller实例了
mScroller = new Scroller(getContext());2 . 复写View#computeScroll方法
@Override
    public void computeScroll() {
        super.computeScroll();
        if (mScroller.computeScrollOffset()) {
            scrollTo(mScroller.getCurrX(), mScroller.getCurrY());
            invalidate();
        }
    }
3 . 调用Scroller的startScroll方法滑动View的内容
/**
     * 开始弹性滑动
     * @param startX 开始滑动的x坐标
     * @param startY 开始滑动的y坐标
     * @param dx     x轴滑动的距离
     * @param dy     y轴滑动的距离
     * @param duration 本次滑动的时间毫秒值 可选参数
     */
    public void startScroll(int startX, int startY, int dx, int dy, int duration)
Scroller的使用一般都是在自定义控件中,实例化可以跟控件构造方法中,开始滑动可以在touch事件中,关键就是复写computeScoll方法,invalidate()方法一定不要忘记,稍后会简单分析Scroller的原理。这里我们只需要记住Scroller的一般使用方法即可。
现在我们来看看使用Scroller改造过后的上述实例效果图

是不是比上面的顺滑多了,Scroller用起来还是挺爽的啊。现在来看看我们改造了什么地方
布局文件就不上代码了,与上面一模一样,主要的改变都是我们自定义的MyRelativeLayout.
public class MyRelativeLayout extends RelativeLayout {

    //利用Scroller实现弹性滑动
    private Scroller mScroller;

    public MyRelativeLayout(Context context) {
        super(context, null, 0);
    }

    public MyRelativeLayout(Context context, AttributeSet attrs) {
        this(context, attrs, 0);
    }

    public MyRelativeLayout(Context context, AttributeSet attrs, int defStyleAttr) {
        super(context, attrs, defStyleAttr);
        init();
    }

    private void init() {
        mScroller = new Scroller(getContext());
    }

    @Override
    public void computeScroll() {
        super.computeScroll();
        if (mScroller.computeScrollOffset()) {
            scrollTo(mScroller.getCurrX(), mScroller.getCurrY());
            invalidate();
        }
    }

    public void smoothScrollTo(int x, int y) {
        int dx = x - getScrollX();
        int dy = y - getScrollY();
        mScroller.startScroll(getScrollX(), getScrollY(), dx, dy,1000);
        invalidate();
    }

    public void smoothScrollBy(int x, int y) {
        mScroller.startScroll(getScrollX(), getScrollY(), x, y,500);
        invalidate();
    }

    public void reset(){
       smoothScrollTo((int)getX(), (int)getY());
    }
}
Scroller的三个步骤不用多说,主要是来看看smoothScrollTo/smoothScrollBy方法
public void smoothScrollTo(int x, int y) {
       int dx = x - getScrollX();
       int dy = y - getScrollY();
       mScroller.startScroll(getScrollX(), getScrollY(), dx, dy,1000);
       invalidate();
   }
这里的方法和scrollTo一样,都是滑动到绝对坐标,计算出dx和dy,也就是x,y轴的滑动距离,然后调用startScroll方法开始在1000ms之内完成滑动,reset方法就是调用smoothScrollTo把上下左右摇摆的View的内容复位。
public void smoothScrollBy(int x, int y) {
        mScroller.startScroll(getScrollX(), getScrollY(), x, y,500);
        invalidate();
    }
smoothScrollBy方法就和scrollBy方法一样了,都是相对坐标,所以直接将参数的x,y传入startScroll方法即可,x,y即使滑动的距离dx,dy。
上述demo的项目地址,童鞋们可以直接下载不用听我扯半天。
Demo传送门
Scroller的原理
学会了Scroller的基本使用之后,我们来看看Scroller的原理,探索一波为啥Scroller就能实现弹性滑动,
还是从Scroller的三步骤开始
第一步是Scroller的实例化,本文只是使用了Scroller的最简单的构造方法,传入一个context,其他配置包含插值器等都使用默认配置,先不深究其他构造方法的使用,这里我们就是实例化了一个Scroller。
下面来看看Scroller#startScroll方法
/**
     * Start scrolling by providing a starting point, the distance to travel,
     * and the duration of the scroll.
     * 提供了开始的坐标点,滑动的距离,和滑动所需的时间并开始滑动
     *
     * @param startX Starting horizontal scroll offset in pixels. Positive
     *        numbers will scroll the content to the left.
     * 开始滑动的X坐标
     * @param startY Starting vertical scroll offset in pixels. Positive numbers
     *        will scroll the content up.
     * 开始滑动的y坐标
     * @param dx Horizontal distance to travel. Positive numbers will scroll the
     *        content to the left.
     * x轴的滑动距离,正值会把内容向左移动
     * @param dy Vertical distance to travel. Positive numbers will scroll the
     *        content up.
     * y轴的滑动距离,正值会把内容向上移动
     * @param duration Duration of the scroll in milliseconds.
     * 完成本次滑动所需的时间,毫秒值
     */
    public void startScroll(int startX, int startY, int dx, int dy, int duration) {
        mMode = SCROLL_MODE;
        mFinished = false;
        mDuration = duration;
        mStartTime = AnimationUtils.currentAnimationTimeMillis();
        mStartX = startX;
        mStartY = startY;
        mFinalX = startX + dx;
        mFinalY = startY + dy;
        mDeltaX = dx;
        mDeltaY = dy;
        mDurationReciprocal = 1.0f / (float) mDuration;
    }
多说一句,上面的参数注释我觉得有点问题,startX, startY不应该是控制滑动方向的因素,dx,dy才是,然而谷歌大牛们应该是注释错了,在startX上面也加了“Positive numbers will scroll the content to the left.”,startX/Y只是一个记录起点的坐标。又扯远了。。。。
好啦,我们来看看Scroller#startScroll搞了那些事,
首先将mode 赋值为 滑动模式 SCROLL_MODE,剩下的都是一些直接赋值,有两个地方
mStartTime = AnimationUtils.currentAnimationTimeMillis();
mDurationReciprocal = 1.0f / (float) mDuration;
这里记录了滑动开始的时间,和滑动所需时间的倒数(英语小课堂 Reciprocal = 倒数,英语好的童鞋不要打我,打我别打脸…),这个倒数和时间待会儿都会用到, 我们看到了这个方法并没有调用什么奇技淫巧玩起来弹性滑动,那么弹性滑动是怎么搞起的呢,请注意我们的startScroll方法之后有一个invalidate()方法,答案就在这里!
童鞋们都知道invalidate()方法会导致View的重绘,那么问题又来了,重绘为何就能弹性滑动呢。Scroller的三步操作里面还有一个复写View的computeScroll方法没用起来,是不是这个方法在搞事呢?我先剧透一波,是的!来看看computeScroll的源码
/**
     * Called by a parent to request that a child update its values for mScrollX
     * and mScrollY if necessary. This will typically be done if the child is
     * animating a scroll using a {@link android.widget.Scroller Scroller}
     * object.
     */
    public void computeScroll() {
    }
还是用我的蹩脚英语翻译一下,如果父布局有必要要求子类控件更新他们的x,y滑动距离的时候调用这个方法,这方法的典型用法就是配合Scorller来使用.
请忽略我的机翻,最新想好好练练英语,所以见着英语就不放过啦,好啦,又扯远了….
我们再来看看这个方法何时被调用的,按照上面的猜想,重绘走View#draw方法,那么这个方法是不是在draw方法里面呢,我们就打开Android Studio闪现到View类中,ctrl+f二连,输入computeScoll,疯狂回车,发现果不其然这家伙在draw方法中被调用了,具体代码太多就不展示了。现在的关键就是computeScroll方法了,再来看看我们Demo中的computeScroll方法
@Override
    public void computeScroll() {
        super.computeScroll();
        if (mScroller.computeScrollOffset()) {
            scrollTo(mScroller.getCurrX(), mScroller.getCurrY());
            invalidate();
        }
    }
一步步分析,第一步我们做了一个判断,继续看看这个判断搞了哪些事情,
/**
     * Call this when you want to know the new location.  If it returns true,
     * the animation is not yet finished.
     */
    public boolean computeScrollOffset() {
        if (mFinished) {
            return false;
        }

        int timePassed = (int)(AnimationUtils.currentAnimationTimeMillis() - mStartTime);

        if (timePassed < mDuration) {
            switch (mMode) {
            case SCROLL_MODE:
                final float x = mInterpolator.getInterpolation(timePassed * mDurationReciprocal);
                mCurrX = mStartX + Math.round(x * mDeltaX);
                mCurrY = mStartY + Math.round(x * mDeltaY);
                break;
                //省略了FLING_MODE的判断,本文暂不讨论
            }
        }
        else {
            mCurrX = mFinalX;
            mCurrY = mFinalY;
            mFinished = true;
        }
        return true;
    }
这个方法就是在你获取当前滑动位置的时候调用来判断滑动是否结束的,true代表滑动结束.
分析一下这个方法,其实这个方法做的事很简单,第一步就是判断滑动完成了吗,如果没有结束,
接着会计算出已经滑动的时间,就是通过当前时间减去我们在startScroll方法里面自动赋值的起始时间,
然后继续判断,已经滑动的时间如果大于滑动所需的时间则认为滑动结束,返回true.如果小于的话,
其他模式我们就暂不讨论了,直接进入滑动模式SCROLL_MODE,这里会先做一个计算,我会伪代码来描述一下
x = timePassed * mDurationReciprocal
x = 滑动开始过的时间/滑动所需时间
就是把滑动所需时间等分为滑动所需时间份,
再通俗一点,比如滑动所需时间为1000ms,mDurationReciprocal = 1/1000,
timePassed * mDurationReciprocal 滑动开始过的时间占滑动所需的总时间的比例
得到这个比例后,我们就可以用这个比例更新mCurrX ,就是在滑动开始的坐标上加上当前已经滑动的距离(Math.round(x *mDeltaX)),这里的描述起来有点egg pain,童鞋们多理解一下,描述的不好轻点拍砖。这里的mCurrX,也就是在computeScroll调用Scroller#getCurrX()方法得到的值,所以得到之后再调用View#scrollTo方法进行滑动,最后又调用了一次invalidate方法进行了重绘,如果Scroller还没结束,又会继续进行上面的操作继续滑动。
画了一个很挫的流程图来解释上面的原理描述

Scroller巧妙的运用了invalidate方法一步一步重绘View实现了弹性滑动。也是一个递归的思维,关于递归可以看我之前用的博文递归经典案例汉诺塔 python实现,其实弹性滑动的核心思想就是将一次大位移逐渐分成一次次小位移实现了用户体验更好的滑动。就是闪现和开疾步的区别啦,哈哈,好像不对,闪现可以穿墙,是不是原理打散重组了,又扯远了…
这篇文章只是简单介绍了Scroller的基本用法和简单的从源码分析了Scroller的滑动原理。Scroller还有很多姿势的,比如插值器实现变速运动等等。本文到这里就到此结束啦,各位童鞋,有问题欢迎留言,拍砖,大家一起进步。


