文章目录
- 浅析Android的Handler机制
- ThreadLocal
- Handler
- ①专一的Looper与Thread
- 📱当你发送信息的时候你在想什么
- ⚪循环,徘徊着等待她的消息
浅析Android的Handler机制
ThreadLocal
理解Java中的ThreadLocal
position: package java.lang;
Looper初始化的时候,会初始化ThreadLocal
public final class Looper {
    /*
     * API Implementation Note:
     *
     * This class contains the code required to set up and manage an event loop
     * based on MessageQueue.  APIs that affect the state of the queue should be
     * defined on MessageQueue or Handler rather than on Looper itself.  For example,
     * idle handlers and sync barriers are defined on the queue whereas preparing the
     * thread, looping, and quitting are defined on the looper.
     */

    private static final String TAG = "Looper";

    // sThreadLocal.get() will return null unless you've called prepare().
    @UnsupportedAppUsage
    static final ThreadLocal<Looper> sThreadLocal = new ThreadLocal<Looper>();//👈在这里,ThreadLocal被初始化
    @UnsupportedAppUsage
    private static Looper sMainLooper;  // guarded by Looper.class
    private static Observer sObserver;

    @UnsupportedAppUsage
    final MessageQueue mQueue;
    final Thread mThread;

    @UnsupportedAppUsage
    private Printer mLogging;
    private long mTraceTag;

    ...
}
public class Test1 {
private ThreadLocal<String> local1 = new ThreadLocal<>();
private ThreadLocal<String> local2 = new ThreadLocal<>();
public static void main(String[] args) {
Test1 test1 = new Test1();
test1.test();
}
public void test() {
new Thread("Thread1") {
@Override
public void run() {
local1.set("Hello 1#");
System.out.println(local1.get());
local2.set("Hello 2#");
System.out.println(local2.get());
Thread thread = this;
}
}.start();
new Thread("Thread2") {
@Override
public void run() {
local1.set("Hello 1*");
System.out.println(local1.get());
local2.set("Hello 2*");
System.out.println(local2.get());
Thread thread = this;
}
}.start();
}
}我们看到,每个线程会存储属于自己的threadLocals,即ThreadLocal的内部类ThreadLocalMap。
// ThreadLocal#ThreadLocalMap
static class ThreadLocalMap {

    /**
         * The entries in this hash map extend WeakReference, using
         * its main ref field as the key (which is always a
         * ThreadLocal object).  Note that null keys (i.e. entry.get()
         * == null) mean that the key is no longer referenced, so the
         * entry can be expunged from table.  Such entries are referred to
         * as "stale entries" in the code that follows.
         */
    static class Entry extends WeakReference<ThreadLocal<?>> {
        /** The value associated with this ThreadLocal. */
        Object value;

        Entry(ThreadLocal<?> k, Object v) {
            super(k);
            value = v;
        }
    }

    private Entry getEntry(ThreadLocal<?> key) {
        int i = key.threadLocalHashCode & (table.length - 1);
        Entry e = table[i];
        if (e != null && e.get() == key)
            return e;
        else
            return getEntryAfterMiss(key, i, e);
    }

   	...
}
public class Test1 {
private ThreadLocal<String> local1 = new ThreadLocal<>();
private ThreadLocal<String> local2 = new ThreadLocal<>();
public static void main(String[] args) {
Test1 test1 = new Test1();
test1.test();
}
public void test() {
new Thread("Thread1") {
@Override
public void run() {
local1.set("Hello 1#");
System.out.println(local1.get());
local2.set("Hello 2#");
System.out.println(local2.get());
Thread thread = this;
}
}.start();
new Thread("Thread2") {
@Override
public void run() {
local1.set("Hello 1*");
System.out.println(local1.get());
local2.set("Hello 2*");
System.out.println(local2.get());
Thread thread = this;
}
}.start();
}
}

当我们使用ThreadLocal的set方法的时候,其内部会检测当前Thread内是否有threadLocals;如果没有则为线程创建;
//ThreadLocal.java


public void set(T value) {
    Thread t = Thread.currentThread();
    ThreadLocalMap map = getMap(t);
    if (map != null)
        map.set(this, value);
    else
        createMap(t, value);
}

/**
     * Get the map associated with a ThreadLocal. Overridden in
     * InheritableThreadLocal.
     *
     * @param  t the current thread
     * @return the map
     */
ThreadLocalMap getMap(Thread t) {
    return t.threadLocals;
}

/**
     * Create the map associated with a ThreadLocal. Overridden in
     * InheritableThreadLocal.
     *
     * @param t the current thread
     * @param firstValue value for the initial entry of the map
     */
void createMap(Thread t, T firstValue) {
    t.threadLocals = new ThreadLocalMap(this, firstValue);
}如果有的话,则向当前线程的threadLocals中添加一个Entry
Entry是一个弱引用类型,他就像Map中的Entry一样,可以视为键值对类型,key是ThreadLocal,而value就是我们设置的值。
当我们想要get数据的时候,ThreadLocal会以自己(this)为参数,从他所在的Thread中获得threadLocals(ThreadLocalMap),threadLocals里面有一个Entry型的数组table,使用ThreadLocal自己的threadLocalHashCode进行一番位运算操作,获得一个位置index,这个table[index]就是包含着当前的ThreadLocal的Entry的位置。

下面的图简化了,没有显示出thredLocals,但是threadLocals基本上就是table,因为他里面只有这一个元素
static class ThreadLocalMap {

    /**
         * The initial capacity -- MUST be a power of two.
         */
    private static final int INITIAL_CAPACITY = 16;

    /**
         * The table, resized as necessary.
         * table.length MUST always be a power of two.
         */
    private Entry[] table;

    /**
         * The number of entries in the table.
         */
    private int size = 0;

    /**
         * The next size value at which to resize.
         */
    private int threshold; // Default to 0
}
ThreadLocal在不同的线程中,取出来的对应结果是不同的,这也就保证了不同线程的数据互不干扰,而且每个线程中含有ThreadLocal1(或者ThreadLocal2或者ThreadLocalx……)的Entry也具有唯一性。


我们在使用Handler的时候,如果是在非主线程中调用Handler,必须首先调用Looper.prepare(),然后调用Looper.loop()
这个Looper.prepare()就是往其所在线程的threadLocals里面添加Entry(其实是一个内部持有Looper的ThreadLocal弱引用,即我们上面说的ThreadLocalMap内的Entry类),但是要注意:
// Looper.java
 private static void prepare(boolean quitAllowed) {
     if (sThreadLocal.get() != null) {
         throw new RuntimeException("Only one Looper may be created per thread");
     }
     sThreadLocal.set(new Looper(quitAllowed));//ThreadLocal.set->ThreadLocal#ThreadLocalMap.set->Thread的threadLocals进行添加
}如果我们的线程中没有存入Entry,我们可以通过set方法,创建一个新的Looper,在set方法内部这个Looper会被整合到一个Entry类中,存入Thread的threadLocals;
如果我们的线程中,threadLocals里面的table已经存入一个Entry了,我们就不可以再往里存了,也就是说一个Thread对应一个Looper
所以我们可以认为,在安卓Handler消息机制中,ThreadLocal扮演了一个为不同线程添加Looper,检测和限制线程中Looper数量的角色
Handler
记住,handler的作用是线程间通信切换,而不是单纯只从其他线程切换到主线程
下面这个例子可以证明这个线程间通信的过程:
public class HandlerTestActivity extends AppCompatActivity {

    private Button handlerButton;
    private TextView textView;
    private TestHandler handler;
    private Handler handlerInThread1;
    private static final String TAG = "HANDLER_TEST";
    static class TestHandler extends Handler {
        WeakReference<HandlerTestActivity> activity;

        public TestHandler(@NonNull Looper looper, HandlerTestActivity act) {
            super(looper);
            this.activity = new WeakReference<>(act);
        }

        @Override
        public void handleMessage(@NonNull Message msg) {
            super.handleMessage(msg);
            activity.get().textView.setText("Hello Boy!");
        }
    }

    @Override
    protected void onCreate(Bundle savedInstanceState) {
        super.onCreate(savedInstanceState);
        setContentView(R.layout.activity_handler_test);
        handler =  new TestHandler(Looper.getMainLooper(), this);
        handlerButton = findViewById(R.id.handler_btn_test);
        textView = findViewById(R.id.handler_txt_input);
        new Thread(() -> {
            Looper.prepare();
            handlerInThread1 = new Handler(Looper.myLooper()) {
                @Override
                public void handleMessage(@NonNull Message msg) {
                    super.handleMessage(msg);
                    Log.d(TAG, "handleMessage: enter handler1!");
                    handler.handleMessage(msg);
                }
            };
            Looper.loop();
        }).start();
        handlerButton.setOnClickListener(v -> {
            new Thread(() -> {
                Message obtain = Message.obtain();
                obtain.what = 1;
                Bundle bundle = new Bundle();
                bundle.putString("info", "Hello Boy!");
                obtain.setData(bundle);
                while (handlerInThread1 == null);
                handlerInThread1.sendMessage(obtain);
                // handler.sendMessage(obtain);
            }).start();
        });

    }
}
Android学习笔记4:关于handler以及它已过时的构造函数handler()

比如线程1想向线程2发送消息,必须使用在线程2内部创建的handler。
那么handler是如何把消息发送出去并且切换到不同的线程的呢?
①专一的Looper与Thread
private static void prepare(boolean quitAllowed) {
    if (sThreadLocal.get() != null) {
        throw new RuntimeException("Only one Looper may be created per thread");
    }
    sThreadLocal.set(new Looper(quitAllowed));
}
创建Handler之前,首先要调用Looper.prepare(),目的是为该线程创建唯一的一个Looper,该Looper存在ThreadLocal中,具体分析见上一节ThreadLocal。
一个Thread的♥中,只有一个Looper的位置。
📱当你发送信息的时候你在想什么
当我们调用handlerThread1.sendMessage的时候都发生了什么
我们来好好看看handler的调用过程
//handlerInThread1 接受消息的Handler
new Thread(() -> {
    Looper.prepare();
    handlerInThread1 = new Handler(Looper.myLooper()) {
        @Override
        public void handleMessage(@NonNull Message msg) {
            super.handleMessage(msg);
            Log.d(TAG, "handleMessage: enter handler1!");
            handler.handleMessage(msg);
        }
    };
    Looper.loop();
}).start();

new Thread(() -> {
    Message obtain = Message.obtain();
    obtain.what = 1;
    Bundle bundle = new Bundle();
    bundle.putString("info", "Hello Boy!");
    obtain.setData(bundle);
    while (handlerInThread1 == null);
    handlerInThread1.sendMessage(obtain);
    // handler.sendMessage(obtain);
}).start();
👉首先,我们通过Message.obtain获得了一个Message对象
👉往Message对象中添加了数据后,调用Handler的sendMessage方法
//Handler.java
public final boolean sendMessage(@NonNull Message msg) {
    return sendMessageDelayed(msg, 0);
}
public final boolean sendMessageDelayed(@NonNull Message msg, long delayMillis) {
    if (delayMillis < 0) {
        delayMillis = 0;
    }
    return sendMessageAtTime(msg, SystemClock.uptimeMillis() + delayMillis);
}
public boolean sendMessageAtTime(@NonNull Message msg, long uptimeMillis) {
    MessageQueue queue = mQueue;
    if (queue == null) {
        RuntimeException e = new RuntimeException(
            this + " sendMessageAtTime() called with no mQueue");
        Log.w("Looper", e.getMessage(), e);
        return false;
    }
    return enqueueMessage(queue, msg, uptimeMillis);
}
private boolean enqueueMessage(@NonNull MessageQueue queue, @NonNull Message msg,
                               long uptimeMillis) {
    msg.target = this;//把目前的Handler存入Message
    msg.workSourceUid = ThreadLocalWorkSource.getUid();

    if (mAsynchronous) {
        msg.setAsynchronous(true);
    }
    return queue.enqueueMessage(msg, uptimeMillis);
}👉最后调用queue.enqueMessage方法,queue是Looper内部的MessageQueue,enqueueMessage()就是往消息队列MessageQueue中插入了一条信息。
每个线程内含有一个唯一的Looper,每个线程都有属于自己的一些Handler,Handler内部持有自己所在线程的Looper,当我们调用Handler.sendMessage方法传送Message的时候,就会把Handler调用Looper内部的MessageQueue的enqueueMessage方法,把Message存入MessageQueue;
//Handler.java
/**
 * Use the provided {@link Looper} instead of the default one.
 *
 * @param looper The looper, must not be null.
 */
public Handler(@NonNull Looper looper) {
    this(looper, null, false);
}


@UnsupportedAppUsage
public Handler(@NonNull Looper looper, @Nullable Callback callback, boolean async) {
    mLooper = looper;
    mQueue = looper.mQueue;
    mCallback = callback;
    mAsynchronous = async;
}

private boolean enqueueMessage(@NonNull MessageQueue queue, @NonNull Message msg,
                               long uptimeMillis) {
    msg.target = this;//把目前的Handler存入Message
    msg.workSourceUid = ThreadLocalWorkSource.getUid();

    if (mAsynchronous) {
        msg.setAsynchronous(true);
    }
    return queue.enqueueMessage(msg, uptimeMillis);
}
总结下来就是:
Handler->MessageQueue#enqueueMessage 发送信息,同时记录下当前发送信息的Handler,将引用存入Message当中
⚪循环,徘徊着等待她的消息
Looper->MessageQueue#next,获得信息
我们知道,在非主线程使用Looper的时候,不仅需要调用Looper.prepare,还要调用Loop.loop开启这个Looper。
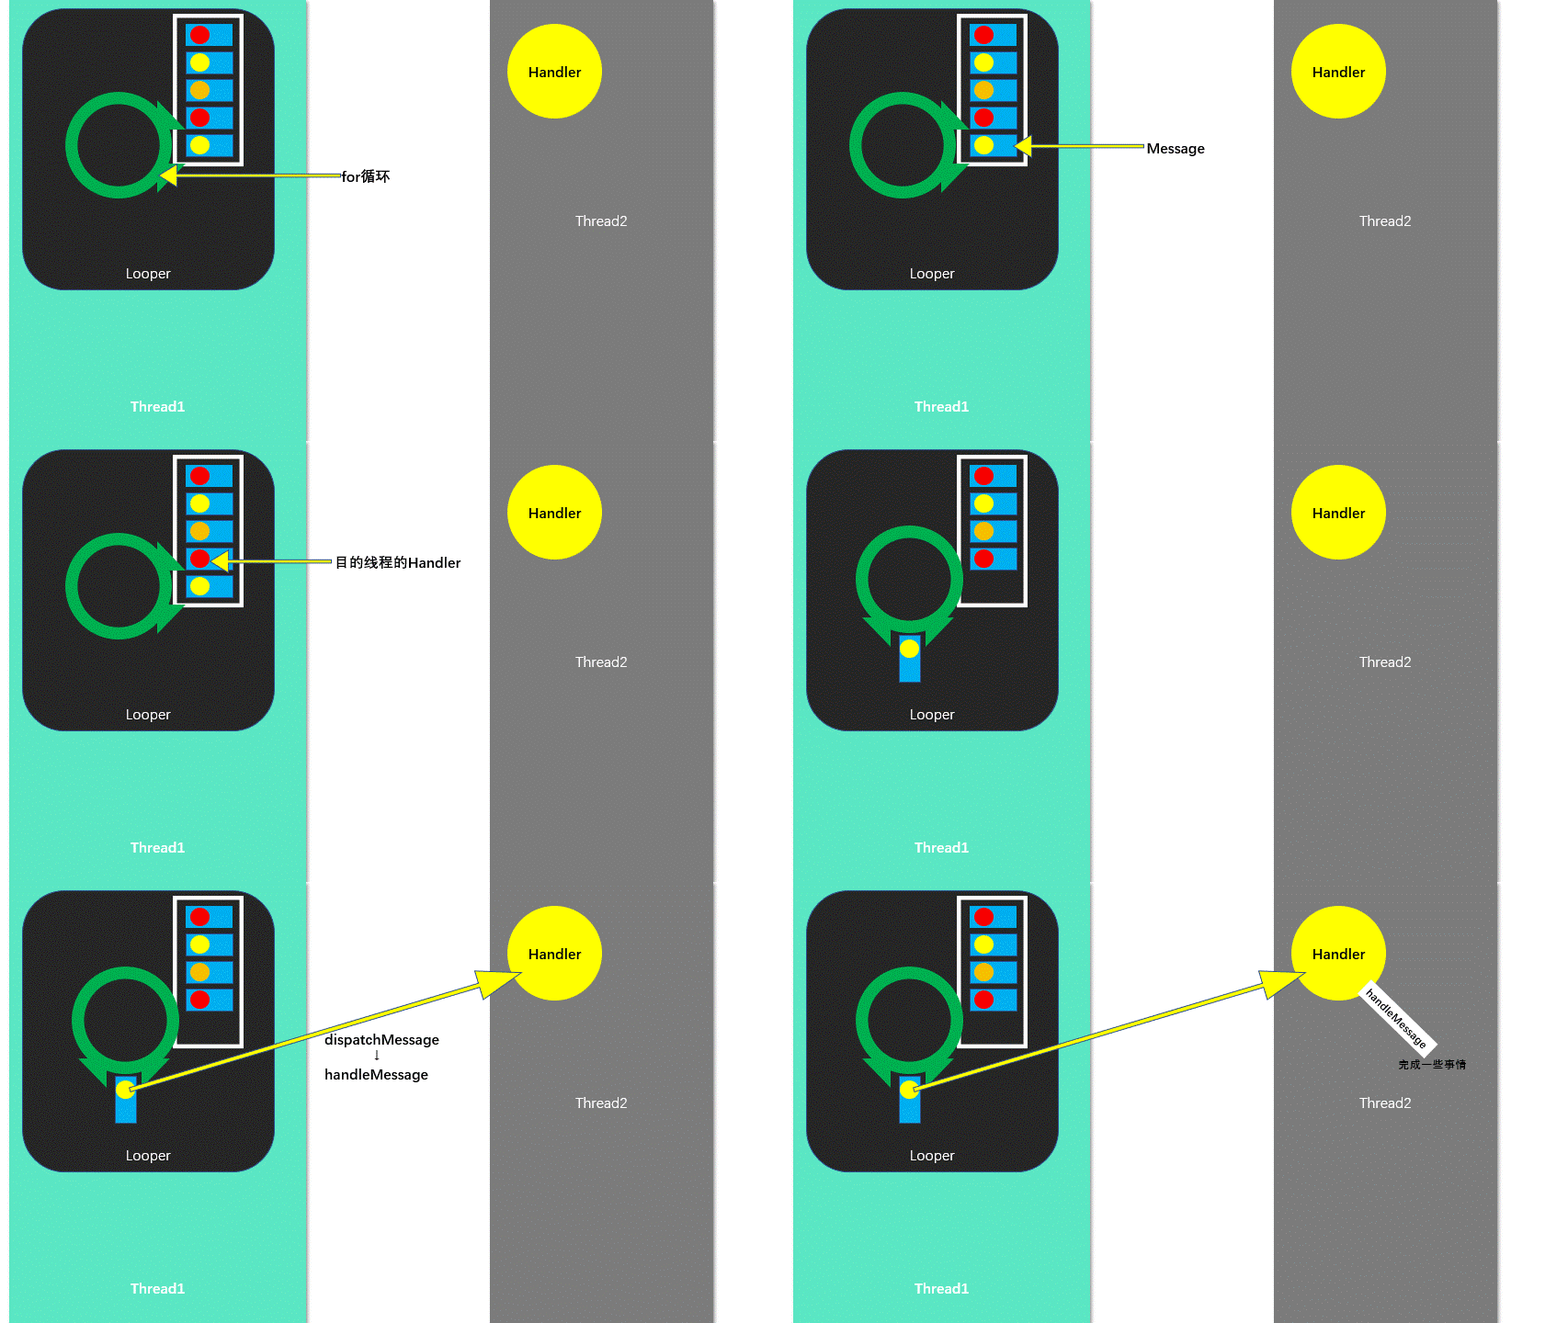
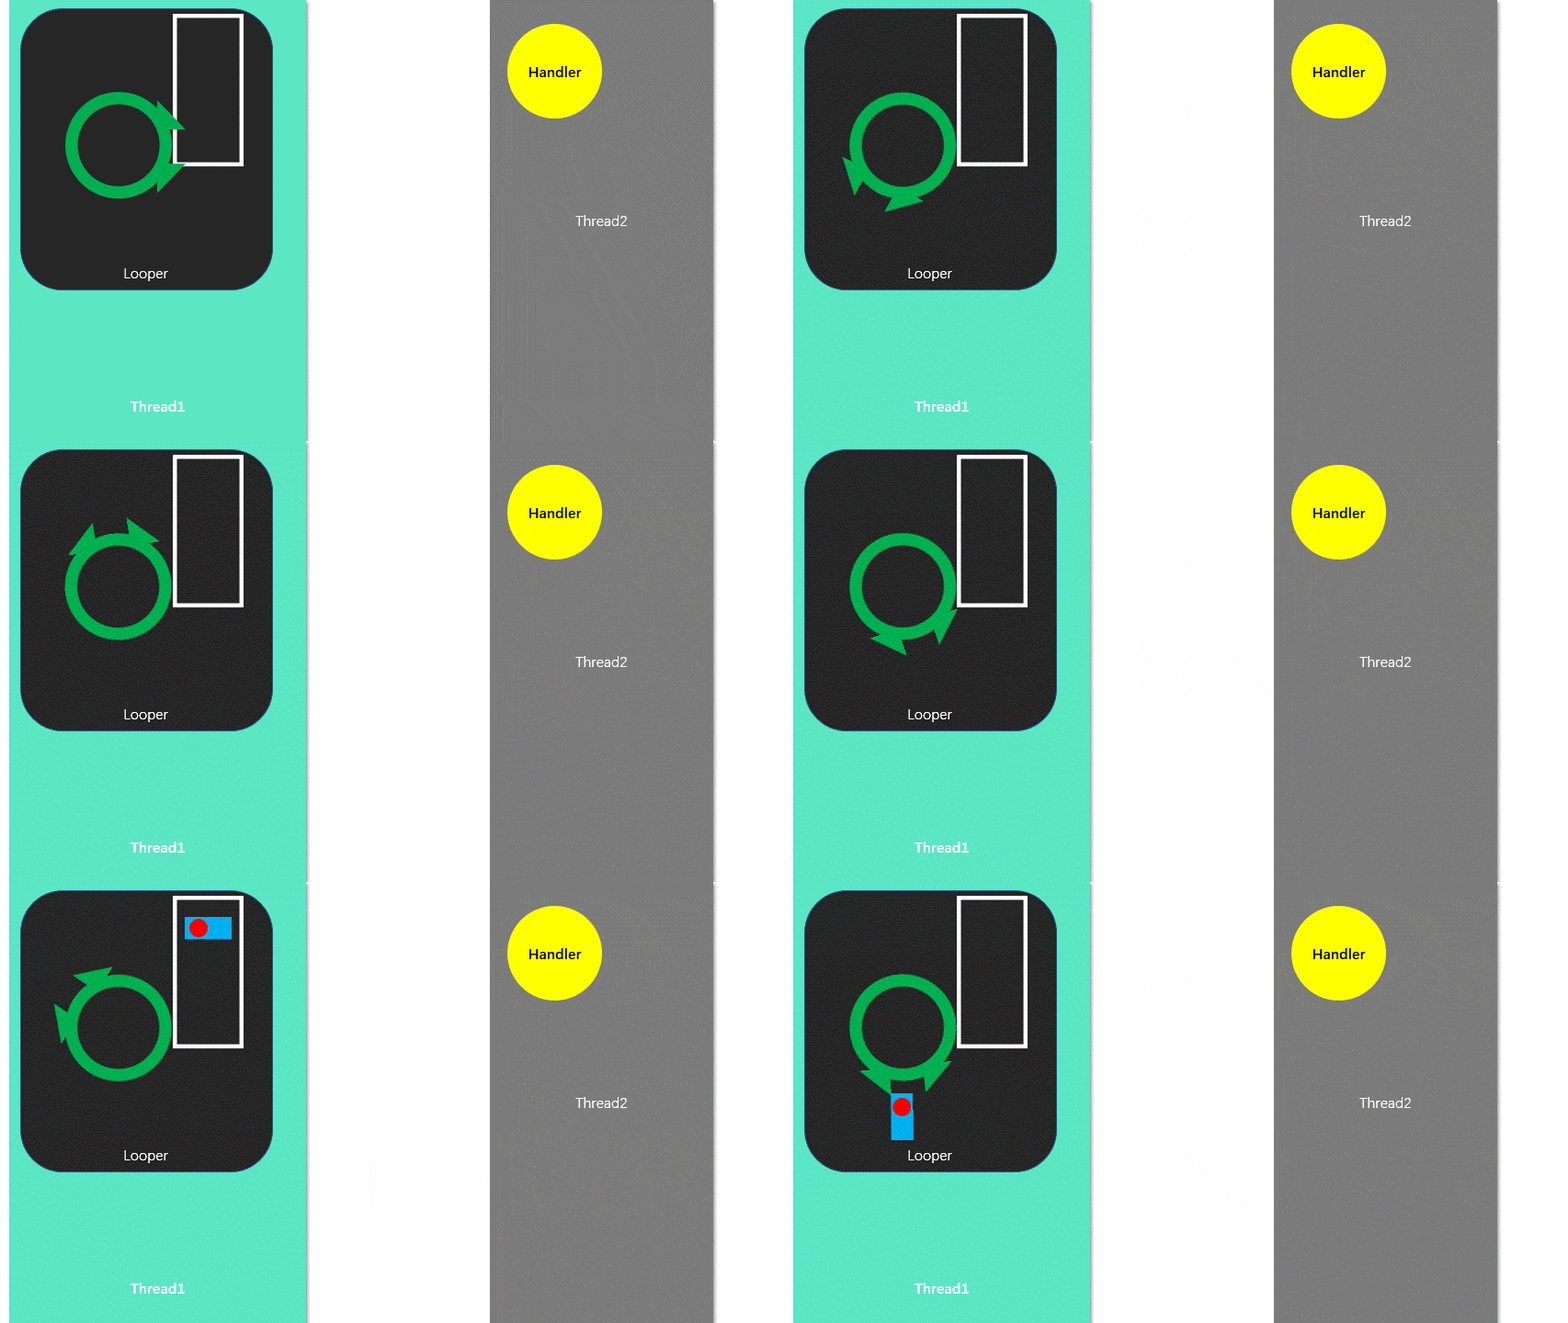
开启looper后,该线程会启动一个for循环,调用MessageQueue的next方法
//Looper.java
public static void loop() {
     final Looper me = myLooper();
     if (me == null) {
         throw new RuntimeException("No Looper; Looper.prepare() wasn't called on this thread.");
     }
     final MessageQueue queue = me.mQueue;
     ...

    for (;;) {
        Message msg = queue.next(); // might block 如果queue内部为空的话,会一直等待,也就是block
        if (msg == null) {
            // No message indicates that the message queue is quitting.
            return;
        }

        ...

        long origWorkSource = ThreadLocalWorkSource.setUid(msg.workSourceUid);
        try {
            msg.target.dispatchMessage(msg);//在这里,handler发送信息
            if (observer != null) {
                observer.messageDispatched(token, msg);
            }
            dispatchEnd = needEndTime ? SystemClock.uptimeMillis() : 0;
        } catch (Exception exception) {
            ...
        } finally {
            ...
        }

        ...

        msg.recycleUnchecked();
    }
}
我们看看next方法
//MessageQueue
@UnsupportedAppUsage
    Message next() {
        // Return here if the message loop has already quit and been disposed.
        // This can happen if the application tries to restart a looper after quit
        // which is not supported.
        ...

        for (;;) {
            ...

            nativePollOnce(ptr, nextPollTimeoutMillis);

            synchronized (this) {
                // Try to retrieve the next message.  Return if found.
                ...
            }
        }
}MessageQueue的next方法也是一个for循环,从自身的消息链表中查找不为空的消息,并返回给Looper,否则就一直循环,这时候Looper内部就一直停留在Message msg = queue.next方法处,也就说,Looper被block了。
在Looper中,一旦获得了msg,便会立即发送消息
msg.target.dispatchMessage(msg);//在这里,handler发送信息
我们在上面分析过,msg.target是一个Handler类型,
//Handler.java
private boolean enqueueMessage(@NonNull MessageQueue queue, @NonNull Message msg,
                               long uptimeMillis) {
    msg.target = this;//👈
    msg.workSourceUid = ThreadLocalWorkSource.getUid();

    if (mAsynchronous) {
        msg.setAsynchronous(true);
    }
    return queue.enqueueMessage(msg, uptimeMillis);
}
//Handler
/**
* Handle system messages here.
*/
public void dispatchMessage(@NonNull Message msg) {
if (msg.callback != null) {//如果Message设置了Callback,优先调用
handleCallback(msg);
} else {
if (mCallback != null) {
if (mCallback.handleMessage(msg)) {//Handler本身设置了Callback,其次调用
return;
}
}
handleMessage(msg);//👈看这里,如果上面两个Callback都没设置,最终调用Handler的handleMessage方法
}
}Handler以及Message都可以设置Callback接口,用法类似于View的setOnClickListner,这里就不过多解释了。
Looper\MessageQueue\Handler之间的引用关系大致如下图:

而这整个流程的大致示意如以下动图:

整个Looper轮转的过程如下图所示:


