文章目录
- 菜单Menu 设计的基本概念
- 菜单Menu 设计的基本应用
- tearoff 参数
- 菜单列表间加上分割线
- 建立多个菜单的应用
- Alt快捷键
- Ctrl + 快捷键
- 建立子菜单
- 建立弹出式菜单
- add_checkbutton()
菜单Menu 设计的基本概念
窗口中一般会有菜单设计,菜单是一种下拉式窗体,在这中窗体中可以设计菜单列表。语法格式如下:
Menu(父对象, options, ...)参数:
- 第一个参数:
父对象,表示这个菜单将建立在哪一个窗口内 - 第二个参数:
options,参数如下
参数 | 含义 |
activebackground | 当光标移至此菜单列表上时的背景色彩 |
activeborderwidth | 当被鼠标选取时它的外边框厚度 默认是1 |
activeforeground | 当光标移至此菜单列表上时的前景色彩 |
bd | 所有菜单列表的外边框厚度 默认是1 |
bg | 菜单列表未被选取时的背景色彩 |
cursor | 当菜单分离时,鼠标光标在列表上的外观 |
disabledforeground. | 菜单列表是 |
font | 菜单列表文字的字形 |
fg | 菜单列表未被选取时的前景色彩 |
image | 菜单的图标 |
tearoff | 菜单上方的分割线。这是一个虚线,线条有分割线时tearoff值为True或1,此时菜单列表从位置1开始放置,同时可以让菜单分离,分离方式是开启菜单后单击分割线 如果将tearoff设为False或0时,此时不会显示分割线,也就是菜单无法分离,但是菜单列表将从位置0开始存放 |
add_cascade | 建立分层菜单,同时让此子功能列表与父菜单建立链接 |
add_command | 增加菜单列表 |
add_separator | 增加菜单列表的分隔线 |
菜单Menu 设计的基本应用
例子:
import tkinter


def show():
    label.config(text='I Like Python!')


root = tkinter.Tk()
root.geometry('150x120')

menu = tkinter.Menu(root)
menu.add_command(label='Hello', command=show)
menu.add_command(label='Exit', command=root.destroy)
# 显示菜单对象
root.config(menu=menu)

label = tkinter.Label(root)
label.pack(padx=5, pady=10)

root.mainloop()
运行结果:

上述程序虽然可以执行,但是这并不是一个正规的菜单设计方式,正规的菜单设计方式是在最上方建立菜单类别,然后在各个菜单类别内建立相关子菜单列表,使用下拉式窗体显示
例子:
import tkinter


def show():
    label.config(text='I Like Python!')


root = tkinter.Tk()
root.geometry('150x120')

# 建立最上层菜单
menuBar = tkinter.Menu(root)
# 建立菜单类别对象,并将此菜的类别命名file
menuFile = tkinter.Menu(menuBar)
# 建立分层菜单,让此子功能列表与父菜单建立链接
menuBar.add_cascade(label='file', menu=menuFile)
# 在file菜单内建立菜单列表
menuFile.add_command(label='New', command=show)
menuFile.add_command(label='Exit', command=root.destroy)
# 显示菜单对象
root.config(menu=menuBar)

label = tkinter.Label(root)
label.pack(padx=5, pady=10)

root.mainloop()
运行结果:

tearoff 参数
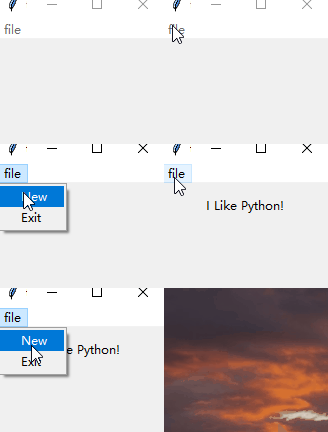
由上面的小程序可以看出,下拉子菜单是有分割线的,不符合常理,很影响美观,这也是tearoff的默认值导致的,我们把分割线隐藏
例子:
import tkinter


def show():
    label.config(text='I Like Python!')


root = tkinter.Tk()
root.geometry('150x120')

# 建立最上层菜单
menuBar = tkinter.Menu(root)
# 建立菜单类别对象,并将此菜的类别命名file,tearoff设置为False
menuFile = tkinter.Menu(menuBar, tearoff=False)
# 建立分层菜单,让此子功能列表与父菜单建立链接
menuBar.add_cascade(label='file', menu=menuFile)
# 在file菜单内建立菜单列表
menuFile.add_command(label='New', command=show)
menuFile.add_command(label='Exit', command=root.destroy)
# 显示菜单对象
root.config(menu=menuBar)

label = tkinter.Label(root)
label.pack(padx=5, pady=10)

root.mainloop()
运行结果:
菜单列表间加上分割线
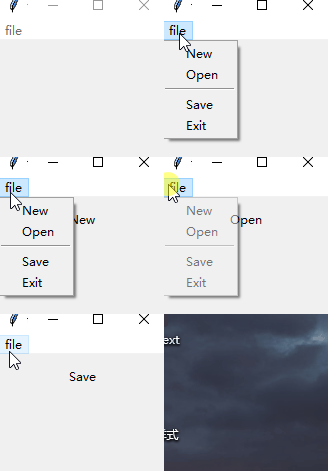
建立下拉菜单列表时,如果列表项目有很多,可以适当的使用add_separator()方法在菜单列表内加上分割线
例子:
import tkinter


def show(i):
    label.config(text=i)


root = tkinter.Tk()
root.geometry('150x120')

# 建立最上层菜单
menuBar = tkinter.Menu(root)
# 建立菜单类别对象,并将此菜的类别命名file
menuFile = tkinter.Menu(menuBar, tearoff=False)
# 建立分层菜单,让此子功能列表与父菜单建立链接
menuBar.add_cascade(label='file', menu=menuFile)
# 在file菜单内建立菜单列表
menuFile.add_command(label='New', command=lambda: show('New'))
menuFile.add_command(label='Open', command=lambda: show('Open'))
menuFile.add_separator()
menuFile.add_command(label='Save', command=lambda: show('Save'))
menuFile.add_command(label='Exit', command=root.destroy)
# 显示菜单对象
root.config(menu=menuBar)

label = tkinter.Label(root)
label.pack(padx=5, pady=10)

root.mainloop()
运行结果:
建立多个菜单的应用
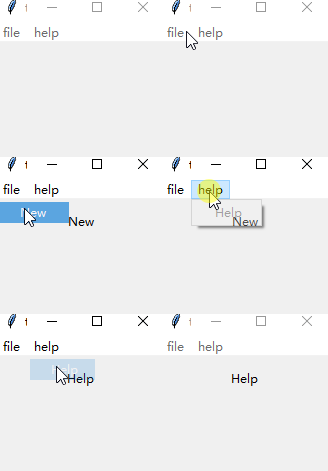
一个实用的窗口应用程序在最上层menubar中应该会有很多组菜单类别,在先前的例子中只建立了file菜单的对象,所使用的方法如下:
menuBar = tkinter.Menu(root)
menuFile = tkinter.Menu(menuBar, tearoff=False)
menuBar.add_cascade(label='file', menu=menuFile)
如果想要建立多组菜单类别,所需要的就是增加设计上述第2行和第3行,然后用不同的名称取代即可
例子:
import tkinter


def show(i):
    label.config(text=i)


root = tkinter.Tk()
root.geometry('150x120')

# 建立最上层菜单
menuBar = tkinter.Menu(root)
# 建立菜单类别对象,并将此菜的类别命名file
menuFile = tkinter.Menu(menuBar, tearoff=False)
# 建立分层菜单,让此子功能列表与父菜单建立链接
menuBar.add_cascade(label='file', menu=menuFile)
# 在file菜单内建立菜单列表
menuFile.add_command(label='New', command=lambda: show('New'))
menuFile.add_command(label='Open', command=lambda: show('Open'))
menuFile.add_separator()
menuFile.add_command(label='Save', command=lambda: show('Save'))
menuFile.add_command(label='Exit', command=root.destroy)

menuHelp = tkinter.Menu(menuBar, tearoff=False)
menuBar.add_cascade(label='help', menu=menuHelp)
menuHelp.add_command(label='Help', command=lambda: show('Help'))


# 显示菜单对象
root.config(menu=menuBar)

label = tkinter.Label(root)
label.pack(padx=5, pady=10)

root.mainloop()
运行结果:
Alt快捷键
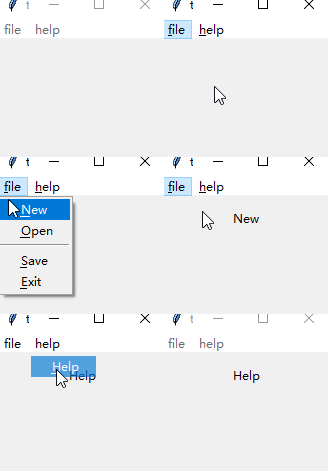
快捷键是某个菜单类别或是列表指令的英文字符串内为单一字母增加下划线,然后可以用Alt键先启动此功能,当菜单显示下划线字母时,可以直接按指定字母键启动该功能。设计方式是在下列两个方法内增加underline参数
add_cascade(..., underline=n)   # n代表第几个所有字母含下划线
add_command(..., underline=n) # n代表第几个所有字母含下划线- add_cascade() 的underline是为菜单类别增加字母下划线
- add_command() 的underline是为命令列表增加字母下划线
上述索引从0开始计算,当然,在将所选择的字母处理成带有下划线时,必须适度选择具有代表性的字母,通常会是字符串的第1个字母。
例如,File菜单可以选择F,Help可以选择H
例子:
import tkinter


def show(i):
    label.config(text=i)


root = tkinter.Tk()
root.geometry('150x120')

# 建立最上层菜单
menuBar = tkinter.Menu(root)
# 建立菜单类别对象,并将此菜的类别命名file
menuFile = tkinter.Menu(menuBar, tearoff=False)
# 建立分层菜单,让此子功能列表与父菜单建立链接
menuBar.add_cascade(label='file', menu=menuFile, underline=0)
# 在file菜单内建立菜单列表
menuFile.add_command(label='New', command=lambda: show('New'), underline=0)
menuFile.add_command(label='Open', command=lambda: show('Open'), underline=0)
menuFile.add_separator()
menuFile.add_command(label='Save', command=lambda: show('Save'), underline=0)
menuFile.add_command(label='Exit', command=root.destroy, underline=0)

menuHelp = tkinter.Menu(menuBar, tearoff=False)
menuBar.add_cascade(label='help', menu=menuHelp, underline=0)
menuHelp.add_command(label='Help', command=lambda: show('Help'), underline=0)


# 显示菜单对象
root.config(menu=menuBar)

label = tkinter.Label(root)
label.pack(padx=5, pady=10)

root.mainloop()
运行结果:
按Alt键~~
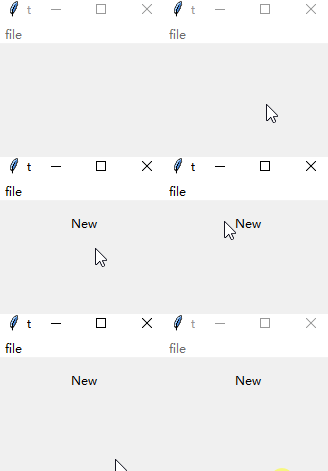
Ctrl + 快捷键
在设计菜单列表时,也可以在指令右边设计Ctrl + X之类的快捷键,要设计这类操作可以借助accelerator参数,然后再使用bind()方法绑定一起
例子:
import tkinter


def show(event):
    label.config(text=event)


root = tkinter.Tk()
root.geometry('150x120')

# 建立最上层菜单
menuBar = tkinter.Menu(root)
# 建立菜单类别对象,并将此菜的类别命名file
menuFile = tkinter.Menu(menuBar, tearoff=False)
# 建立分层菜单,让此子功能列表与父菜单建立链接
menuBar.add_cascade(label='file', menu=menuFile)
# 在file菜单内建立菜单列表
menuFile.add_command(label='New', command=lambda: show('New'), accelerator='Ctrl+N')

# 显示菜单对象
root.config(menu=menuBar)
root.bind('<Control-n>', lambda event: show('New'))

label = tkinter.Label(root)
label.pack(padx=5, pady=10)

root.mainloop()
运行结果:
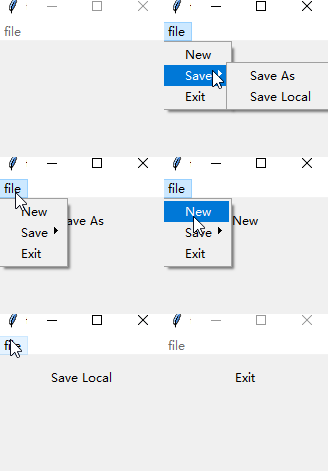
建立子菜单
建立菜单时所使用的的概念如下
menuBar = tkinter.Menu(root)
menuFile = tkinter.Menu(menuBar, tearoff=False)
menuBar.add_cascade(label='file', menu=menuFile)建立子菜单时,就需要再次嵌套Menu就行
menuSave = tkinter.Menu(menuFile, tearoff=False)
menuFile.add_cascade(label='Save', menu=menuSave)
menuSave.add_command(label='Save As')
menuSave.add_command(label='Save Local')例子:
import tkinter


def show(event):
    label.config(text=event)


root = tkinter.Tk()
root.geometry('150x120')

# 建立最上层菜单
menuBar = tkinter.Menu(root)

# file菜单
menuFile = tkinter.Menu(menuBar, tearoff=False)
menuBar.add_cascade(label='file', menu=menuFile)
menuFile.add_command(label='New', command=lambda: show('New'))

# Save菜单与Save子菜单
menuSave = tkinter.Menu(menuFile, tearoff=False)
menuFile.add_cascade(label='Save', menu=menuSave)
menuSave.add_command(label='Save As', command=lambda: show('Save As'))
menuSave.add_command(label='Save Local', command=lambda: show('Save Local'))


menuFile.add_command(label='Exit', command=lambda: show('Exit'))

# 显示菜单对象
root.config(menu=menuBar)

label = tkinter.Label(root)
label.pack(padx=5, pady=10)

root.mainloop()
运行结果:
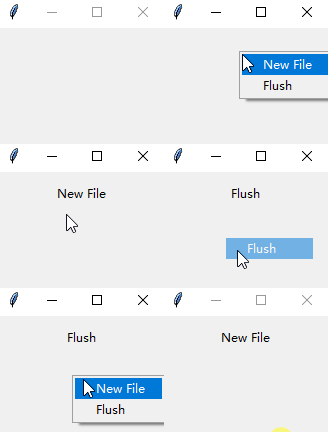
建立弹出式菜单
当使用windows操作系统时,可以在桌面上单击鼠标右键,此时会弹出一个菜单,这就是弹出式菜单 Popup menu,有人将此菜单称为快捷菜单
设计这类菜单与先前需要在窗口的menubar区建立菜单类别有一些差异,建立好Menu对象后,可以直接利用此对象建立指令列表,最后的单击鼠标右键操作绑定显示弹出菜单即可
例子:
import tkinter


def show(event):
    label.config(text=event)


def showInfo(event):
    # 显示弹出式菜单,根据Windows窗口的绝对位置
    popupMenu.post(event.x_root, event.y_root)


root = tkinter.Tk()
root.geometry('150x120')

# 建立弹出式菜单对象
popupMenu = tkinter.Menu(root, tearoff=False)
# 弹出菜单内建立两个指令列表
popupMenu.add_command(label='New File', command=lambda: show('New File'))
popupMenu.add_command(label='Flush', command=lambda: show('Flush'))

# 右键绑定弹出菜单方法
root.bind('<Button-3>', showInfo)

label = tkinter.Label(root)
label.pack(padx=5, pady=10)

root.mainloop()
运行结果:
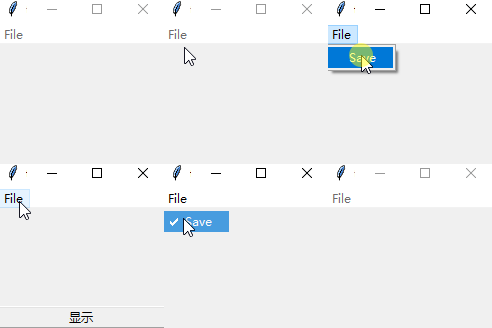
add_checkbutton()
在设计菜单列表时,也可以将命令用复选框(checkbutton)方式表示。也称为Cheak menu button
例子:
import tkinter


def show():
    if demo.get():
        # 显示
        label.pack(side=tkinter.BOTTOM, fill=tkinter.X)
    else:
        # 隐藏
        label.pack_forget()


root = tkinter.Tk()
root.geometry('150x120')

menu = tkinter.Menu(root)
fileMenu = tkinter.Menu(menu, tearoff=False)
menu.add_cascade(label='File', menu=fileMenu)

# 创建复选框按钮
demo = tkinter.BooleanVar()
demo.set(False)
fileMenu.add_checkbutton(label='Save', command=show, variable=demo)

# 创建是否显示的状态栏
demoLabel = tkinter.StringVar()
demoLabel.set('显示')
label = tkinter.Label(root, textvariable=demoLabel, relief='raised')

# 显示菜单对象
root.config(menu=menu)
root.mainloop()
运行结果:
谢谢观看,笔者会持续更新,如有错误或者建议,请私信我


