一、前言
其实我这个写法每个UI库都通用 , 不局限于ElementUI , 看明白思路就知道怎么写了
一键换肤 , 动态替换全局主题颜色功能已经实现很久了 , 在项目验收的时候出现了一个小问题 , 想改动一下 , 于是来记录一下
前段时间公司项目里需要实现一键换服 , 换主题颜色 , 网上看了一部分 大多数都是用js获取标签元素添加Attribute , 如document.XXXXXXX ,或者是建theme.css文件什么的 , 不太符合我想要实现的用最少的代码实现换肤的功能 , 如果用了框架 , 还要用一大堆代码实现一个不复杂的功能的话 , 我觉得他是在凑code量, 凑代码绩效 , 冗余且不易理解
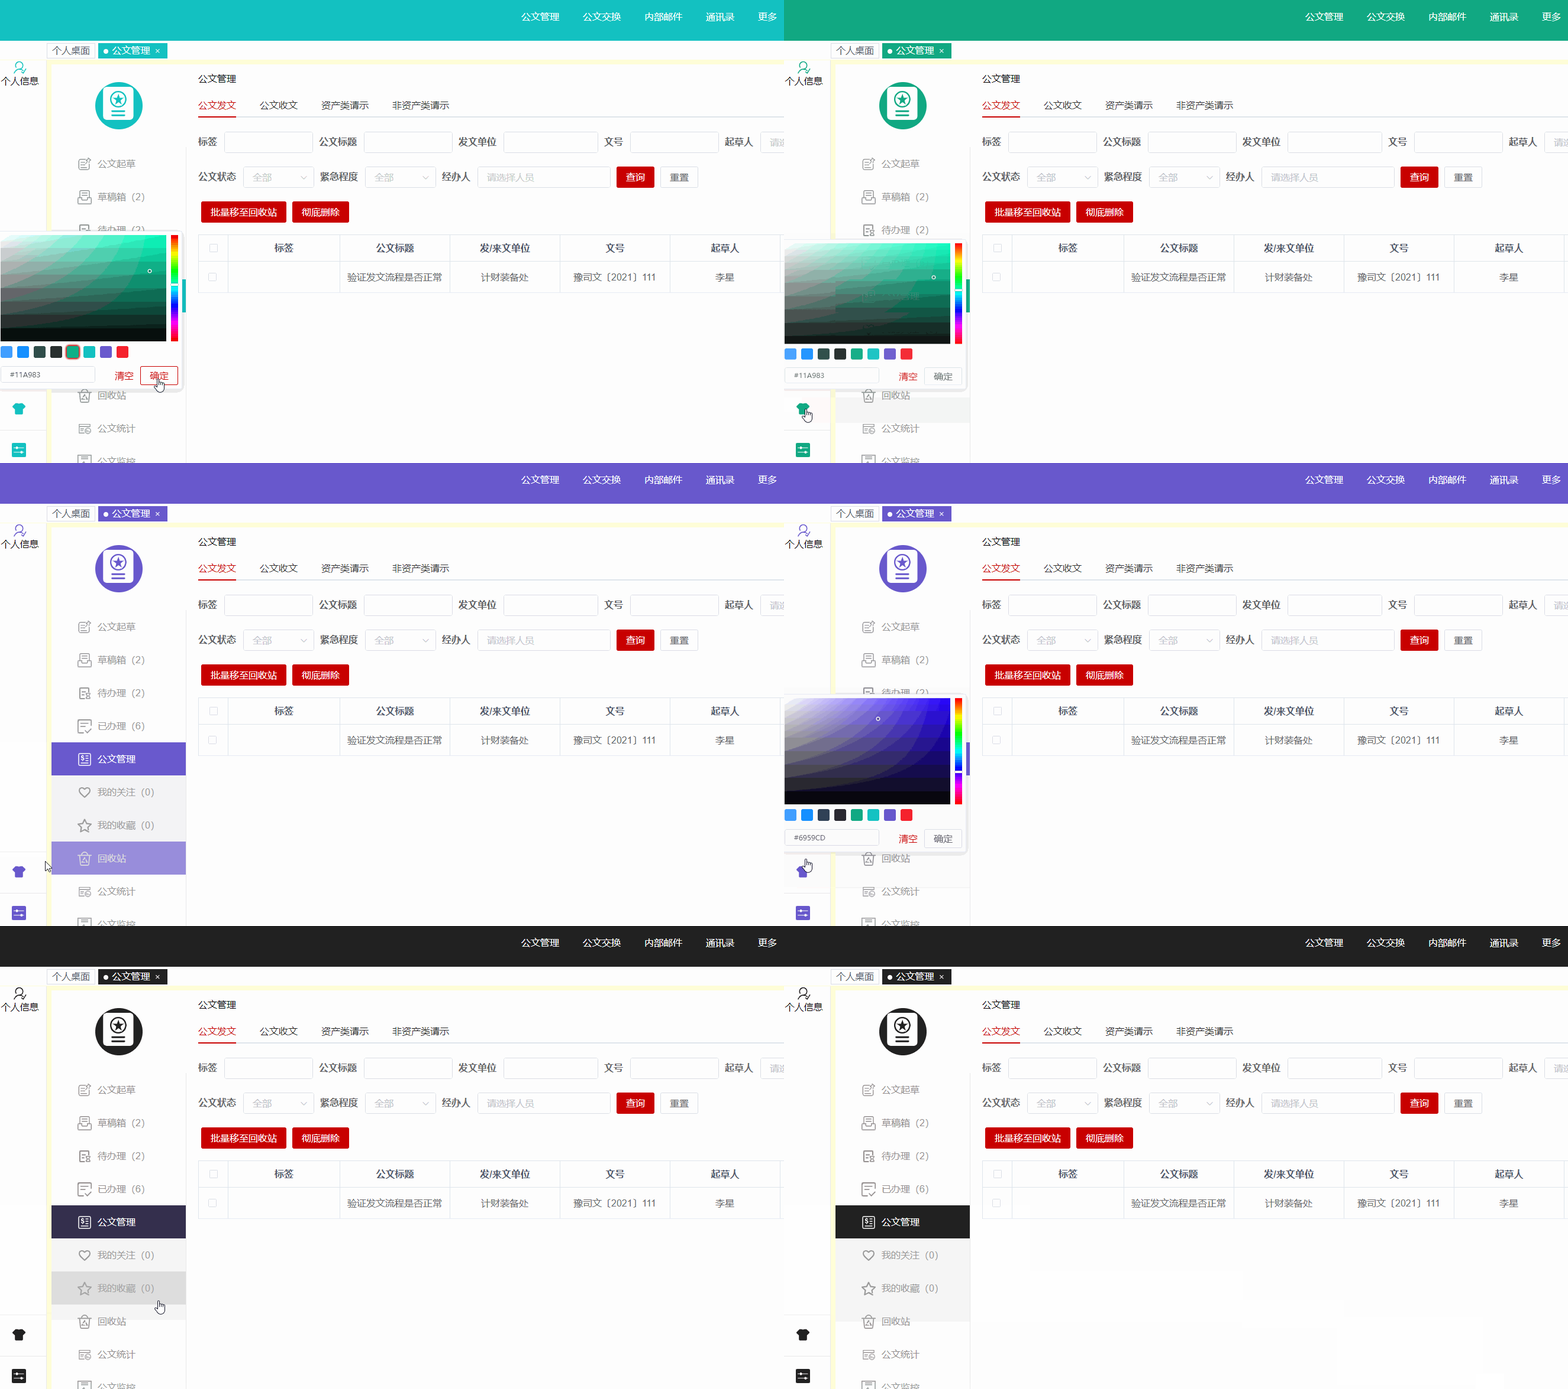
二、效果图
老规矩 , 观众老爷们先看效果图

三、实现思路
前言已经讲了那么多废话 , 这段来捋一下实现的思路 , UI库用的是ElementUi , 要实现一键换肤 , 唯一的一个变量是色值 ,
用 一个变量 来控制颜色 , 首选scss , 想要全局可控一个变量的话 , 肯定是vue里面的vuex状态管理 , 思路到这就够了 , 还想其他什么呢
四、贴上代码
1. 第一步封装一个theme-picker颜色选择器组件 , 是子组件
子组件第一种 ( 不包括element里面的组件色值,比如按钮颜色,单选选中颜色 ,下拉级联等等等等 )
<template>
  <el-color-picker
    v-model="themeColor"
    :predefine="['#409EFF', '#1890ff', '#304156','#212121','#11a983', '#13c2c2', '#6959CD', '#f5222d', ]"
    class="theme-picker"
    popper-class="theme-picker-dropdown"
  />
</template>


<script>

export default {
  name: "ThemePicker",
  data() {
    return {
      chalk: "", // content of theme-chalk css
      themeColor: variables.mainTone
    };
  },
  mounted() {
  	// 也可以从localStorage里拿值, 看个人需求
    this.themeColor = this.defaultTheme;
  },
  computed: {
  	// 计算store里面的theme值
    defaultTheme() {
      return this.$store.state.settings.theme;
    }
  },
  watch: {
    async themeColor(newVal, oldVal) {

      if (typeof newVal !== "string") return;

        this.$emit("change", newVal); //将更换的颜色存入store
    }
  },
  methods: {
  }
};
</script>

<style>
.theme-message,
.theme-picker-dropdown {
  z-index: 99999 !important;
}

.theme-picker .el-color-picker__trigger {
  height: 26px !important;
  width: 26px !important;
  padding: 2px;
}

.theme-picker-dropdown .el-color-dropdown__link-btn {
  display: none;
}
</style>
子组件第二种 ( 包括element里面的组件色值,比如按钮颜色,单选选中颜色 ,下拉级联等等等等 ,但是有局限性 , 具体局限看代码注解 )
<template>
  <el-color-picker
    v-model="theme"
    :predefine="['#409EFF', '#1890ff', '#304156','#212121','#11a983', '#13c2c2', '#6959CD', '#f5222d', ]"
    class="theme-picker"
    popper-class="theme-picker-dropdown"
  />
</template>

<script>
const version = require('element-ui/package.json').version //获取版本号 element-ui version from node_modules
const ORIGINAL_THEME = '#409EFF' // default color
export default {
  data() {
    return {
      chalk: '', // content of theme-chalk css
      theme: ''
    }
  },
  computed: {
    defaultTheme() {
      return this.$store.state.settings.theme
    }
  },
  watch: {
    defaultTheme: {
      handler: function(val, oldVal) {
        this.theme = val
      },
      immediate: true
    },
    async theme(val) {
      const oldVal = this.chalk ? this.theme : ORIGINAL_THEME
      if (typeof val !== 'string') return
      const themeCluster = this.getThemeCluster(val.replace('#', ''))
      const originalCluster = this.getThemeCluster(oldVal.replace('#', ''))
      //	换肤中loading开启
      // const $message = this.$message({
      //   message: '  主题皮肤更换中 , 请稍后...',
      //   customClass: 'theme-message',
      //   type: 'success',
      //   duration: 0,
      //   iconClass: 'el-icon-loading'
      // })
      const getHandler = (variable, id) => {
        return () => {
          const originalCluster = this.getThemeCluster(ORIGINAL_THEME.replace('#', ''))
          const newStyle = this.updateStyle(this[variable], originalCluster, themeCluster)

          let styleTag = document.getElementById(id)
          if (!styleTag) {
            styleTag = document.createElement('style')
            styleTag.setAttribute('id', id)
            document.head.appendChild(styleTag)
          }
          styleTag.innerText = newStyle
        }
      }

      if (!this.chalk) {
      // 此处重点!!!!
      // 本地css文件不用调用this.getCSSString()方法去下载文件 , 但是,element按钮下拉等等会不随着换色更改色值(此处不建议内网项目使用)
      // const url ="../../assets/styles/theme-chalk/index.css" //本地css文件
      // https下载线上文件, element按钮下拉等等会随着换色而改变色值(外网项目可用)
        const url = `https://unpkg.com/element-ui@${version}/lib/theme-chalk/index.css` //element线上css文件
        await this.getCSSString(url, 'chalk')
      }

      const chalkHandler = getHandler('chalk', 'chalk-style')

      chalkHandler()

      const styles = [].slice.call(document.querySelectorAll('style'))
        .filter(style => {
          const text = style.innerText
          return new RegExp(oldVal, 'i').test(text) && !/Chalk Variables/.test(text)
        })
      styles.forEach(style => {
        const { innerText } = style
        if (typeof innerText !== 'string') return
        style.innerText = this.updateStyle(innerText, originalCluster, themeCluster)
      })
      // 告知父组件选了什么颜色
        this.$emit('change', val);
      // $message.close() //换肤中loading关闭
    }
  },

  methods: {
    updateStyle(style, oldCluster, newCluster) {
      let newStyle = style
      oldCluster.forEach((color, index) => {
        newStyle = newStyle.replace(new RegExp(color, 'ig'), newCluster[index])
      })
      return newStyle
    },
	//下载动态版本号样式css
    getCSSString(url, variable) {
      return new Promise(resolve => {
        const xhr = new XMLHttpRequest()
        xhr.onreadystatechange = () => {
          if (xhr.readyState === 4 && xhr.status === 200) {
          //剔除element样式里指定的字体样式
            this[variable] = xhr.responseText.replace(/@font-face{[^}]+}/, '')
            resolve()
          }
        }
        xhr.open('GET', url)
        xhr.send()
      })
    },

    getThemeCluster(theme) {
      const tintColor = (color, tint) => {
        let red = parseInt(color.slice(0, 2), 16)
        let green = parseInt(color.slice(2, 4), 16)
        let blue = parseInt(color.slice(4, 6), 16)

        if (tint === 0) { // when primary color is in its rgb space
          return [red, green, blue].join(',')
        } else {
          red += Math.round(tint * (255 - red))
          green += Math.round(tint * (255 - green))
          blue += Math.round(tint * (255 - blue))

          red = red.toString(16)
          green = green.toString(16)
          blue = blue.toString(16)

          return `#${red}${green}${blue}`
        }
      }

      const shadeColor = (color, shade) => {
        let red = parseInt(color.slice(0, 2), 16)
        let green = parseInt(color.slice(2, 4), 16)
        let blue = parseInt(color.slice(4, 6), 16)

        red = Math.round((1 - shade) * red)
        green = Math.round((1 - shade) * green)
        blue = Math.round((1 - shade) * blue)

        red = red.toString(16)
        green = green.toString(16)
        blue = blue.toString(16)

        return `#${red}${green}${blue}`
      }

      const clusters = [theme]
      for (let i = 0; i <= 9; i++) {
        clusters.push(tintColor(theme, Number((i / 10).toFixed(2))))
      }
      clusters.push(shadeColor(theme, 0.1))
      return clusters
    }
  }
}
</script>

<style>
.theme-message,
.theme-picker-dropdown {
  z-index: 99999 !important;
}

.theme-picker .el-color-picker__trigger {
  height: 26px !important;
  width: 26px !important;
  padding: 2px;
}

.theme-picker-dropdown .el-color-dropdown__link-btn {
  display: none;
}
</style>
2. 第二步父组件调用颜色选择器组件
父组件 ( 接收传递过来的色值 , 可请求接口向后台传递数据存储 , 以达到每个用户的皮肤可记忆 ,或存储到localStorage里方便调用 , 看个人项目需求情况 )
// 调用
<theme-picker ref="ThemePicker" @change="themeChange" class="themeChange"/>
// 按需引入
import ThemePicker from "@/components/ThemePicker";// 声明
components: { ThemePicker },// 选中的值储存
themeChange(val) {
console.log('val',val);
// 可选 ,可调取接口向后台存储数据
updatehandUser().then(res => {
if (res.code == "200") {
// 重点:vuex store存储色值
this.$store.dispatch("settings/changeSetting", {
key: "theme",
value: val
});
}
});
},3. 第三步store储存色值
需要解释目录文件所在 就截图了哈

此处是项目需要读取后台接口返回数据里存储的个人换肤颜色色值 , 所以选择再验证是否有token后调用userInfo接口来直接更换主题颜色


5. 第五步layout父组件动态挂载


上面图中标签上绑定的 :style=“styleObject”**
styleObject是当前页面computed里计算的函数
返回的是store里面的theme值注: 父组件上挂载的:style=“styleObject” ,子组件里可直接使用background-color: var(–mainTone); 如果嵌套太深 , 子组件里面使用不了这个var(–mainTone)变量 , 那么就标签上再挂载一次styleObject ,以及computed
variables.scss文件存储scss样式变量 , 定值,一般为项目的默认主题颜色
声明$mainTone
export暴露出去变量

@import “~@/assets/styles/variables.scss”;
当前.vue文件引入后可直接使用定义好的Scss变量
比如下图
<style lang="scss" scoped>
  @import "~@/assets/styles/variables.scss";
  .fixed-header {
    color: $mainTone;
  }
</style>
五、总结
到这说明已经结束了 , 言语措辞不当 , 词不达意或者描述的不够清楚还希望见谅 , 组织语言水平不太行
目前唯一感到遗憾的就是没解决掉文中注解标注的内网环境下如何改变element默认的组件的色值 , 如有同学有好的思路 , 希望不吝赐教 , 不胜感激 !!
哦对了 , 细心的同学能够发现截图中有个值 –gloabalFont 小声的说一下是一键更改字体大小 ,与一键更换主题颜色同理哈

到此为此 , 还希望看官老爷来个一键三连 , 关注 + 评论 + 收藏 支持一下 !


