一、概述
EventBus是一款针对Android优化的发布/订阅事件总线。主要功能是替代Intent,Handler,BroadCast在Fragment,Activity,Service,线程之间传递消息.优点是开销小,代码更优雅。以及将发送者和接收者解耦。
1、下载EventBus的类库
源码:https://github.com/greenrobot/EventBus
2、基本使用
(1)自定义一个类,可以是空类,比如:
[java] view plain copy
- public class
- public
- }
(2)在要接收消息的页面注册:
[java] view plain copy
- eventBus.register(this);
(3)发送消息
[java] view plain copy
- eventBus.post(new
(4)接受消息的页面实现(共有四个函数,各功能不同,这是其中之一,可以选择性的实现,这里先实现一个):
[java] view plain copy
- public void
(5)解除注册
[java] view plain copy
- eventBus.unregister(this);
顺序就是这么个顺序,可真正让自己写,估计还是云里雾里的,下面举个例子来说明下。
首先,在EventBus中,获取实例的方法一般是采用EventBus.getInstance()来获取默认的EventBus实例,当然你也可以new一个又一个,个人感觉还是用默认的比较好,以防出错。
二、实战
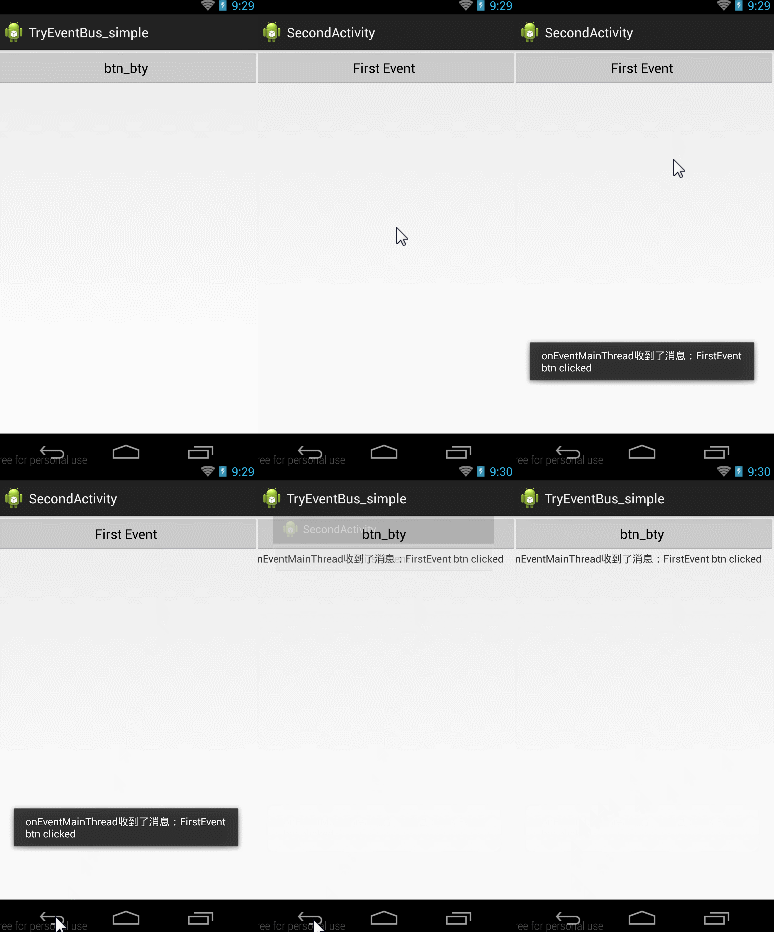
先给大家看个例子:
当击btn_try按钮的时候,跳到第二个Activity,当点击第二个activity上面的First Event按钮的时候向第一个Activity发送消息,当第一个Activity收到消息后,一方面将消息Toast显示,一方面放入textView中显示。

按照下面的步骤,下面来建这个工程:
1、基本框架搭建
想必大家从一个Activity跳转到第二个Activity的程序应该都会写,这里先稍稍把两个Activity跳转的代码建起来。后面再添加EventBus相关的玩意。
MainActivity布局(activity_main.xml)
[html] view plain copy
1. <LinearLayout xmlns:android="http://schemas.android.com/apk/res/android"
2. xmlns:tools="http://schemas.android.com/tools"
3. android:layout_width="match_parent"
4. android:layout_height="match_parent"
5. android:orientation="vertical">
6.
7. <Button
8. android:id="@+id/btn_try"
9. android:layout_width="match_parent"
10. android:layout_height="wrap_content"
11. android:text="btn_bty"/>
12. <TextView
13. android:id="@+id/tv"
14. android:layout_width="wrap_content"
15. android:layout_height="match_parent"/>
16.
17. </LinearLayout>
新建一个Activity,SecondActivity布局(activity_second.xml)
[html] view plain copy
1. <LinearLayout xmlns:android="http://schemas.android.com/apk/res/android"
2. xmlns:tools="http://schemas.android.com/tools"
3. android:layout_width="match_parent"
4. android:layout_height="match_parent"
5. android:orientation="vertical"
6. tools:context="com.harvic.try_eventbus_1.SecondActivity" >
7.
8. <Button
9. android:id="@+id/btn_first_event"
10. android:layout_width="match_parent"
11. android:layout_height="wrap_content"
12. android:text="First Event"/>
13.
14. </LinearLayout>
MainActivity.java (点击btn跳转到第二个Activity)
[java] view plain copy
1. public class MainActivity extends
2.
3.     Button btn;
4.
5. @Override
6. protected void
7. super.onCreate(savedInstanceState);
8.         setContentView(R.layout.activity_main);
9.
10.         btn = (Button) findViewById(R.id.btn_try);
11.
12. new
13.
14. @Override
15. public void
16. // TODO Auto-generated method stub
17. new
18. class);
19.                 startActivity(intent);
20.             }
21.         });
22.     }
23.
24. }
到这,基本框架就搭完了,下面开始按步骤使用EventBus了。
2、新建一个类FirstEvent
[java] view plain copy
1. package
2.
3. public class
4.
5. private
6. public
7. // TODO Auto-generated constructor stub
8.         mMsg = msg;
9.     }
10. public
11. return
12.     }
13. }
这个类很简单,构造时传进去一个字符串,然后可以通过getMsg()获取出来。
3、在要接收消息的页面注册EventBus:
在上面的GIF图片的演示中,大家也可以看到,我们是要在MainActivity中接收发过来的消息的,所以我们在MainActivity中注册消息。
通过我们会在OnCreate()函数中注册EventBus,在OnDestroy()函数中反注册。所以整体的注册与反注册的代码如下:
[java] view plain copy
1. package
2.
3. import
4.
5. import
6. import
7. import
8. import
9. import
10. import
11. import
12. import
13. import
14.
15. public class MainActivity extends
16.
17.     Button btn;
18.     TextView tv;
19.
20. @Override
21. protected void
22. super.onCreate(savedInstanceState);
23.         setContentView(R.layout.activity_main);
24. //注册EventBus
25. this);
26.
27.         btn = (Button) findViewById(R.id.btn_try);
28.         tv = (TextView)findViewById(R.id.tv);
29.
30. new
31.
32. @Override
33. public void
34. // TODO Auto-generated method stub
35. new
36. class);
37.                 startActivity(intent);
38.             }
39.         });
40.     }
41. @Override
42. protected void
43. super.onDestroy();
44. this);//反注册EventBus
45.     }
46. }
4、发送消息
发送消息是使用EventBus中的Post方法来实现发送的,发送过去的是我们新建的类的实例!
[java] view plain copy
1. EventBus.getDefault().post(new FirstEvent("FirstEvent btn clicked"));
完整的SecondActivity.java的代码如下:
[java] view plain copy
1. package
2.
3. import
4.
5. import
6. import
7. import
8. import
9. import
10.
11. public class SecondActivity extends
12. private
13.
14. @Override
15. protected void
16. super.onCreate(savedInstanceState);
17.         setContentView(R.layout.activity_second);
18.         btn_FirstEvent = (Button) findViewById(R.id.btn_first_event);
19.
20. new
21.
22. @Override
23. public void
24. // TODO Auto-generated method stub
25.                 EventBus.getDefault().post(
26. new FirstEvent("FirstEvent btn clicked"));
27.             }
28.         });
29.     }
30. }
5、接收消息
接收消息时,我们使用EventBus中最常用的onEventMainThread()函数来接收消息,具体为什么用这个,我们下篇再讲,这里先给大家一个初步认识,要先能把EventBus用起来先。
在MainActivity中重写onEventMainThread(FirstEvent event),参数就是我们自己定义的类:
在收到Event实例后,我们将其中携带的消息取出,一方面Toast出去,一方面传到TextView中;
[java] view plain copy
1. public void
2.
3. "onEventMainThread收到了消息:"
4. "harvic", msg);
5.     tv.setText(msg);
6. this, msg, Toast.LENGTH_LONG).show();
7. }
完整的MainActiviy代码如下:
[java] view plain copy
1. package
2.
3. import
4.
5. import
6. import
7. import
8. import
9. import
10. import
11. import
12. import
13. import
14.
15. public class MainActivity extends
16.
17.     Button btn;
18.     TextView tv;
19.
20. @Override
21. protected void
22. super.onCreate(savedInstanceState);
23.         setContentView(R.layout.activity_main);
24.
25. this);
26.
27.         btn = (Button) findViewById(R.id.btn_try);
28.         tv = (TextView)findViewById(R.id.tv);
29.
30. new
31.
32. @Override
33. public void
34. // TODO Auto-generated method stub
35. new
36. class);
37.                 startActivity(intent);
38.             }
39.         });
40.     }
41.
42. public void
43.
44. "onEventMainThread收到了消息:"
45. "harvic", msg);
46.         tv.setText(msg);
47. this, msg, Toast.LENGTH_LONG).show();
48.     }
49.
50. @Override
51. protected void
52. super.onDestroy();
53. this);
54.     }
55. }
好了,到这,基本上算初步把EventBus用起来了,下篇再讲讲EventBus的几个函数,及各个函数间是如何识别当前如何调用哪个函数的。


