前言
说到自定义控件,随便百度一下,都是继承View或者ViewGroup,然后重写onMeasure,onLayout,onDraw,其实实战开发中有更简单快捷的方法,那就是直接继承XXXLayout,然后导入xml布局,下面我将用一个实例来讲解。
这一节会讲到知识点有:
1.如何快速、简单自定义控件(完全不需要重写onDraw,onMeasure,onLayout哦!)
项目目标
现在要求实现一种自定义键盘,效果如图:

这个键盘一般用于用遥控器控制的键盘,可以看到这个键盘比较特殊的地方就是展开后是一个圆盘状的小键盘,首先我们就对这个圆盘小键盘先进行自定义。
自定义圆盘按键
自定义布局
根据圆盘的布局,我准备采用LinearLayout,分三行,中间一行又是三列,除了最中间的是Button,其他都是TextView。(布局文件又臭又长,我就只讲思路,不贴代码了。)布局文件取名为custom_keyboard_item_circle.xml
然后新建一个类,取名为CustomCircleKeyboardItem.java,继承LinearLayout,重写它的构造方法,其实就是在原来的构造方法之后加上我们的自定义功能:
public CustomCircleKeyboardItem(final Context context, final AttributeSet attrs, final int defStyle) {
        super(context, attrs, defStyle);
        load();
    }

    public CustomCircleKeyboardItem(final Context context, final AttributeSet attrs) {
        super(context, attrs);
        load();
    }

    public CustomCircleKeyboardItem(final Context context) {
        super(context);
        load();
    }
可以看到我只是在每个构造方法后都加了一个方法load()。下面看load里面:
private void load() {
        if (isInEditMode()) {
            return;
        }
        inflateLayout();
        initUI();
        initData();
    }
load里面很简单,三个方法,第一个是引入本类对应的布局,这样可以少写很多代码,不用用代码去写添加各种view;第二个方法是初始化UI,在这里得到想要控制的UI及设置一些初始状态;第三个方法是初始化一些初始数据。(这样的分类完全是个人习惯,可以不用照搬。)
现在,我们只要实现第一个方法就可以,把刚刚写好的布局文件加进来:
/**
     * @Description inflate the main layout
     */
    private void inflateLayout() {
        try {
            LayoutInflater.from(getContext()).inflate(R.layout.keyboard_item_circle, this, true);
        } catch (Exception e) {
            e.printStackTrace();
        }
    }
然后我们在main.xml直接用完整文件名引入新建的控件名即可
<RelativeLayout xmlns:android="http://schemas.android.com/apk/res/android"
    xmlns:tools="http://schemas.android.com/tools"
    android:layout_width="match_parent"
    android:layout_height="match_parent"
    android:columnCount="3"
    tools:context=".MainActivity"
    android:id="@+id/contentView" >

    <com.azz.customkeyboard.viewmodel.CustomCircleKeyboardItem
            android:id="@+id/custom_circle_keyboard_item"
            android:layout_width="wrap_content"
            android:layout_height="wrap_content"/>

</RelativeLayout>
运行。可以看到运行后已经有了效果图般的圆盘按键。

恭喜你!看到这里,你已经学会了如何快速自定义控件了!
设置数据
下面我们来更完善一点这个圆盘按键,首先,根据效果图知道它是用来显示多个数据的,并且目的是为了更快捷地选中。
那么我们首先给他加入设置数据的方法:
/**
     * @Description 设置数据
     * @param data 自定义键盘item实体类
     */
    public void setData(final CustomKeyboardItemEntity data) {
        mData = data; //把数据存起来
        leftTextView.setText(data.getLeftText());
        topTextView.setText(data.getTopText());
        rightTextView.setText(data.getRightText());
        bottomTextView.setText(data.getBottomText());
        centerButton.setText(data.getCenterText());
    }
上面的textview和button就是在initUI()里获取到的:
/**
     * @Description initialize the ui
     */
    private void initUI() {
        topTextView = (TextView) findViewById(R.id.topTextView);
        bottomTextView = (TextView) findViewById(R.id.bottomTextView);
        leftTextView = (TextView) findViewById(R.id.leftTextView);
        rightTextView = (TextView) findViewById(R.id.rightTextView);
        centerButton = (Button) findViewById(R.id.centerButton);
    }
定义的名称应该还是很清晰明了的。而CustomKeyboardItemEntity 是我封装一个装数据的模型,里面分别存储了各个位置所存放的数据:
public final class CustomKeyboardItemEntity {
    /**
     * @Field topText : 上
     */
    private String mTopText;
    /**
     * @Field bottomText : 下
     */
    private String mBottomText;
    /**
     * @Field leftText : 左
     */
    private String mLeftText;
    /**
     * @Field rightText : 右
     */
    private String mRightText;
    /**
     * @Field @centerText : 中
     */
    private String mCenterText;
        /**
     * @Description initialize the entity
     */
    public CustomKeyboardItemEntity(
            final String center, final String left,
            final String top, final String right, final String bottom) {
        mCenterText = center;
        mLeftText = left;
        mTopText = top;
        mRightText = right;
        mBottomText = bottom;
    }
}
注:这里的数据类型我用了String,其实看效果图好像用char就足够了。
这些代码都很简单,稍微有点封装思想 都知道,后面这种又臭又长的代码我就不贴了哈!~
在MainActivity随便写几行代码加入假数据:
protected void onCreate(Bundle savedInstanceState) {
        super.onCreate(savedInstanceState);
        setContentView(R.layout.activity_main);
        customcircleKeyBoardItemView = (CustomCircleKeyboardItem) findViewById(R.id.custom_circle_keyboard_item);
        CustomKeyboardItemEntity data = new CustomKeyboardItemEntity("W", "X", "Y", "Z", "9");
        customcircleKeyBoardItemView.setData(data);
    }
最后运行,得到我们想要的。

设置选中
因为这个项目是在机顶盒上运行的,为了方便遥控器选中,接下来就是给它加入选中事件。
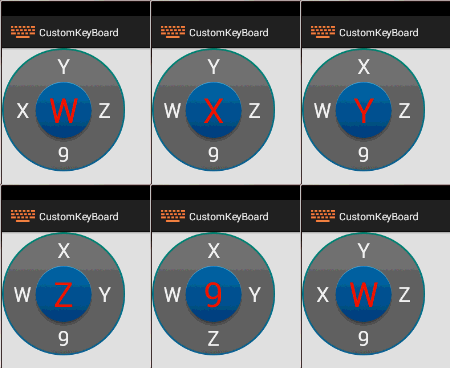
分析:焦点很明显默认是在W处,遥控器操作无非是按上下左右,当按左时,有两种方案:1.可以让X和W换位置,即X出现在最中心;2.让焦点打在左边的X,X变成焦点色(红色)。
而我觉得第一种方案更好一点,于是接下来实现第一种方案。
思路:按某个方向键让该方向上的数据和中心数据对调,然后刷新界面。(MVC思想:操控数据来改变界面。)但是为了保护好原有数据,我们进行数据备份一次,用备份的数据来改变位置。
在CustomKeyboardItemEntity.java中加入备份方法:
/**
     * @Description 备份
     * @return 相同的数据备份
     */
    public CustomKeyboardItemEntity backup() {
        return new CustomKeyboardItemEntity(mCenterText, mLeftText, mTopText, mRightText, mBottomText);
}在CustomCircleKeyboardItem类中setData的函数里加一句mDataBackup = mData.backup();
以及交换方法,这里以左为例,其他相仿:
/**
     * @Description 和左边交换
     */
    public void left() {
        if (mLeftText == null) {
            return;
        }
        String temp = mLeftText;
        mLeftText = mCenterText;
        mCenterText = temp;
    }
然后在CustomCircleKeyboardItem类中,给centerButton加上onKey事件
private void initData() {
    centerButton.setOnKeyListener(this);
}
再让本类实现接口OnKeyListener,然后实现方法:
@Override
    public boolean onKey(final View v, final int keyCode, final KeyEvent event) {
        if (event.getAction() == KeyEvent.ACTION_UP) {
            switch (keyCode) {
            case KeyEvent.KEYCODE_DPAD_LEFT:
                mDataBackup.left();
                break;
            case KeyEvent.KEYCODE_DPAD_UP:
                mDataBackup.up();
                break;
            case KeyEvent.KEYCODE_DPAD_RIGHT:
                mDataBackup.right();
                break;
            case KeyEvent.KEYCODE_DPAD_DOWN:
                mDataBackup.down();
                break;
            case KeyEvent.KEYCODE_DPAD_CENTER: //复原
                Log.v(TAG, "-----------------center:" + mDataBackup.getCenterText());
                mDataBackup = mData.backup();
                break;
            default:
                break;
            }
            updateDataBackup();
        }
        return false;
    }

    /**
     * @Description 更新数据
     */
    private void updateDataBackup() {
        leftTextView.setText(mDataBackup.getLeftText());
        topTextView.setText(mDataBackup.getTopText());
        rightTextView.setText(mDataBackup.getRightText());
        bottomTextView.setText(mDataBackup.getBottomText());
        centerButton.setText(mDataBackup.getCenterText());
    }
运行。这里我是按左-上-右-下-中(复原)的顺序操作的。

选中时是利用selector改变颜色
下一节我会讲
1.如何自定义数字按键
2.结合数字按键和圆盘按键
3.如何思考设计以及使用回调
Demo地址:https://github.com/Xieyupeng520/CustomKeyboard
如果你有任何问题,请留言告诉我!


