2、表单元素-输入框
输入框使用input标签。
<input>标签,根据type属性的不同,会有不同的表现样式。默认type="text",也就是文本输入框。
2.1、文本输入框
单行的文本区域,(输入中的换行会被自动去除)。
<input type="text"
    name="username"
    maxlength="6"
    readonly="readonly"
    disabled="disabled"
    value="用户名" />
type:type="text" 表示文本输入框
name:输入框的名字
maxlength:文本框能输入的最大字符数。
minlength:文本框能输入的最小字符数。
readonly:文本框只读
disabled:文本框禁用
value:输入框中的默认内容
placeholder:输入框中的提示语
2.2、密码输入框
用于输入密码的控件。
<input type="password" />注意:密码字段字符不会明文显示,而是以星号 * 或圆点 · 替代。
PS:文本输入框的所有属性对密码输入框都有效
2.3、数字输入框
用于输入数字的控件。
<input type="number" name="num" step="2" />
step:默认情况下,向上和向下按钮可以将值增加或减小 1。通过使用step 属性来更改此步长值。
min:最小值
max:最大值注意:min和max只是点击上下按钮不会让你低于 min 或高于 max 的值,但是可以通过手动输入数字。
2.3、单选框
radio 类型元素默认渲染为小型圆圈图表,填充即为激活,也就是我们所说的选中效果。
<input type="radio" name="gender" checked="checked" />男
<input type="radio" name="gender" />女
checked="checked"或者直接写checked,可以设置默认选中的项。单选效果:当有多个单选框是如何设置只能有一个被选中?默认的情况下,单选框是独立存在的,如果要实现单选切换效果,需要
将 name 的值设置相同,才能实现单选效果。
20181009
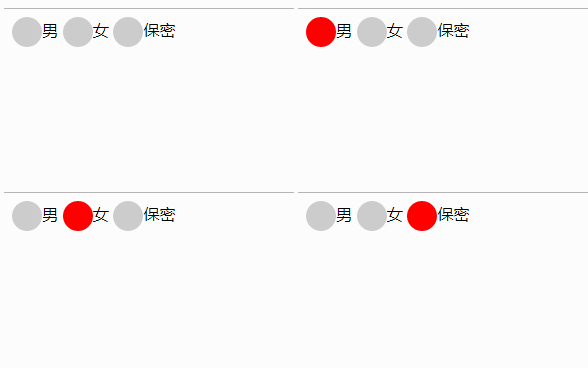
设置单选框的样式:
由于单选框的样式是只能设置大小,不能设置颜色,更不能设置样式。所以,一般我们自定义单选框的样式。
实现原理:
在单选框的后面加上label标签(需要设置为inline-block或者block),在点击单选框的时候,使用 + 选择器选中label标签,设置label标签的宽高和颜色代替单选框,将单选框display:none;
代码:
<!DOCTYPE html>


<head>
    <meta charset="UTF-8">
    <title>Document</title>
    <style>
        input {
            display: none;
        }
        label {
            display: inline-block;
            width: 30px;
            height: 30px;
            background-color: #ccc;
            border-radius: 50%;
            vertical-align: middle;
        }
        input:checked + label {
            background-color: red;
        }
    </style>
</head>


<body>
    <input type="radio" name="sex" id="a"><label for="a" />男
    <input type="radio" name="sex" id="b"><label for="b" />女
    <input type="radio" name="sex" id="c"><label for="c" />保密
</body>


</html>
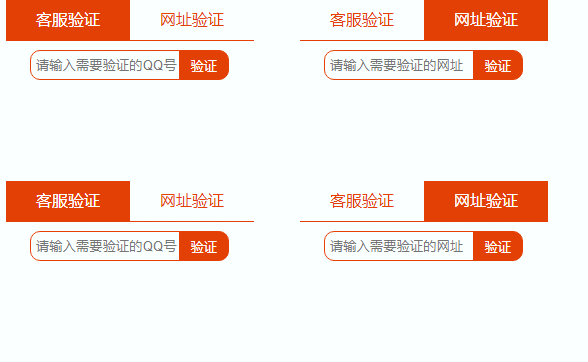
另外,我们还可以实现选项卡效果,代码如下:
<!DOCTYPE html>


<head>
    <meta charset="UTF-8">
    <title>Document</title>
    <style>
        * {
            padding: 0;
            margin: 0;
        }
        ul {
            position: relative;
        }
        li {
            list-style: none;
            float: left;
        }
        input {
            outline: none;
        }
        input[type="radio"] {
            display: none;
        }
        label {
            display: block;
            text-align: center;
            line-height: 42px;
            width: 124px;
            height: 42px;
            color: rgb(227,64,5);
            border-bottom: 1px solid rgb(227,64,5);
            cursor: pointer;
        }
        input:checked + label {
            background-color: rgb(227,64,5);
            color: #fff;
        }
        li .dv1,
        li .dv2 {
            width: 248px;
            height: 50px;
            /* background-color: #ddd; */
            position: absolute;
            display: none;
        }


        .dv1 {
            position: relative;
            left: 0;
            top: 42px;
        }
        .dv2 {
            left: 0;
            top: 42px;
        }


        input:checked + label + div {
            display: block;
        }


        .txt1 {
            position: absolute;
            width: 200px;
            height: 30px;
            left: 50%;
            top: 50%;
            margin-left: -100px;
            margin-top: -15px;
        }
        .txt1 input[type="text"] {
            width: 150px;
            height: 30px;
            vertical-align: top;
            float: left;
            box-sizing: border-box;
            border: 1px solid rgb(227,64,5);
            border-radius: 10px 0 0 10px;
            padding-left: 5px;
        }
        .txt1 input[type="submit"] {
            width: 50px;
            height: 30px;
            float: left;
            border: 1px solid rgb(227,64,5);
            border-radius: 0 10px 10px 0;
            margin-left: -1px;
            background-color: rgb(227,64,5);
            color: white;
        }
        .txt2 {
            position: absolute;
            width: 200px;
            height: 30px;
            left: 50%;
            top: 50%;
            margin-left: -100px;
            margin-top: -15px;
        }
        .txt2 input[type="text"] {
            width: 150px;
            height: 30px;
            vertical-align: top;
            float: left;
            box-sizing: border-box;
            border: 1px solid rgb(227,64,5);
            border-radius: 10px 0 0 10px;
            padding-left: 5px;
        }
        .txt2 input[type="submit"] {
            width: 50px;
            height: 30px;
            float: left;
            border: 1px solid rgb(227,64,5);
            border-radius: 0 10px 10px 0;
            margin-left: -1px;
            background-color: rgb(227,64,5);
            color: white;
        }
    </style>
</head>


<body>
    <div class="box">
        <form action="">


            <ul class="uu">
                <li>
                    <input type="radio" name="yz" id="a" checked>
                    <label for="a">客服验证</label>
                    <div class="dv1">
                        <div class="txt1">
                            <input type="text" placeholder="请输入需要验证的QQ号">
                            <input type="submit" value="验证">
                        </div>
                    </div>
                </li>
                <li>
                    <input type="radio" name="yz" id="b">
                    <label for="b">网址验证</label>
                    <div class="dv2">
                        <div class="txt2">
                            <input type="text" placeholder="请输入需要验证的网址">
                            <input type="submit" value="验证">
                        </div>
                    </div>
                </li>
            </ul>
        </form>
    </div>


</body>


</html>
效果:

2.4、多选框
复选框可以选取一个或多个选项:
第一个多选框:<input type="checkbox" checked="checked" value="one" />
第二个多选框:<input type="checkbox" checked />
value:复选框选中时的值。如果省略,则默认为"on"。
注意:所有的 <input> 元素都有 value 属性;但是,它对 checkbox 类型的输入有特殊作用:当表单被提交时,只有当前被选中的复选框会被提交给服务器,值就是 value 属性的值。如果没有指定 value,默认为字符串 on。
2.5、文本上传控件
文本上传控件允许用户可以从他们的设备中选择一个或多个文件。选择后,这些文件可以使用提交表单的方式上传到服务器上。
<input type="file" />
accept:表示允许的文件类型(accept="image/*,.pdf" 表示任何图片文件或者pdf文件。
multiple:如果出现,则表示用户可以选择多个文件
20181009 修改文本上传控件的样式:
实现原理:
由于上传控件的大小和颜色等是无法直接修改的,若想要修改的话,可以另外添加一个div,将div的大小设置和file控件的大小一致,将div定位,之后file文件也进行定位,覆盖到div之上(可以设置z-index),然后设置file控件的opacity为0即可。
示例:
<!DOCTYPE html>


<head>
    <meta charset="UTF-8">
    <title>Document</title>
    <style>
        input {
            width: 180px;
            height: 60px;
            background-color: pink;
            position: absolute;
            left: 0;
            top: 0;
            z-index: 1;
            opacity: 0;
        }
        div {
            width: 180px;
            height: 60px;
            background-color: #37f;
            color: white;
            text-align: center;
            line-height: 60px;
            position: absolute;
            left: 0;
            top: 0;
        }
    </style>
</head>


<body>
    <input type="file" />
    <div>点击上传</div>
</body>


</html>
2.6、文件提交按钮
文件提交按钮,可以实现信息提交功能。
当用户单击确认按钮时,表单的内容会被传送到服务器。表单form的属性 action 定义了服务端的文件名。
<form name="input" action="html_form_action.php" method="get">
    用户名: <input type="text" name="user">
    <input type="submit" value="Submit">
</form>
比如在上面的文本框内键入几个字母,然后点击确认按钮,那么输入数据会传送到 html_form_action.php 文件。
2.7、按钮
用来创建一个没有默认值的可点击按钮。已经在 HTML5 被 <button>元素取代。
<input type="button" value="input按钮">


<!--HTML5方式-->
<button>button按钮</button>
区别:
<button>在form里面,默认可以进行提交操作,除非设置type=button;而input按钮需要配合JS进行提交。
2.8、重置按钮
此按钮点击后,会将表单的所有内容重置为输入前的初始值(一般为空值)。不推荐使用。
<input type="reset">


