写在前面
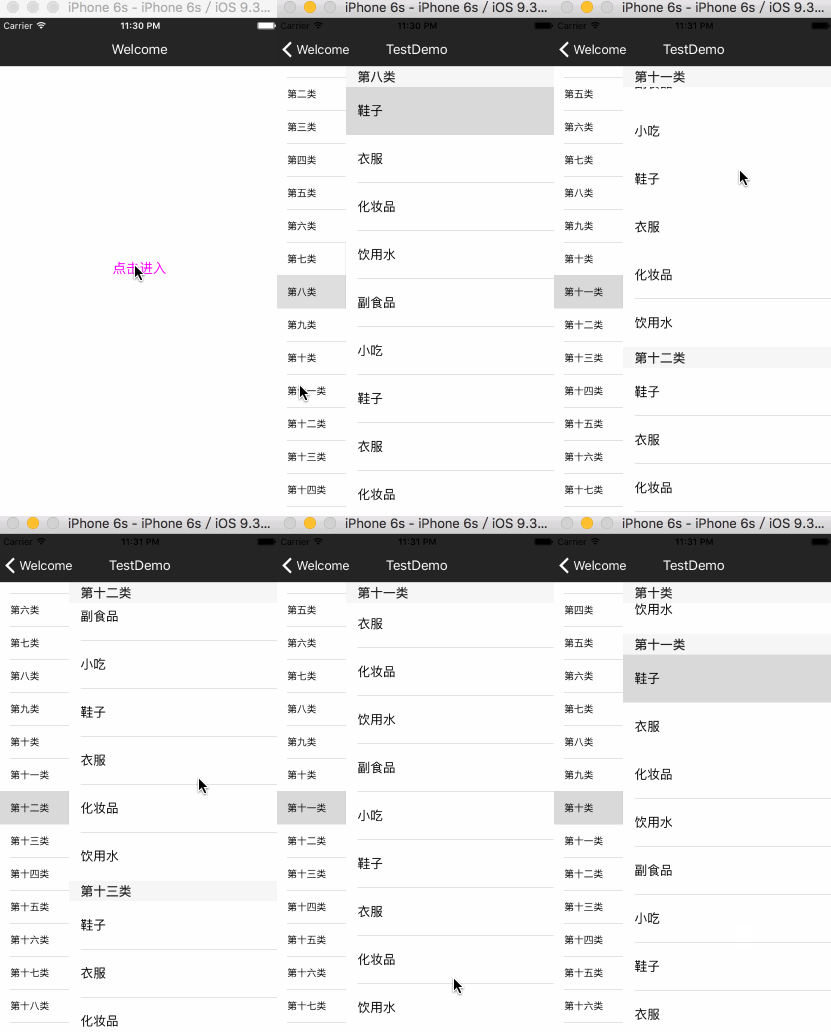
首先声明哈,不是广告,我就是用的时候觉得这个功能比较好玩,就想着实现了一下。效果如图:

PageBlurTestGif.gif
接下来简单的说一下思路吧~
大体思路
可能我们看到这种功能的实现的时候,首先想着的是我在这个控制器中左右各放一个tableView,然后进行关联。我是用了另一个思路,具体如下:
我建了两个类LGJCategoryVC用来盛放左边写着第几类的tableView和LGJProductsVC用来盛放右边写在各种产品的tableView。然后将LGJProductsVC作为LGJCategoryVC的childViewController,将LGJProductsVC的viewaddSubView到LGJCategoryVC的view上。
代码实现如下:
- (void)createProductsVC {

    _productsVC = [[LGJProductsVC alloc] init];
    _productsVC.delegate = self;
    [self addChildViewController:_productsVC];
    [self.view addSubview:_productsVC.view];
}这样做有什么好处呢?简单的说就是将tableView分离,各自使用一个congtroller,这样做使每个控制器管理自己的tableView里面的事件,可以更好的分离代码,降低两个tableView之间的耦合度,同时也避免了把两个 tableView放在一个controller里造成一个controller代码的冗余,这样使逻辑更清晰。
接下来说一下我们点击左边tableView的cell的时候怎样使右边的tableView跟着滑动。我在LGJCategoryVC也就是左边tableView的这个代理方法中didSelectRowAtIndexPath做了些操作:
- (void)tableView:(UITableView *)tableView didSelectRowAtIndexPath:(NSIndexPath *)indexPath {

    if (_productsVC) {
        [_productsVC scrollToSelectedIndexPath:indexPath];
    }
}其中这个scrollToSelectedIndexPath方法是在_productsVC中声明的。这个方法就是具体调动右边tableView滑动的。
#pragma mark - 一级tableView滚动时 实现当前类tableView的联动
- (void)scrollToSelectedIndexPath:(NSIndexPath *)indexPath {

    [self.productsTableView selectRowAtIndexPath:([NSIndexPath indexPathForRow:0 inSection:indexPath.row]) animated:YES scrollPosition:UITableViewScrollPositionTop];
}我们需要的只是让右边tableView的sectionHeaderView跟随左边的点击cell移动到最上部就可以了,所以在这里我们设置selectRowAtIndexPath:([NSIndexPath indexPathForRow:0 inSection:indexPath.row])
接下来就是当我们滑动右边tableView的时候左边的tableView的cell跟随滑动。这里我们在LGJProductsVC类中声明了一个协议。
@protocol ProductsDelegate <NSObject>

- (void)willDisplayHeaderView:(NSInteger)section;
- (void)didEndDisplayingHeaderView:(NSInteger)section;

@end
同时声明两个变量,这两个变量非常有用。
@property(nonatomic, assign)BOOL isScrollUp;//是否是向上滚动
@property(nonatomic, assign)CGFloat lastOffsetY;//滚动即将结束时scrollView的偏移量
具体作用就在这里了:
#pragma mark - scrollViewDelegate
- (void)scrollViewDidScroll:(UIScrollView *)scrollView {

    NSLog(@"_lastOffsetY : %f,scrollView.contentOffset.y : %f", _lastOffsetY, scrollView.contentOffset.y);
    _isScrollUp = _lastOffsetY < scrollView.contentOffset.y;
    _lastOffsetY = scrollView.contentOffset.y;
    NSLog(@"______lastOffsetY: %f", _lastOffsetY);
}在这个方法中,_isScrollUp用来判断右边的tableView是否是向上滑,当scrollView滑动时,我们用上次的偏移量和本次的偏移量作对比,如果上次的偏移量小于本次的偏移量说明tableView是向上滑动的。(关于contentOffset我在上篇的《iOS 实现NavigationController的titleView动态缩放效果》链接:http://www.jianshu.com/p/bcf3d692f99d 中有简单介绍)此时,_isScrollUp为YES,反之为NO。我们根据_isScrollUp这个重要的标识来到这儿:UITableViewDelegate的这两个代理方法
- (void)tableView:(UITableView *)tableView willDisplayHeaderView:(UIView *)view forSection:(NSInteger)section {

    if (self.delegate != nil && [self.delegate respondsToSelector:@selector(willDisplayHeaderView:)] != _isScrollUp) {
        [self.delegate willDisplayHeaderView:section];
    }

}

- (void)tableView:(UITableView *)tableView didEndDisplayingHeaderView:(UIView *)view forSection:(NSInteger)section {

    if (self.delegate != nil && [self.delegate respondsToSelector:@selector(didEndDisplayingHeaderView:)] && _isScrollUp) {
        [self.delegate didEndDisplayingHeaderView:section];
    }
}在UITableViewDelegate的这两个代理方法中,第一个方法是当headerView将要显示时调用。第二个方法是当headerView结束显示时调用。在这里我们根据_isScrollUp的BOOL值,当headerView将要显示的时候说明此时_isScrollUp为NO,因为此时是向下滑动的。当headerView结束显示的时候说明此时_isScrollUp为YES,因为此时是向上滑动的。此时我们调用ProductsDelegate代理方法,在LGJCategoryVC类中实现代理方法:
#pragma mark - ProductsDelegate
- (void)willDisplayHeaderView:(NSInteger)section {

    [self.categoryTableView selectRowAtIndexPath:[NSIndexPath indexPathForRow:section inSection:0] animated:YES scrollPosition:UITableViewScrollPositionMiddle];
}

- (void)didEndDisplayingHeaderView:(NSInteger)section {

    [self.categoryTableView selectRowAtIndexPath:[NSIndexPath indexPathForRow:section + 1 inSection:0] animated:YES scrollPosition:UITableViewScrollPositionMiddle];
}在willDisplayHeaderView这个代理方法中,右边tableView向下滑动,此时headerView即将显示,左边cell选择indexPathForRow:section,在didEndDisplayingHeaderView代理方法中,右边tableView向上滑动,此时headerView结束显示,左边cell选择indexPathForRow:section+1
总结
基本的大体思路就是上面这些,可能老是左边tableView右边tableView的看起来有点儿绕了,具体的还是看代码吧。最


