一,概述
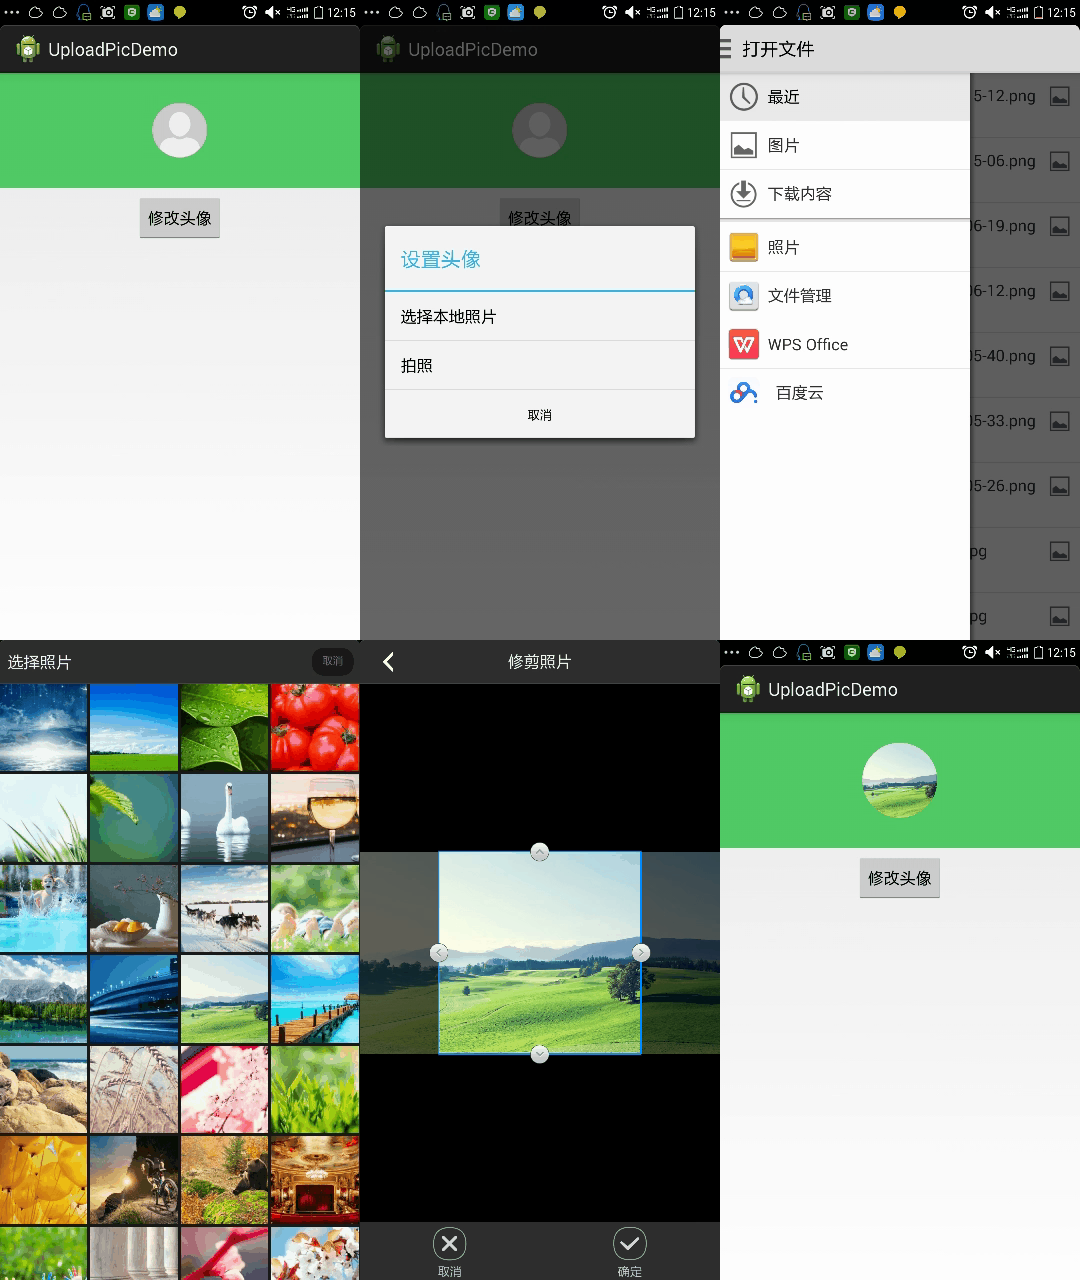
本篇博客总结一下自己在开发过程中应用到的一些知识,在本篇博客中带领大家完成用户头像选择或者拍照上传,并对图片进行大小的压缩,和形状的控制,可以将用户选择到的图片裁剪成圆形上传。
ok,我们开始写一个小的demo,完成用户圆形头像的选取,在写即将实现的效果之前我们看一下即将要实现的效果图

二,实现代码
activity_main.xml
<LinearLayout xmlns:android="http://schemas.android.com/apk/res/android"
    xmlns:tools="http://schemas.android.com/tools"
    android:layout_width="match_parent"
    android:layout_height="match_parent"
    android:gravity="center_horizontal"
    android:orientation="vertical" >

    <RelativeLayout
        android:layout_width="match_parent"
        android:layout_height="wrap_content"
        android:background="#51CA65"
        android:padding="30dp" >

        <ImageView
            android:id="@+id/iv_personal_icon"
            android:layout_width="wrap_content"
            android:layout_height="wrap_content"
            android:layout_centerInParent="true"
            android:src="@drawable/default_personal_image" />
    </RelativeLayout>

    <Button
        android:id="@+id/btn_change"
        android:layout_marginTop="6dp"
        android:layout_width="wrap_content"
        android:layout_height="wrap_content"
        android:text="修改头像" >
    </Button>

</LinearLayout>
MainActivity.java
package com.example.uploadpicdemo;

import java.io.File;

import android.app.Activity;
import android.app.AlertDialog;
import android.content.DialogInterface;
import android.content.Intent;
import android.graphics.Bitmap;
import android.net.Uri;
import android.os.Bundle;
import android.os.Environment;
import android.provider.MediaStore;
import android.util.Log;
import android.view.View;
import android.view.View.OnClickListener;
import android.widget.Button;
import android.widget.ImageView;

public class MainActivity extends Activity {

    protected static final int CHOOSE_PICTURE = 0;
    protected static final int TAKE_PICTURE = 1;
    private static final int CROP_SMALL_PICTURE = 2;
    protected static Uri tempUri;
    private ImageView iv_personal_icon;
    private String imagePath;

    @Override
    protected void onCreate(Bundle savedInstanceState) {
        super.onCreate(savedInstanceState);
        setContentView(R.layout.activity_main);
        Button btn_change = (Button) findViewById(R.id.btn_change);
        iv_personal_icon = (ImageView) findViewById(R.id.iv_personal_icon);
        // 到缓存中取数据,CacheUtils类看最下面链接
        String imagePath = CacheUtils.getString(mActivity, "imagePath");
        if(imagePath!=null){
          Bitmap bm = BitmapFactory.decodeFile(imagePath);
          iv_personal_icon.setImageBitmap(bm);
        btn_change.setOnClickListener(new OnClickListener() {

            @Override
            public void onClick(View v) {
                showChoosePicDialog();
            }
        });
    }

    /**
     * 显示修改头像的对话框
     */
    protected void showChoosePicDialog() {
        AlertDialog.Builder builder = new AlertDialog.Builder(this);
        builder.setTitle("设置头像");
        String[] items = { "选择本地照片", "拍照" };
        builder.setNegativeButton("取消", null);
        builder.setItems(items, new DialogInterface.OnClickListener() {

            @Override
            public void onClick(DialogInterface dialog, int which) {
                switch (which) {
                case CHOOSE_PICTURE: // 选择本地照片
		/**
			原博主用的是Intent.ACTION_GET_CONTENT,但是android4.4或以上与android4.4以下的路径存储格式不同,
                                                            如果想简单使用,看中的是它的功能的话,我们就直接用到 Intent.ACTION_PICK
		**/
                    Intent openAlbumIntent = new Intent(
                            Intent.ACTION_PICK);
                    openAlbumIntent.setType("image/*");
                    startActivityForResult(openAlbumIntent, CHOOSE_PICTURE);
                    break;
                case TAKE_PICTURE: // 拍照
                    Intent openCameraIntent = new Intent(
                            MediaStore.ACTION_IMAGE_CAPTURE);
                    tempUri = Uri.fromFile(new File(Environment
                            .getExternalStorageDirectory(), "image.jpg"));
                    // 指定照片保存路径(SD卡),image.jpg为一个临时文件,每次拍照后这个图片都会被替换
                    openCameraIntent.putExtra(MediaStore.EXTRA_OUTPUT, tempUri);
                    startActivityForResult(openCameraIntent, TAKE_PICTURE);
                    break;
                }
            }
        });
        builder.create().show();
    }

    @Override
    protected void onActivityResult(int requestCode, int resultCode, Intent data) {
        super.onActivityResult(requestCode, resultCode, data);
        if (resultCode == RESULT_OK) { // 如果返回码是可以用的
            switch (requestCode) {
            case TAKE_PICTURE:
                startPhotoZoom(tempUri); // 开始对图片进行裁剪处理
                break;
            case CHOOSE_PICTURE:
                startPhotoZoom(data.getData()); // 开始对图片进行裁剪处理
                break;
            case CROP_SMALL_PICTURE:
                if (data != null) {
                    setImageToView(data); // 让刚才选择裁剪得到的图片显示在界面上
                }
                break;
            }
        }
    }

    /**
     * 裁剪图片方法实现
     *
     * @param uri
     */
    protected void startPhotoZoom(Uri uri) {
        if (uri == null) {
            Log.i("tag", "The uri is not exist.");
        }
        tempUri = uri;
        Intent intent = new Intent("com.android.camera.action.CROP");
        intent.setDataAndType(uri, "image/*");
        // 设置裁剪
        intent.putExtra("crop", "true");
        // aspectX aspectY 是宽高的比例
        intent.putExtra("aspectX", 1);
        intent.putExtra("aspectY", 1);
        // outputX outputY 是裁剪图片宽高
        intent.putExtra("outputX", 150);
        intent.putExtra("outputY", 150);
        intent.putExtra("return-data", true);
        startActivityForResult(intent, CROP_SMALL_PICTURE);
    }

    /**
     * 保存裁剪之后的图片数据
     *
     * @param
     *
     * @param picdata
     */
    protected void setImageToView(Intent data) {
        Bundle extras = data.getExtras();
        if (extras != null) {
            Bitmap photo = extras.getParcelable("data");
            photo = Utils.toRoundBitmap(photo, tempUri); // 这个时候的图片已经被处理成圆形的了
            iv_personal_icon.setImageBitmap(photo);
            uploadPic(photo);
        }
    }

    private void uploadPic(Bitmap bitmap) {
        // 上传至服务器
        // ... 可以在这里把Bitmap转换成file,然后得到file的url,做文件上传操作
        // 注意这里得到的图片已经是圆形图片了
        // bitmap是没有做个圆形处理的,但已经被裁剪了

        imagePath = Utils.savePhoto(bitmap, Environment
                .getExternalStorageDirectory().getAbsolutePath(), String
                .valueOf(System.currentTimeMillis()));
        Log.e("imagePath", imagePath+"");
        if(imagePath != null){
            // 拿着imagePath上传了
            // ...
	    //缓存
         CacheUtils.setString(mActivity,"imagePath", imagePath);
        }
    }
}
demo下载地址:
关于Intent.ACTION_GET_CONTENT和Intent.ACTION_PICK的使用区别:请点击下面链接。
CacheUtils类的实现方法见下面链接。


