
作者:刘乃杰
编辑整理:曾辉
引入
本系列文章是基于 Apache SeaTunnel 2.3.6版本,围绕Zeta引擎给大家介绍其任务是如何从提交到运行的全流程,希望通过这篇文档,对刚刚上手SeaTunnel的朋友提供一些帮助。

我们整体的文章将会分成三篇,从以下方向给大家介绍:
- SeaTunnel Server端的初始化
- Client端的任务提交流程
- Server端的接收到任务的执行流程
由于涉及源码解析,涉及篇幅较大,所以分成系列文章来记录下一个任务的整体流程。
参考
- [ST-Engine][Design] The Design of LogicalPlan to PhysicalPlan:https://github.com/apache/seatunnel/issues/2269
作者介绍
大家好,我是刘乃杰,一名大数据开发工程师,参与Apache SeaTunnel的开发也有一年多的时间了,不仅给SeaTunnel提交了一些PR,而且添加的一些功能也非常有意思,欢迎大家来找我交流,其中包括支持Avro格式文件,SQL Transform中支持嵌套结构查询,给节点添加Tag达到资源隔离等。
接之前的文章:
下面我们会再从一个简单的任务开始, 从客户端看下任务的提交流程。
客户端提交任务
这里以命令行提交任务的形式来讲解任务的提交流程。
命令行提交任务的命令为
./bin/seatunnel/sh -c <config_path>
我们查看这个脚本文件后可以看到这个脚本中最后会调用org.apache.seatunnel.core.starter.seatunnel.SeaTunnelClient这个类
public class SeaTunnelClient {
    public static void main(String[] args) throws CommandException {
        ClientCommandArgs clientCommandArgs =
                CommandLineUtils.parse(
                        args,
                        new ClientCommandArgs(),
                        EngineType.SEATUNNEL.getStarterShellName(),
                        true);
        SeaTunnel.run(clientCommandArgs.buildCommand());
    }
}
在这个类中,仅有一个main方法, 与上面的server端的代码类似,不过这里构建的是ClientCommandArgs
解析命令行参数
我们查看clientCommandArgs.buildCommand方法
public Command<?> buildCommand() {
    Common.setDeployMode(getDeployMode());
    if (checkConfig) {
        return new SeaTunnelConfValidateCommand(this);
    }
    if (encrypt) {
        return new ConfEncryptCommand(this);
    }
    if (decrypt) {
        return new ConfDecryptCommand(this);
    }
    return new ClientExecuteCommand(this);
}
这里是调用了jcommander来解析参数, 会根据用户传递的参数来决定构建哪个类, 例如是对配置文件做检查,还是加密文件,解密文件以及是不是Client提交任务的命令。
这里就不再讲解其他几个类,主要来看下ClientExecuteCommand这个类的主要代码都在execute方法中, 整体方法比较长, 我将分段来描述每一段的作业
连接集群
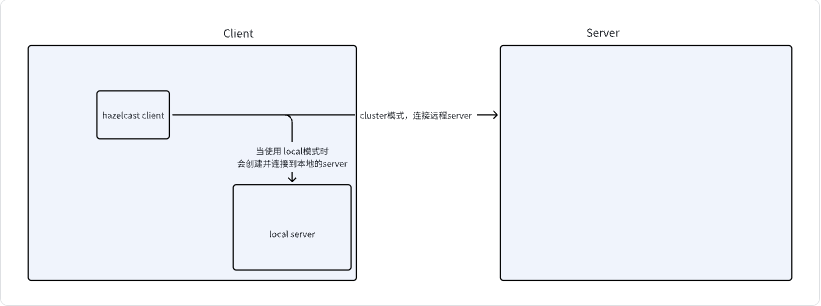
在这一部分代码中, 做的事情是读取hazelcast-client.yaml文件,尝试建立与server端的连接, 当使用local模式时,会现在本地创建一个hazelcast的实例, 然后连接到这个实例上, 当使用cluster模式时, 则直接连接到集群上。
public void execute() throws CommandExecuteException {
    JobMetricsRunner.JobMetricsSummary jobMetricsSummary = null;
    LocalDateTime startTime = LocalDateTime.now();
    LocalDateTime endTime = LocalDateTime.now();
    SeaTunnelConfig seaTunnelConfig = ConfigProvider.locateAndGetSeaTunnelConfig();
    try {
        String clusterName = clientCommandArgs.getClusterName();
        // 加载配置信息
        ClientConfig clientConfig = ConfigProvider.locateAndGetClientConfig();
        // 根据此次提交的任务类型,当使用local模式时,意味着上面服务端的流程是没有执行的,
        // 所以先创建一个本地seatunnel server
        if (clientCommandArgs.getMasterType().equals(MasterType.LOCAL)) {
            clusterName =
                    creatRandomClusterName(
                            StringUtils.isNotEmpty(clusterName)
                                    ? clusterName
                                    : Constant.DEFAULT_SEATUNNEL_CLUSTER_NAME);
            instance = createServerInLocal(clusterName, seaTunnelConfig);
            int port = instance.getCluster().getLocalMember().getSocketAddress().getPort();
            clientConfig
                    .getNetworkConfig()
                    .setAddresses(Collections.singletonList("localhost:" + port));
        }
        // 与远程或本地的seatunnel server连接,创建一个engineClient
        if (StringUtils.isNotEmpty(clusterName)) {
            seaTunnelConfig.getHazelcastConfig().setClusterName(clusterName);
            clientConfig.setClusterName(clusterName);
        }
        engineClient = new SeaTunnelClient(clientConfig);
        // 省略第二段代码
        // 省略第三段代码
        }
    } catch (Exception e) {
        throw new CommandExecuteException("SeaTunnel job executed failed", e);
    } finally {
        if (jobMetricsSummary != null) {
            // 任务结束,打印日志
            log.info(
                    StringFormatUtils.formatTable(
                            "Job Statistic Information",
                            "Start Time",
                            DateTimeUtils.toString(
                                    startTime, DateTimeUtils.Formatter.YYYY_MM_DD_HH_MM_SS),
                            "End Time",
                            DateTimeUtils.toString(
                                    endTime, DateTimeUtils.Formatter.YYYY_MM_DD_HH_MM_SS),
                            "Total Time(s)",
                            Duration.between(startTime, endTime).getSeconds(),
                            "Total Read Count",
                            jobMetricsSummary.getSourceReadCount(),
                            "Total Write Count",
                            jobMetricsSummary.getSinkWriteCount(),
                            "Total Failed Count",
                            jobMetricsSummary.getSourceReadCount()
                                    - jobMetricsSummary.getSinkWriteCount()));
        }
        closeClient();
    }
}
判断任务类型,调用相关方法
则是根据用户的参数来判断这次的任务类型是什么, 根据参数的不同,调用不同的方法。
例如取消任务, 则会调用相应的取消任务方法, 这次对这里的几个任务不再具体分析, 这次以提交任务为主, 当我们将提交任务的流程弄明白, 这些再去看时也就简单了。
 if (clientCommandArgs.isListJob()) {
            String jobStatus = engineClient.getJobClient().listJobStatus(true);
            System.out.println(jobStatus);
        } else if (clientCommandArgs.isGetRunningJobMetrics()) {
            String runningJobMetrics = engineClient.getJobClient().getRunningJobMetrics();
            System.out.println(runningJobMetrics);
        } else if (null != clientCommandArgs.getJobId()) {
            String jobState =
                    engineClient
                            .getJobClient()
                            .getJobDetailStatus(Long.parseLong(clientCommandArgs.getJobId()));
            System.out.println(jobState);
        } else if (null != clientCommandArgs.getCancelJobId()) {
            engineClient
                    .getJobClient()
                    .cancelJob(Long.parseLong(clientCommandArgs.getCancelJobId()));
        } else if (null != clientCommandArgs.getMetricsJobId()) {
            String jobMetrics =
                    engineClient
                            .getJobClient()
                            .getJobMetrics(Long.parseLong(clientCommandArgs.getMetricsJobId()));
            System.out.println(jobMetrics);
        } else if (null != clientCommandArgs.getSavePointJobId()) {
            engineClient
                    .getJobClient()
                    .savePointJob(Long.parseLong(clientCommandArgs.getSavePointJobId()));
        } else {
              // 省略第三段代码
提交任务到集群
           // 获取配置文件的路径, 并检查文件是否存在
           Path configFile = FileUtils.getConfigPath(clientCommandArgs);
            checkConfigExist(configFile);
            JobConfig jobConfig = new JobConfig();
            // 下面会根据这次任务是根据savepoint重启还是启动新任务来调用不同的方法来构建ClientJobExecutionEnvironment对象
            ClientJobExecutionEnvironment jobExecutionEnv;
            jobConfig.setName(clientCommandArgs.getJobName());
            if (null != clientCommandArgs.getRestoreJobId()) {
                jobExecutionEnv =
                        engineClient.restoreExecutionContext(
                                configFile.toString(),
                                clientCommandArgs.getVariables(),
                                jobConfig,
                                seaTunnelConfig,
                                Long.parseLong(clientCommandArgs.getRestoreJobId()));
            } else {
                jobExecutionEnv =
                        engineClient.createExecutionContext(
                                configFile.toString(),
                                clientCommandArgs.getVariables(),
                                jobConfig,
                                seaTunnelConfig,
                                clientCommandArgs.getCustomJobId() != null
                                        ? Long.parseLong(clientCommandArgs.getCustomJobId())
                                        : null);
            }
            // get job start time
            startTime = LocalDateTime.now();
            // create job proxy
            // 提交任务
            ClientJobProxy clientJobProxy = jobExecutionEnv.execute();
            // 判断是否为异步提交,当异步提交时会直接退出,不进行状态检查
            if (clientCommandArgs.isAsync()) {
                if (clientCommandArgs.getMasterType().equals(MasterType.LOCAL)) {
                    log.warn("The job is running in local mode, can not use async mode.");
                } else {
                    return;
                }
            }
            // register cancelJob hook
            // 添加hook方法, 当提交完成任务后, 命令行退出时, 取消刚刚提交的任务
            Runtime.getRuntime()
                    .addShutdownHook(
                            new Thread(
                                    () -> {
                                        CompletableFuture<Void> future =
                                                CompletableFuture.runAsync(
                                                        () -> {
                                                            log.info(
                                                                    "run shutdown hook because get close signal");
                                                            shutdownHook(clientJobProxy);
                                                        });
                                        try {
                                            future.get(15, TimeUnit.SECONDS);
                                        } catch (Exception e) {
                                            log.error("Cancel job failed.", e);
                                        }
                                    }));


            // 同步,检查任务状态相关代码
            // 获取任务id, 然后启动后台线程定时检查任务状态
            long jobId = clientJobProxy.getJobId();
            JobMetricsRunner jobMetricsRunner = new JobMetricsRunner(engineClient, jobId);
            // 创建线程,定时检查状态
            executorService =
                    Executors.newSingleThreadScheduledExecutor(
                            new ThreadFactoryBuilder()
                                    .setNameFormat("job-metrics-runner-%d")
                                    .setDaemon(true)
                                    .build());
            executorService.scheduleAtFixedRate(
                    jobMetricsRunner,
                    0,
                    seaTunnelConfig.getEngineConfig().getPrintJobMetricsInfoInterval(),
                    TimeUnit.SECONDS);
            // wait for job complete
            // 等待任务结束, 检查任务状态,当任务为异常退出时, 抛出异常
            JobResult jobResult = clientJobProxy.waitForJobCompleteV2();
            jobStatus = jobResult.getStatus();
            if (StringUtils.isNotEmpty(jobResult.getError())
                    || jobResult.getStatus().equals(JobStatus.FAILED)) {
                throw new SeaTunnelEngineException(jobResult.getError());
            }
            // get job end time
            endTime = LocalDateTime.now();
            // get job statistic information when job finished
            jobMetricsSummary = engineClient.getJobMetricsSummary(jobId);
下面我们就看下jobExecutionEnv这个类的初始化与execute方法
public ClientJobExecutionEnvironment(
        JobConfig jobConfig,
        String jobFilePath,
        List<String> variables,
        SeaTunnelHazelcastClient seaTunnelHazelcastClient,
        SeaTunnelConfig seaTunnelConfig,
        boolean isStartWithSavePoint,
        Long jobId) {
    super(jobConfig, isStartWithSavePoint);
    this.jobFilePath = jobFilePath;
    this.variables = variables;
    this.seaTunnelHazelcastClient = seaTunnelHazelcastClient;
    this.jobClient = new JobClient(seaTunnelHazelcastClient);
    this.seaTunnelConfig = seaTunnelConfig;
    Long finalJobId;
    if (isStartWithSavePoint || jobId != null) {
        finalJobId = jobId;
    } else {
        finalJobId = jobClient.getNewJobId();
    }
    this.jobConfig.setJobContext(new JobContext(finalJobId));
    this.connectorPackageClient = new ConnectorPackageClient(seaTunnelHazelcastClient);
}
这个类的初始化中,很简单,只是变量赋值操作,没有做其他初始化操作。再来看下execute方法
public ClientJobProxy execute() throws ExecutionException, InterruptedException {
    LogicalDag logicalDag = getLogicalDag();
    log.info(
            "jarUrls is : [{}]",
            jarUrls.stream().map(URL::getPath).collect(Collectors.joining(", ")));
    JobImmutableInformation jobImmutableInformation =
            new JobImmutableInformation(
                    Long.parseLong(jobConfig.getJobContext().getJobId()),
                    jobConfig.getName(),
                    isStartWithSavePoint,
                    seaTunnelHazelcastClient.getSerializationService().toData(logicalDag),
                    jobConfig,
                    new ArrayList<>(jarUrls),
                    new ArrayList<>(connectorJarIdentifiers));

    return jobClient.createJobProxy(jobImmutableInformation);
}
这个方法中,先调用getLogicalDag生产了逻辑计划,然后构建JobImmutableInformation 信息,传递给jobClient,我们先看后面的步骤,等会再看如何生成的逻辑计划。
public ClientJobProxy createJobProxy(@NonNull JobImmutableInformation jobImmutableInformation) {
    return new ClientJobProxy(hazelcastClient, jobImmutableInformation);
}


public ClientJobProxy(
        @NonNull SeaTunnelHazelcastClient seaTunnelHazelcastClient,
        @NonNull JobImmutableInformation jobImmutableInformation) {
    this.seaTunnelHazelcastClient = seaTunnelHazelcastClient;
    this.jobId = jobImmutableInformation.getJobId();
    submitJob(jobImmutableInformation);
}

private void submitJob(JobImmutableInformation jobImmutableInformation) {
    LOGGER.info(
            String.format(
                    "Start submit job, job id: %s, with plugin jar %s",
                    jobImmutableInformation.getJobId(),
                    jobImmutableInformation.getPluginJarsUrls()));
    ClientMessage request =
            SeaTunnelSubmitJobCodec.encodeRequest(
                    jobImmutableInformation.getJobId(),
                    seaTunnelHazelcastClient
                            .getSerializationService()
                            .toData(jobImmutableInformation),
                    jobImmutableInformation.isStartWithSavePoint());
    PassiveCompletableFuture<Void> submitJobFuture =
            seaTunnelHazelcastClient.requestOnMasterAndGetCompletableFuture(request);
    submitJobFuture.join();
    LOGGER.info(
            String.format(
                    "Submit job finished, job id: %s, job name: %s",
                    jobImmutableInformation.getJobId(), jobImmutableInformation.getJobName()));
}
在这里的代码可以看到,生成JobImmutableInformation后,会将这个信息转换为ClientMessage(SeaTunnelSubmitJobCodec)然后发送给Master节点,也就是hazelcast server中的master节点。
提交完成之后又回到上面的任务状态检测相关步骤。
这里的消息发送是调用了Hazelcast的相关方法,我们对其的实现不需要关注。
逻辑计划解析
最后一篇文章会再回到Server端看下当收到client端发送的提交任务后的处理逻辑,这里我们先回到前面,看下在客户端如何生成的逻辑计划。
LogicalDag logicalDag = getLogicalDag();
先看下LogicalDag的结构
@Getter private JobConfig jobConfig;
private final Set<LogicalEdge> edges = new LinkedHashSet<>();
private final Map<Long, LogicalVertex> logicalVertexMap = new LinkedHashMap<>();
private IdGenerator idGenerator;
private boolean isStartWithSavePoint = false;
在这个类里有这几个变量,有两个比较关键的类LogicalEdge和LogicalVertex,通过任务之间的关联关联构建出DAG。
LogicalEdge的类中存储的变量很简单, 存储了两个点的关系。
/** The input vertex connected to this edge. */
private LogicalVertex inputVertex;

/** The target vertex connected to this edge. */
private LogicalVertex targetVertex;

private Long inputVertexId;

private Long targetVertexId;
LogicalVertex的变量为这几个变量,有当前点的编号,以及所需的并行度,以及Action接口, Action接口会有SourceAction,SinkAction,TransformAction等不同的实现类。
private Long vertexId;
private Action action;

/** Number of subtasks to split this task into at runtime. */
private int parallelism;
看下getLogicalDag的方法
public LogicalDag getLogicalDag() {
    //
    ImmutablePair<List<Action>, Set<URL>> immutablePair = getJobConfigParser().parse(null);
    actions.addAll(immutablePair.getLeft());
    // seatunnel有个功能是不需要服务端所有节点有全部的依赖,可以在客户端中将所需依赖上传到服务端
    // 这里的if-else是这个功能的一些逻辑判断,判断是否需要从客户端将jar包上传到服务端,从而服务端不需要维护全部的jar包
    boolean enableUploadConnectorJarPackage =
            seaTunnelConfig.getEngineConfig().getConnectorJarStorageConfig().getEnable();
    if (enableUploadConnectorJarPackage) {
        Set<ConnectorJarIdentifier> commonJarIdentifiers =
                connectorPackageClient.uploadCommonPluginJars(
                        Long.parseLong(jobConfig.getJobContext().getJobId()), commonPluginJars);
        Set<URL> commonPluginJarUrls = getJarUrlsFromIdentifiers(commonJarIdentifiers);
        Set<ConnectorJarIdentifier> pluginJarIdentifiers = new HashSet<>();
        uploadActionPluginJar(actions, pluginJarIdentifiers);
        Set<URL> connectorPluginJarUrls = getJarUrlsFromIdentifiers(pluginJarIdentifiers);
        connectorJarIdentifiers.addAll(commonJarIdentifiers);
        connectorJarIdentifiers.addAll(pluginJarIdentifiers);
        jarUrls.addAll(commonPluginJarUrls);
        jarUrls.addAll(connectorPluginJarUrls);
        actions.forEach(
                action -> {
                    addCommonPluginJarsToAction(
                            action, commonPluginJarUrls, commonJarIdentifiers);
                });
    } else {
        jarUrls.addAll(commonPluginJars);
        jarUrls.addAll(immutablePair.getRight());
        actions.forEach(
                action -> {
                    addCommonPluginJarsToAction(
                            action, new HashSet<>(commonPluginJars), Collections.emptySet());
                });
    }
    return getLogicalDagGenerator().generate();
}
方法中首先调用了.parse(null)方法,此方法的返回值是一个不可变二元组,第一个值为List<Action>对象,getJobConfigParser返回的对象是MultipleTableJobConfigParser
public MultipleTableJobConfigParser(
        Config seaTunnelJobConfig,
        IdGenerator idGenerator,
        JobConfig jobConfig,
        List<URL> commonPluginJars,
        boolean isStartWithSavePoint) {
    this.idGenerator = idGenerator;
    this.jobConfig = jobConfig;
    this.commonPluginJars = commonPluginJars;
    this.isStartWithSavePoint = isStartWithSavePoint;
    this.seaTunnelJobConfig = seaTunnelJobConfig;
    this.envOptions = ReadonlyConfig.fromConfig(seaTunnelJobConfig.getConfig("env"));
    this.fallbackParser =
            new JobConfigParser(idGenerator, commonPluginJars, this, isStartWithSavePoint);
}
当调用parse(null)方法时,会进行解析
public ImmutablePair<List<Action>, Set<URL>> parse(ClassLoaderService classLoaderService) {
    // 将配置文件中的 env.jars添加到 commonJars中
    this.fillJobConfigAndCommonJars();
    // 从配置文件中,将source,transform,sink的配置分别读取处理
    List<? extends Config> sourceConfigs =
            TypesafeConfigUtils.getConfigList(
                    seaTunnelJobConfig, "source", Collections.emptyList());
    List<? extends Config> transformConfigs =
            TypesafeConfigUtils.getConfigList(
                    seaTunnelJobConfig, "transform", Collections.emptyList());
    List<? extends Config> sinkConfigs =
            TypesafeConfigUtils.getConfigList(
                    seaTunnelJobConfig, "sink", Collections.emptyList());
    // 获取连接器的jar包地址
    List<URL> connectorJars = getConnectorJarList(sourceConfigs, sinkConfigs);
    if (!commonPluginJars.isEmpty()) {
        // 将commonJars添加到连接器的jars中
        connectorJars.addAll(commonPluginJars);
    }
    ClassLoader parentClassLoader = Thread.currentThread().getContextClassLoader();

    ClassLoader classLoader;
    if (classLoaderService == null) {
        // 由于我们刚才传递了null,所以这里会创建SeaTunnelChildFirstClassLoader类加载器
        // 从名字也能看出,这里会与默认的加载器不同,不会先调用父类进行加载,
        // 而是自己找不到之后再调用父类进行加载,避免jar包冲突
        classLoader = new SeaTunnelChildFirstClassLoader(connectorJars, parentClassLoader);
    } else {
        classLoader =
                classLoaderService.getClassLoader(
                        Long.parseLong(jobConfig.getJobContext().getJobId()), connectorJars);
    }
    try {
        Thread.currentThread().setContextClassLoader(classLoader);
        // 检查DAG里面是否构成环,避免后续的构建过程陷入循环
        ConfigParserUtil.checkGraph(sourceConfigs, transformConfigs, sinkConfigs);
        LinkedHashMap<String, List<Tuple2<CatalogTable, Action>>> tableWithActionMap =
                new LinkedHashMap<>();

        log.info("start generating all sources.");
        for (int configIndex = 0; configIndex < sourceConfigs.size(); configIndex++) {
            Config sourceConfig = sourceConfigs.get(configIndex);
            // parseSource方法为真正生成source的方法
            // 返回值为2元组,第一个值为 当前source生成的表名称
            // 第二个值为 CatalogTable和Action的二元组列表
            // 由于SeaTunnel Source支持读取多表,所以第二个值为列表
            Tuple2<String, List<Tuple2<CatalogTable, Action>>> tuple2 =
                    parseSource(configIndex, sourceConfig, classLoader);
            tableWithActionMap.put(tuple2._1(), tuple2._2());
        }

        log.info("start generating all transforms.");
        // parseTransforms来生成transform
        // 这里将上面的 tableWithActionMap传递了进去,所以不需要返回值
        parseTransforms(transformConfigs, classLoader, tableWithActionMap);

        log.info("start generating all sinks.");
        List<Action> sinkActions = new ArrayList<>();
        for (int configIndex = 0; configIndex < sinkConfigs.size(); configIndex++) {
            Config sinkConfig = sinkConfigs.get(configIndex);
            // parseSink方法来生成sink
            // 同样,传递了tableWithActionMap
            sinkActions.addAll(
                    parseSink(configIndex, sinkConfig, classLoader, tableWithActionMap));
        }
        Set<URL> factoryUrls = getUsedFactoryUrls(sinkActions);
        return new ImmutablePair<>(sinkActions, factoryUrls);
    } finally {
        // 将当前线程的类加载器切换为原来的类加载器
        Thread.currentThread().setContextClassLoader(parentClassLoader);
        if (classLoaderService != null) {
            classLoaderService.releaseClassLoader(
                    Long.parseLong(jobConfig.getJobContext().getJobId()), connectorJars);
        }
    }
}
解析Source
先来看下parseSource方法
public Tuple2<String, List<Tuple2<CatalogTable, Action>>> parseSource(
        int configIndex, Config sourceConfig, ClassLoader classLoader) {
    final ReadonlyConfig readonlyConfig = ReadonlyConfig.fromConfig(sourceConfig);
    // factoryId就是我们配置里面的 source名称,例如 FakeSource, Jdbc
    final String factoryId = getFactoryId(readonlyConfig);
    // 获取当前数据源生成的 表 名称,注意这里的表可能并不对应一个表
    // 由于 seatunnel source支持多表读取,那么这里就会出现一对多的关系
    final String tableId =
            readonlyConfig.getOptional(CommonOptions.RESULT_TABLE_NAME).orElse(DEFAULT_ID);
    // 获取并行度
    final int parallelism = getParallelism(readonlyConfig);

    // 这个地方是由于某些Source还不支持通过Factory工厂来构建,所以会有两种构建方法
    // 后续当所有连接器都支持通过工厂来创建后,这里的代码会被删除掉,所以这次忽略掉这部分代码
    // 方法内部是查询是否有相应的工厂类,相应的工厂类不存在时返回 true,不存在时返回false
    boolean fallback =
            isFallback(
                    classLoader,
                    TableSourceFactory.class,
                    factoryId,
                    (factory) -> factory.createSource(null));
    if (fallback) {
        Tuple2<CatalogTable, Action> tuple =
                fallbackParser.parseSource(sourceConfig, jobConfig, tableId, parallelism);
        return new Tuple2<>(tableId, Collections.singletonList(tuple));
    }
    // 通过FactoryUtil来创建Source
    // 返回对象为 SeaTunnelSource实例,以及List<CatalogTable>
    // 这里会创建我们同步任务中Source的实例,catalogtable列表表示这个数据源读取的表的表结构等信息
    Tuple2<SeaTunnelSource<Object, SourceSplit, Serializable>, List<CatalogTable>> tuple2 =
            FactoryUtil.createAndPrepareSource(readonlyConfig, classLoader, factoryId);
    // 获取当前source connector的jar包
    Set<URL> factoryUrls = new HashSet<>();
    factoryUrls.addAll(getSourcePluginJarPaths(sourceConfig));

    List<Tuple2<CatalogTable, Action>> actions = new ArrayList<>();
    long id = idGenerator.getNextId();
    String actionName = JobConfigParser.createSourceActionName(configIndex, factoryId);
    SeaTunnelSource<Object, SourceSplit, Serializable> source = tuple2._1();
    source.setJobContext(jobConfig.getJobContext());
    PluginUtil.ensureJobModeMatch(jobConfig.getJobContext(), source);
    // 构建 SourceAction
    SourceAction<Object, SourceSplit, Serializable> action =
            new SourceAction<>(id, actionName, tuple2._1(), factoryUrls, new HashSet<>());
    action.setParallelism(parallelism);
    for (CatalogTable catalogTable : tuple2._2()) {
        actions.add(new Tuple2<>(catalogTable, action));
    }
    return new Tuple2<>(tableId, actions);
}
看一下新版本中是如何通过工厂来创建Source实例的
public static <T, SplitT extends SourceSplit, StateT extends Serializable>
        Tuple2<SeaTunnelSource<T, SplitT, StateT>, List<CatalogTable>> createAndPrepareSource(
                ReadonlyConfig options, ClassLoader classLoader, String factoryIdentifier) {

    try {
        // 通过SPI加载TableSourceFactory的类,然后根据factoryIdentifier找对应的类
        // 即 找到 souce对应的 SourceFactory
        final TableSourceFactory factory =
                discoverFactory(classLoader, TableSourceFactory.class, factoryIdentifier);
        // 通过Factory来创建Source实例,这个Source实例就是你任务中对应类型的Source
        // 也就是说Source类的初始化会在Client端创建一次,需要注意这里的环境是否能够连接到该Source
        SeaTunnelSource<T, SplitT, StateT> source =
                createAndPrepareSource(factory, options, classLoader);
        List<CatalogTable> catalogTables;
        try {
            // 获取 source会产生的表 列表。包含了字段,数据类型,分区信息等
            catalogTables = source.getProducedCatalogTables();
        } catch (UnsupportedOperationException e) {
            // 为了兼容有些Connector未实现getProducedCatalogTables方法
            // 调用老的获取数据类型的方法,并转换为Catalog
            SeaTunnelDataType<T> seaTunnelDataType = source.getProducedType();
            final String tableId =
                    options.getOptional(CommonOptions.RESULT_TABLE_NAME).orElse(DEFAULT_ID);
            catalogTables =
                    CatalogTableUtil.convertDataTypeToCatalogTables(seaTunnelDataType, tableId);
        }
        LOG.info(
                "get the CatalogTable from source {}: {}",
                source.getPluginName(),
                catalogTables.stream()
                        .map(CatalogTable::getTableId)
                        .map(TableIdentifier::toString)
                        .collect(Collectors.joining(",")));
        // 解析参数,当设置为 SHARDING 时,仅取第一个表结构
        // 该参数没有文档介绍,没有设置,不清楚作用
        if (options.get(SourceOptions.DAG_PARSING_MODE) == ParsingMode.SHARDING) {
            CatalogTable catalogTable = catalogTables.get(0);
            catalogTables.clear();
            catalogTables.add(catalogTable);
        }
        return new Tuple2<>(source, catalogTables);
    } catch (Throwable t) {
        throw new FactoryException(
                String.format(
                        "Unable to create a source for identifier '%s'.", factoryIdentifier),
                t);
    }
}


private static <T, SplitT extends SourceSplit, StateT extends Serializable>
        SeaTunnelSource<T, SplitT, StateT> createAndPrepareSource(
                TableSourceFactory factory, ReadonlyConfig options, ClassLoader classLoader) {
                // 通过TableSourceFactory来创建Source
    TableSourceFactoryContext context = new TableSourceFactoryContext(options, classLoader);
    ConfigValidator.of(context.getOptions()).validate(factory.optionRule());
    TableSource<T, SplitT, StateT> tableSource = factory.createSource(context);
    return tableSource.createSource();
}
在客户端就会通过SPI加载到Source相应的Factory然后创建出对应的Source实例出来,所以这里需要保证提交的客户端也能够与Source/Sink端建立连接,避免网络连不通的问题。
解析Transform
接下来在看一下如何创建Transform
public void parseTransforms(
        List<? extends Config> transformConfigs,
        ClassLoader classLoader,
        LinkedHashMap<String, List<Tuple2<CatalogTable, Action>>> tableWithActionMap) {
    if (CollectionUtils.isEmpty(transformConfigs) || transformConfigs.isEmpty()) {
        return;
    }
    Queue<Config> configList = new LinkedList<>(transformConfigs);
    int index = 0;
    while (!configList.isEmpty()) {
        parseTransform(index++, configList, classLoader, tableWithActionMap);
    }
}

private void parseTransform(
        int index,
        Queue<Config> transforms,
        ClassLoader classLoader,
        LinkedHashMap<String, List<Tuple2<CatalogTable, Action>>> tableWithActionMap) {
    Config config = transforms.poll();
    final ReadonlyConfig readonlyConfig = ReadonlyConfig.fromConfig(config);
    final String factoryId = getFactoryId(readonlyConfig);
    // get jar urls
    Set<URL> jarUrls = new HashSet<>();
    jarUrls.addAll(getTransformPluginJarPaths(config));
    final List<String> inputIds = getInputIds(readonlyConfig);
    // inputIds为source_table_name,根据这个值找到所依赖的上游source
    // 目前Transform不支持对多表进行处理,所以如果所依赖的上游是多表,会抛出异常
    List<Tuple2<CatalogTable, Action>> inputs =
            inputIds.stream()
                    .map(tableWithActionMap::get)
                    .filter(Objects::nonNull)
                    .peek(
                            input -> {
                                if (input.size() > 1) {
                                    throw new JobDefineCheckException(
                                            "Adding transform to multi-table source is not supported.");
                                }
                            })
                    .flatMap(Collection::stream)
                    .collect(Collectors.toList());
    // inputs为空,表明当前Transform节点找不到任何上游的节点
    // 此时会有几种情况
    if (inputs.isEmpty()) {

        if (transforms.isEmpty()) {
            // 未设置source_table_name,设置结果与之前不对应并且只有一个transform时
            // 把最后一个source作为这个transform的上游表
            inputs = findLast(tableWithActionMap);
        } else {
            // 所依赖的transform可能还没有创建,将本次的transform再放回队列中,后续再进行解析
            transforms.offer(config);
            return;
        }
    }
    // 这次transform结果产生的表名称
    final String tableId =
            readonlyConfig.getOptional(CommonOptions.RESULT_TABLE_NAME).orElse(DEFAULT_ID);
    // 获取上游source的Action
    Set<Action> inputActions =
            inputs.stream()
                    .map(Tuple2::_2)
                    .collect(Collectors.toCollection(LinkedHashSet::new));
    // 验证所依赖的多个上游,是否产生的表结构都相同,只有所有的表结构都相同才能进入一个transform来处理
    checkProducedTypeEquals(inputActions);
    // 设置并行度
    int spareParallelism = inputs.get(0)._2().getParallelism();
    int parallelism =
            readonlyConfig.getOptional(CommonOptions.PARALLELISM).orElse(spareParallelism);
    // 创建Transform实例,与刚刚通过Source工厂来创建差不多的行为
    CatalogTable catalogTable = inputs.get(0)._1();
    SeaTunnelTransform<?> transform =
            FactoryUtil.createAndPrepareTransform(
                    catalogTable, readonlyConfig, classLoader, factoryId);
    transform.setJobContext(jobConfig.getJobContext());
    long id = idGenerator.getNextId();
    String actionName = JobConfigParser.createTransformActionName(index, factoryId);
    // 封装成Action
    TransformAction transformAction =
            new TransformAction(
                    id,
                    actionName,
                    new ArrayList<>(inputActions),
                    transform,
                    jarUrls,
                    new HashSet<>());
    transformAction.setParallelism(parallelism);
    // 放入到map中,此时map里面存储了source和transform
    // 以每个节点产生的表结构为key,action作为value
    tableWithActionMap.put(
            tableId,
            Collections.singletonList(
                    new Tuple2<>(transform.getProducedCatalogTable(), transformAction)));
}
解析Sink
当看完Source/transform的解析之后,对于Sink的解析逻辑也会比较明了。
public List<SinkAction<?, ?, ?, ?>> parseSink(
        int configIndex,
        Config sinkConfig,
        ClassLoader classLoader,
        LinkedHashMap<String, List<Tuple2<CatalogTable, Action>>> tableWithActionMap) {

    ReadonlyConfig readonlyConfig = ReadonlyConfig.fromConfig(sinkConfig);
    //
    String factoryId = getFactoryId(readonlyConfig);
    // 获取当前sink节点依赖的上游节点
    List<String> inputIds = getInputIds(readonlyConfig);
    // 在tableWithActionMap中查找
    List<List<Tuple2<CatalogTable, Action>>> inputVertices =
            inputIds.stream()
                    .map(tableWithActionMap::get)
                    .filter(Objects::nonNull)
                    .collect(Collectors.toList());
     // 当sink节点找不到上游节点时,找到最后一个节点信息作为上游节点
     // 这里与transform不一样的地方是,不会再等其他sink节点初始化完成,因为sink节点不可能依赖与其他sink节点
    if (inputVertices.isEmpty()) {
        // Tolerates incorrect configuration of simple graph
        inputVertices = Collections.singletonList(findLast(tableWithActionMap));
    } else if (inputVertices.size() > 1) {
        for (List<Tuple2<CatalogTable, Action>> inputVertex : inputVertices) {
            if (inputVertex.size() > 1) {
            // 当一个sink节点即有多个上游节点,且某个上游节点还会产生多表时抛出异常
            // sink可以支持多个数据源,或者单个数据源下产生多表,不能同时支持多个数据源,且某个数据源下存在多表
                throw new JobDefineCheckException(
                        "Sink don't support simultaneous writing of data from multi-table source and other sources.");
            }
        }
    }
    // 与解析source一样,对老代码的兼容
    boolean fallback =
            isFallback(
                    classLoader,
                    TableSinkFactory.class,
                    factoryId,
                    (factory) -> factory.createSink(null));
    if (fallback) {
        return fallbackParser.parseSinks(configIndex, inputVertices, sinkConfig, jobConfig);
    }

    // 获取sink的连接器jar包
    Set<URL> jarUrls = new HashSet<>();
    jarUrls.addAll(getSinkPluginJarPaths(sinkConfig));
    List<SinkAction<?, ?, ?, ?>> sinkActions = new ArrayList<>();

    // 多个数据源的情况
    if (inputVertices.size() > 1) {
        Set<Action> inputActions =
                inputVertices.stream()
                        .flatMap(Collection::stream)
                        .map(Tuple2::_2)
                        .collect(Collectors.toCollection(LinkedHashSet::new));
        // 检查多个上游数据源产生的表结构是否一致
        checkProducedTypeEquals(inputActions);
        // 创建sinkAction
        Tuple2<CatalogTable, Action> inputActionSample = inputVertices.get(0).get(0);
        SinkAction<?, ?, ?, ?> sinkAction =
                createSinkAction(
                        inputActionSample._1(),
                        inputActions,
                        readonlyConfig,
                        classLoader,
                        jarUrls,
                        new HashSet<>(),
                        factoryId,
                        inputActionSample._2().getParallelism(),
                        configIndex);
        sinkActions.add(sinkAction);
        return sinkActions;
    }

    // 此时只有一个数据源,且此数据源下可能会产生多表,循环创建sinkAction
    for (Tuple2<CatalogTable, Action> tuple : inputVertices.get(0)) {
        SinkAction<?, ?, ?, ?> sinkAction =
                createSinkAction(
                        tuple._1(),
                        Collections.singleton(tuple._2()),
                        readonlyConfig,
                        classLoader,
                        jarUrls,
                        new HashSet<>(),
                        factoryId,
                        tuple._2().getParallelism(),
                        configIndex);
        sinkActions.add(sinkAction);
    }
    // 当一个数据源下多表时与多个数据源 会多进行这么这一步
    // 上面的createSinkAction是一致的
    // 此方法内会判断sink是否支持多表,以及
    Optional<SinkAction<?, ?, ?, ?>> multiTableSink =
            tryGenerateMultiTableSink(
                    sinkActions, readonlyConfig, classLoader, factoryId, configIndex);
    // 最终会将所创建的sink action作为返回值返回
    return multiTableSink
            .<List<SinkAction<?, ?, ?, ?>>>map(Collections::singletonList)
            .orElse(sinkActions);
}
接下来看下创建sinkAction方法
private SinkAction<?, ?, ?, ?> createSinkAction(
        CatalogTable catalogTable,
        Set<Action> inputActions,
        ReadonlyConfig readonlyConfig,
        ClassLoader classLoader,
        Set<URL> factoryUrls,
        Set<ConnectorJarIdentifier> connectorJarIdentifiers,
        String factoryId,
        int parallelism,
        int configIndex) {
    // 使用工厂类创建sink
    SeaTunnelSink<?, ?, ?, ?> sink =
            FactoryUtil.createAndPrepareSink(
                    catalogTable, readonlyConfig, classLoader, factoryId);
    sink.setJobContext(jobConfig.getJobContext());
    SinkConfig actionConfig =
            new SinkConfig(catalogTable.getTableId().toTablePath().toString());
    long id = idGenerator.getNextId();
    String actionName =
            JobConfigParser.createSinkActionName(
                    configIndex, factoryId, actionConfig.getMultipleRowTableId());
    // 创建sinkAction
    SinkAction<?, ?, ?, ?> sinkAction =
            new SinkAction<>(
                    id,
                    actionName,
                    new ArrayList<>(inputActions),
                    sink,
                    factoryUrls,
                    connectorJarIdentifiers,
                    actionConfig);
    if (!isStartWithSavePoint) {
    // 这里需要注意,当非从savepoint启动时,会进行savemode的处理
        handleSaveMode(sink);
    }
    sinkAction.setParallelism(parallelism);
    return sinkAction;
}

public void handleSaveMode(SeaTunnelSink<?, ?, ?, ?> sink) {
// 当sink类支持了savemode特性时,会进行savemode处理
// 例如删除表,重建表,报错等
    if (SupportSaveMode.class.isAssignableFrom(sink.getClass())) {
        SupportSaveMode saveModeSink = (SupportSaveMode) sink;
        // 当 设置savemode在client端执行时,会在client端去做这些事
        // 我们之前出现过一个错误是当在客户端执行完毕后,到集群后任务执行出错,卡在scheduling的状态
        // 导致数据被清空后没有及时写入
        // 以及需要注意这个地方执行的机器到sink集群的网络是否能够连通,推荐将这个行为放到server端执行
        if (envOptions
                .get(EnvCommonOptions.SAVEMODE_EXECUTE_LOCATION)
                .equals(SaveModeExecuteLocation.CLIENT)) {
            log.warn(
                    "SaveMode execute location on CLIENT is deprecated, please use CLUSTER instead.");
            Optional<SaveModeHandler> saveModeHandler = saveModeSink.getSaveModeHandler();
            if (saveModeHandler.isPresent()) {
                try (SaveModeHandler handler = saveModeHandler.get()) {
                    new SaveModeExecuteWrapper(handler).execute();
                } catch (Exception e) {
                    throw new SeaTunnelRuntimeException(HANDLE_SAVE_MODE_FAILED, e);
                }
            }
        }
    }
}
我们看完了如何去解析Source/Transform/Sink的逻辑,再回到调用的地方
    List<Action> sinkActions = new ArrayList<>();
    for (int configIndex = 0; configIndex < sinkConfigs.size(); configIndex++) {
        Config sinkConfig = sinkConfigs.get(configIndex);
        // parseSink方法来生成sink
        // 同样,传递了tableWithActionMap
        sinkActions.addAll(
                parseSink(configIndex, sinkConfig, classLoader, tableWithActionMap));
    }
    Set<URL> factoryUrls = getUsedFactoryUrls(sinkActions);
    return new ImmutablePair<>(sinkActions, factoryUrls);
parseSink会返回所有创建的Sink Action,而每个Action都维护了upstream Action,所以我们能通过最终的Sink Action找到相关联的Transform Action和Source Action
最终调用getUsedFactoryUrls或找到此链路上的所有依赖的Jar,然后返回一个二元组。
逻辑计划解析
再回到逻辑计划生成的部分
public LogicalDag getLogicalDag() {
    //
    ImmutablePair<List<Action>, Set<URL>> immutablePair = getJobConfigParser().parse(null);
    actions.addAll(immutablePair.getLeft());
    ....
    return getLogicalDagGenerator().generate();
}
在上面看完了如何去解析配置,接下来看下如何去生成逻辑计划
// 初始化将我们生成的所有SinkAction传入
protected LogicalDagGenerator getLogicalDagGenerator() {
    return new LogicalDagGenerator(actions, jobConfig, idGenerator, isStartWithSavePoint);
}


public LogicalDag generate() {
    // 根据action来生成节点信息
    actions.forEach(this::createLogicalVertex);
    // 创建边
    Set<LogicalEdge> logicalEdges = createLogicalEdges();
    // 构建LogicalDag对象,并将解析的值设置到相应属性中
    LogicalDag logicalDag = new LogicalDag(jobConfig, idGenerator);
    logicalDag.getEdges().addAll(logicalEdges);
    logicalDag.getLogicalVertexMap().putAll(logicalVertexMap);
    logicalDag.setStartWithSavePoint(isStartWithSavePoint);
    return logicalDag;
}
创建逻辑计划节点
private void createLogicalVertex(Action action) {
    // 获取当前action的id,判断当map中已经存在则返回
    final Long logicalVertexId = action.getId();
    if (logicalVertexMap.containsKey(logicalVertexId)) {
        return;
    }
    // 对上游的依赖进行循环创建
    // map对象的存储结构为:
    // 当前节点的id为key
    // value为一个list,存储下游使用到该节点的id编号
    action.getUpstream()
            .forEach(
                    inputAction -> {
                        createLogicalVertex(inputAction);
                        inputVerticesMap
                                .computeIfAbsent(
                                        inputAction.getId(), id -> new LinkedHashSet<>())
                                .add(logicalVertexId);
                    });
    // 最后创建当前节点的信息
    final LogicalVertex logicalVertex =
            new LogicalVertex(logicalVertexId, action, action.getParallelism());
    // 注意这里有两个map
    // 一个为inputVerticesMap,一个为logicalVertexMap
    // inputVerticesMap中存储了节点之间的关系
    // logicalVertexMap存储了节点编号与节点的关系
    logicalVertexMap.put(logicalVertexId, logicalVertex);
}


private Set<LogicalEdge> createLogicalEdges() {
    // 使用上面创建的两个map来创建边
    return inputVerticesMap.entrySet().stream()
            .map(
                    entry ->
                            entry.getValue().stream()
                                    .map(
                                            targetId ->
                                                    new LogicalEdge(
                                                            logicalVertexMap.get(
                                                                    entry.getKey()),
                                                            logicalVertexMap.get(targetId)))
                                    .collect(Collectors.toList()))
            .flatMap(Collection::stream)
            .collect(Collectors.toCollection(LinkedHashSet::new));
}

上面的配置中,会根据上下游关系生成这样的逻辑计划图,并且由于Fake2节点是没有任务下游的,并不会计入到逻辑计划中
小结一下
至此我们看完了在客户端如何完成一个任务的提交流程
小结一下:
- 首先会判断我们执行的模式,当我们是Local模式时,会在本机创建一个Server节点
- 然后在当前节点创建一个
Hazelcast节点,与Hazelcast集群进行连接,连接到集群或者刚刚启动的本地节点 - 接下来判断我们这次的任务类型来调用不同的方法
- 以提交任务为例,会解析配置文件,并进行逻辑计划解析,在逻辑计划解析时,会在提交的机器上创建
Source/Transform/Sink实例。并且去执行Savemode功能,有可能会建表,重建表,删除数据操作(当启用客户端执行时) - 当逻辑计划解析完成后,会将信息编码,然后通过
Hazelcast的集群通信功能,将信息发送给Server的Master节点
- 发送完成后,根据配置决定退出还是继续做任务状态的检测
- 程序添加
Hook配置,当客户端退出后取消刚刚提交的任务
本文完!
本文由 [白鲸开源]提供发布支持!


