

| | | |
| |
气泡布局的形状可以改变,如四角弧度、气泡颜色、箭头大小和阴影。
气泡Dialog可以根据被点击的view的位置来确定自己展示的位置。
更新
- 1.1.4:
①新增方法setLayout(int width, int height, int margin),width(设置气泡的宽)、height(设置气泡的高)、margin(设置距离屏幕边缘的间距,只有当设置 width 或 height 为 MATCH_PARENT 才有效)。
②autoPosition(true)方法准备弃用(现在还可以用),使用新方法autoPosition(Auto),如果两个都使用了会直接用autoPosition(Auto)。请参考下方“方法参考表”。
③感谢@wolf8088521提供建议#4 - 1.1.3:
①通过重新调用setClickedView可以直接更新当前dialog的所在位置。
②新添加setRelativeOffset(int)方法,设置dialog相对与被点击View的偏移(负值:向被点击view的中心偏移;正值:向被点击view的外侧偏移)
③测试页面SetClickedViewTestActivity.java
测试setClickedView
- 1.1.2:修复默认值没有适配屏幕
- 1.1.1:修复大小变化后,没有对应变化位置的问题;修复接触顶部偏位问题;
- 1.1.0
①Dialog交互事件传递到Activity达到不在不关闭Dialog的情况下做其他Activity的操作。
②添加自动根据被点击View距离屏幕边缘的距离确定Dialog的位置。
③新增“autoPosition”和“setThroughEvent”方法,请参考“BubbleDialog方法参考表”测试“autoPosition”和“setThroughEvent” - 1.0.3:继续优化了点击在气泡之外才会被dismiss;修复了Dialog周围会有部分点击无法dismiss;
- 1.0.2:修复点击dialog边缘无法取消
如何开始?
在你模块中的build.gradle添加上HappyBubble依赖
compile 'com.github.xujiaji:happy-bubble:1.1.4'如何使用 HappyBubble-BubbleDialog?
方法参考表
方法名 | 参数 | 描述 |
addContentView | View | 添加填充在气泡中的视图 |
setClickedView | View | 被点击的View(触发Dialog出现的View) |
setPosition | enum | BubbleDialog相对于被点击的view的位置 |
calBar | boolean | 是否计算状态栏的高度(如果布局没有全屏,则需要计算) |
setOffsetX | int | 如果您对dialog所展示的x轴位置不满,需要调整x轴方向偏移 |
setOffsetY | int | 如果您对dialog所展示的y轴位置不满,需要调整y轴方向偏移 |
setBubbleLayout | BubbleLayout | 自定义dialog的气泡布局 |
setTransParentBackground | - | 背景透明 |
softShowUp | - | 当气泡dialog中有EditText时,软键盘弹出会遮挡EditText时,dialog随软键盘上移。 |
show | - | 显示 |
autoPosition(已弃) | boolean | 是否开启自动确定位置功能,开启后,“setPosition”功能失效 |
autoPosition | enum
| 自动确定位置功能,显示在被点击View距离屏幕边缘的最大空间。开启后,“setPosition”功能失效。 AROUND:被点击View四周; UP_AND_DOWN:被点击View上下显示; LEFT_AND_RIGHT:被点击View左右显示; |
setThroughEvent | boolean, boolean | 第一个参数isThroughEvent设置是否穿透Dialog手势交互。 第二个参数cancelable 点击空白是否能取消Dialog,只有当"isThroughEvent = false"时才有效 |
setRelativeOffset | int | 设置dialog相对与被点击View的偏移(负值:向被点击view的中心偏移;正值:向被点击view的外侧偏移),设置后会直接影响setOffsetX和setOffsetY方法。 |
setLayout | int,int,int | 设置气泡的宽高和距离屏幕边缘的距离 第一个参数:width(设置气泡的宽); 第二个参数:height(设置气泡的高); 第三个参数:margin(设置距离屏幕边缘的间距,只有当设置 width 或 height 为 MATCH_PARENT 才有效)。 宽高单位为px或MATCH_PARENT |
最简单的实现
| |
|
|


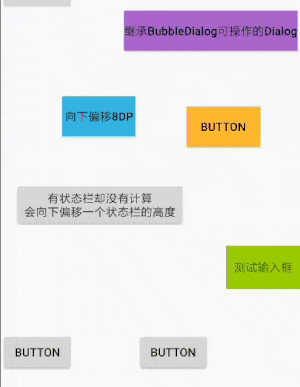
需要提供:Context、填充的View、被点击的View。</br>
如果最外层布局没有全屏时,您需要计算状态栏的高度,否则会多向下偏移一个状态栏的高度。
new BubbleDialog(this)
        .addContentView(LayoutInflater.from(this).inflate(R.layout.dialog_view3, null))
        .setClickedView(mButton)
        .calBar(true)
        .show();
向下偏移8dp

向下偏移8dp测试
new BubbleDialog(this)
        .addContentView(LayoutInflater.from(this).inflate(R.layout.dialog_view3, null))
        .setClickedView(mButton4)
        .setPosition(mPosition)
        .setOffsetY(8)
        .calBar(true)
        .show();
当想要输入框随软键盘上移时
测试软键盘弹出的情况
new BubbleDialog(this)
        .addContentView(LayoutInflater.from(this).inflate(R.layout.dialog_view, null))
        .setClickedView(mButton12)
        .setPosition(mPosition)
        .calBar(true)
        .softShowUp()
        .show();
自定义 BubbleLayout.

测试自定义样式的情况
BubbleLayout bl = new BubbleLayout(this);
bl.setBubbleColor(Color.BLUE);
bl.setShadowColor(Color.RED);
bl.setLookLength(Util.dpToPx(this, 54));
bl.setLookWidth(Util.dpToPx(this, 48));
new BubbleDialog(this)
        .addContentView(LayoutInflater.from(this).inflate(R.layout.dialog_view5, null))
        .setClickedView(mButton8)
        .setPosition(mPosition)
        .calBar(true)
        .setBubbleLayout(bl)
        .show();
自定义 BubbleDialog,可交互的 BubbleDialog.

自定义内部布局的情况
1、布局
<?xml version="1.0" encoding="utf-8"?>
<LinearLayout xmlns:android="http://schemas.android.com/apk/res/android"
    android:layout_width="160dp"
    android:layout_height="match_parent"
    android:orientation="vertical">

    <Button
        android:id="@+id/button13"
        android:layout_width="match_parent"
        android:layout_height="wrap_content"
        android:text="Button1" />

    <Button
        android:id="@+id/button14"
        android:layout_width="match_parent"
        android:layout_height="wrap_content"
        android:text="Button2" />

    <Button
        android:id="@+id/button15"
        android:layout_width="match_parent"
        android:layout_height="wrap_content"
        android:text="Button3" />

</LinearLayout>
2、自定义 BubbleDialog
/**
 * 自定义可操作性dialog
 * Created by JiajiXu on 17-12-11.
 */

public class CustomOperateDialog extends BubbleDialog implements View.OnClickListener
{
    private ViewHolder mViewHolder;
    private OnClickCustomButtonListener mListener;

    public CustomOperateDialog(Context context)
    {
        super(context);
        calBar(true);
        setTransParentBackground();
        setPosition(Position.TOP);
        View rootView = LayoutInflater.from(context).inflate(R.layout.dialog_view4, null);
        mViewHolder = new ViewHolder(rootView);
        addContentView(rootView);
        mViewHolder.btn13.setOnClickListener(this);
        mViewHolder.btn14.setOnClickListener(this);
        mViewHolder.btn15.setOnClickListener(this);
    }

    @Override
    public void onClick(View v)
    {
        if (mListener != null)
        {
            mListener.onClick(((Button)v).getText().toString());
        }
    }

    private static class ViewHolder
    {
        Button btn13, btn14, btn15;
        public ViewHolder(View rootView)
        {
            btn13 = rootView.findViewById(R.id.button13);
            btn14 = rootView.findViewById(R.id.button14);
            btn15 = rootView.findViewById(R.id.button15);
        }
    }

    public void setClickListener(OnClickCustomButtonListener l)
    {
        this.mListener = l;
    }

    public interface OnClickCustomButtonListener
    {
        void onClick(String str);
    }
}
3、显示
CustomOperateDialog codDialog = new CustomOperateDialog(this)
        .setPosition(mPosition)
        .setClickedView(mButton10);
codDialog.setClickListener(new CustomOperateDialog.OnClickCustomButtonListener()
{
    @Override
    public void onClick(String str)
    {
        mButton10.setText("点击了:" + str);
    }
});
codDialog.show();
查看关于BappyDialog的使用代码
写法建议
根据@hm该朋友在文章中反馈的多次点击后位置不对的问题,是由于多次对BappyDialog进行了设置导致,所以建议下方写法。(当然如果对重复调用setClickedView()方法设置不同的被点击的控件来更新位置有需要,是需要写在外面的。)
if(mBubbleDialog == null)
{
    mBubbleDialog = new BubbleDialog(this)
        .addContentView(LayoutInflater.from(this).inflate(R.layout.dialog_view3, null))
        .setClickedView(mButton4)
        .setPosition(mPosition)
        .setOffsetY(8)
        .calBar(true);
}
mBubbleDialog.show();
如何使用 HappyBubble-BubbleLayout?
在XML代码中设置属性值
属性参照表
属性 | 值 | 描述 |
lookAt | left, top, right, bottom | 箭头指向 |
lookLength | dimension | 箭头的长度 |
lookPosition | dimension | 箭头相对于x或y轴的位置 |
lookWidth | dimension | 箭头的宽度 |
bubbleColor | color | 气泡的颜色 |
bubbleRadius | dimension | 气泡四角的圆弧 |
bubblePadding | dimension | 气泡边缘到内容的距离 |
shadowRadius | dimension | 阴影的扩散大小 |
shadowX | dimension | 阴影在x轴方向的偏移 |
shadowY | dimension | 阴影在y轴方向的偏移 |
shadowColor | color | 阴影的颜色 |
xml 例子
<com.xujiaji.happybubble.BubbleLayout
        xmlns:app="http://schemas.android.com/apk/res-auto"
        android:id="@+id/bubbleLayout"
        android:layout_width="match_parent"
        android:layout_height="200dp"
        android:layout_margin="16dp"
        app:lookAt="left"
        app:lookLength="16dp"
        app:lookPosition="20dp"
        app:lookWidth="16dp" />
在java代码中定义属性值。
BubbleLayout 通过“set属性名”方法和invalidate方法来更新BubbleLayout。
mBubbleLayout.setLook(BubbleLayout.Look.LEFT);查看更多
MainActivity 代码
演示BubbleLayout的一些特性
感谢您的使用、Star与建议!


