Android 低功耗蓝牙开发(扫描、连接)

前言

  之前我写过蓝牙开发的文章,只不过是针对于经典蓝牙,可以理解为普通蓝牙,连接的对象是经典蓝牙,列如手机蓝牙、蓝牙耳机等设备。而也有读者说在学习低功耗蓝牙,因此就有了这篇文章,一方面是为了丰富蓝牙的使用,一方面也是为了帮助看我文章的读者,我会讲的很细,很多人也说我在记流水账,不过这不重要,重要的是你从流水账里学到了什么。

正文

  首先明白低功耗蓝牙是什么?

  蓝牙低能耗(Bluetooth Low Energy,或称Bluetooth LE、BLE,旧商标Bluetooth Smart)也称低功耗蓝牙,是蓝牙技术联盟设计和销售的一种个人局域网技术,旨在用于医疗保健、运动健身、信标、安防、家庭娱乐等领域的新兴应用。相较经典蓝牙,低功耗蓝牙旨在保持同等通信范围的同时显著降低功耗和成本。

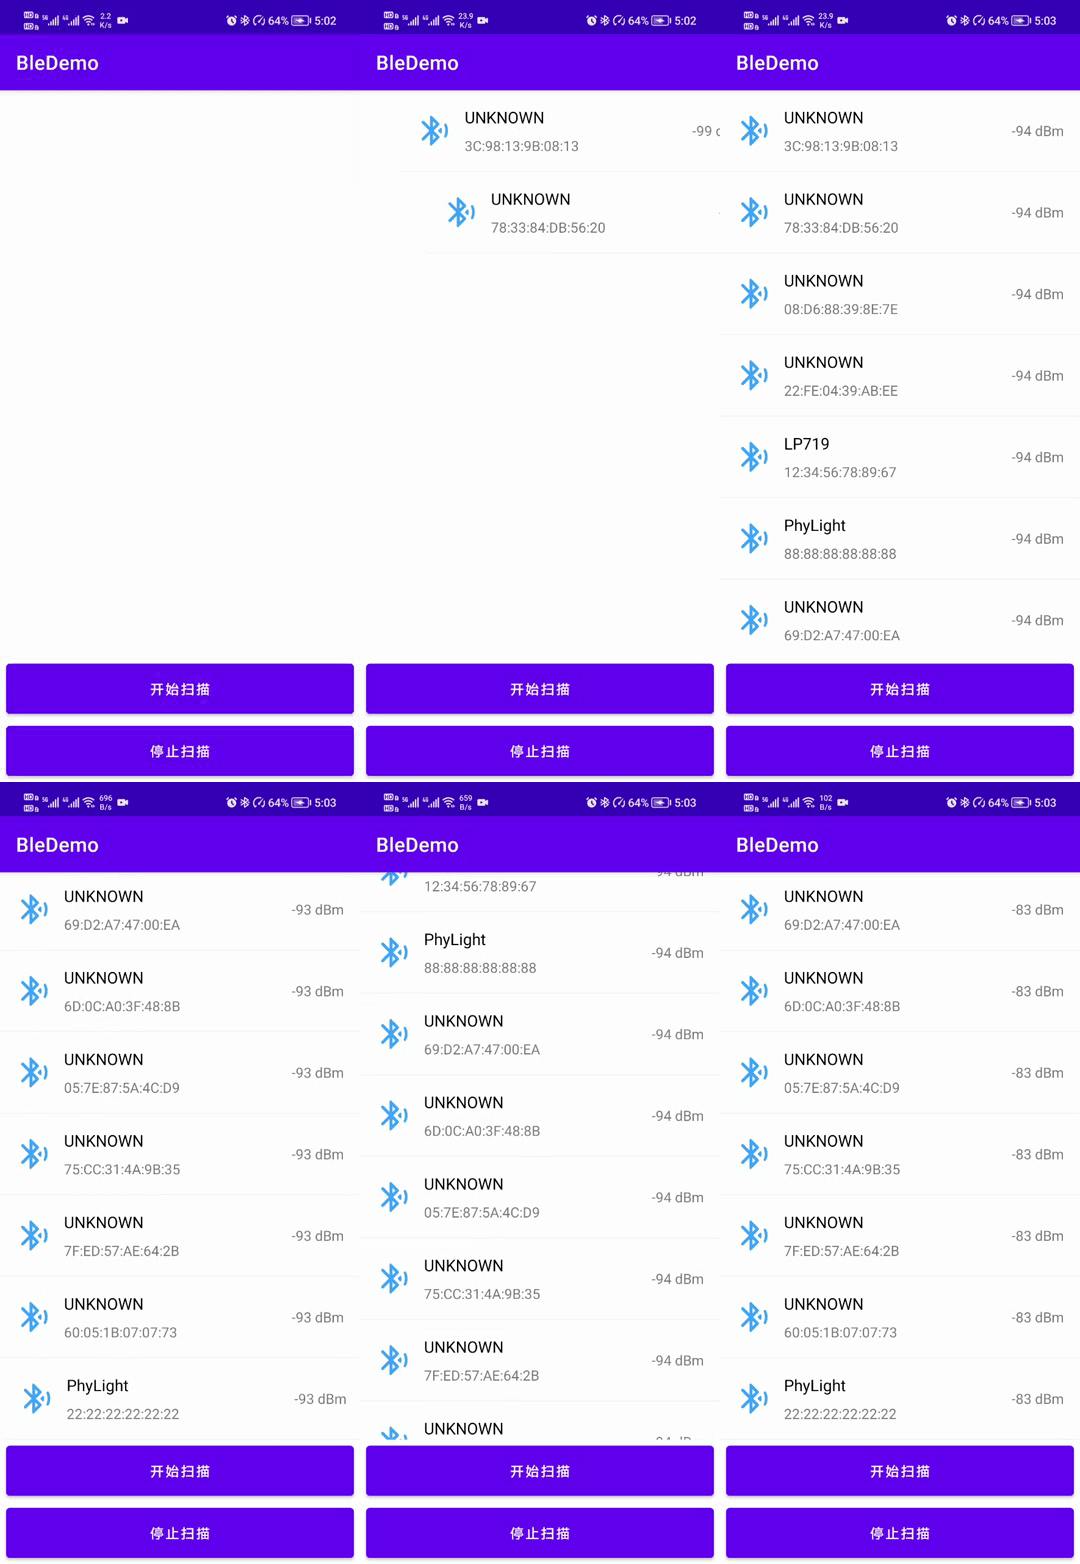
效果图如下:
Android 低功耗蓝牙开发(扫描、连接)_android

  概念已经了解了,下面创建一个名为BleDemo的项目来写这篇文章。

Android 低功耗蓝牙开发(扫描、连接)_低功耗蓝牙扫描_02

一、项目配置

  首先进行项目的配置,一个是build.gradle配置,一个是AndroidManifest.xml配置。
先进行项目的build.gradle的配置,添加jitpack仓库。

maven { url "https://jitpack.io"}

Android 低功耗蓝牙开发(扫描、连接)_android_03

再进行app的build.gradle的配置,这里需要添加几个依赖库,

//蓝牙扫描库
implementation 'no.nordicsemi.android.support.v18:scanner:1.5.0'
//权限请求 支持Androidx
implementation 'pub.devrel:easypermissions:3.0.0'
//让你的适配器一目了然,告别代码冗余
implementation 'com.github.CymChad:BaseRecyclerViewAdapterHelper:3.0.4'

Android 低功耗蓝牙开发(扫描、连接)_低功耗蓝牙_04


改完了build.gradle记得要Sync Now。

这个库是Nordic公司开发的,在蓝牙领域很出名的公司。这个版本是适配androidx的,一般现在创建新项目都是默认支持androidx的,不支持的话就说明你的AS该更新了。如果要支持support请到GitHub上去适配。其他的库或多或少都有接触过就不介绍了。

下面配置AndroidManifest.xml。

<!-- 蓝牙权限 -->
<uses-permission android:name="android.permission.BLUETOOTH" />
<uses-permission android:name="android.permission.BLUETOOTH_ADMIN" />
<!-- 支持ble的设备 -->
<uses-feature
android:name="android.hardware.bluetooth_le"
android:required="true" />
<!-- 定位权限 -->
<uses-permission android:name="android.permission.ACCESS_COARSE_LOCATION" />
<uses-permission android:name="android.permission.ACCESS_FINE_LOCATION" />

添加位置如下图所示

Android 低功耗蓝牙开发(扫描、连接)_android_05


  在Android 6.0以后的系统BLE scan需要申请location的相关权限才能支持BLE的一些功能,比如发现附近的beacons设备。

  这是开发的时候必须用到的权限,并非权限滥用。而在Android6.0以后则有了动态权限的申请,这里就说明一下等下为是什么要请求定位权限,后面就不要问我为什么扫描一个蓝牙还要打开定位权限这样的问题了。

二、权限请求

  这里主要是定位权限的请求,还有就是获得定位之后,蓝牙是否有打开也需要进行处理,下面进行具体的编码。
在MainActivity中新增一个方法,代码如下:

/**
* 检查Android版本
*/
private void checkAndroidVersion() {
if (Build.VERSION.SDK_INT >= Build.VERSION_CODES.M) {
//Android 6.0及以上动态请求权限

} else {
//检查蓝牙是否打开

}
}

这里进行Android版本的判断,6.0及以上则请求权限,6.0一下则判断蓝牙是否打开。

下面先写这个蓝牙是否打开的判断

/**
* 请求打开蓝牙
*/
private static final int REQUEST_ENABLE_BLUETOOTH = 100;
/**
* 蓝牙适配器
*/
private BluetoothAdapter bluetoothAdapter;

/**
* 是否打开蓝牙
*/
public void openBluetooth() {
//获取蓝牙适配器
bluetoothAdapter = BluetoothAdapter.getDefaultAdapter();
if (bluetoothAdapter != null) {//是否支持蓝牙
if (bluetoothAdapter.isEnabled()) {//打开
showMsg("蓝牙已打开");
} else {//未打开
startActivityForResult(new Intent(BluetoothAdapter.ACTION_REQUEST_ENABLE), REQUEST_ENABLE_BLUETOOTH);
}
} else {
showMsg("你的设备不支持蓝牙");
}
}

/**
* Toast提示
*
* @param msg 内容
*/
private void showMsg(String msg) {
Toast.makeText(this, msg, Toast.LENGTH_SHORT).show();
}

这里会有一个页面的返回结果,代码如下:

@Override
protected void onActivityResult(int requestCode, int resultCode, Intent data) {
super.onActivityResult(requestCode, resultCode, data);
if (resultCode == Activity.RESULT_OK) {
if (requestCode == REQUEST_ENABLE_BLUETOOTH) {
if (bluetoothAdapter.isEnabled()) {
//蓝牙已打开
showMsg("蓝牙已打开");
} else {
showMsg("请打开蓝牙");
}
}
}
}

那么现在对于蓝牙是否打开的结果进行了处理,下面进行动态权限的请求。

/**
* 权限请求码
*/
public static final int REQUEST_PERMISSION_CODE = 9527;

/**
* 请求权限
*/
@AfterPermissionGranted(REQUEST_PERMISSION_CODE)
private void requestPermission() {
String[] perms = {Manifest.permission.ACCESS_FINE_LOCATION,
Manifest.permission.ACCESS_COARSE_LOCATION,};
if (EasyPermissions.hasPermissions(this, perms)) {
//权限通过之后检查有没有打开蓝牙
openBluetooth();
} else {
// 没有权限
EasyPermissions.requestPermissions(this, "App需要定位权限", REQUEST_PERMISSION_CODE, perms);
}
}

这里会检查权限,有权限检查有没有打开蓝牙,没有权限则请求权限,请求权限的结果代码如下:

/**
* 权限请求结果
*/
@Override
public void onRequestPermissionsResult(int requestCode, String[] permissions, int[] grantResults) {
super.onRequestPermissionsResult(requestCode, permissions, grantResults);
// 将结果转发给 EasyPermissions
EasyPermissions.onRequestPermissionsResult(REQUEST_PERMISSION_CODE, permissions, grantResults, this);
}

这个结果会通过@AfterPermissionGranted注解将结果返回给这个requestPermission方法,然后重新检查权限结果。下面只要在checkAndroidVersion中调用这个requestPermission()方法和openBluetooth()方法即可,如下图所示:

Android 低功耗蓝牙开发(扫描、连接)_低功耗蓝牙扫描_06


现在就形成了一个逻辑链,不过还需要一个地方去调用这个checkAndroidVersion()方法,就直接在onCreate中调用吧。

Android 低功耗蓝牙开发(扫描、连接)_低功耗蓝牙_07


继续下一步。

三、扫描低功耗蓝牙

  扫描低功耗蓝牙,首先要有触发的地方,其次要有显示结果的地方,这些都需要进行UI的处理,那么下面进行布局的修改和增加,修改activity_main.xml,代码如下:

<?xml version="1.0" encoding="utf-8"?>
<RelativeLayout xmlns:android="http://schemas.android.com/apk/res/android"
xmlns:tools="http://schemas.android.com/tools"
android:layout_width="match_parent"
android:layout_height="match_parent"
tools:context=".MainActivity">

<!--设备列表-->
<androidx.recyclerview.widget.RecyclerView
android:id="@+id/rv_device"
android:layout_width="match_parent"
android:layout_height="match_parent"
android:layout_above="@+id/btn_start_scan"
android:overScrollMode="never" />

<!--开始扫描-->
<com.google.android.material.button.MaterialButton
android:id="@+id/btn_start_scan"
android:layout_width="match_parent"
android:layout_height="50dp"
android:layout_above="@+id/btn_stop_scan"
android:layout_margin="6dp"
android:insetTop="0dp"
android:insetBottom="0dp"
android:text="开始扫描" />
<!--停止扫描-->
<com.google.android.material.button.MaterialButton
android:id="@+id/btn_stop_scan"
android:layout_width="match_parent"
android:layout_height="50dp"
android:layout_alignParentBottom="true"
android:layout_margin="6dp"
android:insetTop="0dp"
android:insetBottom="0dp"
android:text="停止扫描" />
</RelativeLayout>

下面进行列表item的布局编写,在layout下新建一个item_device_rv.xml文件,文件代码如下:

<?xml version="1.0" encoding="utf-8"?>
<LinearLayout xmlns:android="http://schemas.android.com/apk/res/android"
android:layout_width="match_parent"
android:layout_height="wrap_content"
android:background="@color/white"
android:foreground="?attr/selectableItemBackground"
android:orientation="vertical">

<LinearLayout
android:layout_width="match_parent"
android:layout_height="wrap_content"
android:gravity="center_vertical"
android:padding="16dp">

<ImageView
android:layout_width="wrap_content"
android:layout_height="wrap_content"
android:src="@drawable/ic_bluetooth_blue" />

<LinearLayout
android:layout_width="0dp"
android:layout_height="wrap_content"
android:layout_weight="1"
android:orientation="vertical"
android:paddingStart="12dp">

<TextView
android:id="@+id/tv_device_name"
android:layout_width="wrap_content"
android:layout_height="wrap_content"
android:ellipsize="end"
android:singleLine="true"
android:text="设备名称"
android:textColor="@color/black"
android:textSize="16sp" />

<TextView
android:id="@+id/tv_mac_address"
android:layout_width="wrap_content"
android:layout_height="wrap_content"
android:layout_marginTop="8dp"
android:ellipsize="end"
android:singleLine="true"
android:text="Mac地址" />
</LinearLayout>

<TextView
android:id="@+id/tv_rssi"
android:layout_width="wrap_content"
android:layout_height="wrap_content"
android:text="信号强度" />
</LinearLayout>

<View
android:layout_width="match_parent"
android:layout_height="0.5dp"
android:background="#EEE" />
</LinearLayout>

这里面有一个图标,使用路径绘制的ic_bluetooth_blue.xml,放在drawable文件夹下,代码如下:

<?xml version="1.0" encoding="UTF-8" standalone="no"?>
<vector xmlns:android="http://schemas.android.com/apk/res/android"
android:width="36dp"
android:height="36dp"
android:autoMirrored="true"
android:tint="#42A5F5"
android:viewportWidth="24.0"
android:viewportHeight="24.0">

<path
android:fillColor="@android:color/white"
android:pathData="M14.58,12.36l1.38,1.38c0.28,0.28 0.75,0.14 0.84,-0.24c0.12,-0.48 0.18,-0.99 0.18,-1.5c0,-0.51 -0.06,-1.01 -0.18,-1.48c-0.09,-0.38 -0.56,-0.52 -0.84,-0.24l-1.39,1.38C14.39,11.85 14.39,12.17 14.58,12.36zM18.72,7.51l-0.05,0.05c-0.25,0.25 -0.3,0.62 -0.16,0.94c0.47,1.07 0.73,2.25 0.73,3.49c0,1.24 -0.26,2.42 -0.73,3.49c-0.14,0.32 -0.09,0.69 0.16,0.94l0,0c0.41,0.41 1.1,0.29 1.35,-0.23c0.63,-1.3 0.98,-2.76 0.98,-4.3c-0.01,-1.48 -0.34,-2.89 -0.93,-4.16C19.83,7.22 19.13,7.1 18.72,7.51zM15,7l-4.79,-4.79C10.07,2.07 9.89,2 9.71,2h0C9.32,2 9,2.32 9,2.71v6.88L5.12,5.7c-0.39,-0.39 -1.02,-0.39 -1.41,0l0,0c-0.39,0.39 -0.39,1.02 0,1.41L8.59,12l-4.89,4.89c-0.39,0.39 -0.39,1.02 0,1.41h0c0.39,0.39 1.02,0.39 1.41,0L9,14.41v6.88C9,21.68 9.32,22 9.71,22h0c0.19,0 0.37,-0.07 0.5,-0.21L15,17c0.39,-0.39 0.39,-1.02 0,-1.42L11.41,12L15,8.42C15.39,8.03 15.39,7.39 15,7zM11,5.83l1.88,1.88L11,9.59V5.83zM12.88,16.29L11,18.17v-3.76L12.88,16.29z" />

</vector>

好了,现在针对于这个布局方面的内容告一段落,下面先运行一下了:

Android 低功耗蓝牙开发(扫描、连接)_android_08


进行下一步操作。

先进行页面的初始化。新增一个initView的方法。

private static final String TAG = MainActivity.class.getSimpleName();
/**
* nordic扫描回调
*/
private ScanCallback scanCallback;

/**
* 初始化
*/
private void initView() {
RecyclerView rvDevice = findViewById(R.id.rv_device);
findViewById(R.id.btn_start_scan).setOnClickListener(v -> startScanDevice());
findViewById(R.id.btn_stop_scan).setOnClickListener(v -> stopScanDevice());
//扫描结果回调
scanCallback = new ScanCallback() {
@Override
public void onScanResult(int callbackType, @NonNull ScanResult result) {

Log.d(TAG, "name:" + result.getDevice().getName() + ",rssi:" + result.getRssi());
}

@Override
public void onScanFailed(int errorCode) {
throw new RuntimeException("Scan error");
}
};
}

这个initView主要是页面的初始化,列表在后面进行配置,根据扫描结果来定,然后就是配置扫描回调,这里注意导包的问题,不要到错了包。

Android 低功耗蓝牙开发(扫描、连接)_android_09


然后还有一个开始扫描和停止扫描的方法。

/**
* 开始扫描设备
*/
public void startScanDevice() {
BluetoothLeScannerCompat scanner = BluetoothLeScannerCompat.getScanner();
scanner.startScan(scanCallback);
}

/**
* 停止扫描设备
*/
public void stopScanDevice() {
BluetoothLeScannerCompat scanner = BluetoothLeScannerCompat.getScanner();
scanner.stopScan(scanCallback);
}

下面在onCreate方法中调用initView()方法。

Android 低功耗蓝牙开发(扫描、连接)_低功耗蓝牙_10


下面就可以开始运行了。运行之后点击开始扫描按钮,就会扫描附近的低功耗蓝牙设备,(请在附近有已打开低功耗蓝牙时进行扫描)可以在日志栏处进行打印。

Android 低功耗蓝牙开发(扫描、连接)_BLE扫描、连接_11


这里很明显,扫描到了一些蓝牙设备,并且很多设备没有设备名称。既然有了结果,那么下面就是将扫描到的结果显示在列表上,这样才更直观。

四、显示扫描设备

  下面将扫描结果渲染到列表上,首先明确列表要显示扫描设备的那些信息,从item来看有设备名、Mac地址、信号强度。那么可以根据这一个扫描的信息构建一个设备类,新建一个BleDevice类,代码如下:

package com.llw.bledemo.bean;

import android.bluetooth.BluetoothDevice;

/**
* @author llw
* @description BleDevice
* @date 2021/7/21 19:20
*/
public class BleDevice {
private BluetoothDevice device;
private int rssi;
private String realName;//真实名称

/**
* 构造Device
* @param device 蓝牙设备
* @param rssi 信号强度
* @param realName 真实名称
*/
public BleDevice(BluetoothDevice device, int rssi, String realName) {
this.device = device;
this.rssi = rssi;
this.realName = realName;
}

public BluetoothDevice getDevice(){
return device;
}

public int getRssi(){
return rssi;
}

public void setRssi(int rssi) {
this.rssi = rssi;
}

public String getRealName(){
return realName;
}

public void setRealName(String realName) {
this.realName = realName;
}

@Override
public boolean equals(Object object) {
if(object instanceof BleDevice){
final BleDevice that =(BleDevice) object;
return device.getAddress().equals(that.device.getAddress());
}
return super.equals(object);
}
}

下面来写这个适配器,新建一个BleDeviceAdapter类,代码如下:

package com.llw.bledemo.adapter;

import com.chad.library.adapter.base.BaseQuickAdapter;
import com.chad.library.adapter.base.viewholder.BaseViewHolder;
import com.llw.bledemo.R;
import com.llw.bledemo.bean.BleDevice;

import java.util.List;

/**
* @author llw
* @description BleDeviceAdapter
* @date 2021/7/21 19:34
*/
public class BleDeviceAdapter extends BaseQuickAdapter<BleDevice, BaseViewHolder> {

public BleDeviceAdapter(int layoutResId, List<BleDevice> data) {
super(layoutResId, data);
}

@Override
protected void convert(BaseViewHolder holder, BleDevice bleDevice) {
holder.setText(R.id.tv_device_name, bleDevice.getRealName())
.setText(R.id.tv_mac_address, bleDevice.getDevice().getAddress())
.setText(R.id.tv_rssi, bleDevice.getRssi() + " dBm");
}
}

下面回到MainActivity中对列表进行适配,先定义变量

/**
* 设备列表
*/
private List<BleDevice> mList = new ArrayList<>();

/**
* 列表适配器
*/
private BleDeviceAdapter deviceAdapter;

然后在initView方法中进行列表配置,代码如下:

//列表配置
deviceAdapter = new BleDeviceAdapter(R.layout.item_device_rv, mList);
rvDevice.setLayoutManager(new LinearLayoutManager(this));
//启用动画
deviceAdapter.setAnimationEnable(true);
//设置动画方式
deviceAdapter.setAnimationWithDefault(BaseQuickAdapter.AnimationType.SlideInRight);
rvDevice.setAdapter(deviceAdapter);

添加位置如下:

Android 低功耗蓝牙开发(扫描、连接)_android_12


下面就是将扫描结果添加到列表中了,可以写一个方法addDeviceList(),代码如下:

/**
* 添加到设备列表
*
* @param bleDevice 蓝牙设备
*/
private void addDeviceList(BleDevice bleDevice) {
if (!mList.contains(bleDevice)) {
bleDevice.setRealName(bleDevice.getRealName() == null ? "UNKNOWN" : bleDevice.getRealName());
mList.add(bleDevice);
} else {
//更新设备信号强度值
for (BleDevice device : mList) {
device.setRssi(bleDevice.getRssi());
}
}
//刷新列表适配器
deviceAdapter.notifyDataSetChanged();
}

然后在扫描的回调中进行调用即可。

Android 低功耗蓝牙开发(扫描、连接)_BLE扫描、连接_13


点击开始的时候清理一下列表。

Android 低功耗蓝牙开发(扫描、连接)_低功耗蓝牙连接_14

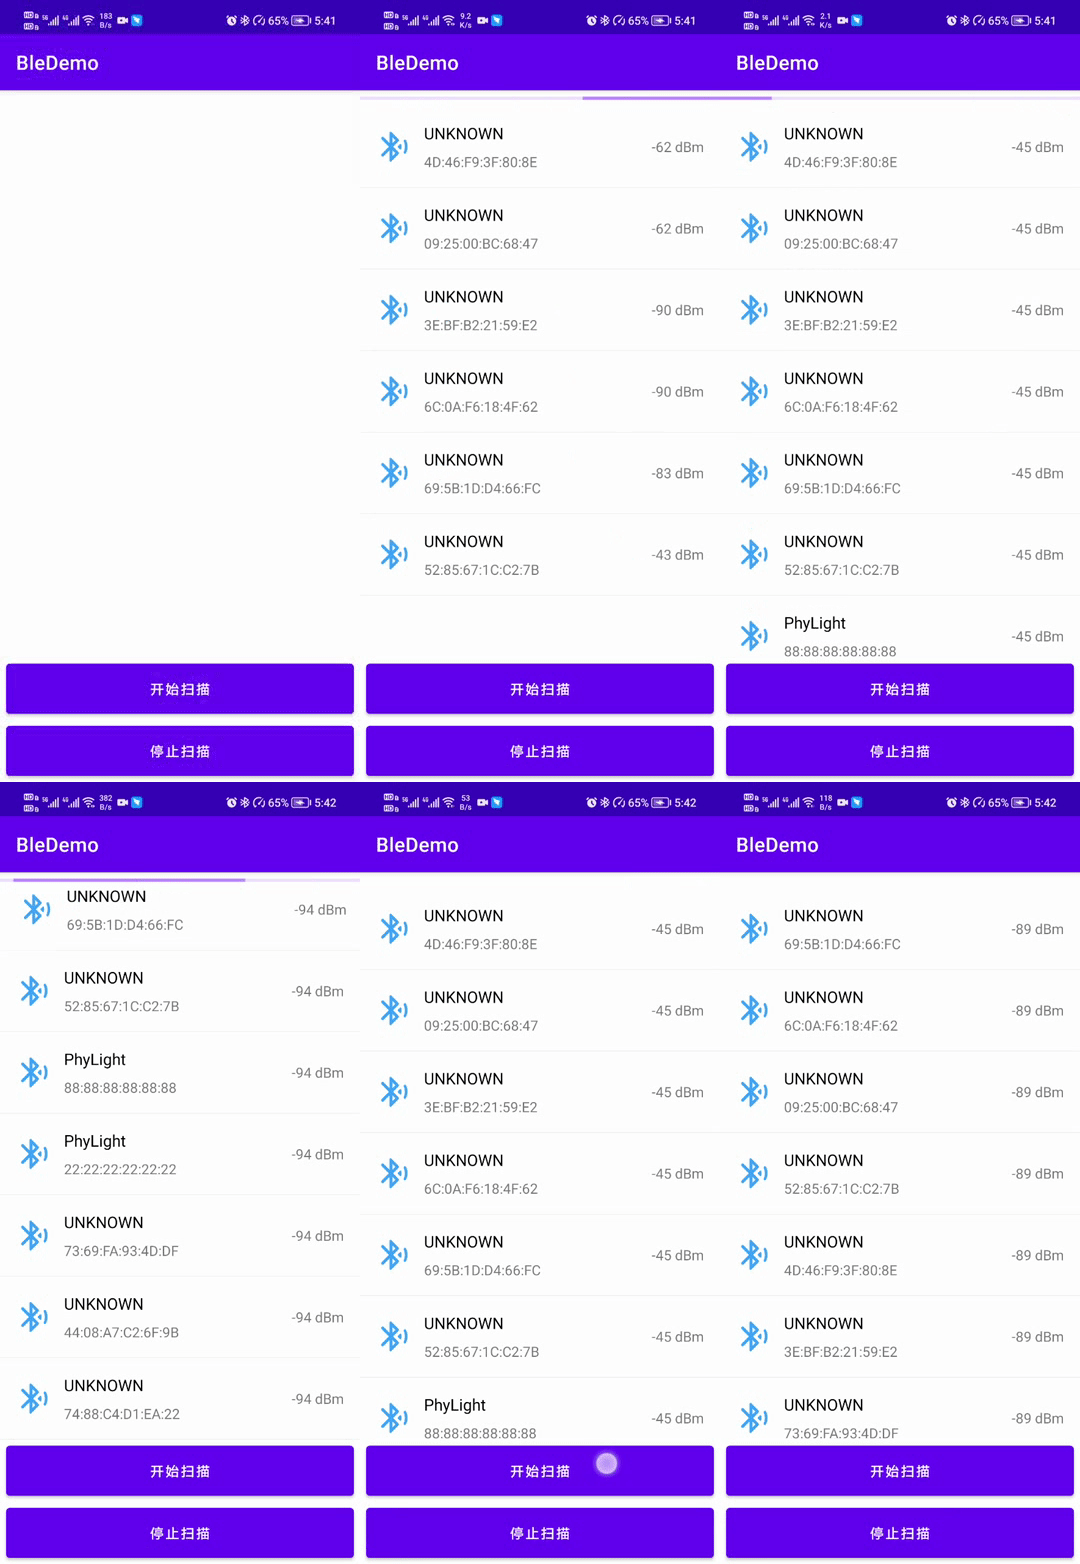
下面运行一下:

Android 低功耗蓝牙开发(扫描、连接)_低功耗蓝牙连接_15


增加一个表示搜索的效果,在activity_main.xml中增加

<androidx.core.widget.ContentLoadingProgressBar
android:id="@+id/loading_progress_bar"
style="?android:attr/progressBarStyleHorizontal"
android:layout_width="match_parent"
android:layout_height="wrap_content"
android:indeterminate="true"
android:indeterminateTint="@color/purple_200"
android:visibility="invisible"
tools:ignore="UnusedAttribute"/>

然后这个进度条设置在列表的上面。

Android 低功耗蓝牙开发(扫描、连接)_低功耗蓝牙_16


回到MainActivity,创建变量:

/**
* 加载进度条
*/
private ContentLoadingProgressBar loadingProgressBar;

绑定视图

Android 低功耗蓝牙开发(扫描、连接)_低功耗蓝牙扫描_17


控制视图

Android 低功耗蓝牙开发(扫描、连接)_BLE扫描、连接_18


运行一下:

Android 低功耗蓝牙开发(扫描、连接)_android_19

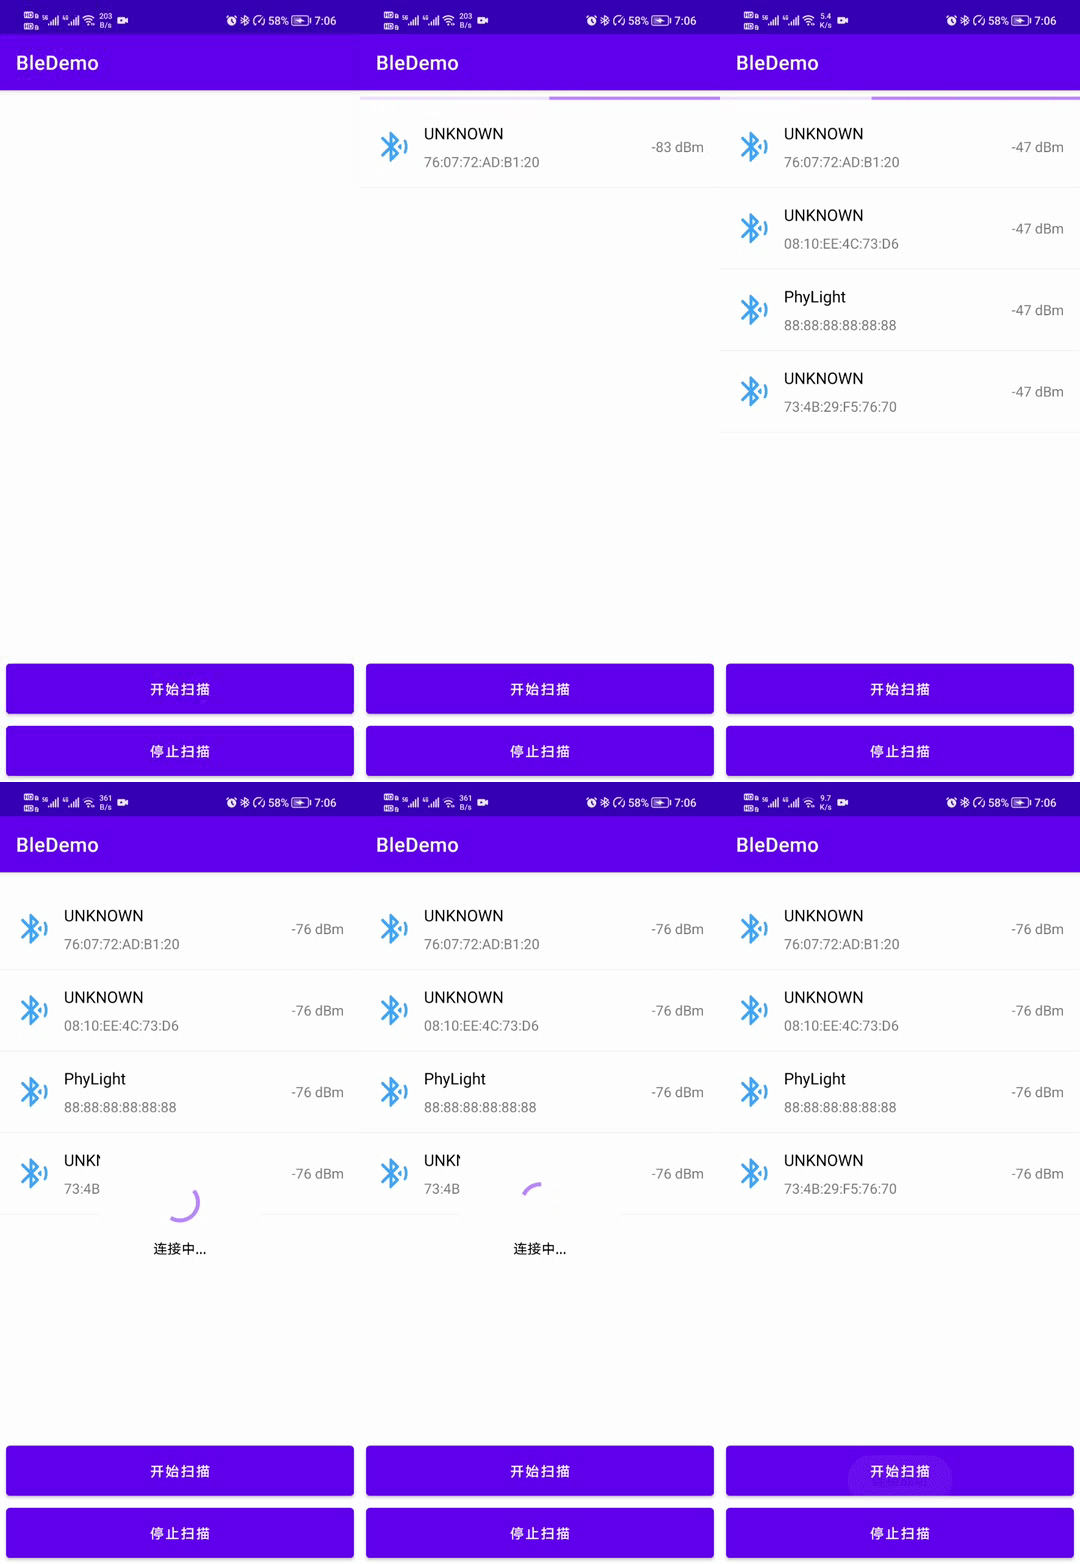
五、连接设备

  连接Ble设备其实也很简单,难的是连接之外的东西,先来构想一下连接功能的业务逻辑,点击设备列表中的设备,进行连接,先显示一个加载布局,表示现在正在连接,然后停止扫描,在根据设备的mac地址去连接这个设备,然后在连接设备的回调中处理连接设备的结果。嗯,就是这样。下面来编码,首先是加载布局的问题。在activity_main.xml中增加如下布局代码:

<!--加载布局-->
<LinearLayout
android:id="@+id/lay_connecting_loading"
android:layout_centerInParent="true"
android:layout_width="160dp"
android:layout_height="160dp"
android:orientation="vertical"
android:visibility="invisible"
android:background="@color/white"
android:gravity="center">

<ProgressBar
android:layout_width="wrap_content"
android:layout_height="wrap_content"
android:indeterminate="true"
android:indeterminateTint="@color/purple_200" />

<TextView
android:layout_marginTop="12dp"
android:layout_width="wrap_content"
android:layout_height="wrap_content"
android:text="连接中..."
android:textColor="@color/black"
android:textSize="@dimen/sp_14" />
</LinearLayout>

添加位置如下图

Android 低功耗蓝牙开发(扫描、连接)_BLE扫描、连接_20


然后在MainActivity中创建变量

/**
* 等待连接
*/
private LinearLayout layConnectingLoading;

绑定视图

Android 低功耗蓝牙开发(扫描、连接)_低功耗蓝牙_21


下面新增一个方法,用来连接设备。在点击设备列表Item的时候调用。

/**
* 连接设备
*
* @param bleDevice 蓝牙设备
*/
private void connectDevice(BleDevice bleDevice) {
//显示连接等待布局
layConnectingLoading.setVisibility(View.VISIBLE);

//停止扫描
stopScanDevice();

//获取远程设备
BluetoothDevice device = bleDevice.getDevice();
//连接gatt
device.connectGatt(this, false, new BluetoothGattCallback() {
@Override
public void onConnectionStateChange(BluetoothGatt gatt, int status, int newState) {
switch (newState) {
case BluetoothProfile.STATE_CONNECTED://连接成功
Log.d(TAG,"连接成功");
runOnUiThread(() -> {
layConnectingLoading.setVisibility(View.GONE);
showMsg("连接成功");
});
break;
case BluetoothProfile.STATE_DISCONNECTED://断开连接
Log.d(TAG,"断开连接");
runOnUiThread(() -> {
layConnectingLoading.setVisibility(View.GONE);
showMsg("断开连接");
});
break;
default:
break;
}
}
});
}

在initView()中设置列表点击。

//item点击事件
deviceAdapter.setOnItemClickListener((adapter, view, position) -> {
//连接设备
connectDevice(mList.get(position));
});

Android 低功耗蓝牙开发(扫描、连接)_低功耗蓝牙_22


OK,下面运行一下:

Android 低功耗蓝牙开发(扫描、连接)_低功耗蓝牙_23


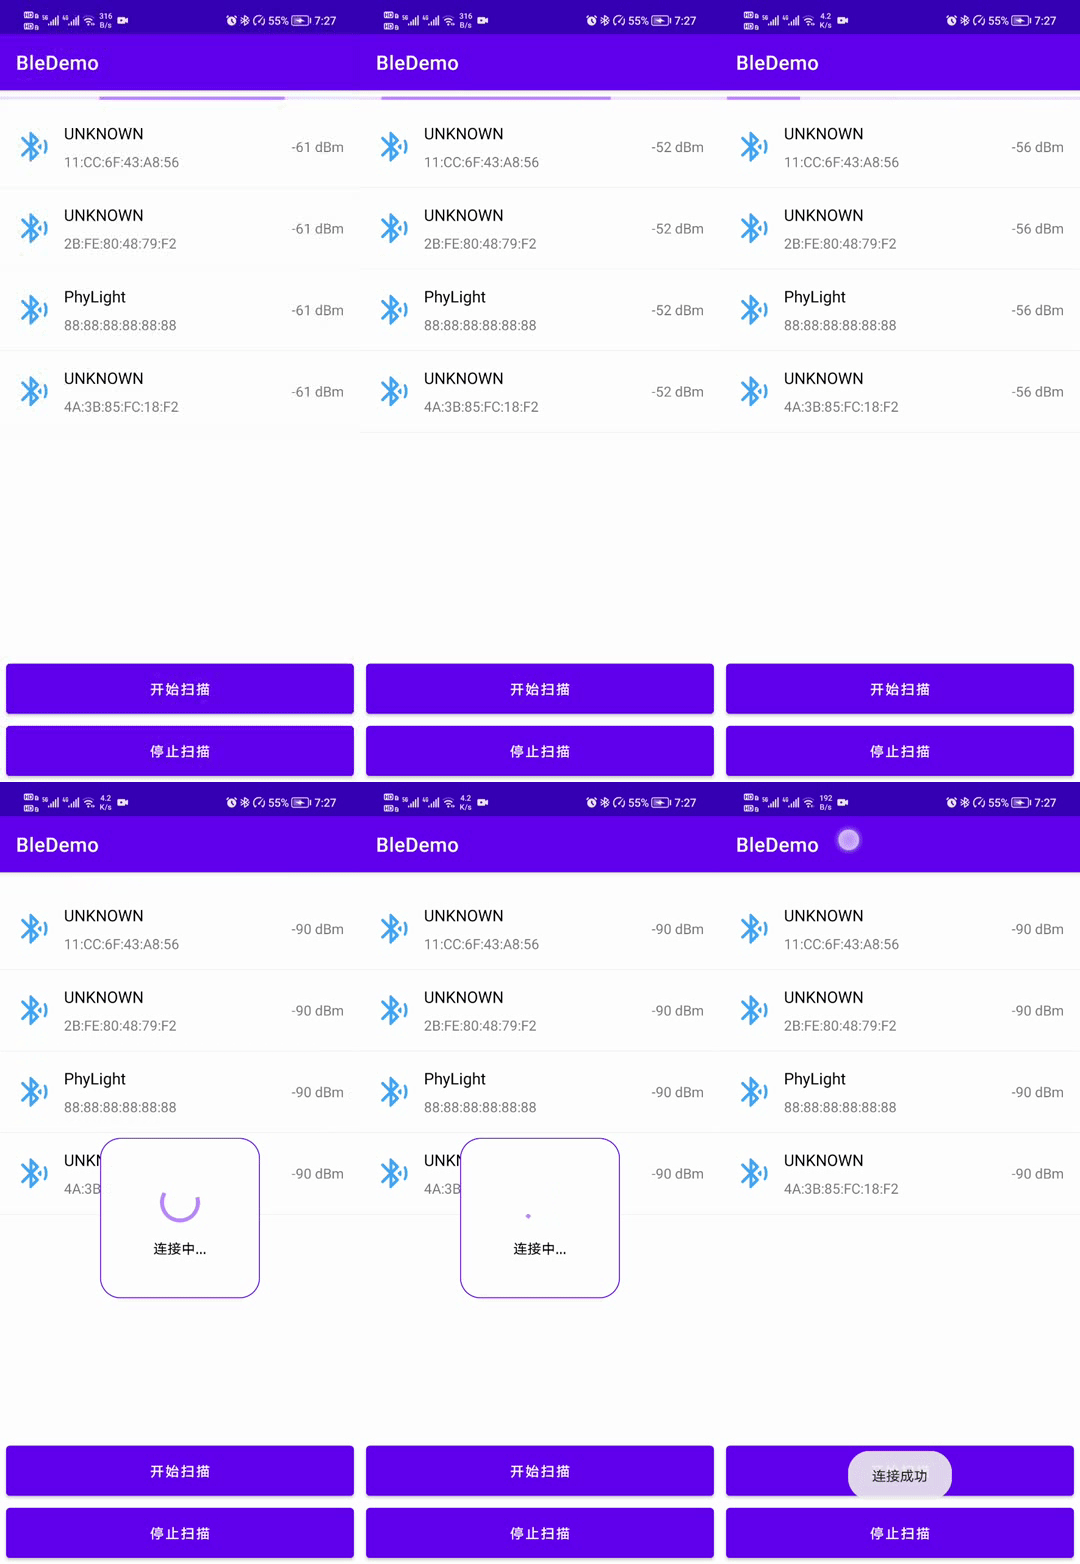
这个布局背景是白色的不是很明显,改一下好了。在drawable文件夹下新建一个shape_loading_bg.xml,里面的代码如下:

<?xml version="1.0" encoding="utf-8"?>
<shape xmlns:android="http://schemas.android.com/apk/res/android">
<solid android:color="@color/white" />
<corners android:radius="20dp" />
<stroke
android:width="1dp"
android:color="@color/purple_500" />
</shape>

然后设置到这个布局中

Android 低功耗蓝牙开发(扫描、连接)_android_24


运行看看

Android 低功耗蓝牙开发(扫描、连接)_android


嗯,还可以,就这样了。

有连接设备就自然有断开连接设备。再增加两个变量

/**
* Gatt
*/
private BluetoothGatt bluetoothGatt;

/**
* 设备是否连接
*/
private boolean isConnected = false;

修改connectDevice()中的代码,如下图所示

Android 低功耗蓝牙开发(扫描、连接)_低功耗蓝牙_26


再新建一个断开连接的方法,代码如下:

/**
* 断开设备连接
*/
private void disconnectDevice() {
if (isConnected && bluetoothGatt != null) {
bluetoothGatt.disconnect();
}
}

六、源码

源码地址Github:​​BleDemo​