由于暂时没想好叫啥名,暂且用“XX”代替。
以下内容主要是对项目的主要流程及做项目过程中碰到的一些问题的记录~~
一、确定 URL
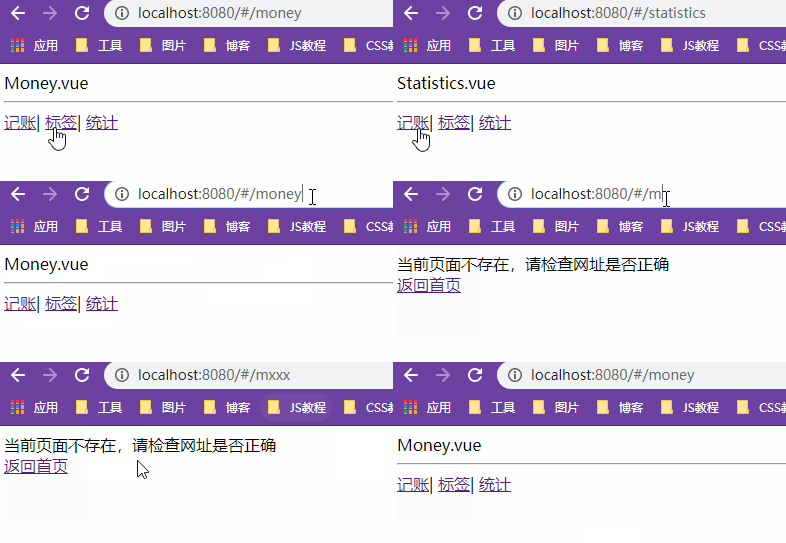
使用VueRouter创建四个页面
-
#/money显示记账页(Money.vue) -
#/labels显示标签页(Labels.vue) -
#/statistics显示统计页(Statistics.vue) - 访问其他路径显示404页面(
NotFound.vue) - 默认进入
#/money(使用重定向)
// router/index.ts
const routes = [
  { // 从'/'重定向到'/money'
    path: '/',
    redirect: '/money'
  },
  {
    path: '/money',
    component: Money
  },
  {
    path: '/labels',
    component: Labels
  },
  {
    path: '/statistics',
    component: Statistics
  },
  {
    path: '*', // 会匹配除上面3个路径以外的所有路径
    component: NotFound
  }
]
注意:路由执行的顺序是先匹配除
*以外的路径,只有当所有正常路径都找不到之后,才会去匹配*,因此含有通配符*的路由应该放在最后。
然后在App.vue中用<router-view/>展示router渲染区域
<!-- App.vue -->
<template>
  <div>
    <router-view />
    <hr />
    <router-link to="/money">记账</router-link>|
    <router-link to="/labels">标签</router-link>|
    <router-link to="/statistics">统计</router-link>
  </div>
</template>
效果显示如下:

二、展示底部<Nav />组件
在上面的代码中,我是在App.vue中全局展示的导航栏的内容,虽然只用写一次代码就让所有页面有了底部的导航栏,但这么写就会存在一个问题,如果这时候我如果想让某一个页面不展示底部导航,比如404页面。那这种在App.vue中全局展示的导航栏的方式显然不太好,当然还是可以用v-if判断URL的方式来决定是否显示导航栏,但这样写起来比较麻烦。
换一种思路,这里我将导航栏的内容封装为一个<Nav />组件,然后让需要有导航栏的页面(组件)单独引入<Nav />(组件复用)不就可以了吗。可以是可以,但这样写依旧比较麻烦,因为我如果想使用<Nav />,那么就得在每个组件中先引入(import),然后局部注册,最后才能使用。
经过权衡,最终我选择在main.ts中全局注册<Nav />组件这种方式,这样哪个页面需要有导航栏我就可以直接使用了,同时也省掉了在每个组件中都得引入和局部注册的步骤。

封装<Nav />组件
<!-- components/Nav.vue -->
<template>
  <div>
    <hr />
    <router-link to="/money">记账</router-link>|
    <router-link to="/labels">标签</router-link>|
    <router-link to="/statistics">统计</router-link>
  </div>
</template>

<script>
export default {
  name: "Nav"
};
</script>
main.ts中全局注册
import Nav from '@/components/Nav.vue'
Vue.component('Nav', Nav)
每个组件中使用
<template>
  <div class="nav-wrapper">
    <div class="content">Money.vue</div>
    <Nav />
  </div>
</template>
三、布局选择,fixed 还是 flex ?
CSS布局这里也有两种推荐方案可供选择,fixed和flex,但是fixed在移动端实在有太多坑了,这里不细讲,不信你试着搜索关键词“fixed 手机 坑”,看看会出来多少结果,于是这里我自然就只能选择使用flex布局。
<!-- Money.vue -->
<template>
  <div class="nav-wrapper">
    <div class="content">Money.vue</div>
    <Nav />
  </div>
</template>
...
<style lang="scss" scoped>
.nav-wrapper {
  display: flex;
  flex-direction: column;
  height: 100vh;
}
.content {
  flex-grow: 1;
  overflow: auto;
}
</style>
写完了Money.vue的布局,通常的做法就是再把同样事情重复几次,只要把相同的布局代码复制给Labels.vue和Statistics.vue用不也挺好?
但这里我们观察一下就会发现,3个组件都使用相同的布局,唯一不同的地方就是其内容,那我把布局抽离成一个组件,然后将每个组件中不同的内容以插槽(<slot />)的形式插入布局中不就可以避免重复了吗。
<!-- components/Layout.vue -->
<template>
  <div class="nav-wrapper">
    <div class="content">
      <slot />
    </div>
    <Nav />
  </div>
</template>
...
<style lang="scss" scoped>
.nav-wrapper {
  border: 1px solid red;
  display: flex;
  flex-direction: column;
  height: 100vh;
}
.content {
  flex-grow: 1;
  overflow: auto;
  border: 1px solid blue;
}
</style>
然后在main.ts中全局注册
import Layout from '@/components/Layout.vue'
Vue.component('Layout', Layout)
最后在每个组件中使用
<template>
  <Layout>Money.vue</Layout>
</template>
四、使用 svg-sprite-loader 引入 icon
步骤如下:
- 去 http://iconfont.cn 上下载
svg放到src/assets/icons目录下 - 如果直接引入
svg,则会报错

- 搜索关键词
typescript svg cannot find module,发现解决方法就是在shims-vue.d.ts文件中写入对.svg文件的声明
// shims-vue.d.ts
declare module '*.svg' {
  const content: string
  export default content
}
- 报错消失,然后控制台中打印出来的是字符串

- 安装svg-sprite-loader
bash yarn add svg-sprite-loader -D - 配置
vue.config.js
const path = require('path')
module.exports = {
  lintOnSave: false,
  chainWebpack: config => {
    const dir = path.resolve(__dirname, 'src/assets/icons')
    config.module
      .rule('svg-sprite')
      .test(/.svg$/)
      .include.add(dir).end() // 包含 icons 目录
      .use('svg-sprite-loader').loader('svg-sprite-loader').options({ extract: false }).end()
    config.plugin('svg-sprite').use(require('svg-sprite-loader/plugin'), [{ plainSprite: true }])
    config.module.rule('svg').exclude.add(dir) // 其他 svg loader 排除 icons 目录
  }
}
eslint报错的解决方法
此时我们发现浏览器中打印出的结果变了

body中也新增了<svg>和<symbol>这两个标签

- 使用
<use/>显示icon
<svg>
  <use xlink:href="#label" />
</svg>
成功显示出图标

从以上过程可以看出svg-sprite-loader的作用就是将下载的svg文件变为<symbol>并放到<svg>中。
两个工程问题
- 能不能一次性导入所有icon,这样一个一个导入很费事儿。
- 每次都要写
<svg>+<use>标签比较麻烦,能不能封装为一个组件?
五、一次性引入整个 icon 目录
用下面的代码可将一个目录里任意后缀的文件(这里指svg文件)统一全部引入到当前文件中
const importAll = (requireContext: __WebpackModuleApi.RequireContext) =>
  requireContext.keys().forEach(requireContext);
try {
  importAll(require.context("../assets/icons", true, /.svg$/));
} catch (error) {
  console.log(error);
}
body中成功显示出3个symbol标签

六、封装 Icon 组件
<template>
  <svg class="icon">
    <use :xlink:href="'#'+name" />
  </svg>
</template>

<script lang="ts">
const importAll = (requireContext: __WebpackModuleApi.RequireContext) =>
  requireContext.keys().forEach(requireContext);
try {
  importAll(require.context("../assets/icons", true, /.svg$/));
} catch (error) {
  console.log(error);
}
export default {
  name: "Icon",
  props: ["name"]
};
</script>

<style lang="scss" scoped>
.icon {
  width: 1em;
  height: 1em;
  vertical-align: -0.15em;
  fill: currentColor;
  overflow: hidden;
}
</style>
别忘了全局注册之后再使用<Icon name="xxx" />
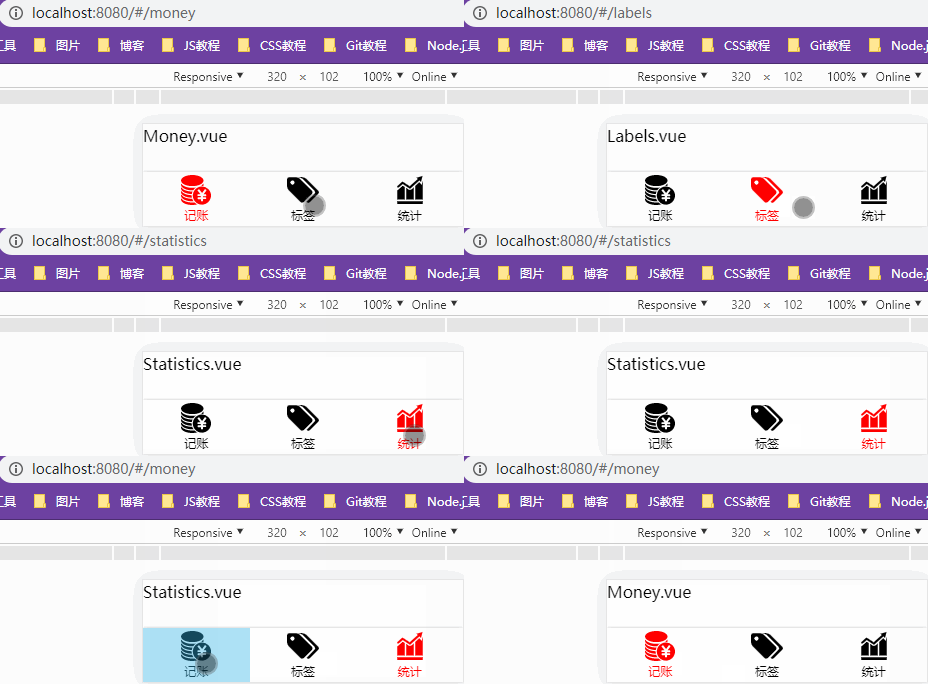
七、active-class(路由激活)的简单使用
查文档可知,active-class是VueRouter模块的router-link组件中的属性,用来做选中样式的切换。
其原理非常简单,就是点击router-link标签“激活”时给它添加一个由你指定的 class 名。
举个例子,如果当前的路径是 /x 开头的,那么 <router-link to="/x"> 此时就是被“激活”的,这个“激活”的标签就会被添加 class。
<router-link to="/money" class="item" active-class="selected">
  <Icon name="money" />记账
</router-link>

<style lang="scss" scoped>
.item.selected {
  color: red;
}
</style>
效果如下:

注意:你很有可能会碰到下载下来的 svg 文件无法通过修改 color/fill 改变其颜色的问题。
出现这个问题的原因其实是在通过symbol获取图标时,默认会在svg的path中增加fill属性(你可以通过查看svg的源代码并使用ctrl+f查找fill属性来验证我的说法),导致无法更改颜色。
解决方法:
- 手动删除
fill
你可以在使用iconfont.cn下载图标时勾选"批量操作-->批量去色"来删除fill,也可以在下载完svg文件之后在它的源代码里手动将fill删除。
- 通过工具 svgo-loader 删除
fill
- 安装
svgo-loaderbash yarn add svgo svgo-loader -D - 在之前修改过的
vue.config.js文件中加入以下两行代码
module.exports = {
    ...
    config.module
      ...
      .use('svgo-loader').loader('svgo-loader')
      .tap(options => ({ ...options, plugins: [{ removeAttrs: { attrs: 'fill' } }] })).end()
      ...
}
通过工具来删除的好处就是不管你在引入svg的时候有没有手动删除fill,也不管你有多少svg文件都一并帮你去掉它们的颜色,比起手动删的方式来说要方便许多。
八、添加 meta:vp
既然是移动端的项目,别忘了在public/index.html中添加一个meta:vp哦
<meta name="viewport" content="width=device-width,initial-scale=1,minimum-scale=1,maximum-scale=1,user-scalable=no,viewport-fit=cover">
最后:eslint 报错的解决方法
报错信息如下图:

这里给出 3 种解决方法:
- 关闭 eslint 提示(鸵鸟做法)
临时在一段代码中取消 eslint 检查,只需在代码上方加上以下内容即可
/* eslint-disable */
- 修改代码
既然 eslint 提示我require语句不属于import语句,那我就把require改为import就好了js import path from 'path'; - 更改配置
在.eslintrc.js文件中添加以下内容
module.exports = {
  ...
  rules: {
  ...
  '@typescript-eslint/no-var-requires': 0
  }
}
end~~
第一次在知乎投稿,顺便吐槽一下知乎的导入.md功能,对markdown文件的支持一点都不好,我本来写好的markdown导入过来好多格式都乱了,花了我好长时间改格式。


