极光推送的使用
为什么需要消息推送
京东有折扣你可以知道,淘宝有优惠你可以知道,游戏的情况你可以知道,微博有人找你你可以知道,贴吧有人回复你可以知道,全民k歌你关注的人唱了歌你可以知道。。。。。。
为什么选择极光推送
极光推送是国内首批为app开发者提供专业推送服务的第三方平台之一,经过近6年的技术积累和扎实的服务,极光推送在业内已经拥有了超高人气和良好口碑,顺利成为了包括探探、聚美优品、快看漫画、浦发银行在内的众多明星 app 的推送解决方案提供商。
极光推送是国内首批为app开发者提供专业推送服务的第三方平台之一,经过近6年的技术积累和扎实的服务,极光推送在业内已经拥有了超高人气和良好口碑,顺利成为了包括探探、聚美优品、快看漫画、浦发银行在内的众多明星 app 的推送解决方案提供商。
如何使用极光推送
1 注册登陆 https://www.jiguang.cn/
2 下载SDK https://www.jiguang.cn/downloads/sdk/android
3 新建安卓项目 JPushDemo
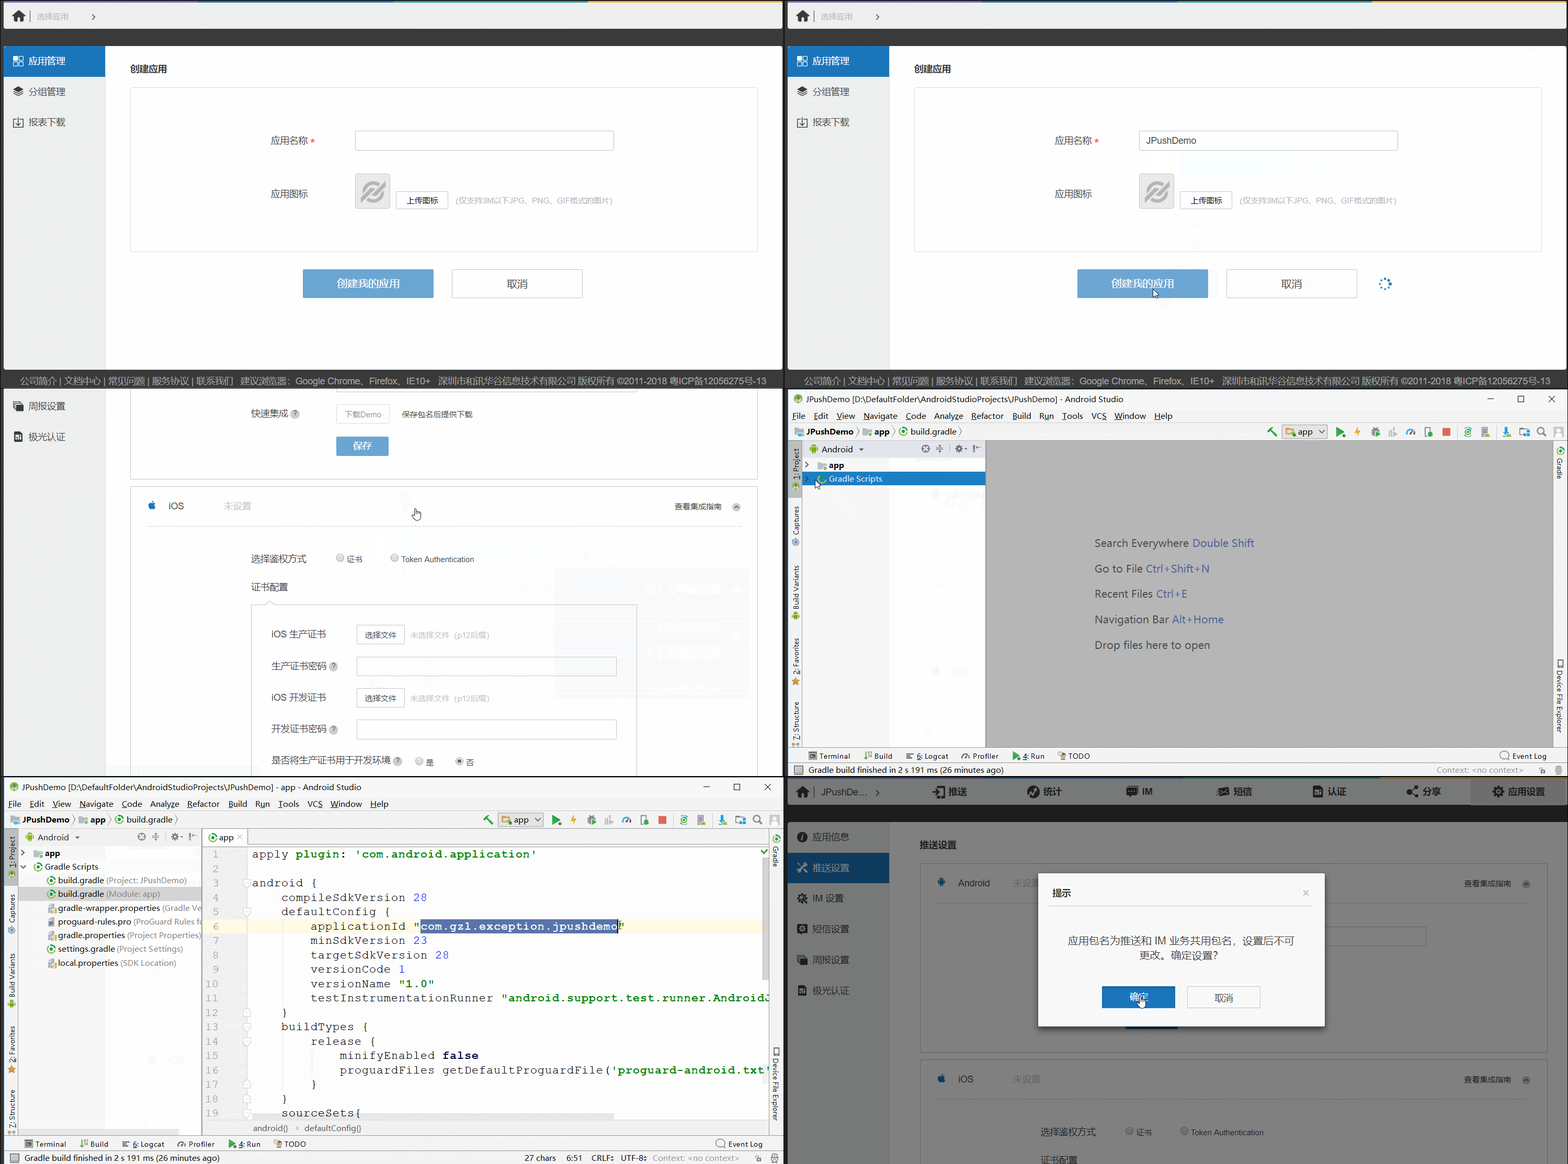
4 极光网站上创建应用 确保已经登陆
https://www.jiguang.cn/dev/#/app/list#dev

5 把下载好的 SDK解压

6 解压文件导入项目
其他资源文件(res)也考进来 然后在bulid.gradle(moudle:app)下添加 sourceSets{ main{ jniLibs.srcDirs = ['libs'] } } 重新构建 就会出现jniLibs文件夹

(不添加 sourceSets{ main{ jniLibs.srcDirs = ['libs'] } } 也行 自己新建 jinLibs文件夹 把cpu类型考进去,Jar包放进libs,完全按自己喜好)
7 接下来是清单文件
这一步不要着急慢慢来,不要一下全部复制粘贴,这样很容易出错,
先拷贝权限
<!-- Required   把下面的应用包名改成你的项目包名 -->
    <permission
        android:name="您应用的包名.permission.JPUSH_MESSAGE"
        android:protectionLevel="signature" />

    <!-- Required -->
    <uses-permission android:name="您应用的包名.permission.JPUSH_MESSAGE" />
    <uses-permission android:name="android.permission.RECEIVE_USER_PRESENT" />
    <uses-permission android:name="android.permission.INTERNET" />
    <uses-permission android:name="android.permission.READ_PHONE_STATE" />
    <uses-permission android:name="android.permission.WRITE_EXTERNAL_STORAGE" />
    <uses-permission android:name="android.permission.READ_EXTERNAL_STORAGE" />
    <uses-permission android:name="android.permission.MOUNT_UNMOUNT_FILESYSTEMS"
        tools:ignore="ProtectedPermissions" />
    <uses-permission android:name="android.permission.ACCESS_NETWORK_STATE" />
    <uses-permission android:name="android.permission.WRITE_SETTINGS"
        tools:ignore="ProtectedPermissions" />
    <uses-permission android:name="android.permission.ACCESS_WIFI_STATE" />

    <!-- Optional. Required for location feature -->
    <uses-permission android:name="android.permission.SYSTEM_ALERT_WINDOW" /> <!-- 用于开启 debug 版本的应用在 6.0 系统上的层叠窗口权限 -->
    <uses-permission android:name="android.permission.ACCESS_COARSE_LOCATION" />
    <uses-permission android:name="android.permission.CHANGE_WIFI_STATE" />
    <uses-permission android:name="android.permission.ACCESS_FINE_LOCATION" />
    <uses-permission android:name="android.permission.ACCESS_LOCATION_EXTRA_COMMANDS" />
    <uses-permission android:name="android.permission.CHANGE_NETWORK_STATE" />
    <uses-permission android:name="android.permission.GET_TASKS" />
    <uses-permission android:name="android.permission.VIBRATE" />
有些权限会报错 因为这些权限只能授予系统级别的应用 添加 tools:ignore="ProtectedPermissions" 属性就可以了
8 添加 活动,广播,服务,内容提供
<!-- Required SDK 核心功能-->
        <!-- 可配置 android:process 参数将 PushService 放在其他进程中 -->
        <service
            android:name="cn.jpush.android.service.PushService"
            android:enabled="true"
            android:exported="false" >
            <intent-filter>
                <action android:name="cn.jpush.android.intent.REGISTER" />
                <action android:name="cn.jpush.android.intent.REPORT" />
                <action android:name="cn.jpush.android.intent.PushService" />
                <action android:name="cn.jpush.android.intent.PUSH_TIME" />
            </intent-filter>
        </service>


    <!-- since 3.0.9 Required SDK 核心功能-->
        <provider
            android:authorities="您应用的包名.DataProvider"
            android:name="cn.jpush.android.service.DataProvider"
            android:exported="true"
        />

        <!-- since 1.8.0 option 可选项。用于同一设备中不同应用的 JPush 服务相互拉起的功能。 -->
        <!-- 若不启用该功能可删除该组件,或把 enabled 设置成 false ;拉起服务被关闭,App 不会通过拉起服务拉起其他的 App,也不会被其他 App 拉起。 -->
         <service
             android:name="cn.jpush.android.service.DaemonService"
             android:enabled="true"
             android:exported="true">
             <intent-filter >
                 <action android:name="cn.jpush.android.intent.DaemonService" />
                 <category android:name="您应用的包名"/>
             </intent-filter>
         </service>

         <!-- since 3.1.0 Required SDK 核心功能-->
          <provider
               android:authorities="您应用的包名.DownloadProvider"
               android:name="cn.jpush.android.service.DownloadProvider"
               android:exported="true"
           />

        <!-- Required SDK 核心功能-->
        <receiver
            android:name="cn.jpush.android.service.PushReceiver"
            android:enabled="true" >
          <intent-filter android:priority="1000">
                <action android:name="cn.jpush.android.intent.NOTIFICATION_RECEIVED_PROXY" />
                <category android:name="您应用的包名"/>
            </intent-filter>
            <intent-filter>
                <action android:name="android.intent.action.USER_PRESENT" />
                <action android:name="android.net.conn.CONNECTIVITY_CHANGE" />
            </intent-filter>
            <!-- Optional -->
            <intent-filter>
                <action android:name="android.intent.action.PACKAGE_ADDED" />
                <action android:name="android.intent.action.PACKAGE_REMOVED" />
                <data android:scheme="package" />
            </intent-filter>
        </receiver>

        <!-- Required SDK 核心功能-->
        <activity
            android:name="cn.jpush.android.ui.PushActivity"
            android:configChanges="orientation|keyboardHidden"
            android:theme="@android:style/Theme.NoTitleBar"
            android:exported="false" >
            <intent-filter>
                <action android:name="cn.jpush.android.ui.PushActivity" />
                <category android:name="android.intent.category.DEFAULT" />
                <category android:name="您应用的包名" />
            </intent-filter>
        </activity>
        <!-- SDK 核心功能-->
        <activity
            android:name="cn.jpush.android.ui.PopWinActivity"
            android:configChanges="orientation|keyboardHidden"
            android:exported="false"
            android:theme="@style/MyDialogStyle">
            <intent-filter>
                <category android:name="android.intent.category.DEFAULT" />
                <category android:name="您应用的包名" />
            </intent-filter>
        </activity>

        <!-- Required SDK 核心功能-->
        <service
            android:name="cn.jpush.android.service.DownloadService"
            android:enabled="true"
            android:exported="false" >
        </service>

        <!-- Required SDK 核心功能-->
        <receiver android:name="cn.jpush.android.service.AlarmReceiver" />

        <!-- Required since 3.0.7 -->
        <!-- 新的 tag/alias 接口结果返回需要开发者配置一个自定的广播 -->
        <!-- 该广播需要继承 JPush 提供的 JPushMessageReceiver 类, 并如下新增一个 Intent-Filter -->
        <receiver
            android:name="自定义 Receiver"
            android:enabled="true"
            android:exported="false" >
            <intent-filter>
                <action android:name="cn.jpush.android.intent.RECEIVE_MESSAGE" />
                <category android:name="您应用的包名" />
            </intent-filter>
        </receiver>

        <!-- User defined. 用户自定义的广播接收器-->
         <receiver
             android:name="您自己定义的 Receiver"
             android:enabled="true"
             android:exported="false">
             <intent-filter>
                 <!--Required 用户注册 SDK 的 intent-->
                 <action android:name="cn.jpush.android.intent.REGISTRATION" />
                 <!--Required 用户接收 SDK 消息的 intent-->
                 <action android:name="cn.jpush.android.intent.MESSAGE_RECEIVED" />
                 <!--Required 用户接收 SDK 通知栏信息的 intent-->
                 <action android:name="cn.jpush.android.intent.NOTIFICATION_RECEIVED" />
                 <!--Required 用户打开自定义通知栏的 intent-->
                 <action android:name="cn.jpush.android.intent.NOTIFICATION_OPENED" />
                 <!-- 接收网络变化 连接/断开 since 1.6.3 -->
                 <action android:name="cn.jpush.android.intent.CONNECTION" />
                 <category android:name="您应用的包名" />
             </intent-filter>
         </receiver>

        <!-- Required. For publish channel feature -->
        <!-- JPUSH_CHANNEL 是为了方便开发者统计 APK 分发渠道。-->
        <!-- 例如: -->
        <!-- 发到 Google Play 的 APK 可以设置为 google-play; -->
        <!-- 发到其他市场的 APK 可以设置为 xxx-market。 -->
        <meta-data android:name="JPUSH_CHANNEL" android:value="developer-default"/>
        <!-- Required. AppKey copied from Portal -->
        <meta-data android:name="JPUSH_APPKEY" android:value="您应用的 Appkey"/>
按要求修改 包名 和 申请到的Key 那两个 receiver 先注释掉
9 初始化
新建类 App 继承 Application 初始化 JPush 清单文件中引用

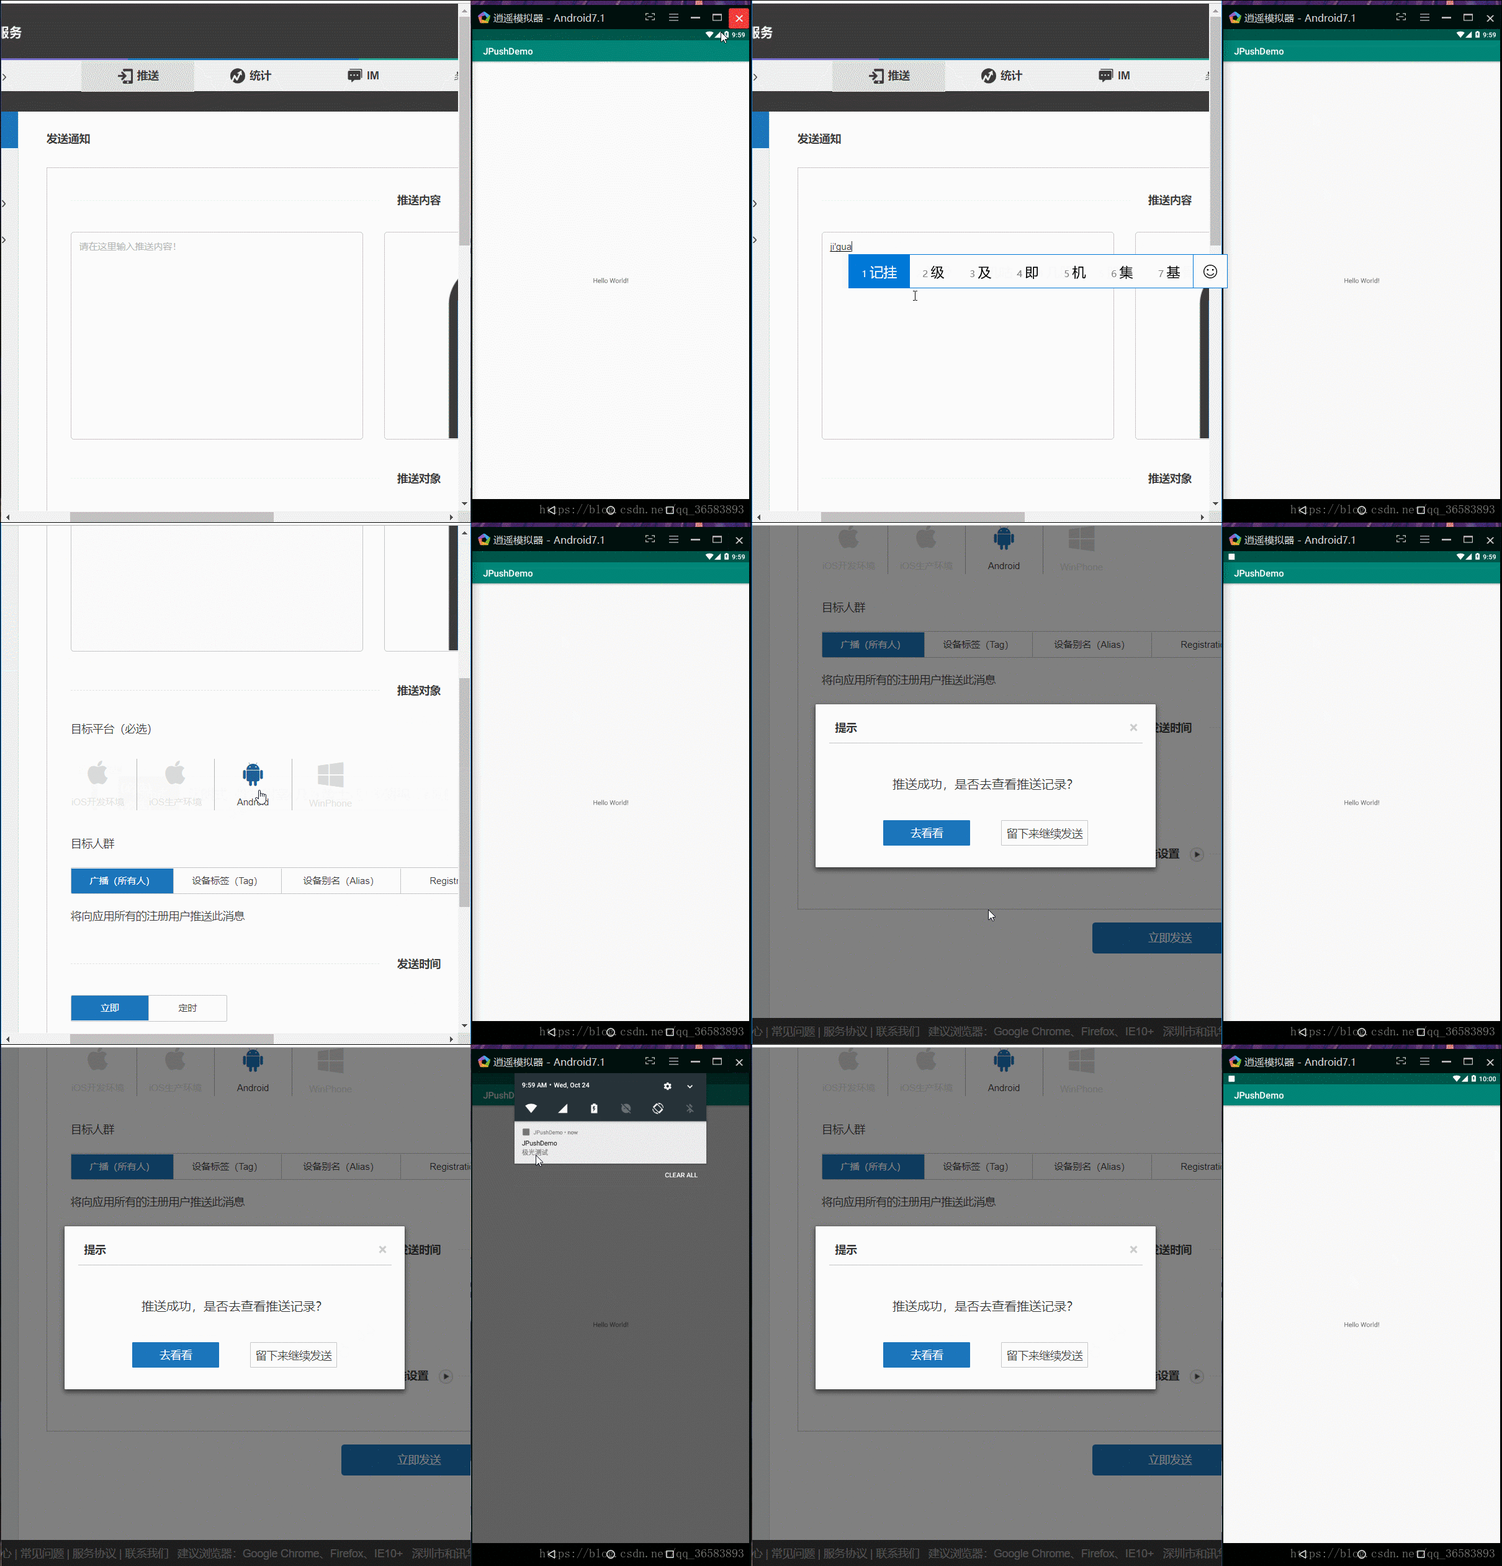
10 (现在就可以运行了)运行效果

那么现在简单的使用就完成了 ,但是现在只是在通知栏显示信息,还不满足开发,用户需要查看处理信息,
那作为开发人员现在要做的就两点 :
1 你不觉得通知太丑了吗,怎么自定义Notification
2 用户点击了通知,该怎么处理
问题一 : 自定义Notification
解决 :
1 在MainActivity.java中添加下面代码
BasicPushNotificationBuilder builder = new BasicPushNotificationBuilder(MainActivity.this);
        builder.statusBarDrawable = R.mipmap.ic_launcher;
        builder.notificationFlags = Notification.FLAG_AUTO_CANCEL | Notification.FLAG_SHOW_LIGHTS;  //设置为自动消失和呼吸灯闪烁
        builder.notificationDefaults = Notification.DEFAULT_VIBRATE | Notification.DEFAULT_LIGHTS;  // 设置为震动、呼吸灯闪烁
        //这两个参数  通知样式的编号   ,    通知的显示方式
        JPushInterface.setPushNotificationBuilder(1, builder);
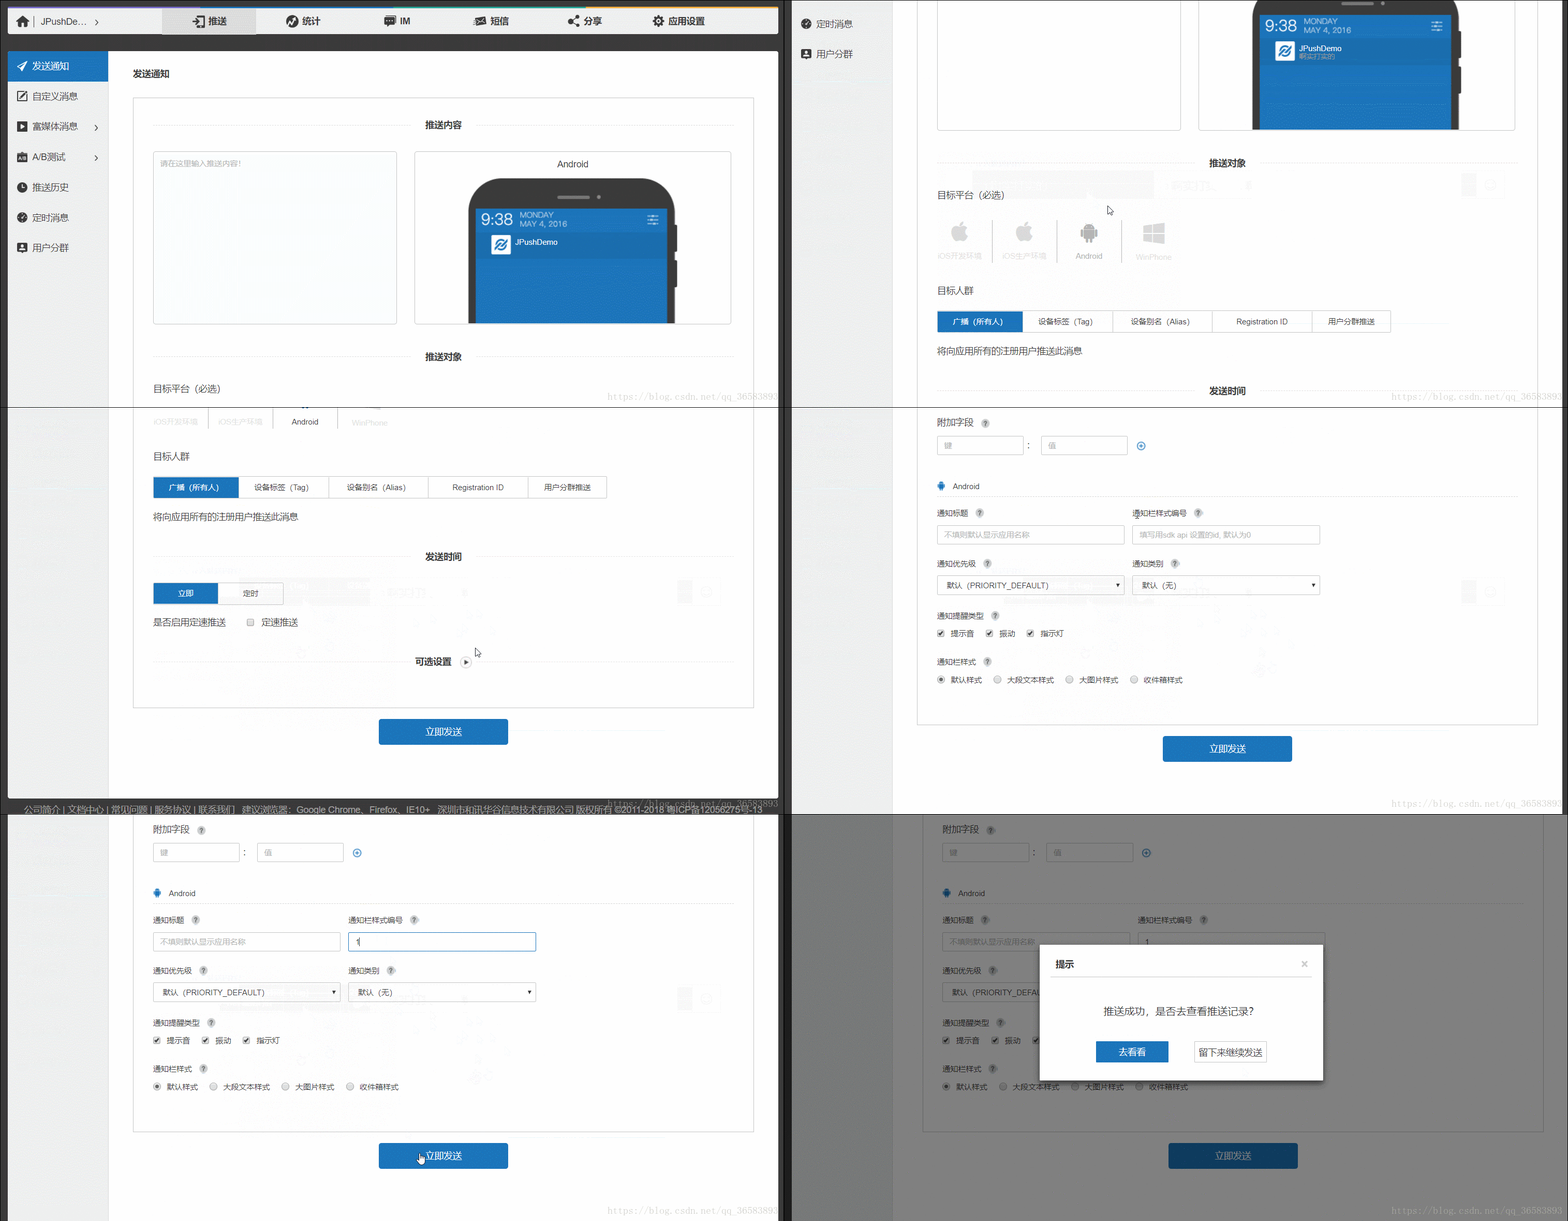
定义好了为什么发送还是有这个声音,代码明明没有设置声音啊 ,那是因为没有选定发送方式
2 选定发送那个方式(上面定义的通知栏编号是 1)

这是最基本的修改更多请访问官方文档 https://docs.jiguang.cn/jpush/client/Android/android_senior/
问题二 :处理通知别用户点击
解决 :
1 新建类 继承 BroadcastReceiver
public class MyReceiver extends BroadcastReceiver {
    private static final String TAG = "MyReceiver";

    private NotificationManager nm;
    @Override
    public void onReceive(Context context, Intent intent) {
        if (null == nm) {
            nm = (NotificationManager) context.getSystemService(Context.NOTIFICATION_SERVICE);
        }
        Bundle bundle = intent.getExtras();
        Log.d(TAG, "onReceive - " + intent.getAction());

        if (JPushInterface.ACTION_REGISTRATION_ID.equals(intent.getAction())) {
            Log.d(TAG, "JPush 用户注册成功");

        } else if (JPushInterface.ACTION_MESSAGE_RECEIVED.equals(intent.getAction())) {
            Log.d(TAG, "接受到推送下来的自定义消息");

        } else if (JPushInterface.ACTION_NOTIFICATION_RECEIVED.equals(intent.getAction())) {
            Log.d(TAG, "接受到推送下来的通知");

            receivingNotification(context, bundle);

        } else if (JPushInterface.ACTION_NOTIFICATION_OPENED.equals(intent.getAction())) {
            Log.d(TAG, "用户点击打开了通知");

            openNotification(context, bundle);

        } else {
            Log.d(TAG, "Unhandled intent - " + intent.getAction());
        }
    }

    private void receivingNotification(Context context, Bundle bundle) {
        String title = bundle.getString(JPushInterface.EXTRA_NOTIFICATION_TITLE);
        Log.d(TAG, " title : " + title);
        String message = bundle.getString(JPushInterface.EXTRA_ALERT);
        Log.d(TAG, "message : " + message);
        String extras = bundle.getString(JPushInterface.EXTRA_EXTRA);
        Log.d(TAG, "extras : " + extras);
    }

    private void openNotification(Context context, Bundle bundle) {
        String extras = bundle.getString(JPushInterface.EXTRA_EXTRA);
        String myValue = "";
        try {
            JSONObject extrasJson = new JSONObject(extras);
            myValue = extrasJson.optString("myKey");
        } catch (Exception e) {
            Log.w(TAG, "Unexpected: extras is not a valid json", e);
            return;
        }

        Intent mIntent = new Intent(context, ThisActivity.class);
        mIntent.putExtras(bundle);
        mIntent.setFlags(Intent.FLAG_ACTIVITY_NEW_TASK);
        context.startActivity(mIntent);

    }
}
2 清单文件中注释了两个receiver 要使用一个

这是最基本的修改更多请访问官方文档 https://docs.jiguang.cn/jpush/client/Android/android_senior/
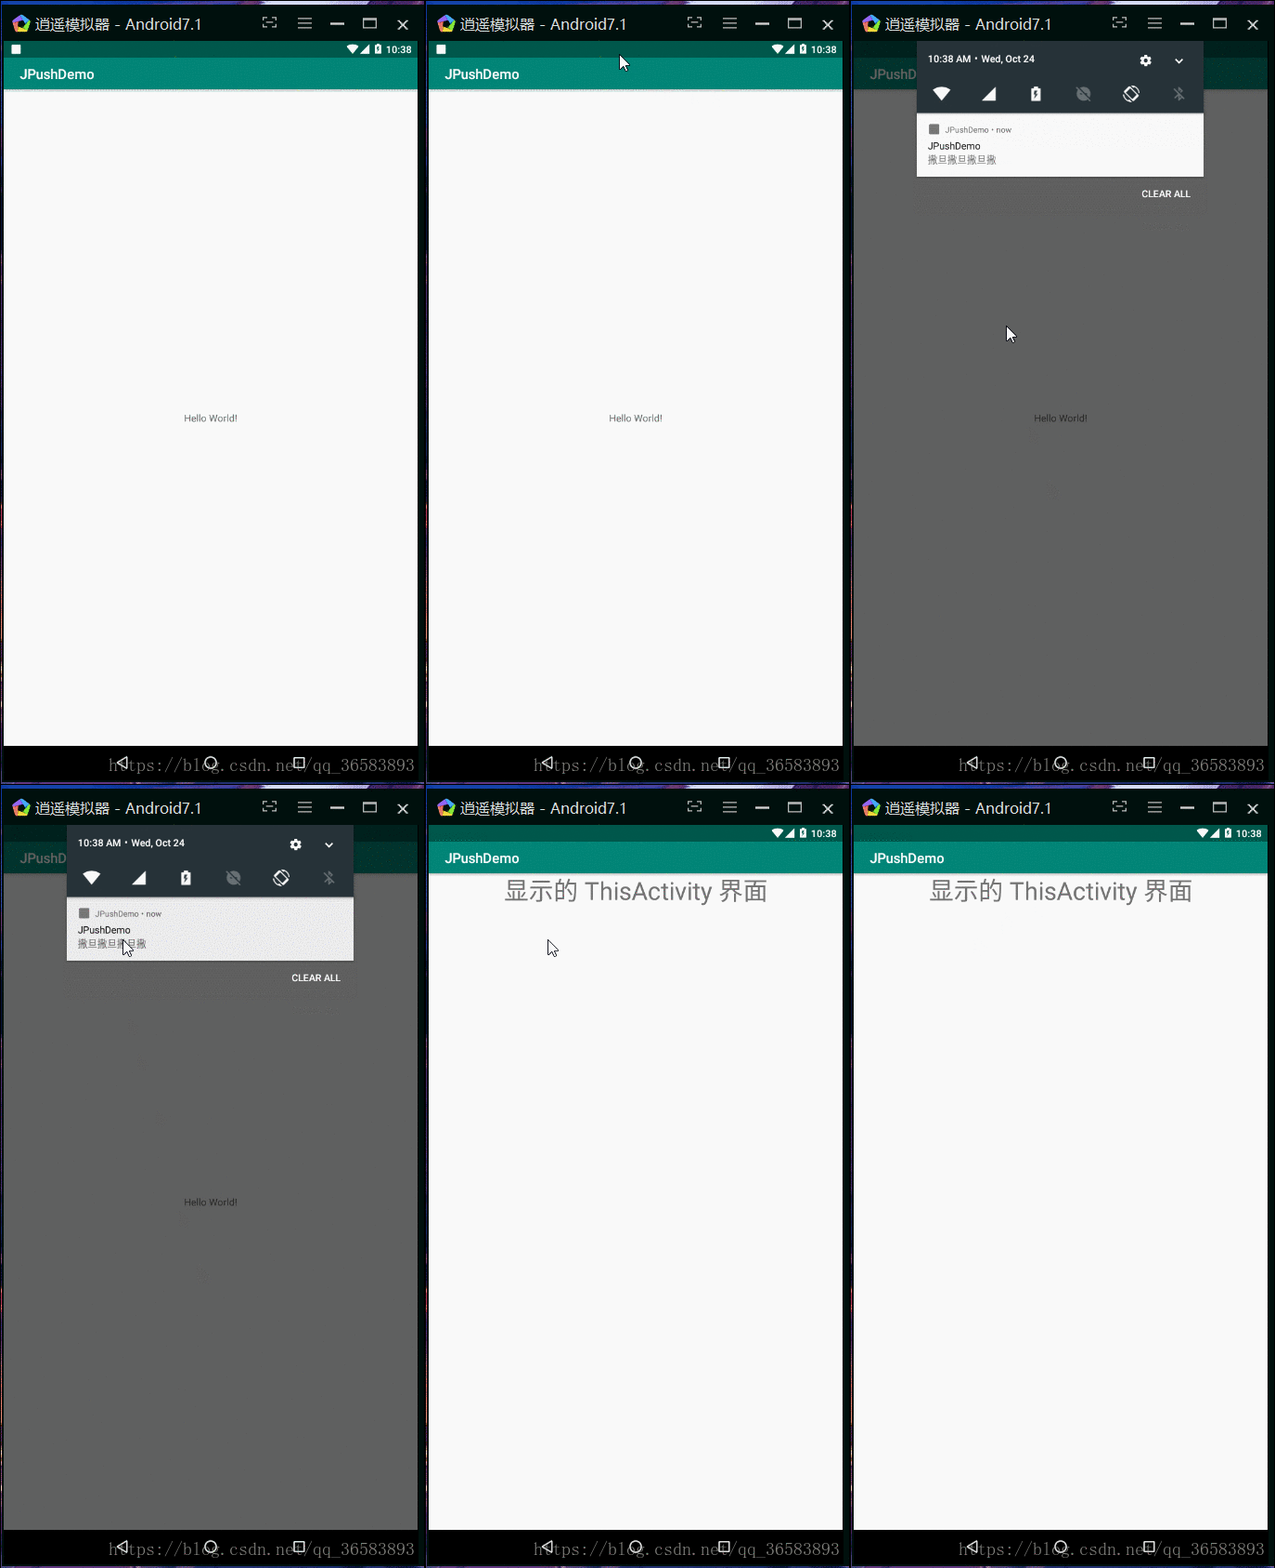
现在运行 就会跳转到 ThisActivity 界面 而不是 MainActivity界面(下面效果图)


