一、通知概述
1.1.通知说明
应用可以通过通知接口发送通知消息,终端用户可以通过通知栏查看通知内容,也可以点击通知来打开应用。通知使用的的常见场景:
- 显示接收到的短消息、即时消息,例如:微信、QQ后台运行后接受到消息后显示在通知栏
- 显示应用推送消息,例如:腾讯视频、天气软件信息推送
- 显示当前正在进行的事件,如上传、下载等
HarmonyOS通过NotificationManager模块提供通知管理的能力,包括发布、取消发布通知,创建、获取、移除通知通道,获取通知的使能状态、角标使能状态,获取通知的相关信息等。
1.2.通知的业务流程
业务流程中有:通知子系统、通知发送端、通知订阅组件,一条通知从通知发送端产生,发送到通知子系统,然后再由通知子系统分发给通知订阅端。

1.3.通知消息的表现形式

1.4.通知结构
通知结构如下:

说明如下:
- 通知小图图标:表示通知的功能与类型
- 通知名称:应用名称或者功能名称
- 时间:发送通知的时间,系统默认显示
- 展示图标:用来展开被折叠的内容和按钮,如果没有折叠的内容和按钮,则不显示这个图标
- 内容标题
- 内容详情
二、基础类型通知
基础类型通知主要应用于发送短信息、提示信息、广告推送...,它支持普通文本类型、长文本类型、多行文本类型、图片类型。
- 普通文本类型:NOTIFICATION_CONTENT_BASIC_TEXT
- 长文本类型:NOTIFICATION_CONTENT_LONG_TEXT
- 多行文本类型:NOTIFICATION_CONTENT_MULTILINE
- 图片类型:NOTIFICATION_CONTENT_PICTURE
2.1.接口说明
常见的几个接口如下:
接口 | 描述 |
publish(request:NotificatioinRequest,callback:AsyncCallback<void>):void | 发布通知 |
cancel(id:number,label:string,callback:AsyncCallback<void>):void | 取消指定的通知,通过id来判断是哪个通知 |
cancelAll(callback:AsycCallback<void>):void | 取消所有该应用发布的通知 |
2.2.使用说明
1.导入模块
import notificationManager from '@ohos.notificationManager'2.发布通知
//1.构建通知请求
let notificationRequest:notificationManager.NotificationRequest = {
  id:this.idx++,//通知ID
  slotType:notificationManager.SlotType.SERVICE_INFORMATION,//通知类型,2代表服务类型
  content:{//通知内容
    contentType: notificationManager.ContentType.NOTIFICATION_CONTENT_BASIC_TEXT,//通知内容的类型:普通类型通知。
    normal:{//基本类型通知内容。
      title:`title陌生人的消息: ${this.idx}`,//标题
      text:"text您好?需要办理海牙认证吗?",//通知的消息内容
      additionalText:"additionalText你有一个消息,通知附加内容,是对通知内容的补充" //附近内容,是对通知内容的补充
    }
  }
}

//2.发布通知
notificationManager.publish(notificationRequest).then(()=>{
  //发布通知
  Prompt.showToast({message:"发布通知消息成功",duration:2000})
}).catch((err)=>{
  Prompt.showToast({message:`发布通知消息失败,失败代码:${err.code},失败原因:${err.message}`,duration:2000})
})
3.取消通知
//取消指定id的通知
notificationManager.cancel(1)
//取消所有通知
notificationManager.cancelAll()
2.3.基础通知类型
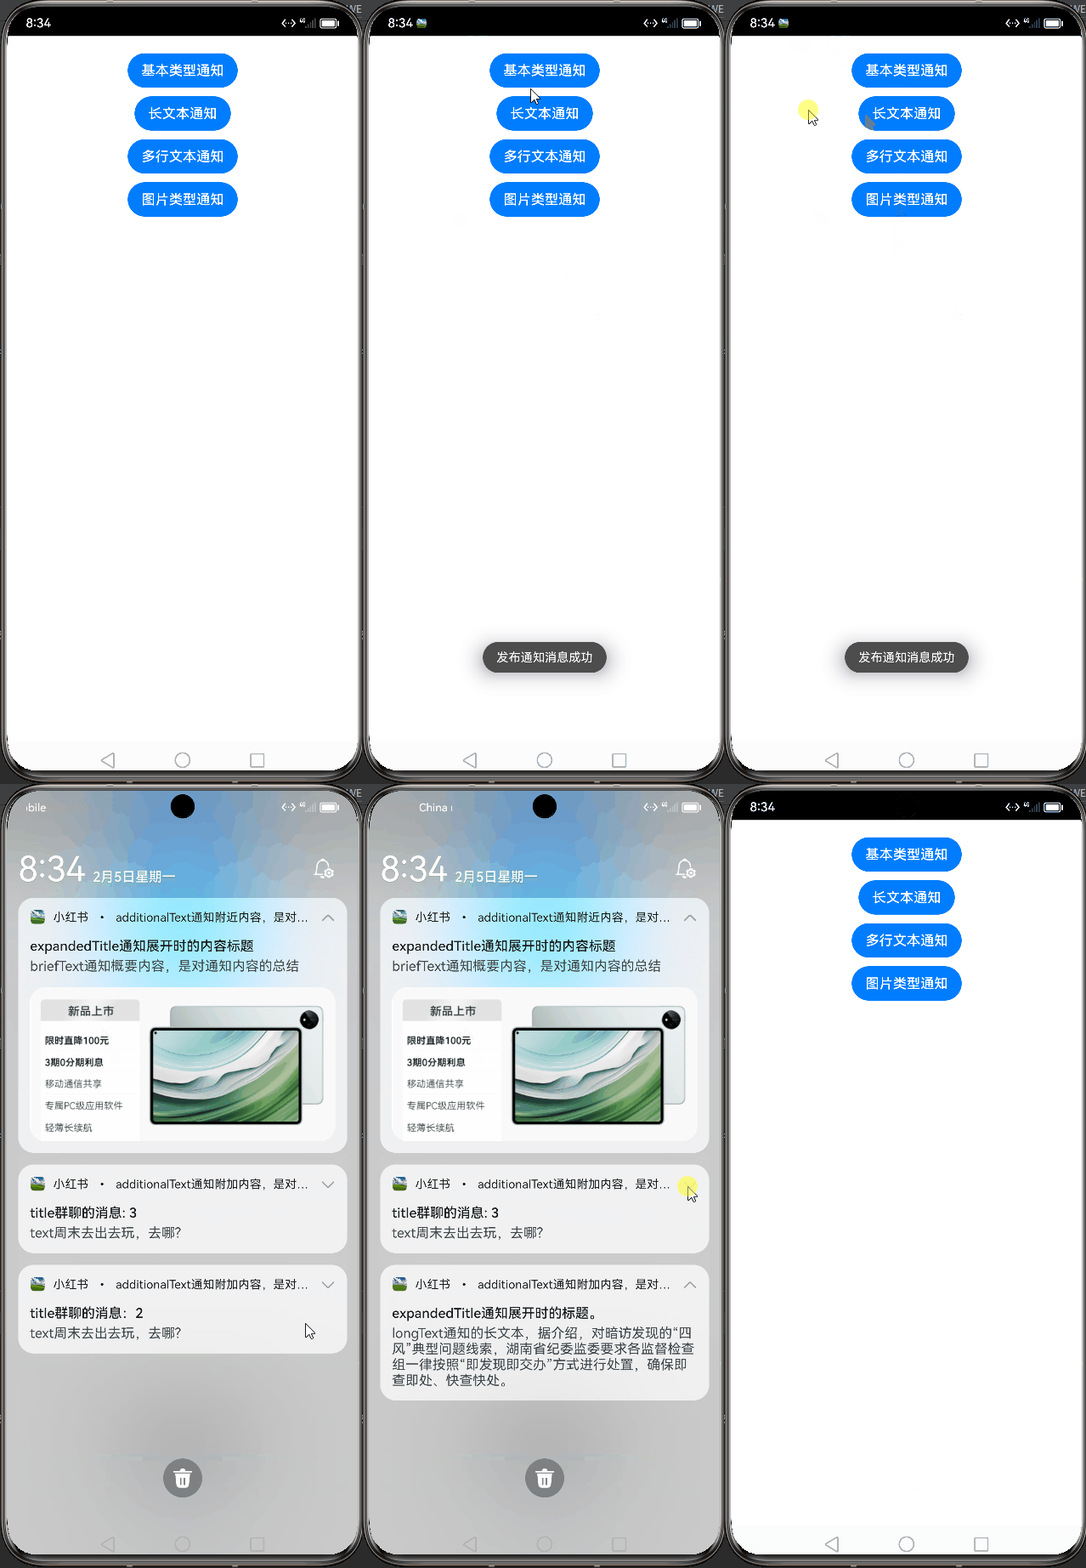
在 NotificationRequest 中的对于参数进行了说明,对于通知内容则在:NotificationContent 中说明,下面对于四种基本通知类型进行案例说明:
import notificationManager from '@ohos.notificationManager'
import Prompt from '@system.prompt'
import image from '@ohos.multimedia.image'
@Entry
@Component
struct Index {
  @State idx: number = 0

  publishNotification1(){
    //1.构建通知请求
    let notificationRequest:notificationManager.NotificationRequest = {
      id:this.idx++,//通知ID
      slotType:notificationManager.SlotType.SERVICE_INFORMATION,//通知类型,2代表服务类型
      content:{//通知内容
        contentType: notificationManager.ContentType.NOTIFICATION_CONTENT_BASIC_TEXT,//通知内容的类型:普通类型通知。
        normal:{//基本类型通知内容。
          title:`title陌生人的消息: ${this.idx}`,//标题
          text:"text您好?需要办理海牙认证吗?",//通知的消息内容
          additionalText:"additionalText你有一个消息,通知附加内容,是对通知内容的补充" //附近内容,是对通知内容的补充
        }
      }
    }

    //2.发布通知
    notificationManager.publish(notificationRequest).then(()=>{
      //发布通知
      Prompt.showToast({message:"发布通知消息成功",duration:2000})
    }).catch((err)=>{
      Prompt.showToast({message:`发布通知消息失败,失败代码:${err.code},失败原因:${err.message}`,duration:2000})
    })

  }

  /**
   * 长文本通知
   */
  publishNotification2(){
    let notificationRequest:notificationManager.NotificationRequest = {
      id:this.idx++,//通知ID
      content:{//通知内容
        contentType: notificationManager.ContentType.NOTIFICATION_CONTENT_LONG_TEXT,//通知内容的类型:多行文本类型通知。
        longText:{//多行类型通知内容。
          title:`title群聊的消息:${this.idx}`,//标题
          text:"text周末去出去玩,去哪?",//通知的内容简介
          additionalText:"additionalText通知附加内容,是对通知内容的补充。",
          longText:"longText通知的长文本,据介绍,对暗访发现的“四风”典型问题线索,湖南省纪委监委要求各监督检查组一律按照“即发现即交办”方式进行处置,确保即查即处、快查快处。",
          briefText:"briefText通知概要内容,是对通知内容的总结。",//这里也没有效果
          expandedTitle:"expandedTitle通知展开时的标题。"
        }
      }
    }

    //发布通知
    notificationManager.publish(notificationRequest).then(()=>{
      //发布通知
      Prompt.showToast({message:"发布通知消息成功",duration:2000})
    }).catch((err)=>{
      Prompt.showToast({message:`发布通知消息失败,失败代码:${err.code},失败原因:${err.message}`,duration:2000})
    })
  }

  /**
   * 多行文本通知
   */
  publishNotification3(){
    let notificationRequest:notificationManager.NotificationRequest = {
      id:this.idx++,//通知ID
      //slotType:notificationManager.SlotType.SERVICE_INFORMATION,//通知类型,2代表服务类型
      content:{//通知内容
        contentType: notificationManager.ContentType.NOTIFICATION_CONTENT_MULTILINE,//通知内容的类型:多行文本类型通知。
        multiLine:{//多行类型通知内容。
          title:`title群聊的消息: ${this.idx}`,//标题
          text:"text周末去出去玩,去哪?",//通知的内容简介
          additionalText:"additionalText通知附加内容,是对通知内容的补充。",
          briefText:"briefText通知概要内容,是对通知内容的总结。", //通知概要内容,是对通知内容的总结。但是配置后再这里并没有看到效果
          longTitle:"longTitle通知展开时的标题。",
          lines:['第一行内容','第二行内容','第三行内容',"第四行内容"]
        }
      }
    }

    //发布通知
    notificationManager.publish(notificationRequest).then(()=>{
      //发布通知
      Prompt.showToast({message:"发布通知消息成功",duration:2000})
    }).catch((err)=>{
      Prompt.showToast({message:`发布通知消息失败,失败代码:${err.code},失败原因:${err.message}`,duration:2000})
    })
  }

  /**
   * 图片通知
   */
  async publishNotification4(){
    //把资源图片转为pixelMap(像素图)对象
    //1.表示获取要访问应用程序资源的能力
    let resourceManager = getContext(this).resourceManager;
    //2.获取Promise模式下指定资源ID对应的媒体文件内容。返回的类型是Promise
    let imageArray = await resourceManager.getMediaContent($r("app.media.MatePad").id)//指定控件的id值。
    //3.根据缓冲区创建 ImageSource 实例。
    let imageResource = image.createImageSource(imageArray.buffer)
    //4.根据图像解码参数创建 PixelMap 对象。此方法使用返回Promise对象。
    let pixelMap = await imageResource.createPixelMap()

    let notificationRequest:notificationManager.NotificationRequest = {
      id:this.idx++,//通知ID
      //slotType:notificationManager.SlotType.SERVICE_INFORMATION,//通知类型,2代表服务类型
      content:{//通知内容
        contentType: notificationManager.ContentType.NOTIFICATION_CONTENT_PICTURE,//通知内容的类型:图片类型通知。
        picture:{//图片类型通知内容。
          title:`title通知消息的标题:${this.idx}`,//标题
          text:"text展开查看详情,通知内容",
          additionalText:"additionalText通知附近内容,是对通知的补充",
          briefText:'briefText通知概要内容,是对通知内容的总结',
          expandedTitle:"expandedTitle通知展开时的内容标题",
          picture:pixelMap //通知的图片内容
        }
      }
    }

    //发布通知
    notificationManager.publish(notificationRequest).then(()=>{
      //发布通知
      Prompt.showToast({message:"发布通知消息成功",duration:2000})
    }).catch((err)=>{
      Prompt.showToast({message:`发布通知消息失败,失败代码:${err.code},失败原因:${err.message}`,duration:2000})
    })
  }

  build() {
    Row(){
      Column({space:10}){
        Button("基本类型通知")
          .onClick(() => {
            this.publishNotification1()
          })

        Button("长文本通知")
          .onClick(() => {
            this.publishNotification2()
          })

        Button("多行文本通知")
          .onClick(() => {
            this.publishNotification3()
          })

        Button("图片类型通知")
          .onClick(() => {
            this.publishNotification4()
          })
      }
      .width("100%")
    }
    .height(80).width("100%").padding({top:20})
  }
}
预览效果如下:

2.4.关闭通知
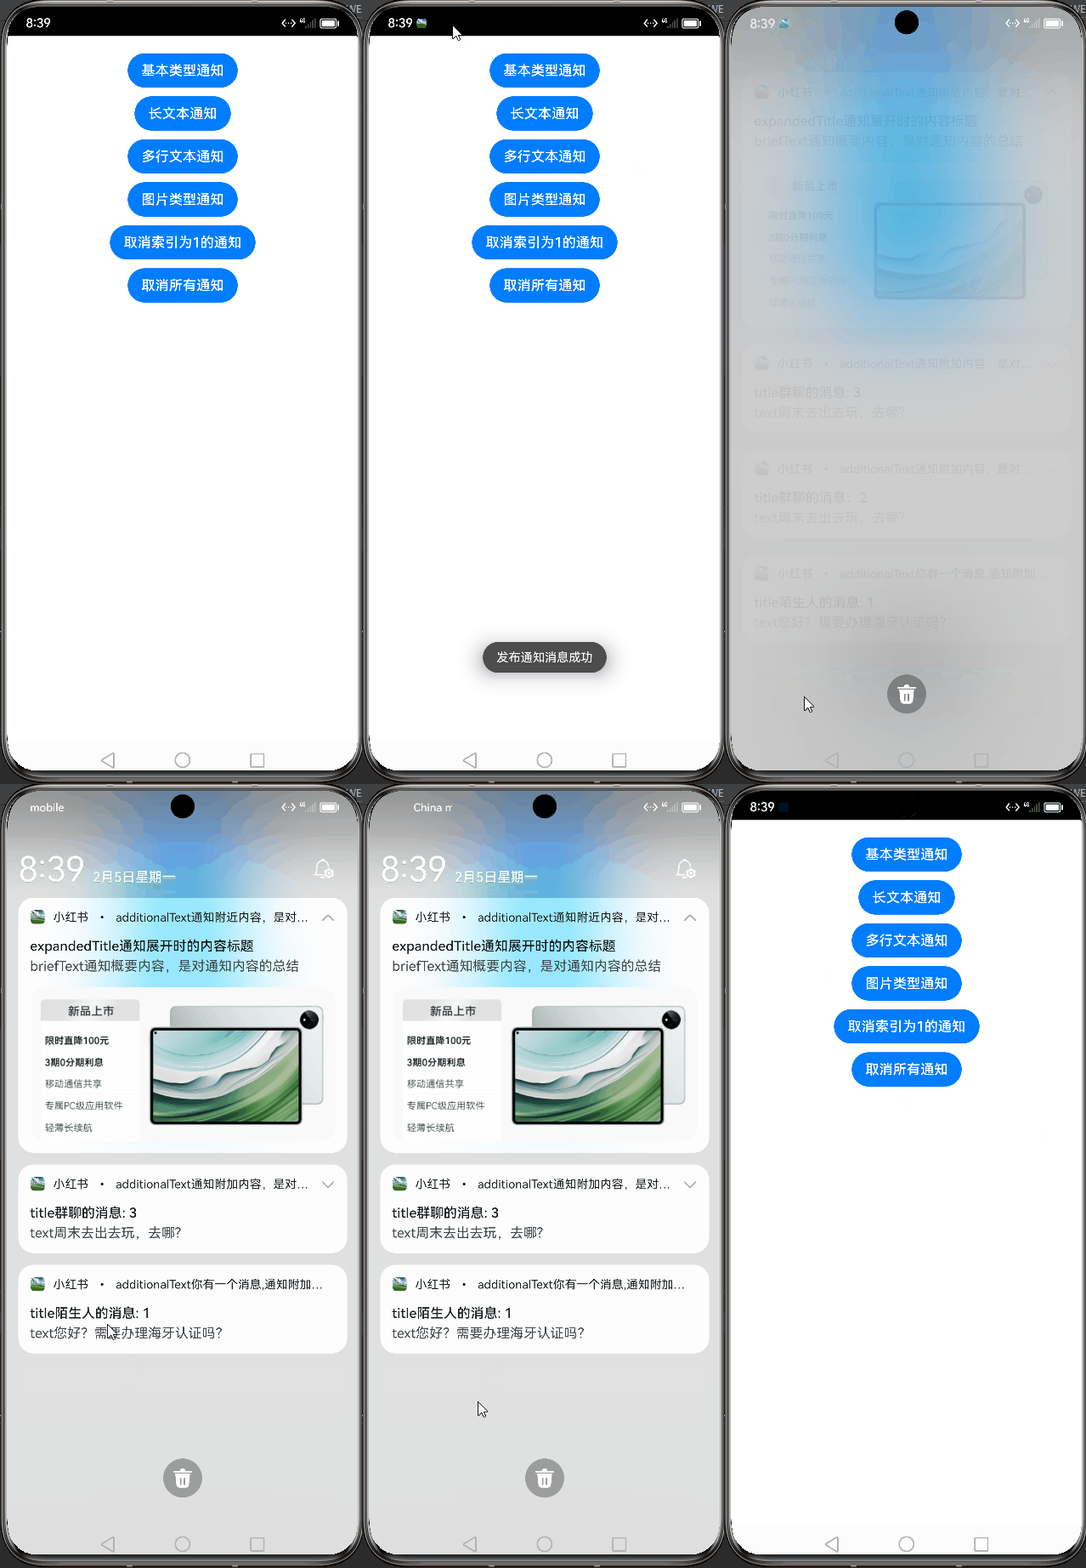
在上面的代码,添加关闭通知,分别指定关闭索引为1的通知、和关闭所有通知的按钮,代码如下:
Button("取消索引为1的通知")
  .onClick(()=>{
    notificationManager.cancel(1)
  })
Button("取消所有通知")
  .onClick(()=>{
    notificationManager.cancelAll()
  })
效率效果如下,注意上面的代码索引从0开始,索引1指的是第二个长文本通知,点击后即可取消,点击取消所有的通知即可关闭所有:

2.5.通道类型设置
在 NotificationRequest 中的对于slotType参数进行了说明,值为SlotType枚举,如下:
名称 | 值 | 说明 |
UNKNOWN_TYPE | 0 | 未知类型。 |
SOCIAL_COMMUNICATION | 1 | 社交类型。 |
SERVICE_INFORMATION | 2 | 服务类型。 |
CONTENT_INFORMATION | 3 | 内容类型。 |
OTHER_TYPES | 0xFFFF | 其他类型。 |
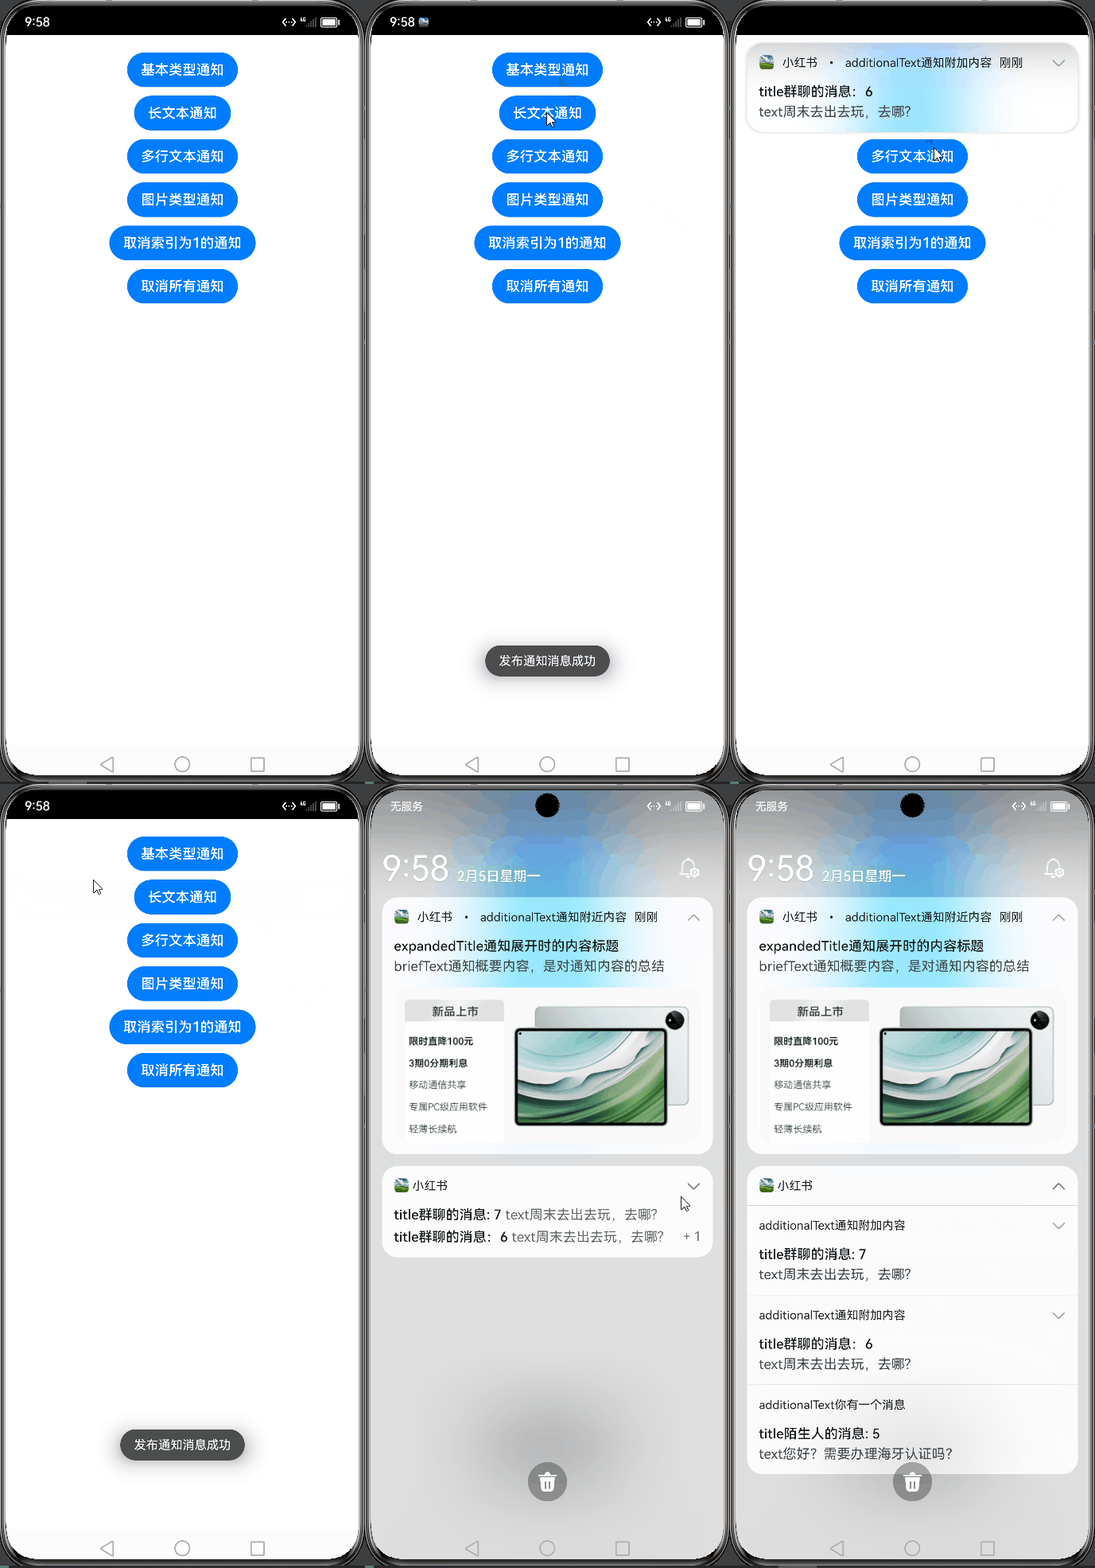
上面的枚举值,效果说明如下:

给之前的代码中,基本类型通知、长文本通知分别设置服务类型和社交类型通道类型,预览效果如下:

代码如下:
import notificationManager from '@ohos.notificationManager'
import Prompt from '@system.prompt'
import image from '@ohos.multimedia.image'
@Entry
@Component
struct Index {
  @State idx: number = 0

  publishNotification1(){
    //1.构建通知请求
    let notificationRequest:notificationManager.NotificationRequest = {
      id:this.idx++,//通知ID
      slotType:notificationManager.SlotType.SERVICE_INFORMATION,//通知类型,2代表服务类型
      content:{//通知内容
        contentType: notificationManager.ContentType.NOTIFICATION_CONTENT_BASIC_TEXT,//通知内容的类型:普通类型通知。
        normal:{//基本类型通知内容。
          title:`title陌生人的消息: ${this.idx}`,//标题
          text:"text您好?需要办理海牙认证吗?",//通知的消息内容
          additionalText:"additionalText你有一个消息,通知附加内容,是对通知内容的补充" //附近内容,是对通知内容的补充
        }
      }
    }

    //2.发布通知
    notificationManager.publish(notificationRequest).then(()=>{
      //发布通知
      Prompt.showToast({message:"发布通知消息成功",duration:2000})
    }).catch((err)=>{
      Prompt.showToast({message:`发布通知消息失败,失败代码:${err.code},失败原因:${err.message}`,duration:2000})
    })

  }

  /**
   * 长文本通知
   */
  publishNotification2(){
    let notificationRequest:notificationManager.NotificationRequest = {
      id:this.idx++,//通知ID
      slotType:notificationManager.SlotType.SOCIAL_COMMUNICATION,//通知类型,SOCIAL_COMMUNICATION代表社交类型
      content:{//通知内容
        contentType: notificationManager.ContentType.NOTIFICATION_CONTENT_LONG_TEXT,//通知内容的类型:多行文本类型通知。
        longText:{//多行类型通知内容。
          title:`title群聊的消息:${this.idx}`,//标题
          text:"text周末去出去玩,去哪?",//通知的内容简介
          additionalText:"additionalText通知附加内容,是对通知内容的补充。",
          longText:"longText通知的长文本,据介绍,对暗访发现的“四风”典型问题线索,湖南省纪委监委要求各监督检查组一律按照“即发现即交办”方式进行处置,确保即查即处、快查快处。",
          briefText:"briefText通知概要内容,是对通知内容的总结。",
          expandedTitle:"expandedTitle通知展开时的标题。"
        }
      }
    }

    //发布通知
    notificationManager.publish(notificationRequest).then(()=>{
      //发布通知
      Prompt.showToast({message:"发布通知消息成功",duration:2000})
    }).catch((err)=>{
      Prompt.showToast({message:`发布通知消息失败,失败代码:${err.code},失败原因:${err.message}`,duration:2000})
    })
  }

  /**
   * 多行文本通知
   */
  publishNotification3(){
    let notificationRequest:notificationManager.NotificationRequest = {
      id:this.idx++,//通知ID
      //slotType:notificationManager.SlotType.SERVICE_INFORMATION,//通知类型,2代表服务类型
      content:{//通知内容
        contentType: notificationManager.ContentType.NOTIFICATION_CONTENT_MULTILINE,//通知内容的类型:多行文本类型通知。
        multiLine:{//多行类型通知内容。
          title:`title群聊的消息: ${this.idx}`,//标题
          text:"text周末去出去玩,去哪?",//通知的内容简介
          additionalText:"additionalText通知附加内容,是对通知内容的补充。",
          briefText:"briefText通知概要内容,是对通知内容的总结。", //通知概要内容,是对通知内容的总结。但是配置后再这里并没有看到效果
          longTitle:"longTitle通知展开时的标题。",
          lines:['第一行内容','第二行内容','第三行内容',"第四行内容"]
        }
      }
    }

    //发布通知
    notificationManager.publish(notificationRequest).then(()=>{
      //发布通知
      Prompt.showToast({message:"发布通知消息成功",duration:2000})
    }).catch((err)=>{
      Prompt.showToast({message:`发布通知消息失败,失败代码:${err.code},失败原因:${err.message}`,duration:2000})
    })
  }

  /**
   * 图片通知
   */
  async publishNotification4(){
    //把资源图片转为pixelMap(像素图)对象
    //1.表示获取要访问应用程序资源的能力
    let resourceManager = getContext(this).resourceManager;
    //2.获取Promise模式下指定资源ID对应的媒体文件内容。返回的类型是Promise
    let imageArray = await resourceManager.getMediaContent($r("app.media.MatePad").id)//指定控件的id值。
    //3.根据缓冲区创建 ImageSource 实例。
    let imageResource = image.createImageSource(imageArray.buffer)
    //4.根据图像解码参数创建 PixelMap 对象。此方法使用返回Promise对象。
    let pixelMap = await imageResource.createPixelMap()

    let notificationRequest:notificationManager.NotificationRequest = {
      id:this.idx++,//通知ID
      //slotType:notificationManager.SlotType.SERVICE_INFORMATION,//通知类型,2代表服务类型
      content:{//通知内容
        contentType: notificationManager.ContentType.NOTIFICATION_CONTENT_PICTURE,//通知内容的类型:图片类型通知。
        picture:{//图片类型通知内容。
          title:`title通知消息的标题:${this.idx}`,//标题
          text:"text展开查看详情,通知内容",
          additionalText:"additionalText通知附近内容,是对通知的补充",
          briefText:'briefText通知概要内容,是对通知内容的总结',
          expandedTitle:"expandedTitle通知展开时的内容标题",
          picture:pixelMap //通知的图片内容
        }
      }
    }

    //发布通知
    notificationManager.publish(notificationRequest).then(()=>{
      //发布通知
      Prompt.showToast({message:"发布通知消息成功",duration:2000})
    }).catch((err)=>{
      Prompt.showToast({message:`发布通知消息失败,失败代码:${err.code},失败原因:${err.message}`,duration:2000})
    })
  }

  /**
   * 社交类型通知
   */
  publishNotification5(){
    let notificationRequest:notificationManager.NotificationRequest = {
      id:this.idx++,//通知ID
      //slotType:notificationManager.SlotType.SERVICE_INFORMATION,//通知类型,2代表服务类型
      content:{//通知内容
        contentType: notificationManager.ContentType.NOTIFICATION_CONTENT_MULTILINE,//通知内容的类型:多行文本类型通知。
        multiLine:{//多行类型通知内容。
          title:`title群聊的消息: ${this.idx}`,//标题
          text:"text周末去出去玩,去哪?",//通知的内容简介
          additionalText:"additionalText通知附加内容,是对通知内容的补充。",
          briefText:"briefText通知概要内容,是对通知内容的总结。", //通知概要内容,是对通知内容的总结。但是配置后再这里并没有看到效果
          longTitle:"longTitle通知展开时的标题。",
          lines:['第一行内容','第二行内容','第三行内容',"第四行内容"]
        }
      }
    }

  }

  build() {
    Row(){
      Column({space:10}){
        Button("基本类型通知")
          .onClick(() => {
            this.publishNotification1()
          })

        Button("长文本通知")
          .onClick(() => {
            this.publishNotification2()
          })

        Button("多行文本通知")
          .onClick(() => {
            this.publishNotification3()
          })

        Button("图片类型通知")
          .onClick(() => {
            this.publishNotification4()
          })

        Button("取消索引为1的通知")
          .onClick(()=>{
            notificationManager.cancel(1)
          })
        Button("取消所有通知")
          .onClick(()=>{
            notificationManager.cancelAll()
          })

      }
      .width("100%")
    }
    .height(80).width("100%").padding({top:20})
  }
}
2.6.设置通知发送时间显示
在通知消息中一般会显示时间,如下:

鸿蒙在 NotificationRequest 中的使用deliveryTime参数进行通知发送时间设置,在之前的图片通知类型中设置如下:
deliveryTime: new Date().getTime(),//设置通知发送时间
showDeliveryTime:true, //是否显示通知的送达时间。
案例代码如下:

预览效果如下:
import notificationManager from '@ohos.notificationManager'
import Prompt from '@system.prompt'
import image from '@ohos.multimedia.image'
@Entry
@Component
struct Index {
  @State idx: number = 0

  publishNotification1(){
    //1.构建通知请求
    let notificationRequest:notificationManager.NotificationRequest = {
      id:this.idx++,//通知ID
      slotType:notificationManager.SlotType.SERVICE_INFORMATION,//通知类型,2代表服务类型
      content:{//通知内容
        contentType: notificationManager.ContentType.NOTIFICATION_CONTENT_BASIC_TEXT,//通知内容的类型:普通类型通知。
        normal:{//基本类型通知内容。
          title:`title陌生人的消息: ${this.idx}`,//标题
          text:"text您好?需要办理海牙认证吗?",//通知的消息内容
          additionalText:"additionalText你有一个消息" //附近内容,是对通知内容的补充
        }
      },
      deliveryTime: new Date().getTime(),//设置通知发送时间
      showDeliveryTime:true, //是否显示通知的送达时间。
    }

    //2.发布通知
    notificationManager.publish(notificationRequest).then(()=>{
      //发布通知
      Prompt.showToast({message:"发布通知消息成功",duration:2000})
    }).catch((err)=>{
      Prompt.showToast({message:`发布通知消息失败,失败代码:${err.code},失败原因:${err.message}`,duration:2000})
    })

  }

  /**
   * 长文本通知
   */
  publishNotification2(){
    let notificationRequest:notificationManager.NotificationRequest = {
      id:this.idx++,//通知ID
      slotType:notificationManager.SlotType.SOCIAL_COMMUNICATION,//通知类型,SOCIAL_COMMUNICATION代表社交类型
      content:{//通知内容
        contentType: notificationManager.ContentType.NOTIFICATION_CONTENT_LONG_TEXT,//通知内容的类型:多行文本类型通知。
        longText:{//多行类型通知内容。
          title:`title群聊的消息:${this.idx}`,//标题
          text:"text周末去出去玩,去哪?",//通知的内容简介
          additionalText:"additionalText通知附加内容",
          longText:"longText通知的长文本,据介绍,对暗访发现的“四风”典型问题线索,湖南省纪委监委要求各监督检查组一律按照“即发现即交办”方式进行处置,确保即查即处、快查快处。",
          briefText:"briefText通知概要内容,是对通知内容的总结。",
          expandedTitle:"expandedTitle通知展开时的标题。"
        }
      },
      deliveryTime: new Date().getTime(),//设置通知发送时间
      showDeliveryTime:true, //是否显示通知的送达时间。
    }

    //发布通知
    notificationManager.publish(notificationRequest).then(()=>{
      //发布通知
      Prompt.showToast({message:"发布通知消息成功",duration:2000})
    }).catch((err)=>{
      Prompt.showToast({message:`发布通知消息失败,失败代码:${err.code},失败原因:${err.message}`,duration:2000})
    })
  }

  /**
   * 多行文本通知
   */
  publishNotification3(){
    let notificationRequest:notificationManager.NotificationRequest = {
      id:this.idx++,//通知ID
      //slotType:notificationManager.SlotType.SERVICE_INFORMATION,//通知类型,2代表服务类型
      deliveryTime: new Date().getTime(),//设置通知发送时间
      showDeliveryTime:true, //是否显示通知的送达时间。
      content:{//通知内容
        contentType: notificationManager.ContentType.NOTIFICATION_CONTENT_MULTILINE,//通知内容的类型:多行文本类型通知。
        multiLine:{//多行类型通知内容。
          title:`title群聊的消息: ${this.idx}`,//标题
          text:"text周末去出去玩,去哪?",//通知的内容简介
          additionalText:"additionalText通知附加内容",
          briefText:"briefText通知概要内容,是对通知内容的总结。", //通知概要内容,是对通知内容的总结。但是配置后再这里并没有看到效果
          longTitle:"longTitle通知展开时的标题。",
          lines:['第一行内容','第二行内容','第三行内容',"第四行内容"]
        }
      }
    }

    //发布通知
    notificationManager.publish(notificationRequest).then(()=>{
      //发布通知
      Prompt.showToast({message:"发布通知消息成功",duration:2000})
    }).catch((err)=>{
      Prompt.showToast({message:`发布通知消息失败,失败代码:${err.code},失败原因:${err.message}`,duration:2000})
    })
  }

  /**
   * 图片通知
   */
  async publishNotification4(){
    //把资源图片转为pixelMap(像素图)对象
    //1.表示获取要访问应用程序资源的能力
    let resourceManager = getContext(this).resourceManager;
    //2.获取Promise模式下指定资源ID对应的媒体文件内容。返回的类型是Promise
    let imageArray = await resourceManager.getMediaContent($r("app.media.MatePad").id)//指定控件的id值。
    //3.根据缓冲区创建 ImageSource 实例。
    let imageResource = image.createImageSource(imageArray.buffer)
    //4.根据图像解码参数创建 PixelMap 对象。此方法使用返回Promise对象。
    let pixelMap = await imageResource.createPixelMap()

    let notificationRequest:notificationManager.NotificationRequest = {
      id:this.idx++,//通知ID
      deliveryTime: new Date().getTime(),//设置通知发送时间
      showDeliveryTime:true, //是否显示通知的送达时间。
      content:{//通知内容
        contentType: notificationManager.ContentType.NOTIFICATION_CONTENT_PICTURE,//通知内容的类型:图片类型通知。
        picture:{//图片类型通知内容。
          title:`title通知消息的标题:${this.idx}`,//标题
          text:"text展开查看详情,通知内容",
          additionalText:"additionalText通知附近内容",
          briefText:'briefText通知概要内容,是对通知内容的总结',
          expandedTitle:"expandedTitle通知展开时的内容标题",
          picture:pixelMap //通知的图片内容
        }
      }
    }

    //发布通知
    notificationManager.publish(notificationRequest).then(()=>{
      //发布通知
      Prompt.showToast({message:"发布通知消息成功",duration:2000})
    }).catch((err)=>{
      Prompt.showToast({message:`发布通知消息失败,失败代码:${err.code},失败原因:${err.message}`,duration:2000})
    })
  }

  build() {
    Row(){
      Column({space:10}){
        Button("基本类型通知")
          .onClick(() => {
            this.publishNotification1()
          })

        Button("长文本通知")
          .onClick(() => {
            this.publishNotification2()
          })

        Button("多行文本通知")
          .onClick(() => {
            this.publishNotification3()
          })

        Button("图片类型通知")
          .onClick(() => {
            this.publishNotification4()
          })

        Button("取消索引为1的通知")
          .onClick(()=>{
            notificationManager.cancel(1)
          })
        Button("取消所有通知")
          .onClick(()=>{
            notificationManager.cancelAll()
          })

      }
      .width("100%")
    }
    .height(80).width("100%").padding({top:20})
  }
}
点击发送消息后,等待一会后,通知的右上角显示通知发送时间,如下:

2.7.通知分组设置
通知分组如下:

通过组通知名称来设置同一个分组中的消息,这里可以让同一个组中的消息显示在一起,鸿蒙在 NotificationRequest 中的使用groupName参数进行组通知名称的设置,如下:
groupName:"LittleRedBook"在之前的代码:基本类型通知、长文本通知和多行文本通知添加通知分组设置,如下:

三个分别设置同一个组通知名称,如下:

三、进度条类型通知
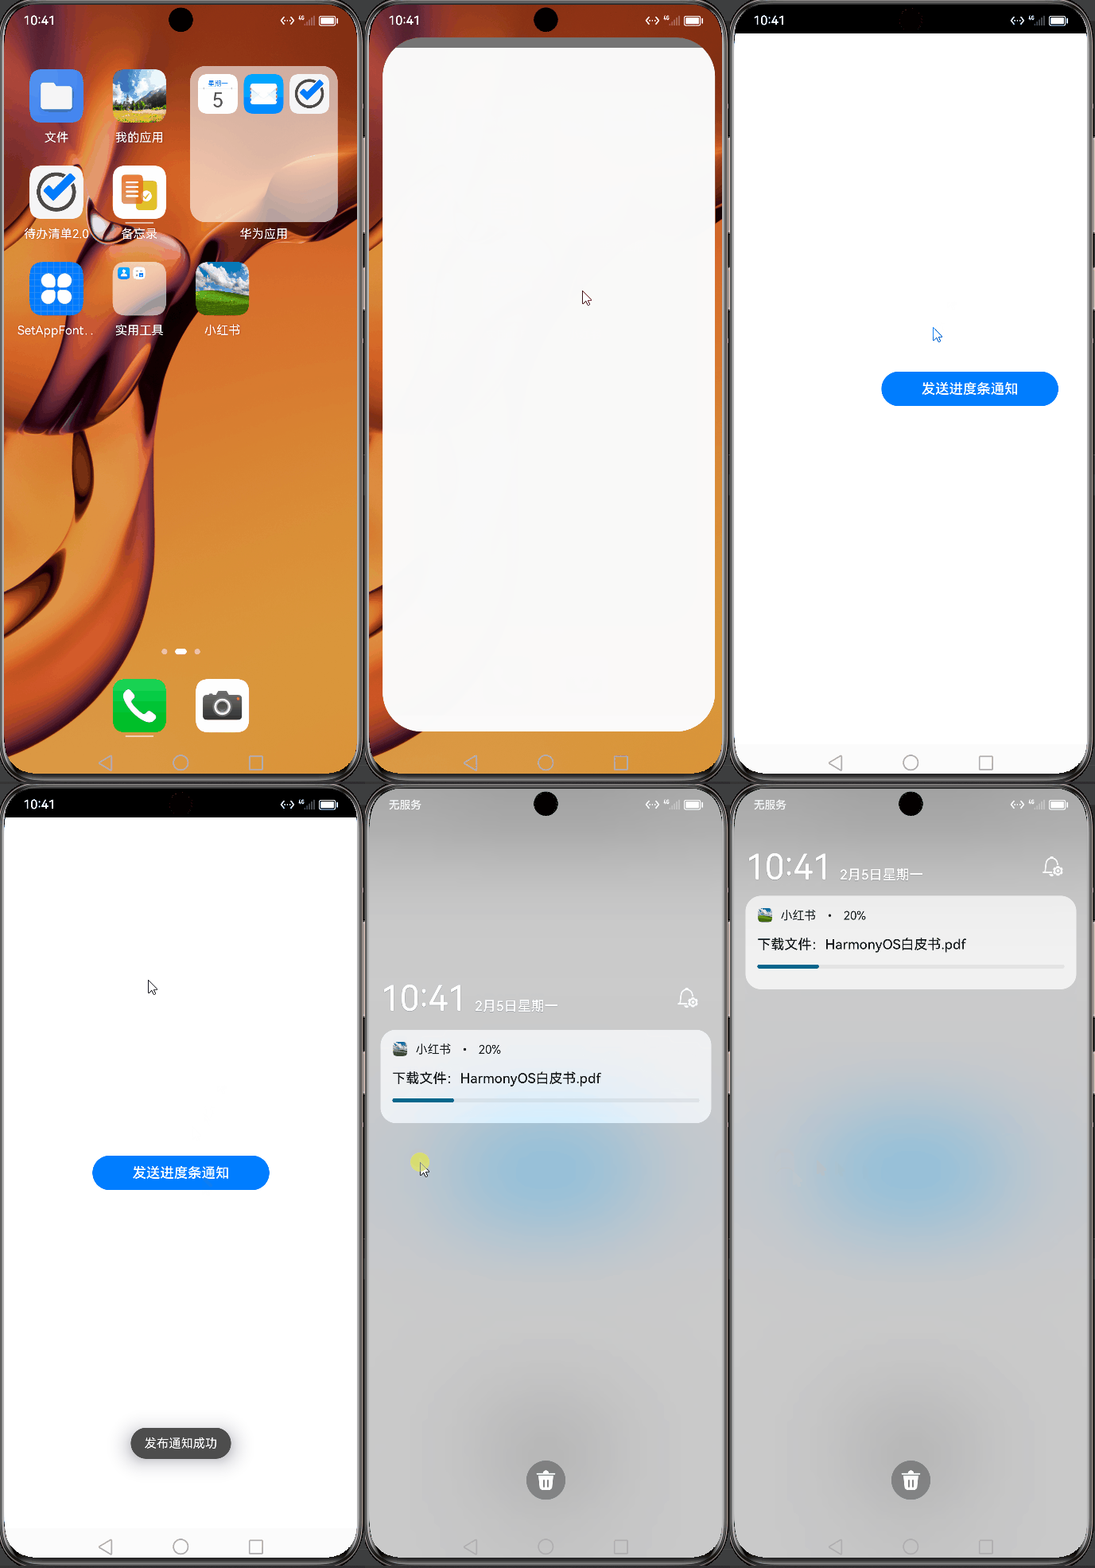
进度条通知也是常见的通知类型,主要应用于文件下载、事务处理进度的显示。HarmonyOS提供了进度条模板,发布通知应用设置好进度条模板的属性值,通过通知子系统发送到通知栏显示。当前系统模板仅支持进度条模板,通知模板NotificationTemplate中的data参数为用户自定义数据,用来显示模块相关的数据。
3.1.相关接口
查询模板是否存在,接口如下:
isSupportTemplate(templateName: string,callback:AsyncCallback<boolean>) : void参数:
参数名 | 类型 | 必填 | 说明 |
templateName | string | 是 | 模板名称。 |
callback | AsyncCallback<boolean> | 是 | 查询模板是否存在的回调函数。 |
3.2.开发步骤
1.导入模块
import NotificationManager from '@ohos.notificationManager'2.查询系统是否支持进度条模板
NotificationManager.isSupportTemplate('downloadTemplate').then((data) => {
    let isSupportTpl: boolean = data;    // 这里为true则表示支持模板
    // ...
}).catch((err) => {
    console.error('查询失败')
})
3.在第2步之后,在构造进度条模板对象,发布通知
import notificationManager from '@ohos.notificationManager'
import Prompt from '@system.prompt'

@Entry
@Component
struct ProgressNotice  {

  async publishProgressNotification(){
    //控制状态
    let isSupport:boolean

    //1. isSupportTemplate判断是否支持进度条模版
    //isSupportTemplate返回的是Promise,索引添加await
    await notificationManager.isSupportTemplate("downloadTemplate").then((data)=>{
      isSupport = data
    }).catch((err)=>{
      Prompt.showToast({message:`判断是否支持进度条模版时报错,error信息:${err}`,duration:2000})
    })

    //2.如果支持进度条模块。则进行模版的构造
    if (isSupport) {
      //构造模版
      let template = {
        name: "downloadTemplate",//模版的名称
        data: {//模版的数据
          progressValue:20, //当前进度值
          progressMaxValue: 100,//最大进度值
        }
      }

      //3.构造请求
      let notificationRequest:notificationManager.NotificationRequest = {
        id: 50,// 这里的id可以不传
        content:{
          contentType:notificationManager.ContentType.NOTIFICATION_CONTENT_BASIC_TEXT,
          normal:{
            title:"下载文件:HarmonyOS白皮书.pdf",
            text: "下载进度",
            additionalText:"20%"
          }
        },
        template:template //通知模板设置
      }

      //4.发布通知
      notificationManager.publish(notificationRequest).then(()=>{
        Prompt.showToast({message:"发布通知成功",duration:2000})
      })
    }else {
      Prompt.showToast({message:"不支持downloadTemplate进度条通知模板",duration:2000})
    }
  }

  build() {
    Row(){
      Column(){
        Button("发送进度条通知")
          .width("50%")
          .onClick(()=>{
            this.publishProgressNotification()
          })
      }.width("100%")
    }.height("100%")
  }
}
预览效果如下:

四、为通知添加行为意图
WantAgent提供了封装行为意图的能力,这里的行为意图能力就要是指拉起指定的应用组件及发布公共事件等能力。HarmonyOS支持以通知的形式,把WantAgent从发布方传递到接收方,从而在接收方触发WantAgent中指定的意图。

为通知添加行为意图的实现方式如上图所示,发布通知的应用向组件管理服务AMS(Ability Manager Service)申请WantAgent,然后随其他通知信息 一起发送给桌面,当用户在桌面通知栏上点击通知时,触发WantAgent动作。
5.1.相关接口
接口名称 | 描述 |
getWantAgent(info: WantAgentInfo, callback:AsyncCallback<WantAgent>):void | 创建WantAgent |
trigger(agent:WantAgent, triggerInfo:TrggerInfo,callback?:Callback<CompleteData>):void | 触发WantAgent意图 |
cancel(agent:WantAgent,callback:AsyncCallback<void>):void | 取消WantAgent |
getWant(agent:WantAgent,callback:AsyncCallback<Want>):void | 获取WantAgent的want |
equal(agent:WantAgent,otherAgent:WantAgent,callback:AsyncCallback<boolean>):void | 判断两个WantAgent实例是否相等 |
WantAgentInfo:定义触发WantAgent所需要的信息,可以作为getWantAgent的入参创建指定的WantAgent对象。
名称 | 类型 | 必填 | 说明 |
wants | Array<Want> | 是 | 将被执行的动作列表。 |
operationType | 是 | 动作类型。 | |
requestCode | number | 是 | 使用者定义的一个私有值。 |
wantAgentFlags | Array<wantAgent.WantAgentFlags> | 否 | 动作执行属性。 |
extraInfo | {[key: string]: any} | 否 | 额外数据。 |
OperationType:动作类型枚举
名称 | 值 | 说明 |
UNKNOWN_TYPE | 0 | 不识别的类型。 |
START_ABILITY | 1 | 开启一个有页面的Ability。 |
START_ABILITIES | 2 | 开启多个有页面的Ability。 |
START_SERVICE | 3 | 开启一个无页面的ability。 |
SEND_COMMON_EVENT | 4 | 发送一个公共事件。 |
WantAgentFlags:动作执行属性
名称 | 值 | 说明 |
ONE_TIME_FLAG | WantAgentFlags | WantAgent仅能使用一次。 |
NO_BUILD_FLAG | WantAgentFlags | 如果描述WantAgent对象不存在,则不创建它,直接返回null。 |
CANCEL_PRESENT_FLAG | WantAgentFlags | 在生成一个新的WantAgent对象前取消已存在的一个WantAgent对象。 |
UPDATE_PRESENT_FLAG | WantAgentFlags | 使用新的WantAgent的额外数据替换已存在的WantAgent中的额外数据。 |
CONSTANT_FLAG | WantAgentFlags | WantAgent是不可变的。 |
REPLACE_ELEMENT | WantAgentFlags | 当前Want中的element属性可被WantAgent.trigger()中Want的element属性取代 |
REPLACE_ACTION | WantAgentFlags | 当前Want中的action属性可被WantAgent.trigger()中Want的action属性取代 |
REPLACE_URI | WantAgentFlags | 当前Want中的uri属性可被WantAgent.trigger()中Want的uri属性取代 |
REPLACE_ENTITIES | WantAgentFlags | 当前Want中的entities属性可被WantAgent.trigger()中Want的entities属性取代 |
REPLACE_BUNDLE | WantAgentFlags | 当前Want中的bundleName属性可被WantAgent.trigger()中Want的bundleName属性取代 |
5.2.开发步骤
1)导入模块
import NotificationManager from '@ohos.notificationManager';
import wantAgent from '@ohos.app.ability.wantAgent';
2)发送通知:创建ButtonNotice.ets内容如下
import notificationManager from '@ohos.notificationManager'
import wantAgent from '@ohos.app.ability.wantAgent';
import Prompt from '@system.prompt';

let wantAgentObj = null;  // 保存创建成功的wantAgent对象,后续使用其完成触发的动作

// 通过WantAgentInfo的operationType设置动作类型
let wantAgentInfo = {
  wants: [
    {
      deviceId: '', // 这里为空表示是本设备
      bundleName: 'com.example.notificationmessages', // 在app.json5中查找
      // moduleName: 'entry', // 在module.json5中查找,如果待启动的ability在同一个module则可以不写
      abilityName: 'EntryAbility', // 待启动ability的名称,在module.json5中查找
    }
  ],
  // 点击通知后,动作类型
  operationType: wantAgent.OperationType.START_ABILITY,//START_ABILITY启动一个ABILITY
  // 使用自定义的一个私有值
  requestCode: 0,
  // 点击通知后,执行动作属性
  wantAgentFlags:[wantAgent.WantAgentFlags.UPDATE_PRESENT_FLAG] //UPDATE_PRESENT_FLAG表示系统仅将现有 WantAgent 的额外数据替换为新对象的数据
}

@Entry
@Component
struct ButtonNotice {

  /**
   * 发布通知函数
   */
  async publishButtonNotice(){
    // 创建WantAgent
    /*await wantAgent.getWantAgent(wantAgentInfo).then((data) => {
      wantAgentObj = data;
    }).catch((err) => {
      Prompt.showToast({
        message: `创建wangAgent失败,${JSON.stringify(err)}`
      })
    })*/
    try {
      wantAgentObj = await wantAgent.getWantAgent(wantAgentInfo)
    } catch(e){
      Prompt.showToast({
        message: `创建wangAgent失败,${JSON.stringify(e)}`
      })
    }

    //1.创建NotificationRequest请求
    let notificationRequest:notificationManager.NotificationRequest = {
      id: 1,
      slotType: notificationManager.SlotType.SOCIAL_COMMUNICATION,  // 这个是社交类型的通知
      content: {
        contentType: notificationManager.ContentType.NOTIFICATION_CONTENT_BASIC_TEXT,//普通类型内容
        normal: {
          title: '附近人',
          text: '洗浴、按摩、棋牌,只需99.9'
        }
      },
      actionButtons: [
        {
          title: '回复',
          wantAgent: wantAgentObj
        }
      ]
    };

    // 2.发布WantAgent通知
    notificationManager.publish(notificationRequest,(err) => {
      if(err) {
        Prompt.showToast({
          message: '发布通知失败!',
          duration: 2000
        })
      } else {
        Prompt.showToast({
          message: '发布通知成功!',
          duration: 2000
        })
      }
    })
  }

  build() {
    Row() {
      Column() {
        Button('发送通知')
          .width('50%')
          .onClick(() => {
            this.publishButtonNotice()
          })
      }
      .width('100%')
    }
    .height('100%')
  }
}
在Index.ets中设置设置点击按钮,跳转到发布通知页面,测试添加行为意图,设置后在通知栏点击回复按钮,即可返回到通知页面,如下:
Button("行为意图")
          .onClick(()=>{
            router.pushUrl({url:"pages/ButtonNotice"},router.RouterMode.Single)
          })
预览效果如下:

五、后台代理提醒
当应用需要在指定时刻向用户发送一些业务提醒通知时,HarmonyOS提供后台代理提醒功能,在应用退居后台或退出后,计时和提醒通知功能被系统后台代理接管。后台代理提醒业务类型:
- 倒计时类:基于倒计时的提醒功能,适用于短时的计时提醒业务
- 日历类:基于日历的提醒功能,适用于较长时间的提醒业务
- 闹钟类:基于时钟的提醒功能,适用于指定时刻的提醒业务
后台代理提醒就是由系统后台进程代理应用的提醒功能。后台代理提醒服务通过reminderAgentManager模块提醒定义、创建提醒、取消提醒

5.1.使用说明
提醒使用的前置条件
- 添加后台代理提醒的使用权限:ohos.permission.PUBLISH_AGENT_REMINDER
- 导入后台代理提醒reminderAgentManager模块
import reminderAgentManager from'@ohos.reminderAgentManager';5.2.准备案例
import reminderAgent from '@ohos.reminderAgentManager';
import Prompt from '@system.prompt';

@Entry
@Component
struct ReminderPage {
  @State message: string = 'Hello World';
  reminderId:number;

  myReminderAgent(){
    let reminderRequest:reminderAgent.ReminderRequestAlarm = {
      reminderType: reminderAgent.ReminderType.REMINDER_TYPE_ALARM,
      hour: 12,
      minute: 23,
      daysOfWeek: [1,2,3,4,5,6,7],  // 星期1~7
      title: '提醒信息 title',
      ringDuration: 10, // 响铃时长
      snoozeTimes: 1, // 延迟提醒次数,默认是0
      timeInterval: 60*60*5,  // 延迟提醒间隔时间
      actionButton: [
        {
          title: '关闭',
          type: reminderAgent.ActionButtonType.ACTION_BUTTON_TYPE_CLOSE
        }
      ]

    };
    reminderAgent.publishReminder(reminderRequest,(err,reminderId) => {
      if(err) {
        Prompt.showToast({
          message: '发布提醒失败',
          duration: 2000
        })
        return;
      }
      Prompt.showToast({
        message: '发布提醒成功!id = ' + reminderId,
        duration: 2000
      })
      this.reminderId = reminderId;
    })
  }

  build() {
    Row() {
      Column() {
        Text(this.message)
          .fontSize(20)
          .fontWeight(FontWeight.Bold)
          .margin({bottom:15})
        Button('发布提醒')
          .width('50%')
          .onClick(() => {
            this.myReminderAgent()
          })
      }
      .width('100%')
    }
    .height('100%')
  }
}


