上一章,讲解了,通过rest+ribbon的方式,进行服务的调用,这一章,我想讲解Feign的方式来消费服务,这种方式的最大区别,就是配置消费的服务方法不一样,Feign是直接通过接口的方式来配置需要消费的服务。Feign服务搭建的步骤:1、配置pom.xml,加入依赖,2、配置application.yml,设定服务,3、配置启动类,添加
@EnableFeignClients注解,4、配置Service接口,添加需要被消费的服务,5、配置Controller层,暴漏服务。最后测试的时候,一定要注意,先看Eureka的管控台,看服务是否都启动完了。
代码地址
https://gitee.com/yellowcong/springcloud/tree/master/chapter3目录结构
这个服务里面,有两个提供服务,这样就可以测试负载均衡的问题了。

项目架构
节点 | 服务 | 项目名 |
yellowcong.com:8761 | eureka注册服务 | eureka-server |
yellowcong.com:8762 | 提供服务1 | eureka-client |
yellowcong.com:8763 | 提供服务2 | eureka-client2 |
yellowcong.com:8765 | feign服务 | feign-server |
Feign服务搭建
Feign服务搭建的步骤:1、配置pom.xml,加入依赖,2、配置application.yml,设定服务,3、配置启动类,添加@EnableFeignClients注解,4、配置Service接口,添加需要被消费的服务,5、配置Controller层,暴漏服务。最后测试的时候,一定要注意,先看Eureka的管控台,看服务是否都启动完了。
1、配置pom.xml
Feign服务的搭建,需要导入spring-cloud-starter-eureka-server,spring-cloud-starter-feign两个依赖包
<!--eureka server -->
<dependency>
    <groupId>org.springframework.cloud</groupId>
    <artifactId>spring-cloud-starter-eureka-server</artifactId>
    <version>1.3.0.RELEASE</version><!--$NO-MVN-MAN-VER$-->
</dependency>

<dependency>
    <groupId>org.springframework.cloud</groupId>
    <artifactId>spring-cloud-starter-feign</artifactId>
    <version>1.3.0.RELEASE</version><!--$NO-MVN-MAN-VER$-->
</dependency>
下面是pom.xml的完整配置
<project xmlns="http://maven.apache.org/POM/4.0.0" xmlns:xsi="http://www.w3.org/2001/XMLSchema-instance"
    xsi:schemaLocation="http://maven.apache.org/POM/4.0.0 http://maven.apache.org/xsd/maven-4.0.0.xsd">
    <modelVersion>4.0.0</modelVersion>

    <groupId>yellowcong.com</groupId>
    <artifactId>cas-client-springboot</artifactId>
    <version>0.0.1-SNAPSHOT</version>
    <packaging>jar</packaging>

    <name>cas-client-springboot</name>
    <url>http://maven.apache.org</url>

    <repositories>
        <repository>
            <id>spring-milestones</id>
            <name>Spring Milestones</name>
            <url>https://repo.spring.io/milestone</url>
            <snapshots>
                <enabled>false</enabled>
            </snapshots>
        </repository>
    </repositories>

    <!-- 引用父类依赖 -->
    <parent>
        <groupId>org.springframework.boot</groupId>
        <artifactId>spring-boot-starter-parent</artifactId>
        <version>1.5.10.RELEASE</version>
    </parent>

    <properties>
        <project.build.sourceEncoding>UTF-8</project.build.sourceEncoding>
        <project.reporting.outputEncoding>UTF-8</project.reporting.outputEncoding>
        <java.version>1.8</java.version>
    </properties>

    <dependencies>

        <!--eureka server -->
        <dependency>
            <groupId>org.springframework.cloud</groupId>
            <artifactId>spring-cloud-starter-eureka-server</artifactId>
            <version>1.3.0.RELEASE</version><!--$NO-MVN-MAN-VER$-->
        </dependency>

        <dependency>
            <groupId>org.springframework.cloud</groupId>
            <artifactId>spring-cloud-starter-feign</artifactId>
            <version>1.3.0.RELEASE</version><!--$NO-MVN-MAN-VER$-->
        </dependency>

        <dependency>
            <groupId>org.springframework.boot</groupId>
            <artifactId>spring-boot-starter-test</artifactId>
            <scope>test</scope>
        </dependency>

    </dependencies>
    <build>
        <plugins>
            <!-- 添加spring的插件, 就可以直接通过 mvn spring-boot:run 运行了 -->
            <plugin>
                <groupId>org.springframework.boot</groupId>
                <artifactId>spring-boot-maven-plugin</artifactId>
                <dependencies>
                    <dependency>
                        <groupId>org.springframework</groupId>
                        <artifactId>springloaded</artifactId>
                        <version>1.2.4.RELEASE</version>
                    </dependency>
                </dependencies>
            </plugin>
        </plugins>
    </build>
</project>
2、配置application.yml
这个feign同其他的Riboon 一样,需要往eureka注册服务,让后设定服务名称,端口信息
#配置eureka 的注册中心
eureka:
  client:
    serviceUrl:
      defaultZone: http://yellowcong.com:8761/eureka/

# 注册服务的端口
server:
  port: 8765

#配置当前服务的名称
spring:
  application:
    name: service-feign
3、配置启动类
在启动类中,添加了@EnableFeignClients注解,表示开启Feign来注册服务的方式。
package com.yellowcong;

import org.springframework.boot.SpringApplication;
import org.springframework.boot.autoconfigure.SpringBootApplication;
import org.springframework.cloud.client.discovery.EnableDiscoveryClient;
import org.springframework.cloud.netflix.feign.EnableFeignClients;

@SpringBootApplication
@EnableDiscoveryClient
@EnableFeignClients
public class ConfigMain {

    public static void main(String[] args) {
        SpringApplication.run(ConfigMain.class, args);
    }
}
4、配置Service接口
通过@FeignClient注解,来标明俺这个服务是访问的那一个服务名称,然后接口里面的方法,表示俺调用的是哪一个服务,这个地方有一点要说的,通过@PathVariable 注解方式,来传递参数的,需要指定引用参数,这个算是Feign的bug吧

package com.yellowcong.service;

import org.springframework.cloud.netflix.feign.FeignClient;
import org.springframework.stereotype.Service;
import org.springframework.web.bind.annotation.PathVariable;
import org.springframework.web.bind.annotation.RequestMapping;

/**
 * 创建日期:2018年3月16日 <br/>
 * 创建用户:yellowcong <br/>
 * 功能描述:
 */
//通过@FeignClient 指定访问那一个服务名
@FeignClient(value = "service-hi")
public interface HelloService {

    /**
     * 创建日期:2018年3月16日<br/>
     * 创建用户:yellowcong<br/>
     * 功能描述:通过feignClient的方式来指定调用
     * service-hi 中的 hi这个请求服务
     * @param name
     * @return
     */
    @RequestMapping(value = "/hi/{name}")
    public String sayHi(@PathVariable(value="name") String name);
}
5、配置Controller层
细心的同学肯定发现了,这个控制成,同Ribbon配置的一毛一样,因为都是暴漏服务,所以没啥太大区别。
package com.yellowcong.controller;

import org.springframework.beans.factory.annotation.Autowired;
import org.springframework.web.bind.annotation.PathVariable;
import org.springframework.web.bind.annotation.RequestMapping;
import org.springframework.web.bind.annotation.RequestParam;
import org.springframework.web.bind.annotation.RestController;

import com.yellowcong.service.HelloService;

/**
 * 创建日期:2018年3月16日 <br/>
 * 创建用户:yellowcong <br/>
 * 功能描述:将提供的服务,用Feign封装一层
 */
@RestController
public class HelloController {
    @Autowired
    HelloService helloService;

    /**
     * 创建日期:2018年3月16日<br/>
     * 创建用户:yellowcong<br/>
     * 功能描述:直接访问riboon的服务地址  /hi
     * @param name
     * @return
     */
    @RequestMapping(value = "/hi/{name}")
    public String hi(@PathVariable String name) {
        return helloService.sayHi(name);
    }
}
6、启动测试
启动的顺序如下,必须先把注册服务端搞起来,不然谁也别想玩了。
项目名 | 启动顺序 |
eureka-server | 1 |
eureka-client | 2 |
eureka-client2 | 3 |
feign-server | 4 |
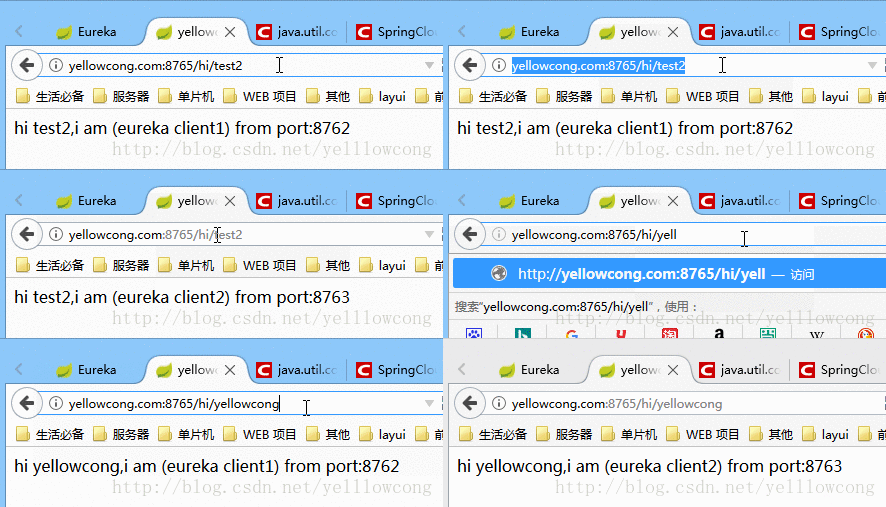
访问riboon站点 http://yellowcong.com:8765/hi/xxx,可以看到处理请求的服务器是变化的,说明负载均衡生效了。

服务启动情况,一定要确认服务都启动了,然后再测试。

常见问题
1、Error creating bean with name ‘com.yellowcong.service.HelloService’: FactoryBean threw exception on object creation; nested exception is java.lang.IllegalStateException: PathVariable annotation was empty on param 0.
不能创建这个控制器,由于 service不是别的问题。实际原因是由于@PathVariable注解的写法,Feign不是别导致的。
发现问题出在用@PathVariable注解的时候
@PathVariable Integer id 这样写没有写明其value,正确写法
@PathVariable(value = "id") Integer id
参考文章
史上最简单的SpringCloud教程 | 第三篇: 服务消费者(Feign)


