arcgis 中.net调用python
About ArcPy
Leveraging ArcPy in .NET
- You can call any Python script (*.py) from .NET. This includes code that uses Python packages designed for analytical and mathematical purposes, such as R statistics, complex matrix algebra, SciPy, or any other script.
- Similarly, you can use simplified ArcPy functions as well. The following are several modules that you can take advantage of:
- Mapping module—For more information see, Geoprocessing scripts for map document management and output in the ArcGIS Desktop User Help system.
- Geostatistical Analyst module—For more information, see A quick tour of the Geostatistical Analyst ArcPy classes in the ArcGIS Desktop User Help system.
- Spatial Analyst module—For more information, see An overview of Spatial Analyst classes in the ArcGIS Desktop User Help system.
- You can use the .NET geoprocessor to execute a script tool that is implemented with Python. This is the way GIS analysts use it.
Using geometry as tool input
#
array = arcpy.Array()
#
coordList = ['1.0;1.0','1.0;10.0','10.0;10.0','10.0;1.0']
# y-coordinates to the point object, then add the point object
# to the array object.
#
for coordPair in coordList:
x, y = coordPair.split(";")
pnt = arcpy.Point(x,y)
array.add(pnt)
#
array.add(array.getObject(0))
#
boundaryPolygon = arcpy.Polygon(array)
#
arcpy.Clip_analysis("c:/data/rivers.shp", boundaryPolygon, "c:/data/rivers_clipped.shp")
// Executes a shell command synchronously.
// Example of command parameter value is
// "python " + @"C:\scripts\geom_input.py".
//
public static void ExecuteCommand(object command)
{
    try
    {
        // Create the ProcessStartInfo using "cmd" as the program to be run,
        // and "/c " as the parameters.
        // "/c" tells cmd that you want it to execute the command that follows,
        // then exit.
        System.Diagnostics.ProcessStartInfo procStartInfo = new
            System.Diagnostics.ProcessStartInfo("cmd", "/c " + command);

        // The following commands are needed to redirect the standard output.
        // This means that it will be redirected to the Process.StandardOutput StreamReader.
        procStartInfo.RedirectStandardOutput = true;
        procStartInfo.UseShellExecute = false;

        // Do not create the black window.
        procStartInfo.CreateNoWindow = true;

        // Now you create a process, assign its ProcessStartInfo, and start it.
        System.Diagnostics.Process proc = new System.Diagnostics.Process();
        proc.StartInfo = procStartInfo;
        proc.Start();

        // Get the output into a string.
        string result = proc.StandardOutput.ReadToEnd();

        // Display the command output.
        Console.WriteLine(result);
    }
    catch (Exception objException)
    {
        Console.WriteLine(objException.Message);
        // Log the exception and errors.
    }
}
[VB.NET]' Executes a shell command synchronously.
' Example of command parameter value is
' "python " + "C:\scripts\geom_input.py".
'
Sub ExecuteCommandSync(ByVal Command As Object)
Try
' Create the ProcessStartInfo using "cmd" as the program to be run,
' and "/c " as the parameters.
' "/c" tells cmd that you want it to execute the command that follows,
' then exit.
Dim procStartInfo As System.Diagnostics.ProcessStartInfo = New System.Diagnostics.ProcessStartInfo("cmd", "/c " + Command)
' The following commands are needed to redirect the standard output.
' This means that it will be redirected to the Process.StandardOutput StreamReader.
procStartInfo.RedirectStandardOutput = True
procStartInfo.UseShellExecute = False
procStartInfo.CreateNoWindow = True
' Now you create a process, assign its ProcessStartInfo, and start it.
Dim proc As System.Diagnostics.Process = New System.Diagnostics.Process()
proc.StartInfo = procStartInfo
proc.Start()
' Get the output into a string.
Dim result As String = proc.StandardOutput.ReadToEnd()
' Display the command output.
Console.WriteLine(result)
Catch ex As Exception
Console.WriteLine(ex.Message)
' Log the exception and errors.
End Try
End Sub
Adding the Python application to the Path variable
- Right-click My Computer and click Properties. The System Properties dialog box appears.
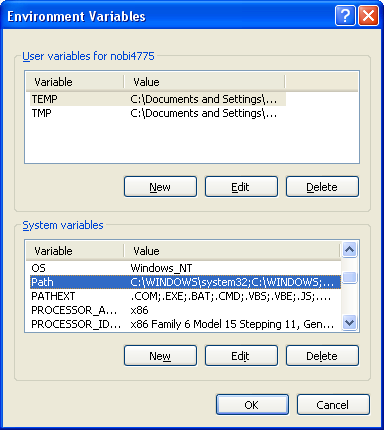
- On the System Properties dialog box, click the Advanced tab, then click the Environment Variables button. The Environment Variables dialog box appears. See the following screen shot:

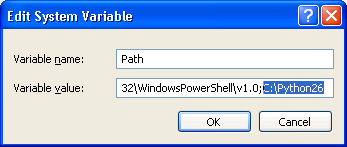
- On the Environment Variables dialog box, under the System variables section, double-click the Path variable. The Edit System Variable dialog box appears. Type the path of the Python application. See the following screen shot:

In this example, Python is installed in the C:\Python26 directory location. If you accept all defaults while installing ArcGIS, your path can resemble C:\Python26\ArcGISx (where x is the version number for ArcGIS).


