
虚拟机环境centOS6.2 (ip:10.0.0.8)
首先安装必要工具
yum -y install httpd* tftp-server system-config-kickstart dhcp syslinux
mount /dev/cdrom /mnt
cp -rf /mnt/* /var/www/html
配置tftp server
- [root@shanker html]# cat /etc/xinetd.d/tftp
- # default: off
- # description: The tftp server serves files using the trivial file transfer \
- # protocol. The tftp protocol is often used to boot diskless \
- # workstations, download configuration files to network-aware printers, \
- # and to start the installation process for some operating systems.
- service tftp
- {
- socket_type = dgram
- protocol = udp
- wait = yes
- user = root
- server = /usr/sbin/in.tftpd
- server_args = -s /tftpboot
- disable = no
- per_source = 11
- cps = 100 2
- flags = IPv4
- }
- [root@shanker html]#
service xinetd restart
建立tftpboot文件夹,并把配置文件复制过去
- mkdir /tftpboot
- cp /usr/share/syslinux/pxelinux.0 /tftpboot
- cd /var/www/html/p_w_picpath/pxeboot/
- cp initrd.img vmlinux /tftpboot
- cp /var/www/html/isolinux/*.msg /tftpboot
- mkdir /tftpboot/pxelinux.cfg
- cp /var/www/html/isolinux/isolinux.cfg /tftpboot/pxelinux.cfg/default
下面配置dchp服务器
- [root@shanker html]# cat /etc/dhcp/dhcpd.conf
- option domain-name-servers 10.0.0.1;
- max-lease-time 7200;
- authoritative;
- subnet 10.0.0.0 netmask 255.255.255.0 {
- range 10.0.0.1 10.0.0.253;
- next-server 10.0.0.8;
- filename "pxelinux.0";
- }
- [root@shanker html]# service dhcpd start
然后是system-config-kickstart图形界面下配置kickstart
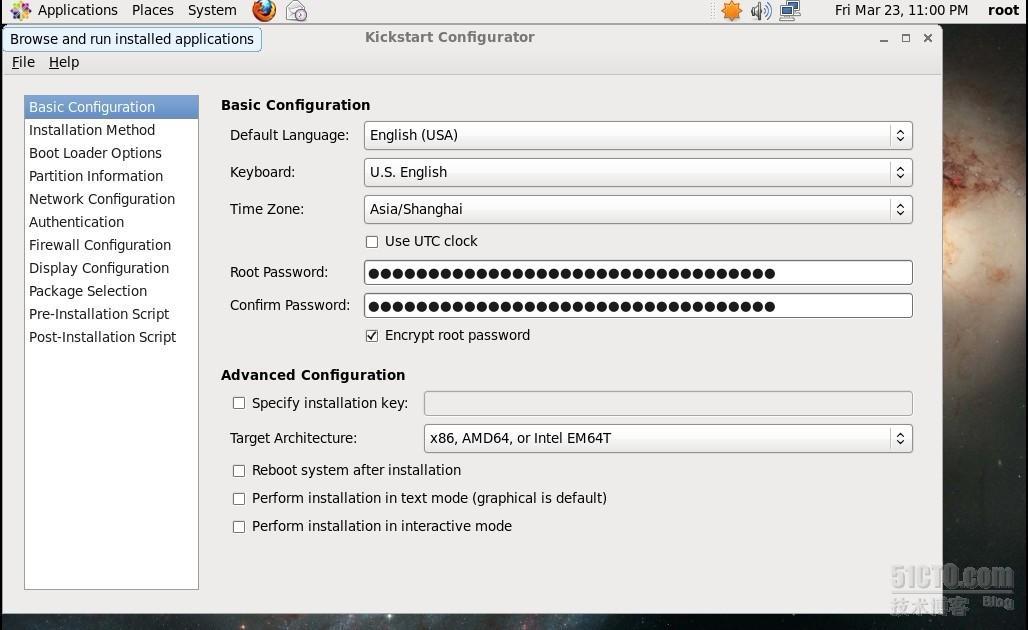


最后点击file将文件另存到/var/www/html下,然后修改/tftpboot/pxelinux.cfg/default
- [root@shanker html]# cat /tftpboot/pxelinux.cfg/default
- default linux
- prompt 1
- timeout 6
- display boot.msg
- menu background splash.jpg
- menu title Welcome to CentOS 6.2!
- menu color border 0 #ffffffff #00000000
- menu color sel 7 #ffffffff #ff000000
- menu color title 0 #ffffffff #00000000
- menu color tabmsg 0 #ffffffff #00000000
- menu color unsel 0 #ffffffff #00000000
- menu color hotsel 0 #ff000000 #ffffffff
- menu color hotkey 7 #ffffffff #ff000000
- menu color scrollbar 0 #ffffffff #00000000
- label linux
- menu label ^Install or upgrade an existing system
- menu default
- kernel vmlinuz
- append ks=http://10.0.0.8/ks.cfg initrdinitrd=initrd.img
- label vesa
- menu label Install system with ^basic video driver
- kernel vmlinuz
- append initrdinitrd=initrd.img xdriver=vesa nomodeset
- label rescue
- menu label ^Rescue installed system
- kernel vmlinuz
- append initrdinitrd=initrd.img rescue
- label local
- menu label Boot from ^local drive
- localboot 0xffff
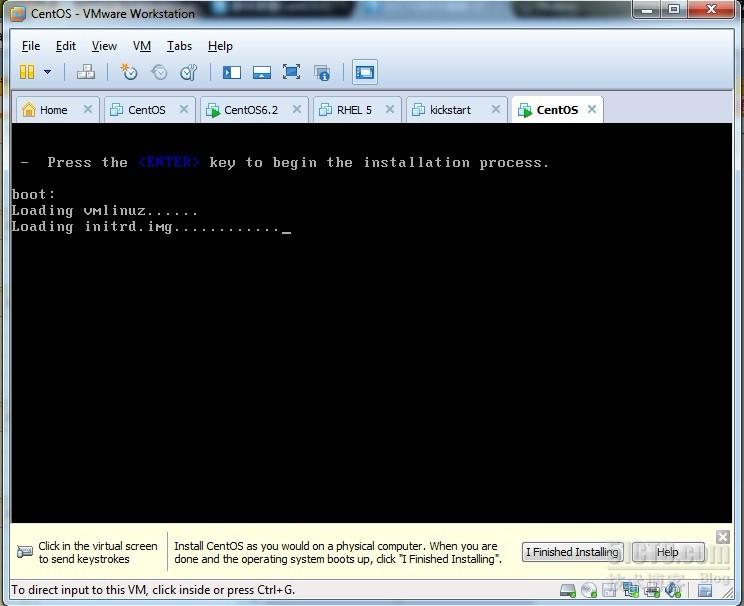
然后就可以添加新的虚拟机启动了。
如图


done ~!
参考文章: http://xiaosu.blog.51cto.com/2914416/667890
《构建高可用服务器》


