
原网页地址:http://me2xp.blog.51cto.com/6716920/1558686
1. Varnish简介
Vanish是一款开源的、高效的的HTTP加速器,可以提供代理服务和缓存服务。
目前最新的版本是4.0.X,而生产环境中用的最多的还是3.x.x的版本。epel源中的rpm过于老旧,不推荐使用。
1.1 Varnish架构
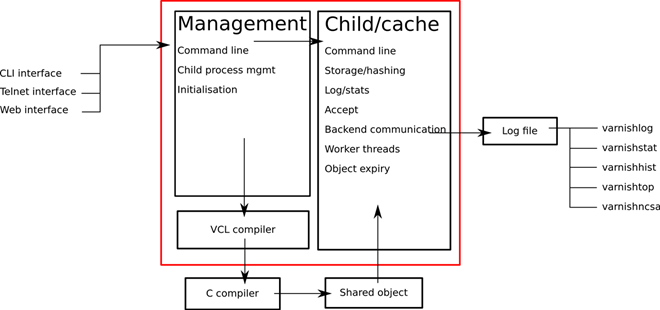
Varnish也采用了多进程的架构,有2个主要的进程:
主进程,也称管理进程
管理进程
应用VCL配置,编译VCL
监视Varnish
初始化Varnish
提供命令行接口
子进程的管理
子进程
管理线程池
移除过期缓存数据
上游服务器通讯和健康检查
将缓存文件映射至内存空间
这些功能需要依靠子进程中众多不同类型的线程完成:
Acceptor线程负责接收新的连接和授权给它们
Worker线程,有很多Worker线程,一个会话由一个线程负责处理。
Expiry线程 从缓存中清除过期内容
1.2 VCL
Varnish Configuration Language,缩写为VCL,即Varnish配置语言,它提供了一种控制Varnish工作的接口,使用该语言配置缓存的处理策略,然后通过管理进程将其解释为C代码,然后使用C编译器编译后,链接至正在运行的Varnish实例。
VCL的语法借鉴了C和Perl的特点。
1.2.1 VCL状态引擎
VCL一个重要的概念就是状态。
每个请求都被单独处理,处理过程中将处在不同的状态。退出一种状态就会转入下一个状态。状态之间是有关联的,而不是孤立的。
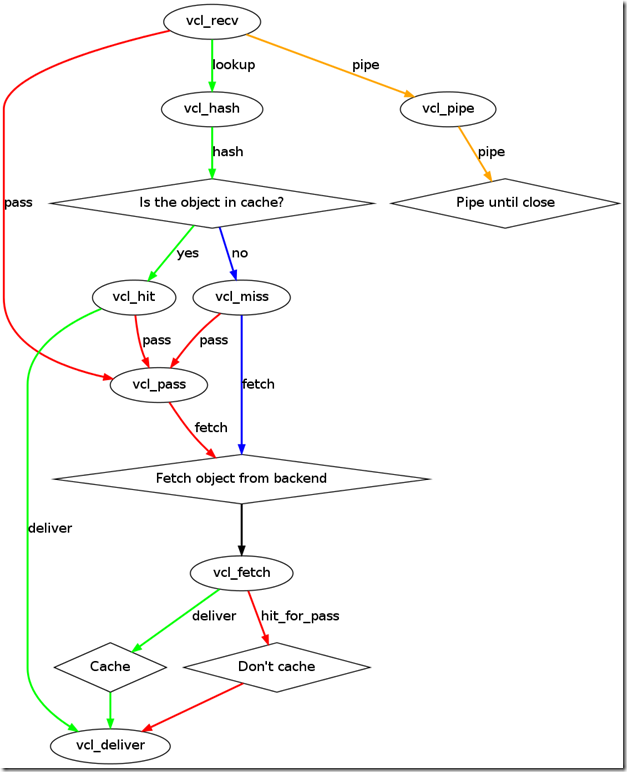
上图来自官方文档
可以清楚的看出状态的转换,以及不同状态所要经过的处理函数。
1.2.2 VCL函数
| vcl_recv | 用户请求成功接收后,遇到的第一个函数,可以在这里对请求的数据进行处理,并决定选取下一步的处理策略 |
| vcl_fetch | 从后端主机获取内容,并判断是否缓冲此内容,然后发送给客户端 |
| vcl_hash | 对URL进行hash,可以自定义hash键 |
| vcl_pass | 将请求直接发给backend,而不是用缓存中的数据 |
| vcl_hit | 在缓存中找到缓存对象时,要执行的操作 |
| vcl_miss | 在缓存中未找到对象时,要执行的操作 |
| vcl_deliver | 响应给客户端时调用此方法 |
| vcl_pipe | 不经由varnish直接将请求发往后端主机的时候调用,请求和内容不做任何改变,如同为客户端和backend建立一个管道 |
| vcl_error | 在varnishi上合成错误响应页时,调用此函数 |
这些函数类似或就是回调函数,是Vanish调用用户逻辑的接口。
1.2.3 内置变量
请求到达时可以使用的变量
req.url
req.http
req.http.header
req.restart
server.ip
server.hostname
server.port
req.backend
请求发往后端主机时可以使用的变量
bereq.url
bereq.http
bereq.http.header
bereq.proto
bereq.connect_timeout
缓存对象进入cache后可用的变量
obj.response
obj.status
obj.http.header
obj.proto
obj.ttl
obj.hits
后端主机响应的内容可用的变量
beresp.response
beresp.http.header
beresp.ttl
beresp.proto
beresp.do_gzip
beresp.do_gunzip
beresp.backend.name
beresp.backend.ip
响应客户端可以使用的变量
resp.response
resp.proto
resp.status
resp.http.header
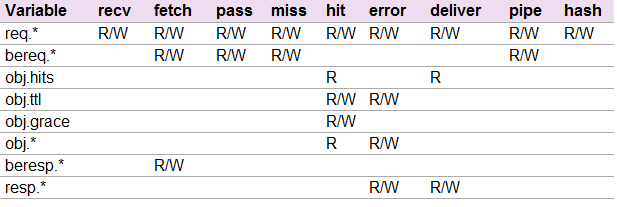
上图可以看出不同变量的使用范围,其实从变量的类型结合请求处理的流程图也基本上可以理解这些变量究竟适合在什么函数中使用。
还有更多变量请参考官方文档。
2. Varnish缓存实验
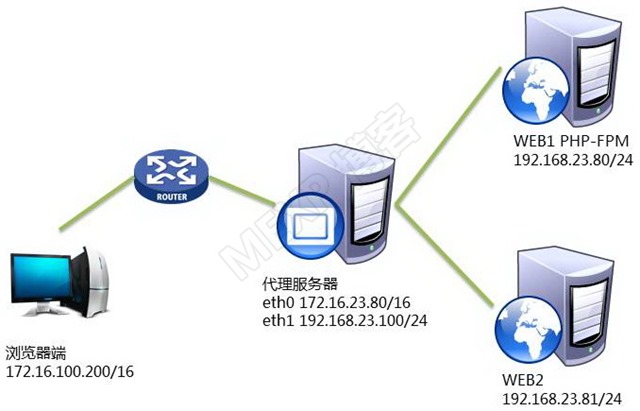
2.1 规划
2.2 实验目标
实现动静分离
缓存静态内容
只缓存GET和HEAD方法
不缓存带有cookie的内容
URL中包含静态资源的,例如jpg、png、jpeg、gif、html、htm、ico、css、js,就缓存600s
不缓存动态资源请求,例如php
判读客户端浏览器类型,以返回不同的页面。包括移动终端。
增加一个header标签,显示是否命中
设置清理缓存PURGE
实现后端主机的健康检查
2.3 环境搭建
2.3.1 安装Varnish
epel源中Varnish版本太低,建议使用官方提供的版本,本文使用3.0.5的三个rpm包安装,分别是varnish-docs-3.0.5-1.el6.x86_64.rpm、varnish-3.0.5-1.el6.x86_64.rpm和varnish-libs-3.0.5-1.el6.x86_64.rpm。
# yum -y install varnish-*
# rpm -ql varnish
/etc/logrotate.d/varnish
/etc/rc.d/init.d/varnish
/etc/rc.d/init.d/varnishlog
/etc/rc.d/init.d/varnishncsa
/etc/sysconfig/varnish
/etc/varnish
/etc/varnish/default.vcl
/usr/bin/varnish_reload_vcl
/usr/bin/varnishadm
/usr/bin/varnishhist
/usr/bin/varnishlog
/usr/bin/varnishncsa
/usr/bin/varnishreplay
/usr/bin/varnishsizes
/usr/bin/varnishstat
/usr/bin/varnishtest
/usr/bin/varnishtop
2.3.2 WEB1
1) 安装、启动php-fpm
# yum install php-fpm -y
# service php-fpm start
Starting php-fpm:                 [  OK  ]
2) nginx
源码或者epel源的yum安装nginx,请参看其他博文。很简单
# vim /usr/local/nginx/conf/nginx.conf
user  nginx;
worker_processes  auto;

#pid        /var/run/nginx.pid;
error_log   /var/log/nginx/error.log;

events {
    use epoll;
    worker_connections  1024;
}

http {
    include       mime.types;
    default_type  application/octet-stream;

    log_format  main  '$remote_addr - $remote_user [$time_local] "$request" '
                      '$status $body_bytes_sent "$http_referer" '
                      '"$http_user_agent" "$http_x_forwarded_for"';

    access_log  /var/log/nginx/access.log  main;

    sendfile        on;
    #tcp_nopush     on;

    #keepalive_timeout  0;
    keepalive_timeout 5;

    #gzip  on;

    server {
        listen       80;
        server_name  WEB1;
        add_header X-upS  WEB1-$server_addr:$server_port;
        #charset koi8-r;

        #access_log  logs/host.access.log  main;

        location / {
            root   html;
            index  index.html index.htm;
        }

        #error_page  404              /404.html;

        # redirect server error pages to the static page /50x.html
        #
        error_page   500 502 503 504  /50x.html;
        location = /50x.html {
            root   html;
        }

        # pass the PHP scripts to FastCGI server listening on 127.0.0.1:9000
        #
        location ~ \.php$ {
            root           html;
            fastcgi_pass   127.0.0.1:9000;
            fastcgi_index  index.php;
            fastcgi_param  SCRIPT_FILENAME  $document_root$fastcgi_script_name;
            fastcgi_param  QUERY_STRING     $query_string;
            include        fastcgi_params;
        }

        # deny access to .htaccess files, if Apache's document root
        # concurs with nginx's one
        #
        #location ~ /\.ht {
        #    deny  all;
        #}
    }
}

# service nginx start
3)提供php测试页
# vim /usr/local/nginx/html/index.php
<h1>This is a PHP Test Page</h1>
<?php phpinfo(); ?>
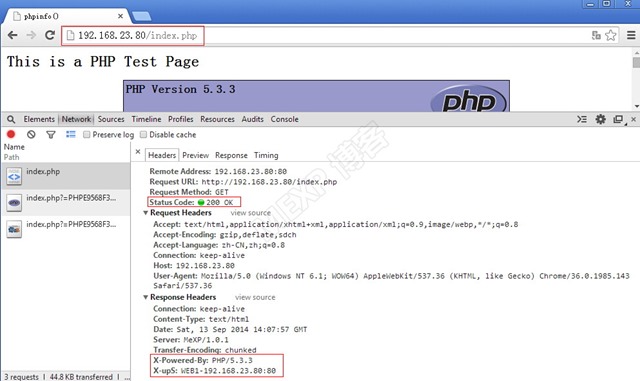
注意这里response header,后面的测试可以和这一次进行对比。
4)提供首页和测试页
# cat /usr/local/nginx/html/index.html
<html>
<head>
<title>dynamic</title>
</head>
<body>
<h1 align="left">This is a static page of WEB1</h1>
</body>
</html>
# cat /usr/local/nginx/html/test.html
Just test for WEB1
2.3.3 WEB2
1) 安装nginx,提供WEB服务
配置如下:
# vim /usr/local/nginx/conf/nginx.conf
user  nginx;
worker_processes  auto;

#pid        /var/run/nginx.pid;
error_log   /var/log/nginx/error.log;

events {
    use epoll;
    worker_connections  1024;
}

http {
    include       mime.types;
    default_type  application/octet-stream;

    log_format  main  '$remote_addr - $remote_user [$time_local] "$request" '
                      '$status $body_bytes_sent "$http_referer" '
                      '"$http_user_agent" "$http_x_forwarded_for"';

    access_log  /var/log/nginx/access.log  main;

    sendfile        on;
    #tcp_nopush     on;

    #keepalive_timeout  0;
    keepalive_timeout 5;

    #gzip  on;

    server {
        listen       8080;
        server_name  WEB2;
        add_header X-upS  WEB2-$server_addr:$server_port;
        #charset koi8-r;

        #access_log  logs/host.access.log  main;

        location / {
            root   html;
            index  index.html index.htm;
        }

        #error_page  404              /404.html;

        # redirect server error pages to the static page /50x.html
        #
        error_page   500 502 503 504  /50x.html;
        location = /50x.html {
            root   html;
        }
    }
}
2)提供主页和测试页
# cat /usr/local/nginx/html/index.html
<html>
<head>
<title>static</title>
</head>
<body>
<h1 align="center">OK! This is a static page</h1>
</body>
</html>
# cat /usr/local/nginx/html/test.html
Just test for WEB2
2.3.4 Varnish主机
1)服务配置文件/etc/sysconfig/varnish,注意以下几个参数的值
VARNISH_LISTEN_PORT=80
VARNISH_STORAGE_SIZE=100M
VARNISH_VCL_CONF=/etc/varnish/default.vcl
VARNISH_ADMIN_LISTEN_ADDRESS=127.0.0.1
VARNISH_ADMIN_LISTEN_PORT=6082
2)VCL文件/etc/varnish/test.vcl,附详细说明
# 定义检测方法
probe healthcheck {
   .url = "/test.html";
   .interval = 5s;
   .timeout = 2 s;
   .window = 8;
   .threshold = 3;
   .initial = 3;
   .expected_response = 200;
}
# 定义后端服务器
backend WEB1 {
  .host = "192.168.23.80";
  .port = "80";
  .probe = healthcheck;
}

backend WEB2 {
  .host = "192.168.23.81";
  .port = "8080";
  .probe = healthcheck;
}
# 定义服务器组
director staticserver random {
    {.backend = WEB1; .weight = 3;}
    {.backend = WEB2; .weight = 6;}
}
# purge的访问控制列表
acl purge {
    "localhost";
    "127.0.0.1";
    "192.168.23.0"/24;
}

sub vcl_recv {
    if (req.restarts == 0) {
      if (req.http.x-forwarded-for) {
          set req.http.X-Forwarded-For =
              req.http.X-Forwarded-For + ", " + client.ip;
      } else {
          set req.http.X-Forwarded-For = client.ip;
      }
    }
    # 非指定的请求方法,就直接访问后端
    if (req.request != "GET" &&
      req.request != "HEAD" &&
      req.request != "PUT" &&
      req.request != "POST" &&
      req.request != "TRACE" &&
      req.request != "OPTIONS" &&
      req.request != "DELETE" &&
      req.request != "PURGE") {
        /* Non-RFC2616 or CONNECT which is weird. */
        return (pipe);
    }
    # 如果是PURGE方法,且不是acl中的,直接返回错误,如果是acl中的则继续
    if (req.request == "PURGE") {
        if (! client.ip ~ purge) {
            error 405 "Not Allowed!";
        }
        return (lookup);
    }
    # 如果不是GET和HEAD方法,就不查缓存
    if (req.request != "GET" && req.request != "HEAD") {
        /* We only deal with GET and HEAD by default */
        return (pass);
    }
    # 如果是认证和Cookie,就不查缓存
    if (req.http.Authorization || req.http.Cookie) {
        /* Not cacheable by default */
        return (pass);
    }
    # 如果是访问php页面,就不查缓存,且直接指向后端的动态网页处理服务器
    if (req.url ~ "\.php($|\?)") {
        set req.backend = WEB1;
        return (pass);
    }
    # 指定后端响应的服务器,这里使用了服务器组
    set req.backend = staticserver;
    return (lookup);
}

sub vcl_hit {
    # 这里隐含一个obj,其url就是当前的请求
    # purge函数就是移除这个obj对应的所有变量
    if (req.request == "PURGE") {
        purge;
        error 200 "Purged in hit.";
    }
}

sub vcl_miss {
    # 需要error,直接通过vcl_error返回客户端
    # 这个客户端是实现清除缓存功能的客户端,通常来自内部主机,且acl中有了限制
    if (req.request == "PURGE") {
        # 这个地方可以不用purge
        # purge;
        error 200 "Purged in miss.";
    }
}

sub vcl_fetch {
    # 如果响应的ttl小于0秒或者使用了cookie或者Vary,则不缓存返回给客户端
    if (beresp.ttl <= 0s ||
        beresp.http.Set-Cookie ||
        beresp.http.Vary == "*") {
            set beresp.ttl = 120 s;
            return (hit_for_pass);
    }
    # 对于GET方法请求的不同静态资源使用不同的缓存时长
    if (req.request == "GET") {
        if (req.url ~ "\.(css|js|html|htm)") {
            set beresp.ttl = 300s;
        }
        elseif (req.url ~ "\.(gif|jpg|jpeg|png)") {
            set beresp.ttl = 3600s;
        }
        elseif (req.url ~ "\.ico") {
            set beresp.ttl = 10d;
        }
    }
    return (deliver);
}

sub vcl_deliver {
    # 返回客户端之前,增加一个header信息
    if (obj.hits > 0) {
        set resp.http.X-Cache = "Hit from cache";
    } else {
        set resp.http.X-Cache = "Miss from cache";
    }
    # 返回客户端之前,根据不同的浏览器类型,增加一个header信息
    if (req.http.User-Agent ~ "iPad") {
        set resp.http.X-Device = "U R iPad";
    }
    elseif (req.http.User-Agent ~ "iPhone") {
        set resp.http.X-Device = "U R iPhone";
    }
    elseif (req.http.User-Agent ~ "Android") {
        set resp.http.X-Device = "U R Android";
    }
    return (deliver);
}
2.3.5 启动服务
# service varnish start
Starting Varnish Cache: [ OK ]
# ss -tnlp | grep varnish
LISTEN 0 128 :::80 :::* users:(("varnishd",1299,9))
LISTEN 0 128 *:80 *:* users:(("varnishd",1299,8))
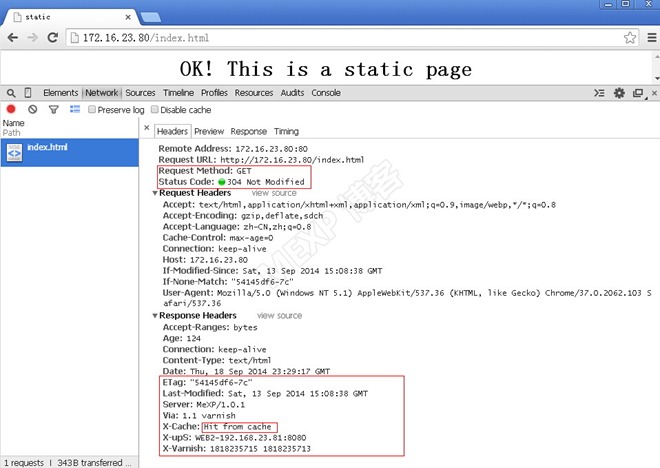
LISTEN 0 10 127.0.0.1:6082 *:* users:(("varnishd",1297,7))可以看到,Varnish监听80端口等待用户请求。监听在127.0.0.1的6082端口,这是管理端口。
加载vcl
# varnishadm -S /etc/varnish/secret -T 127.0.0.1:6082

varnish> vcl.load t1 test.vcl
200
VCL compiled.

varnish> vcl.use t1
200

varnish> vcl.list
200
available       0 boot
active          0 t1
2.4 测试
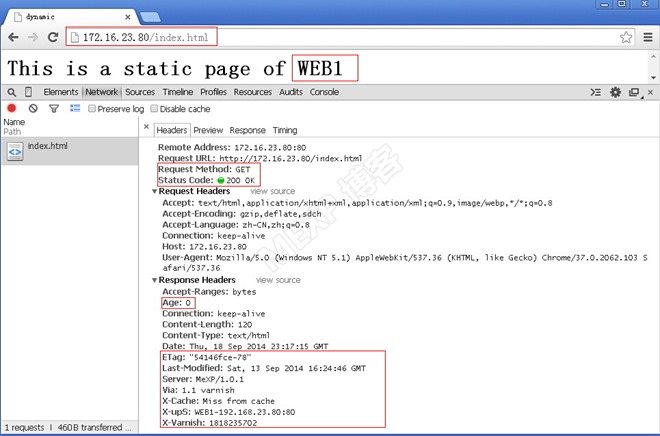
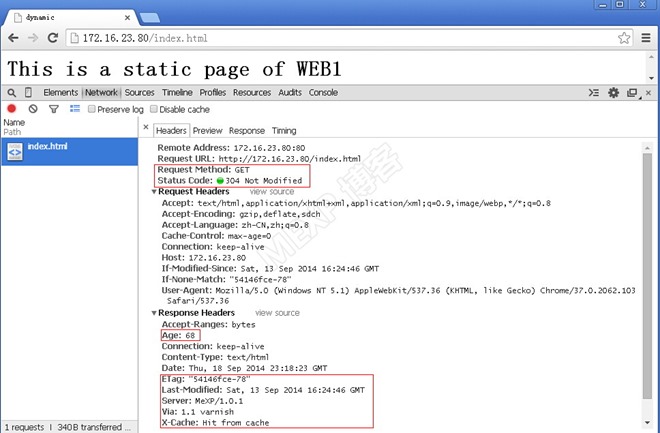
2.4.1 静态页面
1)WEB1的缓存命中
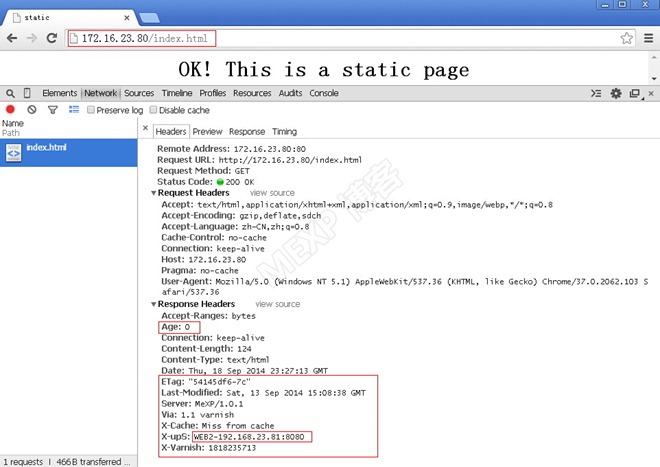
2)WEB2的缓存命中
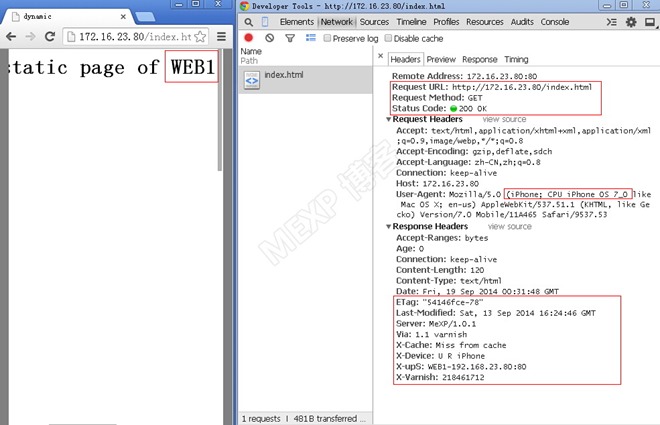
2.4.2 动态页面

php页面怎么刷新都不会缓存,缓存不会命中。印证了VCL中设定的策略。
和上面测试php页面的时候对比,多了响应首部的header。
2.4.3 移动终端设备测试
可以使用req.http.User-Agent来判断浏览器类型、操作系统平台,来对不同客户端用户提供不同的响应方式。当然User-Agent信息可以伪造,另当别论。
实际上,可以在vcl_recv中就根据User-Agent来调度到不同的后端服务器去处理比较好,这些服务器为不同的移动终端设备优化了页面,采用一些轻量级的或响应式框架,提升用户体验。毕竟手机的移动终端不是计算机,性能有限。
模拟IPhone 5
上图左侧是模拟的IPhone手机,右侧是获取的首部信息,多了一条X-Device。
2.4.4 健康状态检测
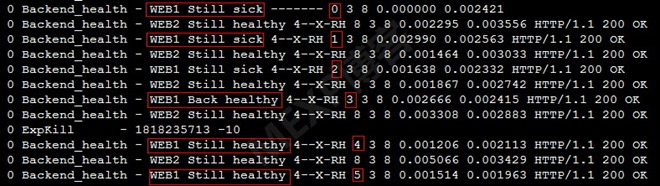
通过probe定义检测的页面、检测时间间隔、超时时长、检测的次数、检测状态变化的阈值、期望的响应状态码等参数,来判断后端主机的健康状况。
上图清楚的看到,WEB1由失败转为成功,检测达到了3次成功后,WEB1才被认为处于正常的状态。
2.4.5 PURGE测试
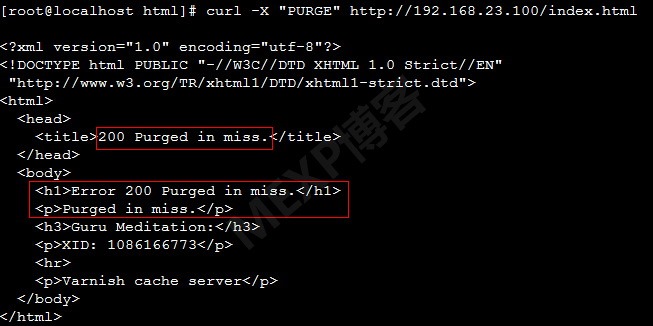
使用curl命令构造一个特殊的请求方法PURGE,未能命中而返回了错误。后面就缓存清除有详细说明。
3. VCL说明
为了方便,VCL中注释基本上已经写得很详细了。
3.1 后端服务器
backend 使用指令指定后端服务器
.host 指定后端主机的IP地址或者FQDN
.port 指定后端主机的监听端口
.probe 指定后端主机的健康状态检测参数,可以使用probe指令单独定义,这样可以被多处调用。当然也可以如下定义:
backend one {
    .host = "example.com";
    .probe = {
        .url = "/healthtest";
        .interval = 3s;
        .window = 5;
        .threshold = 2;
    }
}
3.2 服务器组
director 定义服务器组并指定调度方法,random或者round-robin等,实际一旦缓存启用,资源在缓存命中,采用什么调度方法就不是非常重要了。
定义服务器的成员主机,格式上可以把后端主机定义部分的连同大括号放在这里,这种写法实际是类似某些编程语言中的匿名函数,就是符合某种语法规则的未命名的语句块。当然等号后面只能是其能接受的指令对应格式的语句体。
例如
backend one {
    .host = "localhost";
    .port = "80";
}
backend two {
    .host = "127.0.0.1";
    .port = "81";
}
director localhosts round-robin {
    { .backend = one; }
    { .backend = two; }
    { .backend = { .host = "localhost"; .port = "82"; } }
}
sub vcl_recv {
    set req.backend = localhosts;
}
这里第三个backend就是采用匿名的方式定义在director中,最后vcl_recv中设置req.backend为localhosts。
3.3 acl访问控制列表
这种列表是把主机或者网络组织在一个列表中,方便匹配。
3.4 缓存清除方法
1)purge方法
构建了一个特殊的http方法PURGE,当Varnish收到后就和访问控制列表acl比对。
如果不在列表中将返回一个不被允许的错误给客户端。
如果在列表中,说明被允许清除缓存。
注意这里因为是清除缓存,所以下一个函数应该是vcl_hash,如果命中,则说明此对象缓存过,则清除obj对应的所有变量,并直接返回构建错误响应报文;如果未命中,则直接返回错误构建错误报文返回客户端。
如果vcl_recv之后直接到vcl_pass,这将绕过vcl_hash,这就会绕过缓存,就无法清除已经缓存的对象。因此没有使用return(pass),而是使用的return(lookup)。
2)ban方法
可以使用ban,这样varnish并不马上删除对应的缓存,而是把url追加到ban list中,等用户请求到来并命中后,则设置obj.ttl=0,强制过期并删除obj对象。
缓存的清除需要构建特殊的http方法,而且只能逐个进行,可以使用purge和ban方法。如果需要批量清除可以构建一个清除的文件列表,当然此列表可以存在数据库中,然后由脚本或者程序来读取列表发起方法为PURGE的http请求,来逐个清除指定文件的缓存。
4、Varnish优化
登录到Varnish的管理界面,输入
# varnishadm -S /etc/varnish/secret -T 127.0.0.1:6082
varnish> param.show
有四个参数
thread_pool_max 3.0后,用来设定单个线程池的最大线程数。
thread_pool_min 用来设定单个线程池的最小线程数
thread-pools 设置线程池的数量,一般和CPU的数目相同最好。
thread_pool_timeout 设置线程超时过期的时间。主要是指线程空闲后,空闲进程总数又大于thread_pool_min,那么这些空闲线程超时后就被释放。
官方文档建议线程总数不要超过5000个。
应根据硬件性能和业务访问特征调节这几个参数。
5. 总结
通过以上的实验和分析,熟悉了Varnish的基本应用,vcl是控制Varnish的关键,同时还有些系统参数和Varnish参数需要调整。
清理缓存需要使用一些特殊构造的http方法,还需要编写脚本或者编写程序来完成对批量的指定的文件的缓存清理。
参考资料
https://www.varnish-software.com/static/book/
Varnish 3.x版本下载
https://repo.varnish-cache.org/redhat/varnish-3.0/el6/x86_64/varnish/
本文出自 “终南山下” 博客,谢绝转载,请与原作者联系!


